
- Инструкции →
- Компьютерная техника →
- ТВ-тюнеры →
- AVer Media →
- AVer Media TV Box DVI 1080i
Модель, к которой подходит эта инструкция: AVer Media TV Box DVI 1080i
Скачать инструкцию к AVer Media TV Box DVI 1080i (6 Мб)
Данная инструкция написана на русском языке
Вопросы и отзывы о AVer Media TV Box DVI 1080i
Пожалуйста, если у вас есть вопрос или отзыв, напишите пару строк в форме ниже.
Если вы скачали инструкцию, но не смогли разобраться, как пользоваться той или иной функцией прибора,
напишите свой вопрос, наши специалисты постараются найти ответ на ваш вопрос.
Первый автономный TV-тюнер с полноценной поддержкой DVI
Не так страшно пропустить удар,
как оставить его без ответа.
Неизвестный автор
Задержка компании AVerMedia Technologies Inc., с выпуском новой линейки автономных TV-тюнеров, подключаемых между видеокартой и монитором, имела своё объяснение. Инженеры компании не только ликвидировали наметившееся конкурентное отставание, но и обошли соперников на повороте, предложив пользователям поддержку разрешения 1920×1080. Мы уже успели рассмотреть AVerTV BoxW9 Plus, сменивший заслуженный AverTV Box 9, но одной моделью новая линейка не ограничилась. Вслед за высоким разрешением и полноценной поддержкой широкоформатных дисплеев на свет был извлечён ещё один козырь — поддержка интерфейса Digital Visual Interface, больше знакомого по ставшему уже привычным сокращению DVI. В настоящее время цифровые входы и выходы прочно заняли места в видеокартах, и мониторах практически любого ценового диапазона, включая бюджетные серии, поэтому такой шаг, безусловно, заслуживает одобрения.
Надо сказать, что первые попытки организовать работу с DVI у автономных TV-тюнеров предпринимались уже давно, однако реализация таковой, например, у Greenwood PRO DVI так и осталась скорее курьёзом, чем реально полезной возможностью. Тем любопытнее оценить подход одного из лидеров индустрии.
Комплект поставки
Коробка оформлена в фирменной бело-оранжевой гамме, но без использования чёрного цвета, характерного для упаковки многих моделей компании, в частности, того же AVerTV BoxW9. Стилизованный логотип, повествующий о поддержке разрешений до 1080i на компонентном видеовходе, полностью совпадает с таковым у AVerTV BoxW9, однако аналогичное визуальное решение, сообщающее о поддержке стереозвука, почему-то отсутствует, несмотря на то, что такая возможность у тюнера есть.
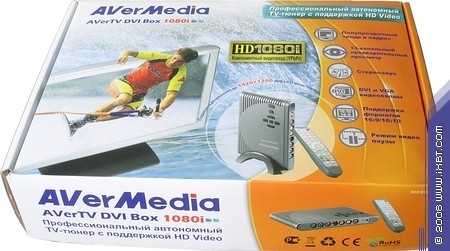
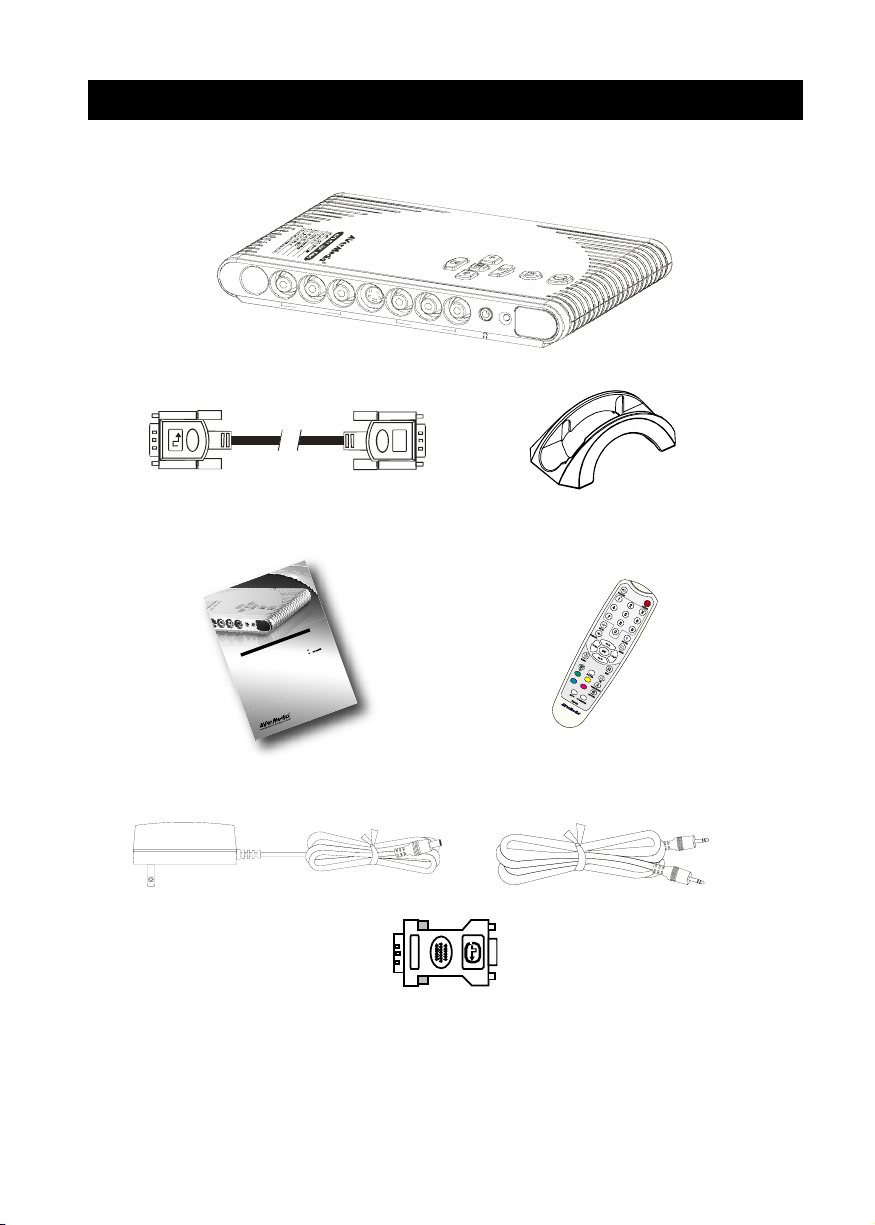
В коробке находятся:
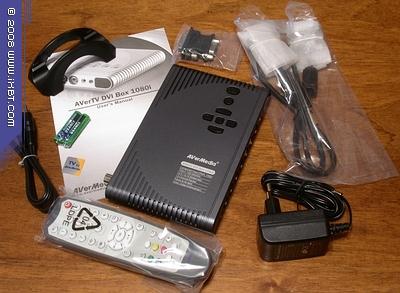
- Тюнер
- Подставка для тюнера
- Пульт ДУ
- DVI-кабель
- Переходник DVI — D-Sub
- Кабель для подключения к линейному входу звуковой карты
- Переходник для для компонентного YPbPr и S-Video подключения
- Блок питания 5V/2A
- Руководство пользователя на русском и английском языках
- Наклейка с логотипом компании
Как и у AVerTV BoxW9, руководство отличается подробностью.
Конструкция и спецификации
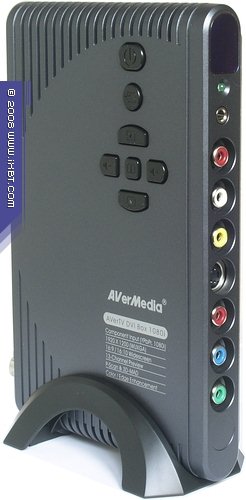
За исключением поддержки DVI, возможности тюнера совпадают с таковыми у AVerTV BoxW9:
- Поддержка 181 канала с возможностью точной настройки каждого
- Поддержка всех телевизионных стандартов аналогового вещания, за исключением SECAM-L
- Декодирование стереозвука в формате A2/NICAM
- Наличие функции автосканирования всего ТВ диапазона
- Поддержка разрешений 1024×768, 1280×1024, 1280×768, 1360×768, 1440×900, 1600×1200, 1680×1050, 1920×1200
- Настройки соотношения сторон
- Улучшенный алгоритм деинтерлейсинга 3D Motion Adaptive De-Interlace
- 3:2/2:2 Pull-Down преобразование (только для NTSC)
- Просмотр телевизионных программ на полный экран и режим фонового звукового сопровождения
- Режим паузы
- Режим «Кадр в кадре» (PIP) для одновременного просмотра ТВ и работы на компьютере при разрешениях до 1680×1050×60 Гц
- Таймер автоматического включения и выключения
- Режим предварительного просмотра каналов
- Регулировка параметров изображения
На официальном сайте можно найти, на первый взгляд, идентичную модель AVerTV DVI Box9. Разница в названии обусловлена отличием в максимальных поддерживаемых разрешениях на компонентном входе, 480i/576i против 720p/1080i у AVerTV DVI Box 1080i. Но к этому вопросу мы ещё вернёмся.
Если начинку AVerTV BoxW9 вмещает тот же корпус, что и у предыдущих моделей Box 5/7/9, то первый тюнер компании с поддержкой DVI отличается радикально обновлённым внешним видом. На смену некоторой спартанской лаконичности пришли закруглённые обводы со стилизованными «решётками». До потустороннего футуризма автономных тюнеров от Compro Technology дело не дошло, но усилия дизайнеров не оказались напрасными. Выглядит AVerTV DVI Box 1080i в меру свежо, а благодаря графитовому цвету, не вызывает ощущения визуального диссонанса при установке рядом с большинством мониторов и телевизоров.
Свершилось, в компанию кнопок включения/выключения, выбора источника, переключения каналов и регулировки громкости на панели добавилась кнопка вызова меню, наконец-то, позволившая управлять тюнеров без использования пульта.
На передней панели находятся скрытый полупрозрачной вставкой ИК-приемник, зелёный светодиодный индикатор активности тюнера, разъем mini-jack 3,5 мм для подключения наушников и полный комплект входных видео- и аудиоразъёмов (2 RCA аудиовхода, композитный видеовход, S-Video и 3 RCA для компонентного). Отказ от использования переходников привёл к закономерному увеличению габаритов, размеры тюнера увеличились относительно AVerTV BoxW9 (180×115×25 мм против 158×113×24 мм).
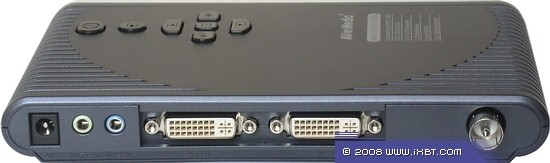
Задняя панель избежала радикальных изменений, на ней можно найти разъём для подключения блока питания, аудиовход и аудиовыход (оба mini-jack 3,5 мм), выходной и входной DVI-разъемы и антенный разъём IEC.
Предусмотрена возможность вертикальной установки при помощи входящей в комплект подставки, но традиционно следует учитывать, что сосредоточение кабелей на задней панели в сочетании с небольшим весом не способствует хорошей устойчивости в таком положении. Впрочем, подключение внешних источников к разъёмам на передней панели способно уравновесить получившуюся конструкцию. Если закрыть глаза на явно страдающую в этом случае эстетику, конечно.
За поддержку DVI отвечают DVI ресивер SiI1161 и DVI трансмиттер SiI164 от Silicon Image. Любопытно, что максимальное поддерживаемое разрешение этих микросхем согласно спецификациям составляет 1600×1200, однако это ограничение каким-то образом удалось обойти, тюнер, действительно, способен обеспечивать 1920×1200. High-bandwidth Digital Content Protection (HDCP) не поддерживается, что теоретически может стать причиной несовместимости с некоторыми источниками сигнала.


В остальном можно заметить полную схемотехническую схожесть AVerTV DVI Box 1080i с AVerTV BoxW9 Plus.
За приём сигнала отвечает мультистандартный полупроводниковый приёмник XC2028ACQ от Xceive Inc..
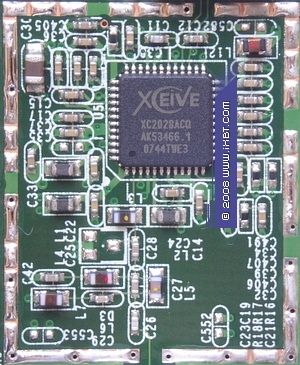
Традиционно напомним, что качество работы этого приёмника в значительной степени зависит от обвязки, но, как показывает практика, инженеры AVerMedia в большинстве случаев не обходят требования к этой части стороной. В нашем случае количество интегральных стабилизаторов, способствующих снижению возможных пульсаций напряжения, по сравнению с AVerTV BoxW9 увеличилось с 4 до 6.
В новых моделях аналогово-цифровым преобразованием занимается 10-битный SAA7136AE/1/G производства NXP Semiconductors (бывшее полупроводниковое подразделение Philips Electronics, являющее теперь самостоятельной компанией). Микросхема поддерживает декодирование всех стандартов стереозвука и работу с компонентным входом. Но об этом далее по тексту.
В качестве видеопроцессора выступает последняя разработка ActVision TECHNOLOGIES, Inc. AV3005-A с поддержкой разрешения 1920×1200.
Для управления тюнером служит 8-битный микроконтроллер SM59264 от SyncMOS Technologies Inc., сменивший SM5964 у AVerTV Box 9.
Буферная память представлена модулем ёмкостью 16 МБ, произведённым Etron Technology, Inc.
Микросхема декодера телетекста у версии для российского рынка отсутствует.
Конфигурация тестового компьютера
- Процессор Intel Core 2 Quad Q6600
- Системная плата Gigabyte GA-965P-DS3 (Intel P965 + Intel ICH8)
- Оперативная память 4 ГБ (4×1024 DDR2 PC6400 KingMax)
- Видеокарта NVIDIA GeForce 8800GTX
- Звуковая карта Creative Sound Blaster Audigy 2ZS
- Жесткий диск 250 ГБ Hitachi (HDT722525DLA380)
- Жесткий диск 320 ГБ Hitachi (*VLA360)
- Жесткий диск 120 ГБ Maxtor Plus9-6Y120M0
- DVD ReWriter BENQ DW1640
- DVD ReWriter NEC ND-3500A
- Блок питания Thermaltake Purepower 680APD (W0049 rev. 2, 680 W)
При тестировании использовался монитор Samsung SyncMaster 215TW.
Список эфирных каналов при тестировании
| Название | Канал | Частота | Уровень сигнала | Стандарт |
| СТС | 1 | 49.75 МГц | 79.5 дБ (мкВ) | SECAM D/K |
| Первый | 3 | 77.25 МГц | 82.3 дБ (мкВ) | SECAM D/K |
| RenTV | 6 | 175.75 МГц | 68.0 дБ (мкВ) | SECAM D/K |
| Скат ТНТ | 7 | 183.25 МГц | 85.4 дБ (мкВ) | SECAM D/K |
| РТР | 9 | 199.25 МГц | 87.2 дБ (мкВ) | SECAM D/K |
| Домашний | 11 | 215.25 МГц | 56.5 дБ (мкВ) | SECAM D/K |
| НТВ | 21 | 471.25 МГц | 59.5 дБ (мкВ) | SECAM D/K |
| 5 канал | 23 | 487.25 МГц | 62.5 дБ (мкВ) | SECAM D/K |
| Культура | 25 | 503.25 МГц | 76.7 дБ (мкВ) | SECAM D/K |
| ДТВ | 27 | 519.25 МГц | 66.2 дБ (мкВ) | SECAM D/K |
| МузТВ | 35 | 583.25 МГц | 63.2 дБ (мкВ) | SECAM D/K |
| ТВ3 | 37 | 599.25 МГц | 62.2 дБ (мкВ) | SECAM D/K |
| ТВЦ | 47 | 679.25 МГц | 59.2 дБ (мкВ) | SECAM D/K |
| Спорт | 50 | 703.25 МГц | 63.0 дБ (мкВ) | SECAM D/K |
Настройка
Управление тюнером полностью совпадает с таковым у AVerTV BoxW9.
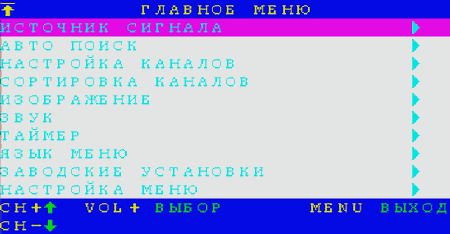
Первым пунктом в списке разделов главного меню является выбор источника сигнала (антенный вход, композитный, S-Video и компонентный входы).
Отсутствовавший ранее автоматический поиск реализован в двух вариантах — по стандартной сетке каналов и по частоте.
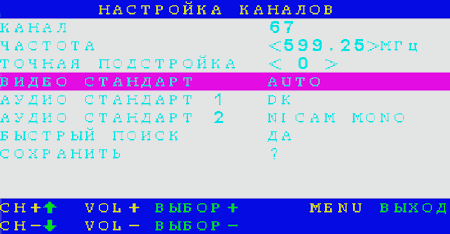
Осталась и фирменная система индивидуальной настройки каждого канала, позволяющая установить стандарт цветности (желающие могут оставить автоопределение, корректно работающее у АЦП от Philips/NXP в большинстве случаев), присвоить номер, установить частоту поднесущей (Аудио стандарт 1) и формат декодирования стереозвука (Аудио стандарт 2), после чего перейти к поиску следующего. Опция Быстрый поиск позволяет использовать стандартную сетку частот, при ее отключении сканирование осуществляется с шагом 0.25 МГц. Таким образом, гарантированно можно добавить любой произвольный канал, включая каналы с неуверенным приемом, зачастую пропускаемые алгоритмами автопоиска.
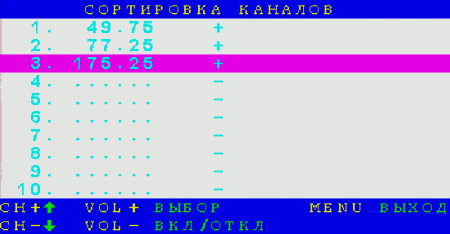
Для удаления лишних каналов и сортировки полученного списка предназначен соответствующий раздел Сортировка каналов. В списке отображаются только частоты, возможность присвоения названий отсутствует.
Изменился раздел настроек изображения.
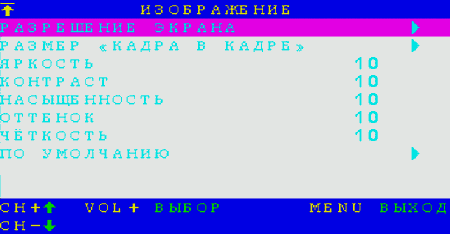
Отметим исчезновение выбора частоты обновления экрана, окончательное вытеснение CRT-мониторов стало причиной поддержки тюнером только 60 Гц.
При выборе широкоформатных разрешений экрана появляется ещё один пункт, отвечающий за настройку соотношения сторон. Кроме стандартного полноэкранного режима, обычно являющегося причиной искажения пропорций при 4:3 вещании, доступны принудительный вывод широкоформатного изображения на дисплей с соотношением сторон 4:3 и режим PANORAMA.
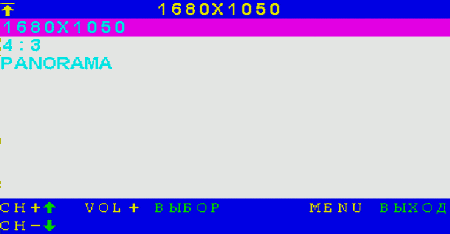
Трактовка последнего у AVerMedia расходится с общепризнанной, вместо преобразования 4:3 для вывода на широкоформатный дисплей с увеличением искажений от центра (искажения минимальны) к краям (искажения максимальны) в нашем случае применяется увеличение изображения, избавляющее, например, от бордюров в случае трансляции в формате letter box. До возможностей тюнеров от Compro и Beholder по этому параметру новые модели AVerMedia не дотягивают, но необходимый минимум обеспечивают.
Здесь же находятся выбор размера окна для режима «Кадр в кадре» (1/4, 1/9 и 1/16 от общей площади экрана) и настройки яркости, контраста, насыщенности, оттенка и чёткости, применяемые ко всем каналам одновременно.
Звуковые настройки лаконичны, доступны выбор источника звука (тюнер, PC) и регулировка баланса.
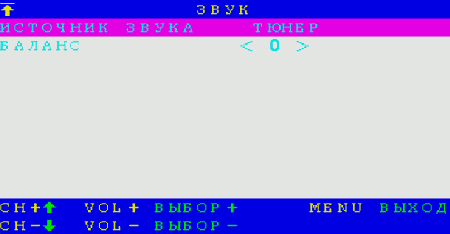
Поддерживаются русский и английский языки меню.
За возврат настроек к заводским отвечает отдельный пункт.
В настройках меню можно найти прозрачность (4 градации), цвета текста и фона, позицию на экране и время индикации (5, 10 и 15 секунд).

Дополнительные возможности
Режим наложения видеопотока на часть аналогового изображения с выхода видеокарты PIP (Picture In Picture, «Картинка в картинке», «Кадр в кадре») активируется при помощи одноименной кнопки на пульте ДУ. Повторное нажатие на кнопку включает режим полупрозрачного окна, следующее возвращает полноэкранный режим.
Поддерживаются следующие разрешения:
- 1024×768 при 60, 70, 75 Гц
- 1280×768 при 60, 75 Гц
- 1280×1024 при 60, 75 Гц
- 1440×900 при 60, 75 Гц
- 1360×768 при 60 Гц
- 1680×1050 при 60 Гц
- 1600×1200 при 60 Гц
Кнопка PIP SIZE на пульте ДУ изменяет размер окна (также доступно в меню), кнопка PIP POS. переводит кнопки управления громкостью и переключения в режим перемещения окна (повторное нажатие возвращает к обычному использованию).
При использовании тюнера в режиме PIP элементы экранного меню выводятся в тех же местах, что и в полноэкранном режиме.
Любопытная ситуация наблюдалась при попытке активировать режим PIP под Windows Vista. С тестовым монитором при установленном драйвере видеокарты добиться функционирования этого режима не удалось. Не помогла и замена видеокарты на AMD RADEON HD3870 X2, так что, влияние производителя, похоже, исключается. Это ограничение распространяется только на DVI подключение, при использовании VGA (производитель категорически рекомендует использовать DVI — DVI или VGA — VGA посредством переходников без «смешивания» интерфейсов) эффект отсутствует.
За включение 13-канального предварительного просмотра с матрицей из 12 каналов вокруг центрального окна большего размера отвечает кнопка PREVIEW.
В разделе Таймер можно установить текущее время (часы и минуты) и активировать таймеры включения (привязан к конкретному времени, возможно ежедневное срабатывание) и выключения (работает в режиме обратного отсчёта от 30 минут до 2 часов 30 минут с получасовым интервалом). Увы, реализацию трудно назвать идеальной, если с энергозависимостью настроек можно смириться, то расхождение часов на 30 минут (!) за сутки, отмеченное ещё при тестировании AVerTV BoxW9, является недостатком.

Качество
Качество приёма находится на хорошем уровне, однако наш экземпляр уступил по этому показателю AverTV Box W9 Plus. Последние АЦП от NXP обеспечивают хорошую цветопередачу. Используемый алгоритм преобразования чересстрочной развёртки в прогрессивную отличается очень хорошей чёткостью, побочным следствием которой являются иногда появляющиеся артефакты в динамичных сценах. Впрочем, наблюдаются они достаточно редко, чтобы вызвать реальный дискомфорт. При подготовке скриншотов использовалось устройство DVI2USB от Epiphan SYSTEMS inc.





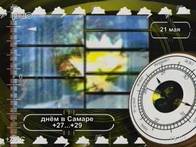

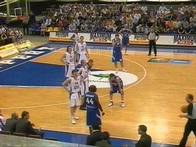
К сожалению, какие-либо настройки шумоподавления, как и у предыдущих моделей на базе процессоров от ActVision, отсутствуют.
В настоящее время мы не располагаем методикой объективного исследования чувствительности автономных тюнеров, поэтому для примерной оценки используется ослабление сигнала при помощи аттенюатора на 20 dB. Вертикальных полос, замеченных при тестировании Compro VideoMate V300, не наблюдалось и на этот раз, что с учётом отсутствия таковых у AVerTV Volar и AVerTV BoxW9 позволяет надеяться, что мы имели дело с единичным случаем, не зависящим от АЦП (напомним, что эффект «вертикальных полос» при ослаблении сигнала был родовой болезнью АЦП от Philips/NXP предыдущих серий).
При перемотке кассеты на подключенном к композитному разъему видеомагнитофоне артефактов и срыва синхронизации не наблюдалось. Автоматическое определение стандарта цветности работало корректно.
Следует отметить отсутствие заметного влияние кабеля и тракта тюнера на качество изображения с видеокарты при VGA подключении. К сожалению, такой, казалось бы, очевидный подход пока ещё встречается не у всех производителей.
Тюнер обеспечивает хорошее качество звука, дополнительная обработка, несмотря на достаточные для последней возможности АЦП, отсутствует.
Наводок на монитор от прилагаемого блока питания во время тестирования замечено не было.
К неприятным мелочам можно отнести долгое время включения тюнера, достигающее 7-8 секунд.
Нагрев тюнера при работе можно охарактеризовать как умеренный, существенного повышения температуры в районе антенного разъёма, замеченного у AVerTV BoxW9, не наблюдается.
Работа с компонентным входом оценивалась в обзоре AVerTV BoxW9, в этой части устройства полностью идентичны.
Пульт ДУ
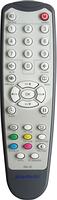
Новая линейка комплектуется 34-кнопочными пультами ДУ, встречающимися у большинства современных моделей с разными интерфейсами. Назначения кнопок изменены в соответствии со спецификой автономного использования. Расположение кнопок по функциональным зонам отличается хорошей эргономикой, нажатие достаточно информативно. Отметим реализованный при помощи кнопки паузы стоп-кадр и кнопку PC PGM/RES, в обычном режиме возвращающую установленное разрешение к 1024×768, что может помочь при неверном выборе.
Пульт работает от двух батареек типоразмера AAA, входящих в комплект поставки.
Выводы
Полноценная поддержка цифрового видеоинтерфейса DVI и максимальное на момент тестирования разрешение 1920×1200 с хорошим качеством масштабирования позволяют отметить AVerTV DVI Box 1080i наградой нашего сайта за оригинальный дизайн. 
Плюсы
- Полноценная поддержка DVI
- Возможность VGA подключения
- Поддержка разрешений до 1920×1200
- Хорошая чёткость изображения
- Хорошее качество изображения и звука
- Компонентный видеовход
- Поддержка широкоформатных разрешений с несколькими режимами масштабирования
- Поиск по частоте
- Возможность сортировки каналов
- Режим «Картинка-в-картинке»
- Таймеры включения и отключения
- Русифицированное меню
Минусы
- Отсутствие настроек шумоподавления
- Экстраполяция разрешений на компонентном входе при подключении 720p/1080i источников
- Отсутствие поддержки 75 Гц
- Низкая точность встроенных часов
- Отсутствие поддержки режима «Картинка-в-картинке» в разрешении 1920×1200
- Отсутствие поддержки HDCP
- Проблемы с работой режима «Картинка-в-картинке» под Windows Vista с некоторыми моделями мониторов при DVI подключении
Если AverTV Box W9 Plus является попыткой возврата занятых недремлющими конкурентами позиций на рынке автономных тюнеров, то AVerTV DVI Box 1080i можно считать состоявшимся контрнаступлением. До появления в широкой продаже моделей с поддержкой DVI от других производителей этот тюнер является практически единственным выбором в своей категории.

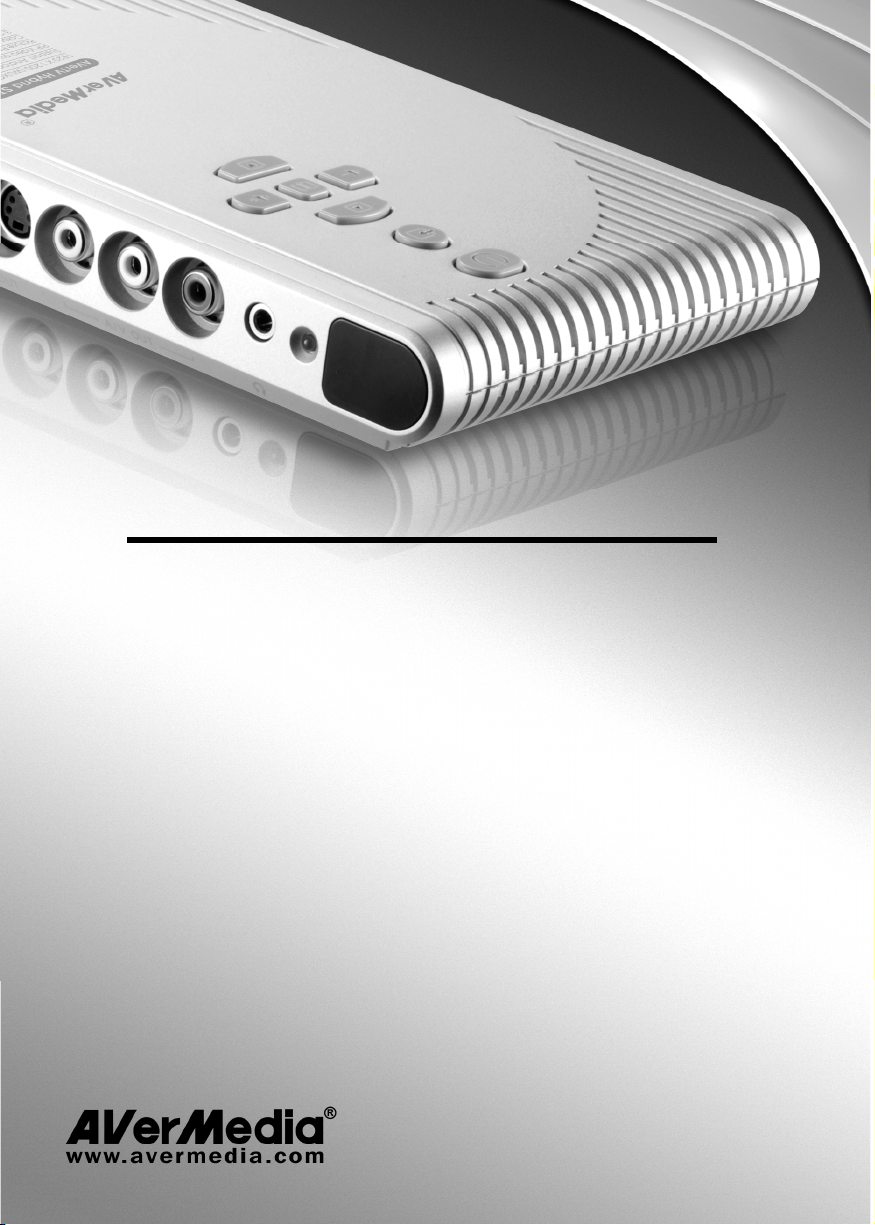
AVerTV DVI Box 1080i
User’s Manual
English
Pусский

FCC NOTICE (Class B)
This device complies with Part 15 of the FCC Rules. Operation is subject to the following two
conditions: (1) this device may not cause harmful interference, and (2) this device must accept
any interference received, including interference that may cause undesired operation.
Federal Communications Commission Statement
NOTE- This equipment has been tested and found to comply with the limits for a Class B digital device,
pursuant to Part 15 of the FCC Rules. These limits are designed to provide reasonable protection against
harmful interference in a residential installation. This equipment generates, uses and can radiate radio
frequency energy and, if not installed and used in accordance with the instructions, may cause harmful
interference to radio communications. However, there is no guarantee that interference will not occur in a
particular installation. If this equipment does cause harmful interference to radio or television reception, which
can be determined by tuning the equipment off and on, the user is encouraged to try to correct the interference
by one or more of the following measures:
‧ Reorient or relocate the receiving antenna.
‧ Increase the separation between the equipment and receiver.
‧ Connect the equipment into an outlet on a circuit different from that to which the receiver is connected.
‧ Consult the dealer or an experienced radio/television technician for help.
CAUTION ON MODIFICATIONS
To comply with the limits for the Class B digital device, pursuant to Part 15 of the FCC Rules, this device must
be installed in computer equipment certified to comply with the Class B limits. All cables used to connect the
computer and peripherals must be shielded and grounded. Operation with non-certified computers or
non-shielded cables may result in interference to radio or television reception.
Changes and modifications not expressly approved by the manufacturer could void the user’s authority to
operate this equipment.
European Community Compliance Statement
Class B
This product is herewith confirmed to comply with the requirements set out in the
Council Directives on the Approximation of the laws of the Member States relating to
Electromagnetic Compatibility Directive 2004/108/EC.
DISCLAIMER
No warranty or representation, either expressed or implied, is made with respect to the contents of this
documentation, its quality, performance, merchantability, or fitness for a particular purpose. Information
presented in this documentation has been carefully checked for reliability; however, no responsibility is
assumed for inaccuracies. The information contained in this documentation is subject to change without notice.
In no event will AVerMedia be liable for direct, indirect, special, incidental, or consequential damages arising
out of the use or inability to use this product or documentation, even if advised of the possibility of such
damages.
TRADEMARKS
AVerMedia is registered trademarks of AVerMedia TECHNOLOGIES, Inc. IBM PC is a registered trademark of
International Business Machines Corporation. Macintosh is a registered trademark of Apple Computer, Inc.
Microsoft is a registered trademark and Windows is a trademark of Microsoft Corporation. All other products or
corporate names mentioned in this documentation are for identification and explanation purposes only, and
may be trademarks or registered trademarks of their respective owners.
COPYRIGHT
© 2008 by AVerMedia TECHNOLOGIES, Inc. All rights reserved. No part of this publication may be reproduced,
transmitted, transcribed, stored in a retrieval system, or translated into any language in any form by any means
without the written permission of AVerMedia TECHNOLOGIES, Inc.
INFORMATION ABOUT WHERE TO DROP OFF YOUR WASTE EQUIPMENT FOR RECYCLING, PLEASE
CONTACT YOUR HOUSEHOLD WASTE DISPOSAL SERVICE OR THE SHOP WHERE YOU PURCHASED
THE PRODUCT.
Safety- Low Voltage Directive 2006/95/EC
THE MARK OF CROSSED-OUT WHEELED BIN INDICATES THAT THIS PRODUCT MUST NOT BE
DISPOSED OF WITH YOUR OTHER HOUSEHOLD WASTE. INSTEAD, YOU NEED TO DISPOSE
OF THE WASTE EQUIPMENT BY HANDING IT OVER TO A DESIGNATED COLLECTION POINT
FOR THE RECYCLING OF WASTE ELECTRICAL AND ELECTRONIC EQUIPMENT. FOR MORE
№ РОСС TW.ME06.B05759
Срок действия с 24.01.2008г по 24.01.2011г
Москва


Table of Content
User’s Manual
Chapter 1 What’s in the Package …………………………………… ENG-2
Chapter 2 The Unit Parts……………………………………………….. ENG-3
2.1 Touch Button Control Panel …………………………………………………ENG-3
2.2 Infrared Sensor………………………………………………………………….ENG-3
2.3 Connection Ports……………………………………………………………….ENG-3
Chapter 3 Installation and Setup……………………………………. ENG-4
3.1 Using the AVerTV DVI Box 1080i………………………………………….ENG-5
3.2 The Remote Control …………………………………………………………..ENG-5
3.3 Customizing the Picture Setting……………………………………………ENG-6
3.4 Supported Display Setting …………………………………………………..ENG-7
3.5 Supported Display Setting in PIP Mode…………………………………ENG-7
Chapter 4 OSD Menu Settings……………………………………….. ENG-8
4.1 Calling Up the MAIN MENU ………………………………………………..ENG-8
4.2 Menu ……………………………………………………………………………….ENG-8
English Polski Magyar Česky Slovenský Български Hrvatski Slovenščina
ENG-1
AVerMedia AVerTV DVI Box 1080i
Chapter 1 What’s in the Package
AVerMedia AVerTV DVI Box 1080i package contains the following items:
Y
P
b
P
r
N
I
S
I
—
N
A
/
V
I
N
AVerMedia AVerTV DVI Box 1080i
DVI-D Cable
*Use the DVI-D cable to input or output the DVI signal.
i
0
8
0
1
x
o
B
I
V
l
a
D
u
n
V
a
T
M
r
s
h
e
V
A
s
’
i
r
l
g
e
n
s
E
U
P
Vertical Stand
User’s Manual
Power Adapter Audio Cable
DVI-I to VGA adapter
Remote Control
(with batteries)
ENG-2
User’s Manual
Chapter 2 The Unit Parts
2.1 Touch Button Control Panel
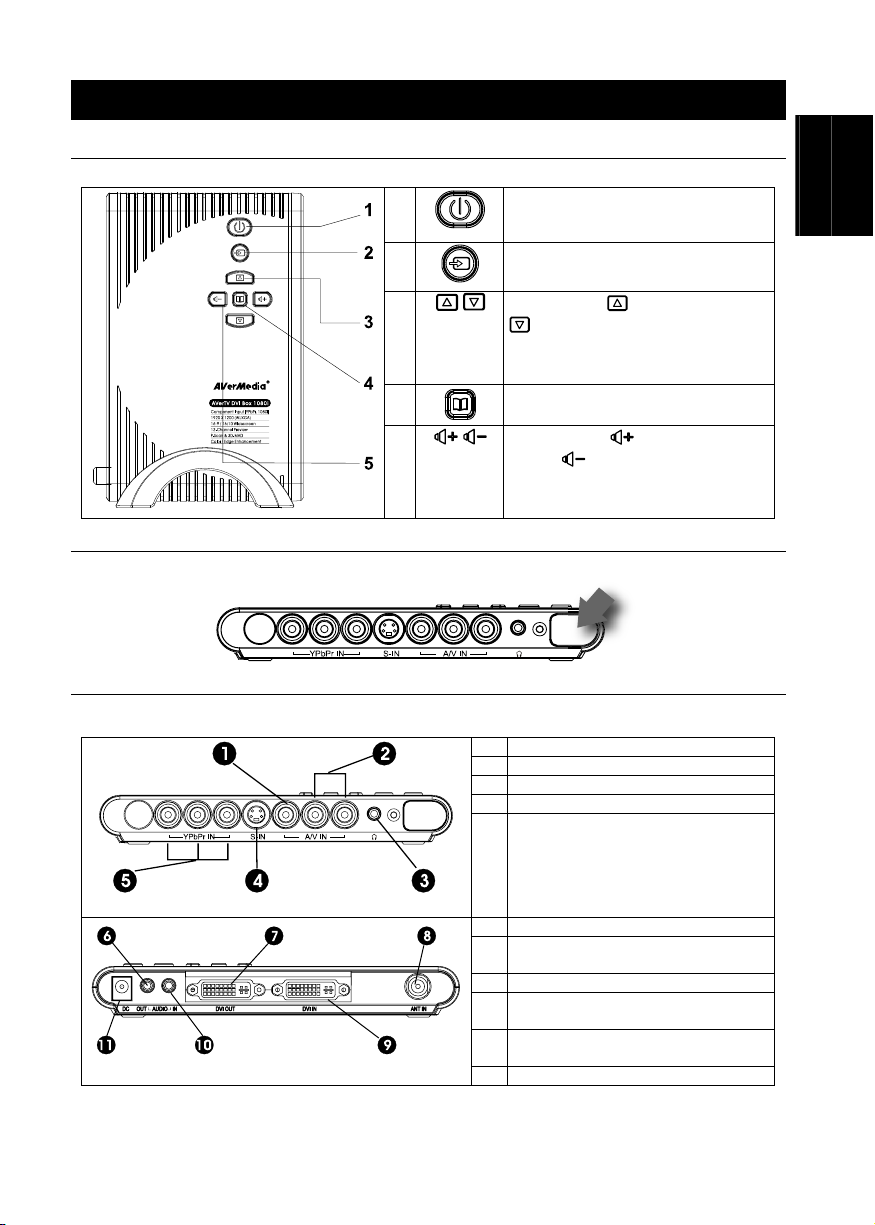
The Touch Button Panel found on the top side of the unit provides quick access to commonly used functions.
1
Turn the unit on /off
2
3
4
5
2.2 Infrared Sensor
When using the remote control, aim it at the Infrared Sensor which is located at the front panel of the unit.
Press this button to toggle between
TV/Video and PC display
/
Press Channel
to go down to the next active TV
channel. Use these buttons to make the
selection in the menu or picture setting
To call up the menu display
/
Press Volume to increase and
Volume
level . Use these buttons to adjust the
menu or picture setting
to go up and Channel
to decrease the volume
English Polski Magyar Česky Slovenský Български Hrvatski Slovenščina
2.3 Connection Ports
The port connectors allow connection of your TV antenna, PC, DVI monitor, VGA monitor (through DVI-I to VGA
Adapter) or LCD projector, speakers, video, or s-video source etc.
Front Panel
Back Panel
The Installation and Setup section provides more information on cable connections.
ENG-3
1 COMPOSITE VIDEO INPUT
2 Left & Right AUDIO INPUT
3 EARPHONE JACK
4 S-VIDEO INPUT
5 COMPONENT VIDEO INPUT
6 Speaker Connection
7 DVI OUTPUT to MONITOR (VGA
supported by DVI-I to VGA Adapter)
8 TV Antenna (75Ω)
9 DVI INPUT from PC (VGA supported
by DVI-I to VGA Adapter)
10 AUDIO INPUT from PC’s SOUND
CARD
11 POWER ADAPTER
AVerMedia AVerTV DVI Box 1080i
Chapter 3 Installation and Setup
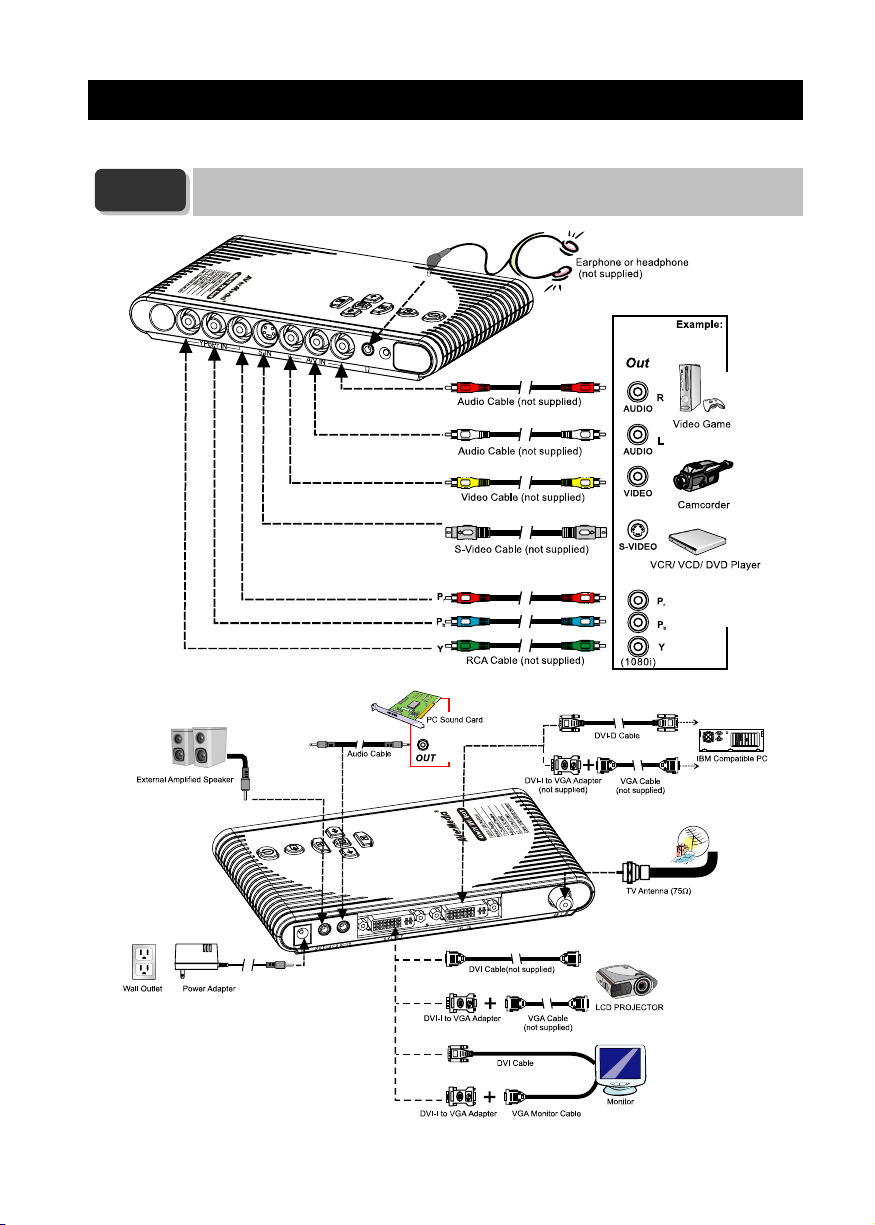
The figure below shows the proper cable connections for installing AVerTV DVI Box 1080i and connecting it to your
audio/video equipment.
NOTE
Please be noted if your signal input and output are not the same type, there will not be able
to detect the signal normally. Please make sure that your input and output are in the same
type (both DVI or both VGA(D-Sub)).
ENG-4
User’s Manual
3.1 Using the AVerTV DVI Box 1080i
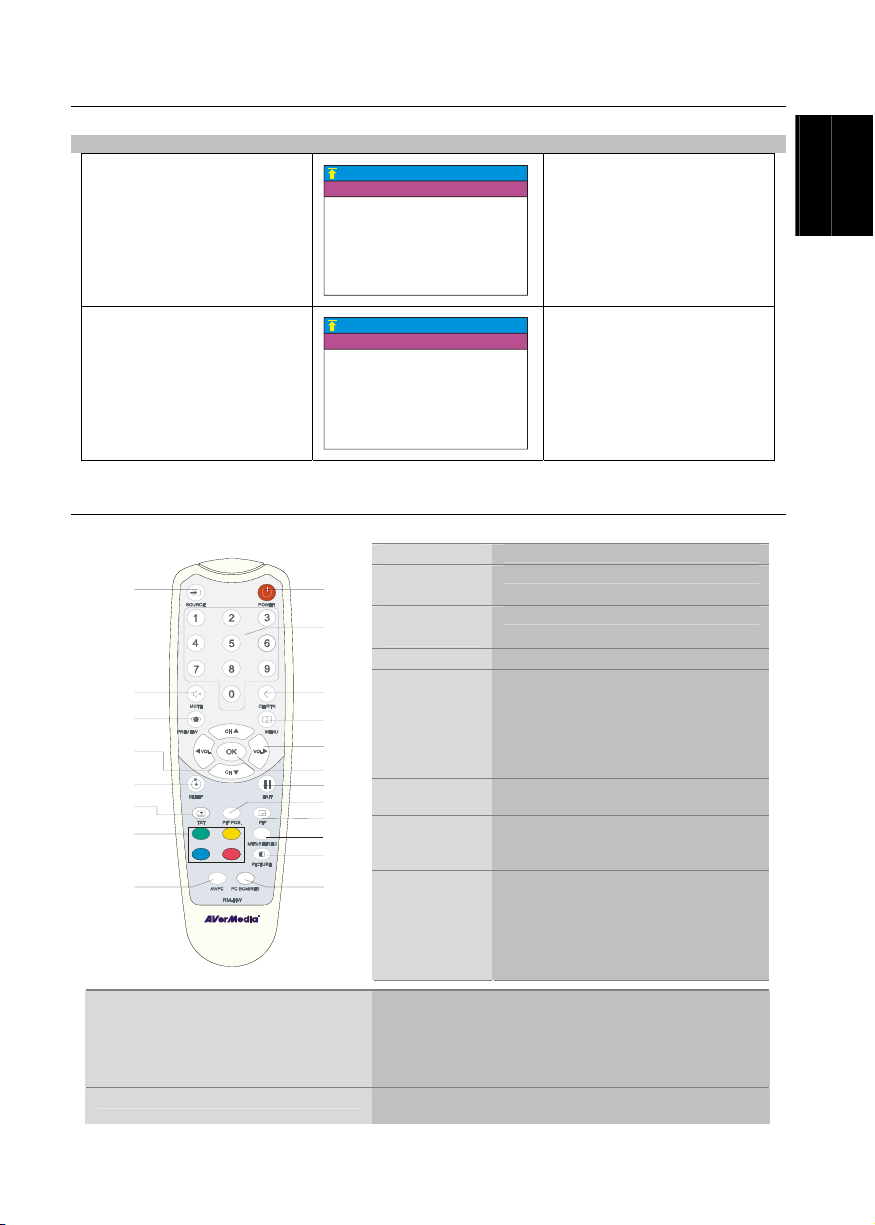
The first time you power on the AVerTV DVI Box 1080i unit, it will automatically display the following menus:
Note: The text appeared in red is the currently selected setting.
LANGUAGE menu
ENGLISH
RUSSIAN
LANGUAGE
In this menu, choose the
language to use for the menus
and on-screen display (OSD).
English Polski Magyar Česky Slovenský Български Hrvatski Slovenščina
CHANNEL SETUP menu
To access various TV controls, open up the menu displays or press on the remote control buttons.
CHANNEL SETUP
CHANNEL
FREQUENCY <49.75> Mhz
FINE TUNING < 0 >
IDEO SYSTEM AUTO
AUDIO SYSTEM1 D/K
AUDIO SYSTEM2 MONO
FAST TUNING YES
SAVE
1
In this menu, change the TV
frequency assignments of certain
channels, fine tune TV channels,
etc. See details on each
configuration setting in the
CHANNEL SETUP menu.
3.2 The Remote Control
The diagram below shows the remote control unit layout.
Turn the unit on/off
To select a TV channel
Go to the previously selected channel
To call up the menu display
* To increase and decrease volume level
* Use these button to adjust the menu or
picture setting
* In adjusting the PIP window position, use
these buttons to move the menu display to
the left and right of the screen.
In the menu, press this button to confirm
the selection.
To temporarily freeze the image on the
screen. Press the button again to
unfreeze the image.
To move the small TV/Video screen using
the CH▲, CH ▼, Vol◄, and Vol►
buttons in PIP mode. Press this button
again to exit the adjusting mode.
13
14
15
16
17
18
19
20
10
11
1
2
3
4
5
6
7
8
9
12
1.POWER
2.NUMBER
BUTTONS
3.CHANNEL
RETURN
4.MENU
5.VOL ◄/►
6.OK
7.
8.PIP Pos.
9.PIP
10.MTS/ STEREO
Switch between PIP*, PIP See-thru** and Full Screen mode
* To watch TV/Video in a small screen on an always on top of
the PC display.
** Make the small video screen semi-transparent allowing the
image behind the small screen show through.
If the channel offers the multi-language feature, press this
button to toggle between languages.
ENG-5
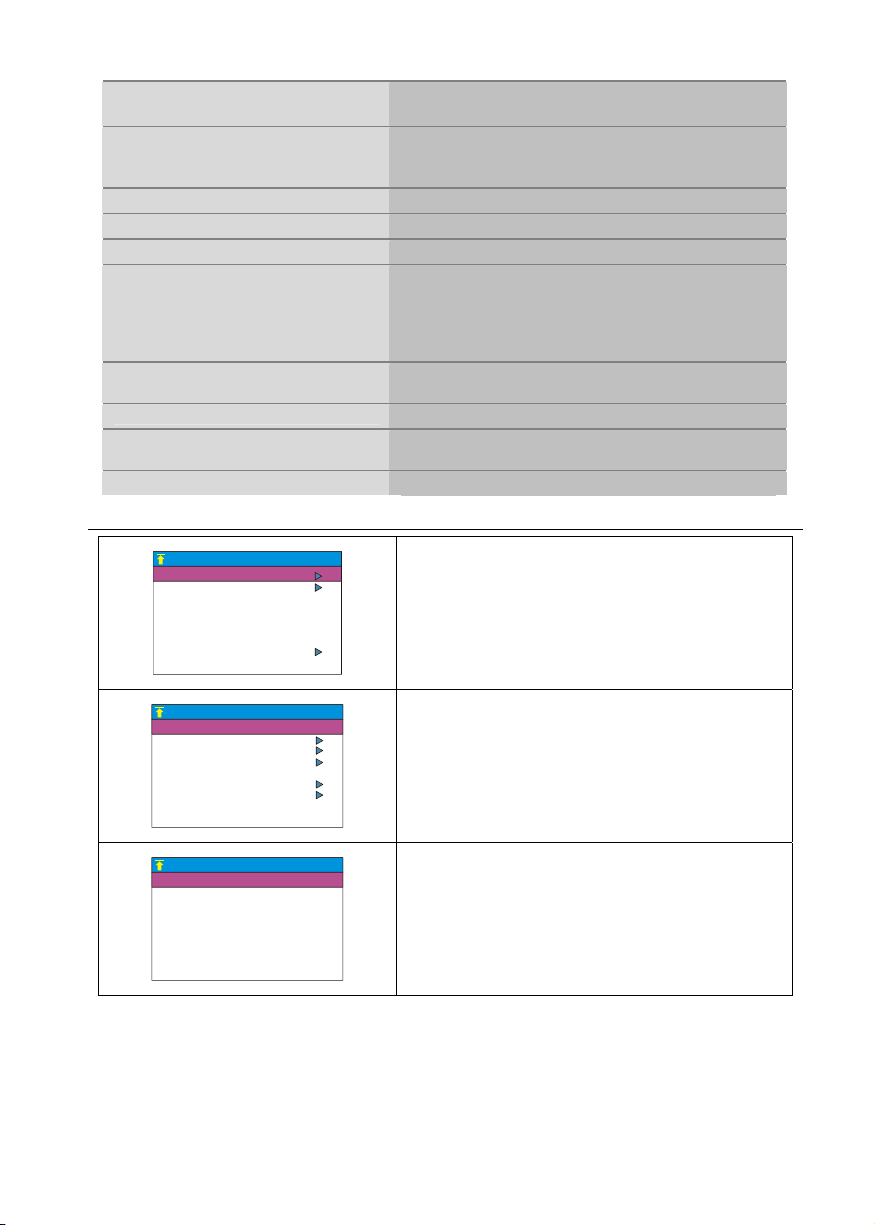
AVerMedia AVerTV DVI Box 1080i
11.PICTURE
12.PC BGM/ Res.
13.SOURCE
14.MUTE
15.PREVIEW
16.CH▲/▼
17.SLEEP
18.TELETEXT(option)
19.FASTTEXT LINK buttons
To adjust brightness, contrast, color, tint or sharpness
Note: The Tint control will not work with a PAL/SECAM source.
— Switch the audio source when in PC display mode
— Switch display resolution setting to 1024×768 when in
TV/Video mode
Switch between TV or external video sources
To turn off /on the sound
Display 13 consecutive TV channels on-screen.
*Go to the next or previous TV channel line up
*Use these buttons to make the selection in the menu or picture
setting
* In adjusting the PIP window position, use these buttons to
move the menu display up and down of the screen
To automatically turn off the unit after 30, 60, 90, 120 or 150
minutes.
This function is not available for this product.
This function is not available for this product.
(option)
20.AV/PC
To toggle between TV/ Video or PC display
3.3 Customizing the Picture Setting
SCREEN RESOLUTION
PIP SIZE
BRIGHTNESS
CONTRAST
SATURATION
HUE
SHARPNESS
SET DEFAULT
1024X768
1280X1024
1280X768
1360X768
1440X900
1600X1200
1680X1050
1920X1200
1/4
1/9
1/16
PICTURE
SCREEN RESO LUTION
PIP SIZE
10
10
10
10
10
If you want to change the screen resolution, set the PIP
SIZE, or adjust the picture quality, press the PICTURE
button on the remote control. Then, you can use the CH▲ or
CH▼ button to select the items in the PICTURE menu; and
the Vol◄ or Vol ► button to open a submenu or make picture
setting adjustments.
To restore the picture default settings, select SET DEFAULT
and then press Vol ►.
In the SCREEN RESOLUTION submenu, choose the desired
display resolution for your monitor screen. Press the CH▲ or
CH▼ button to move up or down the menu and select a
resolution, then press Vol ► to confirm your selection. If you
don’t confirm the selected resolution by pressing Vol ►
within 15 seconds, the resolution will keep at previous
resolution.
In the PIP SIZE submenu, choose the appropriate PIP
window ratio. Press the CH▲ or CH▼ button to make a
selection, then press Vol ► to confirm your selection.
ENG-6
 Loading…
 Loading…
AVerMedia Hybrid TVBox 11 User’s Manual English Français Español Italiano FCC NOTICE (Class B) This device complies with Part 15 of the FCC Rules. Operation is subject to the following two conditions: (1) this device may not cause harmful interference, and (2) this device must accept any interference received, including interference that may cause undesired operation. Federal Communications Commission Statement NOTE- This equipment has been tested and found to comply with the limits for a Class B digital device, pursuant to Part 15 of the FCC Rules. These limits are designed to provide reasonable protection against harmful interference in a residential installation. This equipment generates, uses and can radiate radio frequency energy and, if not installed and used in accordance with the instructions, may cause harmful interference to radio communications. However, there is no guarantee that interference will not occur in a particular installation. If this equipment does cause harmful interference to radio or television reception, which can be determined by tuning the equipment off and on, the user is encouraged to try to correct the interference by one or more of the following measures: ‧ Reorient or relocate the receiving antenna. ‧ Increase the separation between the equipment and receiver. ‧ Connect the equipment into an outlet on a circuit different from that to which the receiver is connected. ‧ Consult the dealer or an experienced radio/television technician for help. CAUTION ON MODIFICATIONS To comply with the limits for the Class B digital device, pursuant to Part 15 of the FCC Rules, this device must be installed in computer equipment certified to comply with the Class B limits. All cables used to connect the computer and peripherals must be shielded and grounded. Operation with non-certified computers or non-shielded cables may result in interference to radio or television reception. Changes and modifications not expressly approved by the manufacturer could void the user’s authority to operate this equipment. BETS-7/NTMR-7: Supplementary Television Broadcasting Receiving Apparatus. Appareils supplémentaires de réception de télévision, Canada BETS-7/NTMR-7. DISCLAIMER No warranty or representation, either expressed or implied, is made with respect to the contents of this documentation, its quality, performance, merchantability, or fitness for a particular purpose. Information presented in this documentation has been carefully checked for reliability; however, no responsibility is assumed for inaccuracies. The information contained in this documentation is subject to change without notice. In no event will AVerMedia be liable for direct, indirect, special, incidental, or consequential damages arising out of the use or inability to use this product or documentation, even if advised of the possibility of such damages. TRADEMARKS AVerMedia is registered trademarks of AVerMedia TECHNOLOGIES, Inc. IBM PC is a registered trademark of International Business Machines Corporation. Macintosh is a registered trademark of Apple Computer, Inc. Microsoft is a registered trademark and Windows is a trademark of Microsoft Corporation. All other products or corporate names mentioned in this documentation are for identification and explanation purposes only, and may be trademarks or registered trademarks of their respective owners. COPYRIGHT © 2008 by AVerMedia TECHNOLOGIES, Inc. All rights reserved. No part of this publication may be reproduced, transmitted, transcribed, stored in a retrieval system, or translated into any language in any form by any means without the written permission of AVerMedia TECHNOLOGIES, Inc. THE MARK OF CROSSED-OUT WHEELED BIN INDICATES THAT THIS PRODUCT MUST NOT BE DISPOSED OF WITH YOUR OTHER HOUSEHOLD WASTE. INSTEAD, YOU NEED TO DISPOSE OF THE WASTE EQUIPMENT BY HANDING IT OVER TO A DESIGNATED COLLECTION POINT FOR THE RECYCLING OF WASTE ELECTRICAL AND ELECTRONIC EQUIPMENT. FOR MORE INFORMATION ABOUT WHERE TO DROP OFF YOUR WASTE EQUIPMENT FOR RECYCLING, PLEASE CONTACT YOUR HOUSEHOLD WASTE DISPOSAL SERVICE OR THE SHOP WHERE YOU PURCHASED THE PRODUCT. IMPORTANT SAFETY INSTRUCTIONS • Read Instructions - Read all the safety and operating instructions before connecting and operating your TV tuner to help ensure your own personal safety and to protect your product from potential damage. • Retain Instructions - Retain all the safety and operating instructions for future reference. • Heed Warnings - Adhere to all warnings on the product and the operating instructions. • Grounding - For continued protection against risk of electric shock and fire, this accessory should be installed/connected only to the products, such as a computer, equipped with a three-wire grounding plug, a plug having a third (grounding) pin. This plug will only fit into a grounding-type power outlet. This is a safety feature. If you are unable to insert the plug into the outlet, contact your electrician to replace the obsolete outlet. Do not defeat the safety purpose of the grounding-type plug. • Lightning - For added protection and to prevent damage due to lightning and power-line surges, unplug the host system, such as a computer, from the wall power outlet and disconnect the antenna or cable system. Unplug the host system from the wall power outlet when left unattended or unused for long periods of time. • Never insert anything metallic into the TV tuner openings. Doing so may create the danger of electric shock. • Openings in the TV tuner cabinet are provided for ventilation. To prevent overheating, these openings should not be blocked or covered. Avoid using the TV tuner on a bed, sofa, rug, or other soft surface, as doing so may block the ventilation openings in the cabinet. If you place the TV tuner in a bookcase or an enclosed space, be sure to provide adequate ventilation and air flow. • Power Lines - An outside antenna system should not be located in the vicinity of overhead power lines or other light or power circuits, or where it can fall into such power lines or circuits. • Antenna Installation - When installing an outside antenna system, extreme care should be taken to prevent it from touching such power lines or circuits, as contact with them may be fatal. • Outdoor Antenna Grounding - If an outside antenna is connected to the product, ensure that the antenna system is grounded so as to provide some protection against voltage surges and built up static charges. Article 810.21 of the National Electric Code, ANSI/NFPA No.70, provides information with regard to proper grounding of the mast and supporting structure, grounding of the lead-in wire to the antenna discharge unit, size of grounding conductors, location of antenna-discharge unit, connection of grounding electrodes, and requirements for the grounding electrode. Note: (for CATV system installer) This reminder is provided to call the CATV systems installer's attention to Section 820.93 of the National Electric Code, ANSI/NFPA 70:2005 (for US/Canada) and/or EN60728-11:2005 standard (for Europe), which provide guidelines for proper grounding and, in particular, specify that the coaxial cable shield shall be connected to the grounding system of the building, as close to the point of cable entry as practical. Battery Safety Information: - Store the batteries in a cool dry place. Do not dispose of used batteries in domestic waste. Dispose of batteries at special collection points or return to point of sale if applies. Remove the batteries during long periods of non-use. Always remove exhausted batteries from the remote control. Battery leakage and corrosion can damage this remote control, dispose of batteries safely. Do not mix old and new batteries. Do not mix different types of batteries: alkaline, standard (carbon-zinc) or rechargeable (nickel-cadmium). Do not dispose of batteries in a fire. The batteries may explode or leak. Never short circuit the battery terminals. CONSUMER ALERT This television receiver has only an analog broadcast tuner and will require a converter box after February 17, 2009, to receive over-the-air broadcasts with an antenna because of the Nation’s transition to digital broadcasting. Analog-only TVs should continue to work as before with cable and satellite TV services, gaming consoles, VCRs, DVD players, and similar products. For more information, call the Federal Communications Commission at 1-888-225-5322 (TTY: 1-888-835-5322) or visit the Commission’s digital television website at: www.dtv.gov. 2.1 2.2 2.3 Chapter 3 3.1 3.2 3.3 3.4 Chapter 4 4.1 4.2 4.3 4.4 4.5 4.6 What’s in the Package ................................................... 2 The Unit Parts................................................................. 3 Touch Button Control Panel..................................................................3 Infrared Sensor.....................................................................................3 Connection Ports ..................................................................................3 Installation and Setup.................................................... 4 The Remote Control .............................................................................5 Customizing the Picture Setting............................................................6 Supported Display Setting ....................................................................7 Supported Display Setting in PIP Mode................................................7 OSD Menu Settings........................................................ 8 Calling Up a Menu Display ...................................................................8 Menu ....................................................................................................8 Setup Menu ..........................................................................................8 Channel Menu ....................................................................................10 Picture Menu ...................................................................................... 11 Parental Control Menu........................................................................ 11 ENG-1 Español Chapter 1 Chapter 2 Français Table of Content English User’s Manual AVerMedia Hybrid TVBox 11 Chapter 1 What’s in the Package AVerMedia Hybrid TVBox 11 package contains the following items: AVerMedia Hybrid TVBox 11 DVI Cable (DVI-D) AVe rTV DVI r’s U se Vertical Stand 0i 108 B ox l ua Man i sh E ngl P Remote Control User’s Manual NOTE (with batteries) Power Adapter Audio Cable S-Video / Component 2-in-1 Cable DVI-I to VGA adapter Use the DVI-D cable to input or output the DVI signal. ENG-2 User’s Manual 2.1 Touch Button Control Panel The Touch Button Panel found on the top side of the unit provides quick access to commonly used functions. 1 Turn the unit on /off 2 Press this button to switch between TV, PC and other available video sources. 3 to go up and Channel Press Channel to go down to the next active TV channel. Use these buttons to make the selection in the menu or picture setting / 4 to increase and Press Volume to decrease the volume Volume level. Use these buttons to adjust the menu or picture setting / 2.2 Infrared Sensor When using the remote control, aim it at the Infrared Sensor which is located at the front panel of the unit. 2.3 Connection Ports The port connectors allow connection of your TV antenna, PC, VGA/DVI monitor or LCD projector, speakers, video, or s-video source etc. Front Panel 1 COMPOSITE VIDEO OUPUT 2 Left & Right AUDIO OUPUT 3 EARPHONE JACK 4 S-VIDEO/Y Pb Pr OUTPUT 5 Left & Right AUDIO INPUT 6. COMPOSITE VIDEO INPUT 7. 8 9 S-VIDEO/Y Pb Pr INPUT Speaker Connection 10 11 12 Back Panel 13 DVI OUTPUT to MONITOR (D-Sub supported by DVI-I to D-Sub Adapter) TV Antenna (75Ω) DVI INPUT from PC (D-Sub supported by DVI-I to D-Sub Adapter) AUDIO INPUT from PC’s SOUND CARD POWER ADAPTER The Installation and Setup section provides more information on cable connections. YPbPr Input: SDTV: 480i HDTV: [email protected], [email protected], [email protected] ENG-3 Français To call up the menu display 5 NOTE English The Unit Parts Español Chapter 2 AVerMedia Hybrid TVBox 11 Chapter 3 Installation and Setup The figure below shows the proper cable connections for installing AVerMedia Hybrid TVBox 11 and connecting it to your audio/video equipment. *Please be noted if your signal input and output are not the same type, there will not be able to detect the signal normally. Please make sure that your input and output are in the same type (both DVI or both D-Sub). ENG-4 Français Español English User’s Manual 3.1 The Remote Control The diagram below shows the remote control unit layout. 1. POWER Turn the unit on/off 2. Numberic To select a TV channel Buttons 3. CH RTN Go to the previously selected channel. * When watching digital TV, this button will function as dash mark. For example, you may press 4, CH RTN, and 1 to switch to channel 4-1. 4. MENU 5. VOL ◄/► Enter / Exit the OSD menu. TV Mode:Increase / Decrease the volume OSD Menu:Enter or exit the sub menu. Function as the LEFT and RIGHT arrow button. PIP Mode:Move the PIP small screen by using the arrow buttons 6. LIST/OK 7. / EXIT In the OSD menu, press this button to confirm the selection. TV Mode:To temporarily freeze the image on the screen. Press the button again to unfreeze the image. OSD Menu:Return to upper menu or exit menu. ENG-5 AVerMedia Hybrid TVBox 11 8. AV/PC To toggle between TV/ Video or PC display 9. PC BGM/ Res. - Switch the audio source when in PC display mode - Switch display resolution setting to 1024x768 when in TV/Video mode - Reset video output to 480i when in component video output mode. 10. SLEEP To automatically turn off the unit after 30, 60, 90, 120 or 150 minutes. 11. PICTURE To adjust brightness, contrast, color, tint. 12. INFO Display the current program information. 13. SOURCE Switch between TV or external video sources (except PC). 14. MUTE To turn off /on the sound 15. PREVIEW Display 13 consecutive TV channels on-screen. *The preview function is not supported in video output mode. 16. CH▲/▼ TV Mode:Go to next or previous program. OSD Menu:Function as the UP and DOWN arrow button. PIP Mode:Move the PIP screen by using the arrow buttons 17. EPG This function is not available for this product. 18. TXT/C.C View Closed Caption information. 19. PIP Pos. PIP Mode: To move the small TV/Video screen using the CH▲, CH ▼, Vol◄, and Vol► buttons in PIP mode*. Press this button again to exit the adjusting mode. *The PIP window may not reach the edge of the screen for certain VGA cards or monitors in use. TV Mode: Switch to different aspect ratios (Analog TV : 4:3, PANOROMA, Full Screen / Digital TV : 16:9, 4:3, Letterbox). 20. PIP Switch between PIP*, transparent PIP** and full screen mode. * To watch TV/Video in a small screen on an always on top of the PC display. ** Make the small video screen semi-transparent allowing the image behind the small screen show through. 21. AUDIO MODE Switch between different audio modes (mono, stereo, dual language). 22. SUBTITLE This function is not available for this product. 23. TV/RADIO This function is not available for this product. 3.2 Customizing the Picture Setting If you want to adjust the picture quality, press the PICTURE button on the remote. Then, you can use the CH▲ or CH▼ buttons to select the items in the PICTURE menu; and the Vol◄ or Vol ► buttons to make the adjustment. To restore the picture default setting, select DEFAULT and then press Vol ►. ENG-6 User’s Manual NOTE Refresh Rate (Hz) 1024x768 60 1280x768 60 1280x1024 60 1360x768 60 1440x900 60 1600x1200 60 1680x1050 60 1920x1200 60 If the resolution setting is not in 4:3 or 16:9 aspect ratio, the image will still be kept in 4:3 or 16:9 aspect ratio (with black bars on sides) for the best viewing experience. 3.4 Supported Display Setting in PIP Mode The reference table below lists the monitor display resolution and refresh rate settings that AVerMedia Hybrid TVBox 11 supports when viewing in PIP mode: NOTE 1. If the monitor does not support or is not set to the following mode listed below, it will switch back to TV/Video mode. 2. If the computer switches to sleep mode, it will change back to TV/Video mode. Resolution Refresh Rate (Hz) 1024 x 768 1280 x 768 1280 x 1024 1440 x 900 1360 x 768 1680 x 1050 1600 x1200 1920x1200 1920x1200 60, 70, 75 60, 75 60, 75 60, 75 60 60 60 60 (Reduce Blanking) 60 (VGA Only) ENG-7 Español Resolution Français The reference table below lists the monitor display resolution and refresh rate settings that AVerMedia Hybrid TVBox 11 supports. English 3.3 Supported Display Setting AVerMedia Hybrid TVBox 11 Chapter 4 OSD Menu Settings 4.1 Calling Up a Menu Display Press the MENU button on the remote control to call up and exit the main menu or submenu display. Then, you can use the CH▲ or CH▼ buttons to move the highlight up or down; and the Vol◄ or Vol►/OK buttons to adjust or to make a selection. Press Exit button to exit the menu. The table below lists the different functions you will find in the menu. 4.2 Menu Setup Closed Caption Picture Brightness PIP size Contrast Resolution Saturation Menu Transparency Hue Component Output Default Factory Default Parental Control Channel Lock TV Parental Guide TV Source Show / Hide Channels MPAA PIN Auto Program 4.3 Setup Menu 4.3.1 Enabling /Disabling Closed Caption Function This product has the ability to decode and display closed caption content. You can enable/disable closed caption function and select a closed caption service from the Closed Caption menu. 1. Press the MENU button to display the menu. 2. Press the CH▲ or CH▼ to select the “Closed Caption” menu and press Vol►/OK. 3. Press the CH▲ or CH▼ to select the “Mode” and press Vol►/OK. 4. Press OK with “ On ” , “Off” or “OnMute” highlighted to turn the closed caption on, off, or on and mute. 4.3.2 Select Caption Service In the Analog Caption and Digital Caption list different language or different content services depending on the broadcast. Select one of these before enable the closed caption function. 1. Press the MENU button to display the menu. 2. Press the CH▲ or CH▼ to select the “Closed Caption” menu and press Vol►/OK. 3. Press the CH▲ or CH▼ to select the “Analog Caption” or “Digital Caption” and press Vol►/OK. ENG-8 User’s Manual 4.3.3 Viewing PIP PIP feature can display the main signal and auxiliary input signal simultaneously so that you can watch TV and work on your PC at the same time. Press the PIP button on the remote control to switch between PIP, transparent PIP and full screen mode. English 4. Use CH▲ or CH▼ buttons to highlight a closed caption service and press Vol►/OK. Or select “Off” to disable the analog or digital closed caption. 4.3.5 Changing the Resolution In the Resolution menu, you can change the video output resolution. 1. Press the MENU button to display the menu. 2. Press the CH▲ or CH▼ to select the “Setup” menu and press Vol►/OK. 3. Press the CH▲ or CH▼ to select the “Resolution” and press Vol►/OK. 4. Use CH▲ or CH▼ buttons to change the resolution. 5. Press Vol►/OK button to save the change. 4.3.6 Changing the Menu Transparency 1. 2. 3. 4. Press the MENU button to display the menu. Press the CH▲ or CH▼ to select the “Setup” menu and press Vol►/OK. Use CH▲ or CH▼ buttons to highlight the “Menu Transparency”. Press Vol◄ or Vol► on the remote to adjust percentage of the ON-Screen-Display’s transparency. 4.3.7 Component Output Under Digital TV signal, you can switch the video output resolution between 480i, 720p or 1080i. Please be noted that 720p and 1080i resolution are only supported by YPbPr video output mode. 1. Press the MENU button to display the menu. 2. Press the CH▲ or CH▼ to select the “Setup” menu and press Vol►/OK. ENG-9 Français 1. Press the MENU button to display the menu. 2. Press the CH▲ or CH▼ to select the “Setup” menu and press Vol►/OK. 3. Press the CH▲ or CH▼ to select the “PIP Size” and press Vol►/OK. 4. Use CH▲ or CH▼ buttons to highlight the desired PIP window display size. The system provides “1/4”、”1/9” and “1/16” for your selection. For instance, when you choose 1/4 PIP mode, the system displays a 1/4 small screen on the main screen. 5. Press Vol►/OK button to save the change. Español 4.3.4 Changing the Size of the PIP Window AVerMedia Hybrid TVBox 11 3. Use CH▲ or CH▼ buttons to highlight the “Component Output ” . 4. Press Vol◄ or Vol► on the remote to select a desired video output resolution. 5. Press OK button to save the change. 4.3.8 Factory Default This feature allows you to revert to default factory settings 1. Press the MENU button to display the menu. 2. Press the CH▲ or CH▼ to select the “Setup” menu and press Vol►/OK. 3. Press the CH▲ or CH▼ to select the “Factory Default ” and press Vol►/OK. 4. A confirmation dialog will appear. Use Vol◄ or Vol► buttons to select “OK ” and press OK button to confirm the operation, or select “ Cancel ” and press OK button to exit the dialog. 4.4 Channel Menu 4.4.1 Setup the TV Source 1. Press the MENU button to display the menu. 2. Press the CH▲ or CH▼ to select the “Channel” menu and press Vol►/OK. 3. Use the CH▲ or CH▼ buttons to select “TV Source” and Press Vol►/OK. 4. Use CH▲ or CH▼ buttons to highlight a TV source (Antenna, Cable-STD, Cable-HRC, Cable-IRC) and press Vol►/OK. 4.4.2 Channel scan 1. 2. 3. 4. After finishing setting TV source, press the MENU button to display the menu. Press the CH▲ or CH▼ to select the “Channel” menu and press Vol►/OK. Press the CH▲ or CH▼ to select the “Auto Program” and press Vol►/OK. A warning message will appear. 5. If you want to overwrite the previous program list, use Vol◄ or Vol► buttons to highlight “OK ” and press OK button. To abort this operation, simply select “ Cancel ” and press OK button. 4.4.3 Show /Hide Channels After scanning, available channels will then be listed. Now you can hide the unwanted programs by check the check box beside each channel. 1. Press the CH▲ or CH▼ to select the “Channel” menu and press Vol►/OK. 2. Press the CH▲ or CH▼ to select the “Show /Hide Channels” and press Vol►/OK. 3. Use CH▲ or CH▼ buttons to highlight a listed channel and will appear, indicating that the press Vol►/OK. The mark channel has been hidden. 4. If you want to hide more channels, repeat step 3. ENG-10 User’s Manual 4.5 Picture Menu 4.6 Parental Control Menu In the parental control menu, you can enable/disable parental control function, use TV Parental Guide or MPAA method to restrict certain channels, and set up your PIN. 4.6.1 Set Up your Personal ID Number(PIN) 1. Press the MENU button to display the menu. 2. Press the CH▲ or CH▼ to select the “Parental Control” menu and press Vol►/OK. 3. Press the CH▲ or CH▼ to select the “PIN” then press Vol►/OK. 4. Press the numeric button on the remote control to enter the new password. 5. Enter the same new password again for confirmation.(The default password is 0000 (four zero))。 4.6.2 Enable/Disable Parental control Press the MENU button to display the menu. Press the CH▲ or CH▼ to select the “Parental Control” menu and press Vol►/OK. Press the Vol◄ or Vol ► to select the “Lock” then press Vol►/OK. Press the numeric button on the remote control to input your PIN number. Press CH▲ or CH▼ to highlight “On” and press Vol►/OK to enable the parental control function (TV Parental Guide and MPAA). 6. If you want to disable the Parental control function, select “Off” then all block programs will become viewable. 1. 2. 3. 4. 5. ENG-11 Español 1. Press the MENU button to display the menu. 2. Press the CH▲ or CH▼ to select the “Picture” menu and press Vol►/OK. 3. Use the CH▲ or CH▼ buttons to select an item. 4. Press the Vol◄ or Vol ► to make the adjustment. 5. To restore the picture default setting, select “Default” and then press Vol►/OK. 6. Use Vol◄ or Vol► buttons to highlight “OK” and press OK on the remote to restore the settings to default. 7. Or highlight “Cancel” and press OK button to abort this operation. Français You can adjust the picture quality, Brightness, Contrast, Saturation and Hue in the Picture menu. English 4.5.1 Adjust the Picture Settings AVerMedia Hybrid TVBox 11 4.6.3 Set up “TV Parental Guide” Rating system 1. 2. 3. 4. Press the MENU button to display the menu. Press the CH▲ or CH▼ to select the “Parental Control” menu and press Vol►/OK. Press the Vol◄ or Vol ► to select the “TV Parental Guide” then press Vol►/OK. Press the numeric button on the remote control to input your PIN number. 5. Press CH▲ or CH▼ to select a particular TV level of restriction then press then press Vol►/OK. 6. Press Vol►/OK to unblock it. 4.6.4 Set up “MPAA” Rating system 1. 2. 3. 4. Press the MENU button to display the menu. Press the CH▲ or CH▼ to select the “Parental Control” menu and press Vol►/OK. Press the Vol◄ or Vol ► to select the “ MPAA ” then press Vol►/OK. Press the numeric button on the remote control to input your PIN number. 5. Press CH▲ or CH▼ to select a particular TV level of restriction then press then press Vol►/OK. ENG-12 2.1 2.2 2.3 Capítulo 3 3.1 3.2 3.3 3.4 Capítulo 4 4.1 4.2 4.3 4.4 4.5 4.6 Contenido de la caja ...................................................... 2 Los componentes de la unidad .................................... 3 Botones del panel de control ................................................................3 Sensor de infrarrojos ............................................................................3 Puertos de conexiones .........................................................................3 Instalación y configuración........................................... 4 El mando a distancia ............................................................................5 Personalización de las opciones de imagen.........................................6 Configuración de pantalla admitida ......................................................7 Configuración de pantalla admitida ......................................................7 Configuración del menú OSD ....................................... 8 Abriendo el menú en pantalla ...............................................................8 Menú ....................................................................................................8 Menu Configuración .............................................................................8 Menú Canales ....................................................................................10 Menú Imagen ..................................................................................... 11 Menú Control Parental........................................................................ 11 ESN-1 Español Capítulo 1 Capítulo 2 Français Índice English Manual de usuario AVerMedia Hybrid TVBox 11 Capítulo 1 Contenido de la caja La caja AVerMedia Hybrid TVBox 11 contiene: AVerMedia Hybrid TVBox 11 Cable DVI (DVI-D) 0i 108 B ox DVI anual M rTV AVe User’s Soporte vertical i sh E ngl P Mando a distancia Manual de usuario NOTA (con pilas) Adaptador de corriente Cable audio S-Video / Compuesto, cable 2 en 1 Adaptador DVI-I a VGA Utilice el cable DVI-D para introducir o extraer la señal DVI. ESN-2 Manual de usuario Por medio del panel táctil de botones, que se encuentra en la parte superior de la unidad podrá acceder a las funciones de uso más común. 1 Encendido / Apagado de la unidad 2 Pulse este botón para cambiar entre TV, PC y otras Fuentes de video disponibles. 3 y bajar al Presione para subir canal siguiente. Utilice los botones para hacer una selección en el menú o en opciones de imagen / 4 Abrir el menú 5 para subir y bajar Presione el volumen. Utilice los botones para ajustar las opciones de menú o imagen. / 2.2 Sensor de infrarrojos Si utiliza el control remoto, apunte con él al sensor de infrarrojos que se encuentra en el panel frontal de la unidad. 2.3 Puertos de conexiones Los puertos permiten la conexión con su antena de TV, PC, monitor VGA/DVI o LCD, altavoces, s-vídeo, etc. 1 2 3 4 5 6. 7. Panel frontal 8 9 10 11 12 Panel posterior 13 Salida Video Compuesto Salida Audio Izquierdo y Derecho. AURICULAR MINI-JACK Salida S-Video/Y Pb Pr ENTRADA DE AUDIO izquierda y derecha ENTRADA de VÍDEO COMPUESTO Entrada S-Video/Y Pb Pr Conexión de altavoces SALIDA DVI a MONITOR (D-Sub admitido por medio de adaptador DVI-I a D-Sub) Antena de TV(75Ω) ENTRADA DVI desde PC (D-Sub admitido por medio de adaptador DVI-I a D-Sub) ENTRADA DE AUDIO de UNA TARJETA DE SONIDO del pc. Fuente de alimentación La sección de instalación y configuración proporciona información sobre las conexiones de los cables. NOTA ENTRADA DE YPbPr: SDTV: 480i, 576i HDTV: [email protected], [email protected], [email protected], [email protected] ESN-3 Español 2.1 Botones del panel de control English Los componentes de la unidad Français Capítulo 2 AVerMedia Hybrid TVBox 11 Capítulo 3 Instalación y configuración La figura inferior muestra el cableado correcto para instalar y conectar AVerMedia Hybrid TVBox 11 a equipos de audio/vídeo. *Por favor, si su señal de entrada y salida no es del mismo tipo, no se detectará la señal. Por favor asegúrese que si tipo de entrada y salida son del mismo tipo (las dos en DVI o las dos en D-Sub) ESN-4 Français Español English Manual de usuario 3.1 El mando a distancia La imagen en la siguiente página muestra una clara distribución del mando a distancia. 1. POWER Encendido/Apagado de la unidad 2. Botones numéricos 3. CH RTN Seleccionar un canal de TV 4. MENU Entrar / Salir del menú OSD. 5. VOL ◄/► Modo TV:Aumenta/disminuye el volumen Menu OSD:Entrar o salir del submenú. Los cursores izquierdo y derecho son los asociados a esta función. Modo PIP:Mueve la pantalla de PIP usando los botones de flechas. 6. LIST/OK En el menú OSD, presione este botón para confirmar la selección. 7. / EXIT Modo TV:Para congelar temporalmente la imagen en la pantalla. Pulse de nuevo el botón para descongelar la imagen. Menu OSD:Volver al menú superior o salir del menú. 8. AV/PC Conmuta entre TV/Vídeo o PC. ESN-5 Ir a el canal previo seleccionado. * Cuando este viendo TV Digital, este botón puede funcionar como marca. Por ejemplo, puede presionar 4, CH RTN, y 1 para cambiar la canal 4-1. AVerMedia Hybrid TVBox 11 9. PC BGM/ Res. - Cambia la fuente de audio en el modo de pantalla PC - Cambia la resolución de pantalla a 1024 x 768 en el modo TV / Vídeo - Resetea la salida de video para 480i cuando esta en modo de salida por componentes. 10. SLEEP Para apagar la unidad automáticamente después de 30, 60, 90, 120 o 150 minutos. 11. PICTURE Ajuste de brillo, contraste, color, tinte. 12. INFO Muestra la información del programa actual. 13. SOURCE Conmuta entre TV o fuentes de vídeo externo (excepto PC). 14. MUTE Activar o desactivar el volumen. 15. PREVIEW Muestra 13 canales de TV consecutivos en pantalla. *La función de previsualización no está soportada en el modo de salida de video. 16. CH▲/▼ Modo TV:Vaya al siguiente programa o al anterior. Menu OSD:Funciona como las flechas Arriba y Abajo. Modo PIP:Mueve la ventana PIP mediante los botones de flechas. 17. EPG Esta función no esta disponible para este producto. 18. TXT/C.C Ver información de subtítulos 19. PIP Pos. Modo PIP:Coloque la pantalla pequeña de TV/vídeo usando los botones CH▲, CH▼, Vol◄, y Vol ► durante el modo PIP*. Pulse este botón de nuevo para salir del modo de ajuste. *La ventana de la función PIP no puede llegar al borde de la pantalla en ciertas tarjetas VGA o monitores en uso. Modo TV:Cambia entre las diferentes relaciones de aspecto (TV Analógica : 4:3, Panorámica, Pantalla Completa / TV Digital : 16:9, 4:3, Letterbox). 20. PIP Cambia entre PIP*, PIP transparente** y a pantalla completa. * Para ver la TV / Video en una pequeña pantalla sobre la pantalla de su PC. ** Hace semitransparente la pequeña pantalla de vídeo, permitiendo ver a través de ella la imagen de la pantalla. 21. AUDIO MODE Cambia entre los diferentes modos de audio (mono, estereo, dual). 22. SUBTITLE Esta función no esta disponible para este producto. 23. TV/RADIO Esta función no esta disponible para este producto. 3.2 Personalización de las opciones de imagen Si quiere ajustar la calidad de TV o de la imagen de vídeo, presione el botón de imagen (PICTURE) en el mando. Luego, use los botones CH▲ or CH▼ para seleccionar las distintas opciones en el menú de imagen (PICTURE) y utilice los botones Vol◄ or Vol► para realizar los ajustes. Para restaurar los valores por defecto, seleccione DEFAULT y presione Vol►. ESN-6 Manual de usuario NOTA Tasa de refresco (Hz) 1024x768 60 1280x768 60 1280x1024 60 1360x768 60 1440x900 60 1600x1200 60 1680x1050 60 1920x1200 60 Si la resolución no se ajusta a 4:3 o 16:9 , la imagen mantendrá la relación aspecto en 4:3 o 16:9 (con franjas negras en ambos lados) para la mejor experiencia visual. 3.4 Configuración de pantalla admitida La siguiente tabla indica las distinas resoluciones y frecuencias que soportan los dispositivos AVerMedia Hybrid TVBox 11. NOTA 1. Si el monitor no admite los modos que se muestran a continuación, volverá al modo TV/Vídeo. 2. Si el equipo se suspende, cambiará al modo TV/Video. Resolución Tasa de refresco (Hz) 1024 x 768 1280 x 768 1280 x 1024 1440 x 900 1360 x 768 1680 x 1050 1600 x1200 1920x1200 1920x1200 60, 70, 75 60, 75 60, 75 60, 75 60 60 60 60 (Reduce Blanco) 60 (Solo VGA) ESN-7 Español Resolución Français La siguiente tabla indica las distinas resoluciones y frecuencias que soportan los dispositivos AVerMedia Hybrid TVBox 11. English 3.3 Configuración de pantalla admitida AVerMedia Hybrid TVBox 11 Capítulo 4 Configuración del menú OSD 4.1 Abriendo el menú en pantalla Presione el botón MENU en el mando a distancia para activar o salir del menú principal o submenús. Luego, utilice los botones CH▲ o CH▼ para seleccionar las opciones en la lista del menú y utilice Vol◄ o Vol►/OK para hacer ajustes o realizar selecciones. Presione el botón Salir para salir. La tabla siguiente lista las diferentes funciones que encontrará en el menu. 4.2 Menú Setup Closed Caption Picture Brightness PIP size Contrast Resolution Saturation Menu Transparency Hue Component Output Default Factory Default Parental Control Channel Lock TV Parental Guide TV Source Show / Hide Channels MPAA PIN Auto Program 4.3 Menu Configuración 4.3.1 Habilitar/Deshabilitar Captura Cerrada. Este producto tiene la capacidad de decodificar y mostrar contenido con subtítulos. Puede habilitar/deshabilitar la función Captura Cerrada y seleccionar un servicio de Captura Cerrada desde el menú Captura Cerrada. 1. Pulse el botón MENU para mostrar el menú. 2. Presione los botones CH▲ o CH▼ para seleccionar el menú “Closed Caption(Captura Cerrada)” y presione Vol►/OK. 3. Presione los botones CH▲ o CH▼ para seleccionar “Mode(Modo)” y presione Vol►/OK. 4. Presione OK cuando aparezca “On(Encendido)”, “Off(Apagado)” o “OnMute(Silencio)” para apagar, encender o quitar el sonido de la captura cerrada. 4.3.2 Seleccione Captura Cerrada En la Analog Caption (Captura Analógica) y Digital Caption(Captura Digital) pueden aparecer diferentes lenguajes o diferentes contenidos de servicios dependiendo de la emisión. Seleccione una de estas antes de habilitar la función de títulos ocultos. 1. Pulse el botón MENU para mostrar el menú. ESN-8 English Manual de usuario 2. Presione los botones CH▲ o CH▼ para seleccionar el menú “Closed Caption(Captura Cerrada)” y presione Vol►/OK. 3. Presione los botones CH▲ o CH▼ para seleccionar “Analog Caption(Captura Analógica)” o “Digital Caption(Captura Digital)” y presione Vol►/OK. 4. Use los botones CH▲ o CH▼ cuando aparezca Servicio Captura Cerrada y presione Vol►/OK. O seleccione “Off(Apagado)” para deshabilitar la captura cerrada analógica o digital. 4.3.4 Cambiando el tamaño de la ventana PIP 1. Pulse el botón MENU para mostrar el menú. 2. Presione los botones CH▲ o CH▼ para seleccionar el menú “Setup(Configuración)” y presione Vol►/OK. 3. Presione los botones CH▲ o CH▼ para seleccionar “PIP Size” y presione Vol►/OK. 4. Uselos botones CH▲ o CH▼ cuando aparezca la ventana PIP para ajustarla. El sistema proporciona las dimensiones “1/4”、”1/9” y “1/16” para elegir. Por ejemplo, cuando escoja el modo PIP 1/4, el sistema muestra un 1/4 de pantalla en la pantalla principal. 5. Presione el botón Vol►/OK para salvar los cambios. 4.3.5 Cambiando la Resolución En el menú Resolución, puede cambiar la resolución de salida de video. 1. Pulse el botón MENU para mostrar el menú. 2. Presione los botones CH▲ o CH▼ para seleccionar el menú “Setup(Configuración)” y presione Vol►/OK. 3. Presione los botones CH▲ o CH▼ para seleccionar “Resolution” y presione Vol►/OK. 4. Use los botones CH▲ o CH▼ para cambiar la resolución. 5. Presione el botón Vol►/OK para salvar el cambio. 4.3.6 Cambiando el Menú Transparencia. 1. 2. 3. 4. Pulse el botón MENU para mostrar el menú. Presione los botones CH▲ o CH▼ para seleccionar el menú “Setup(Configuración)” y presione Vol►/OK. Use los botones CH▲ o CH▼ cuando aparezca el “Menu Transparency (Menu Transparencia)”. Presione Vol◄ o Vol► en el mando a distancia para ajustar el porcentaje de transparencia que aparece en la pantalla de visualización. ESN-9 Français PIP puede mostrar la señal principal y auxiliar de entrada al mismo tiempo de modo que puede trabajar y ver TV a la vez. Presione el botón PIP en el mando a distancia para cambiar entre los modos PIP, PIP Transparente y Pantalla completa.. Español 4.3.3 Vista PIP AVerMedia Hybrid TVBox 11 4.3.7 Salida Video por Componentes En TV Digital, puede cambiar la resolución de salida entre 480i, 720p o 1080i. Tenga en cuenta que las resoluciones 720p y 1080i solo están soportadas en el modo de Video por Componentes YPbPr. 1. Pulse el botón MENU para mostrar el menú. 2. Presione los botones CH▲ o CH▼ para seleccionar el menú “Setup(Configuración)” y presione Vol►/OK. 3. Use los botones CH▲ o CH▼ cuando aparezca “Component Output(Salida por Componentes)”. 4. Presione Vol◄ o Vol► en el mando a distancia para selccionar la resolución de salida de video. 5. Presione el botón OK para salvar el cambio. 4.3.8 Valores predeterminados de fabrica Está función le permite volver a la configuración por defecto de fabrica. . 1. Pulse el botón MENU para mostrar el menú. 2. Presione los botones CH▲ o CH▼ para seleccionar el menú “Setup(Configuración)” y presione Vol►/OK. 3. Presione los botones CH▲ o CH▼ para seleccionar “Factory Default” y presione Vol►/OK. 4. Un cuadro de dialogo de confirmación aparecerá. Use los botones Vol◄ o Vol► para selecionar “OK” y presione el botón OK para confirmar la operación, o seleccione “Cancel(Cancelal)” y presione el botón OK para salir del cuadro de dialogo. 4.4 Menú Canales 4.4.1 Configurar la fuente de TV 1. Pulse el botón MENU para mostrar el menú. 2. Presione los botones CH▲ o CH▼ para seleccionar el menú “Channel” y presione Vol►/OK. 3. Presione los botones CH▲ o CH▼ para seleccionar “TV Source” y presione Vol►/OK. 4. Use los botones CH▲ o CH▼ cuando aparezca fuente de TV (Antena, Cable-STD, Cable-HRC, Cable-IRC) y presione Vol►/OK. 4.4.2 Escaneando Canales 1. 2. 3. 4. Después de finalizar la configuración de fuente de TV, haga click en el botón MENU para que aparezca el menú. Presione los botones CH▲ o CH▼ para seleccionar el menú “Channel” y presione Vol►/OK. Presione los botones CH▲ o CH▼ para seleccionar “Auto Program” y presione Vol►/OK. Aparecerá un mensaje de Advertencia. 5. Si desea sobreescribir la lista de programas, use los botones Vol◄ o Vol► cuando aparezca “OK” y haga click en el botón OK. Para abortar esta operación, simplemente seleccione “Cancel(Cancelar)” y haga click en el botón OK. ESN-10 Manual de usuario 1. Presione los botones CH▲ o CH▼ para seleccionar el menú “Channel” y presione Vol►/OK. 2. Presione los botones CH▲ o CH▼ para seleccionar “Show /Hide Channels” y presione Vol►/OK. 3. Use los botones CH▲ o CH▼ cuando aparezca la lista de canales y presione Vol►/OK. La marca aparecerá, lo que indica que el canal se ha ocultado. 4. Si quiere ocultar más canales, repita el paso 3. Español Despues de escanear, estará disponible la lista de canales. Ahora puede ocultar los canales no deseados desactivando la casilla al lado del canal. English 4.4.3 Mostrar / Ocultar Canales 4.5.1 Ajustar la configuración de Imagen Puede ajustar la calidad de imagen, brillo, contraste, saturación y Matiz en el menú imagen. 1. Pulse el botón MENU para mostrar el menú. 2. Presione los botones CH▲ o CH▼ para seleccionar el menú “Picture” y presione Vol►/OK. 3. Use los botones CH▲ o CH▼ para seleccionar un articulo. 4. Presione Vol◄ o Vol ► para realizar el ajuste. 5. Para restaurar por defecto la configuración de Imagen, seleccione “Default(Por defecto)” y presione Vol►/OK. 6. Use los botones Vol◄ o Vol► cuando aparezca “OK” y presione OK o nel mando a distancia para restaurar la configuración por defecto. 7. O “Cancel(Cancelar)” y presione el botón OK para abortar esta operación. 4.6 Menú Control Parental En el menú Control Parental puede habilitar/deshabilitar la función Control Parental, use la Guía TV Parental o el método MPAA para restringir ciertos canales, y configure su pin. 4.6.1 Configure su número de identificación personal (PIN) 1. Presione el botón MENU para que aparezca el menú. 2. Presione CH▲ o CH▼ para selecionar el menú “Parental Control” y presione Vol►/OK. 3. Presione los botones CH▲ o CH▼ para seleccionar “PIN” y presione Vol►/OK. 4. Presione el botón numérico del mando a distancia para introducir su nueva contraseña. 5. Introduzca de Nuevo la misma contraseña para confirmarlo.(La contraseña por defecto es 0000 (4 ceros)。 ESN-11 Français 4.5 Menú Imagen AVerMedia Hybrid TVBox 11 4.6.2 Habilitar/Deshabilitat Control Parental Pulse el botón MENU para mostrar el menú. Presione los botones CH▲ o CH▼ para seleccionar el menú “Parental Control” y presione Vol►/OK. Presione los botones CH▲ o CH▼ para seleccionar “Lock” y presione Vol►/OK. Presione el botón numérico del mando a distancia.para introducir su número PIN. Presione CH▲ o CH▼ cuando aparezca “Encendido” y presione Vol►/OK para habilitar la función de control parental (TV Parental Guide(Guia TV Parental) y MPAA). 6. Si quiere deshabilitar la función Control Parental , seleccione “Off(Apagado)” entonces todos los programas bloqueados serán nuevamente visibles. 1. 2. 3. 4. 5. 4.6.3 Configuración sistema clasificación “Guia Parental” 1. 2. 3. 4. Pulse el botón MENU para mostrar el menú. Presione los botones CH▲ o CH▼ para seleccionar el menú “Parental Control” y presione Vol►/OK. Presione los botones Vol◄ o Vol ► para seleccionar “TV Parental Guide” y presione Vol►/OK. Presione el botón numérico del mando a distancia para introducir su número PIN. 5. Presione CH▲ o CH▼ para seleccionar un determinado nivel de restricción a continuación, entonces presione Vol►/OK. 6. Presione Vol►/OK para desbloquearlo. 4.6.4 Configuración sistema clasificación “MPAA” 1. 2. 3. 4. Pulse el botón MENU para mostrar el menú. Presione los botones CH▲ o CH▼ para seleccionar el menú “Parental Control” y presione Vol►/OK. Presione los botones Vol◄ o Vol ► para seleccionar “MPAA” y presione Vol►/OK. Presione el botón numérico del mando a distancia para introducir su número PIN. 5. Presione CH▲ o CH▼ para seleccionar un determinado nivel de restricción a continuación, presione Vol►/OK. ESN-12 2.1 2.2 2.3 Chapitre 3 3.1 3.2 3.3 3.4 Chapitre 4 4.1 4.2 4.3 4.4 4.5 4.6 Contenu de l’emballage................................................. 2 Boutons de commande ................................................. 3 Panneau de contrôle avec boutons ......................................................3 Détecteur infrarouge.............................................................................3 Ports de connexion...............................................................................3 Installation et configuration .......................................... 4 Télécommande.....................................................................................5 Personnaliser la configuration de l’image .............................................6 Personnaliser la configuration de l’image .............................................7 Personnaliser la configuration de l’image .............................................7 Paramètres du menu OSD............................................. 8 APPELER UN MENU ...........................................................................8 Menu ....................................................................................................8 Menu d’installation................................................................................8 Menu des Chaînes .............................................................................10 Menu Image ....................................................................................... 11 Menu de Contrôle Parental................................................................. 11 FRA-1 Español Chapitre 1 Chapitre 2 Français Sommaire English Ce guide d’utilisation AVerMedia Hybrid TVBox 11 Chapitre 1 Contenu de l’emballage L’emballage de AVerMedia Hybrid TVBox 11 contient les éléments suivants: AVerMedia Hybrid TVBox 11 Câble DVI (DVI-D) AVe rTV DVI r’s U se Socle vertical 0i 108 B ox l ua Man i sh E ngl P Télécommande Guide d’utilisation Remarque (avec piles) Adaptateur secteur Câble audio Câble S-Vidéo/Composant 2-en-1 Adaptateur DVI-I à VGA Utilisez le câble DVI-D pour l’entrée ou la sortie du signal DVI. FRA-2 Ce guide d’utilisation Les boutons situés sur le sommet du panneau de commande vous permettent d’accèder facilement et rapidement aux principales fonctions. 1 Placez l'unité sous/hors tension. 2 Appuyez sur le bouton passer du mode PC au mode TV o tout autre source video disponible. Appuyez sur le bouton Channel pour aller vers les chaînes précédentes et sur le bouton Channel pour les chaînes suivantes Utilisez ces boutons pour le paramétrage du menu et de l’image. Pour appeler le menu. 3 / 4 5 Appuyez sur le bouton Volume pour pour augmenter le réduire et Volume niveau du volume Utilisez ces boutons pour faire une sélection dans le menu ou dans l’image.. / 2.2 Détecteur infrarouge Lorsque vous utilisez la télécommande, orientez-la vers le capteur infrarouge situé sur le dessus de l’appareil. 2.3 Ports de connexion Les connecteurs permettent la connexion de l’antenne de votre télévision, de votre ordinateur, de votre moniteur VGA/DVI ou de votre projecteur LCD, de vos hauts-parleurs, de votre source vidéo ou s-vidéo etc. Panneau frontal 1 SORTIE VIDEO COMPOSITE 2 3 SORTIE AUDIO DROITE ET GAUCHE CONNECTEUR DU CASQUE 4 5 SORTIE S-VIDEO / Y Pb Pr ENTRÉE AUDIO GAUCHE & DROITE 6. 7. ENTRÉE VIDÉO COMPOSITE ENTRÉE S-VIDEO/ Y Pb Pr 8 9 Connexion des haut-parleurs 10 11 12 Panneau arrière 13 Sortie DVI vers le Moniteur (D-Dub supporté grâce à l’adaptateur DVI-I/D-Sub) Antenne de télévision (75Ω) ENTRÉE DVI depuis le PC (D-Dub supporté grâce à l’adaptateur DVI-I/D-Sub) ENTRÉE AUDIO de LA CARTE SON DE L'ORDINATEUR Adaptateur secteur La section Installation et configuration vous donne des informations détaillées sur les connexions des câbles. Remarque ENTRÉE YPbPr: SDTV: 480i, 576i HDTV: [email protected], [email protected], [email protected], [email protected] FRA-3 Español 2.1 Panneau de contrôle avec boutons English Boutons de commande Français Chapitre 2 AVerMedia Hybrid TVBox 11 Chapitre 3 Installation et configuration L’illustration ci-dessous montre comment correctement connecter l’unité pour l’installation de AVerMedia Hybrid TVBox 11 ainsi que la connexion au équipements audio/vidéo. *Sachez que si le signal d’entrée et de sortie ne sont pas du même type, l’appareil ne pourra pas détecter le signal correctement. Veuillez vérifier que votre entrée et votre sortie sont bien du même type (DVI ou D-sub). FRA-4 Français Español English Ce guide d’utilisation 3.1 Télécommande L’illustration de la page suivante montre l’apparence de l’unité télécommande. 1. POWER 2. Boutons numériques 3. CH RTN 4. MENU 5. VOL ◄/► 6. LIST/OK 7. / EXIT FRA-5 Place l’unité hors/sous tension Pour selectionner une chaîne de television Permet d’aller vers la chaîne précédemment sélectionnée. * Lorsque vous regardez la television, ce bouton fonctionne comme un marqueur. Par exemple, vous pouvez appuyer sur 4, CHRTN, et sur 1 pour passer sur la chaîne 4-1. Entrer/Sortir du Menu OSD. Mode Télévision:Augmente/diminue le volume. Menu OSD (Affichage à l’écran): Entrer ou quitter le sous-menu. Fonctionne comme le bouton de la Flèche à Droite et à Gauche. Mode PIP:Déplacer le petit écran PIP en utilisant les boutons fléchés. Dans le menu OSD, appuyez sur ce bouton pour confirmer la selection. Mode Télévision:Pour geler temporairement l’image à l’écran. Pour revenir à l’affichage normal, appuyez à nouveau sur le bouton. Menu OSD (Affichage à l’écran): Retourner au menu racine ou sortir du menu. AVerMedia Hybrid TVBox 11 8. AV/PC 9. PC BGM/ Res. 10. SLEEP 11. PICTURE 12. INFO 13. SOURCE 14. MUTE 15. PREVIEW 16. CH▲/▼ 17. EPG 18. TXT/C.C 19. PIP Pos. 20. PIP 21. AUDIO MODE 22. SUBTITLE 23. TV/RADIO Váltás a TV/ Video, vagy PC között. - Changez de source audio lorsque vous êtes dans le menu d’affichage. - Choisissez la résolution de 1024x768, lorsque vous êtes en mode TV/Vidéo. - Reparamétrer la sortie video en 480i lorsque vous êtes en mode sortie composante. Cette fonction permet d’éteindre automatiquement l’appareil après 30, 60, 90, 120 ou 150 minutes. Pour ajuster la luminosité, le contraste, la couleur et la teinte. Visualisation de l’information du programme actuel. Bascule de la télévision vers des sources vidéo externs (sauf PC). Active/désactive le son. Affiche 13 chaînes de télévision consécu-ivement à l’écran. *La fonction prévisualisation n’est pas supportée pour le mode sortie video. Mode Télévision:Allez au programme suivant ou antérieur. Menu OSD (Affichage à l’écran):Il fonctionne comme le bouton fléché vers le HAUT et vers le BAS. Mode PIP:Déplacez l’écran PIP en utilisant les boutons fléchés. Cette fonction n’est pas disponible pour ce produit. Afficher les informations le sous-titrage "Close Caption" Mode PIP: Pour déplacer le petit écran télévision/vidéo en utilisant les boutons CH ▲, CH ▼, VolW et Vol X en mode PIP*. Appuyez à nouveau sur ce bouton pour sortir du menu de réglage. La fenêtre PIP peut ne pas atteindre le bord de l’écran pour certaines cartes VGA ou moniteurs. Mode Télévision: Permet de passer d’un ration d’aspect à un autre (TV analogique : 4:3,PANORAMA, PLEIN ECRAN / TV numérique : 16:9, 4:3, Letterbox) Passer au mode PIP* PIP transparent** et en mode plein écran. * Pour afficher la Télévision/Vidéo dans un petit écran toujours sur le dessus de l’affichage d’un ordinateur personnel. ** Rend le petit écran vidéo semi-transparent permettant à l’image se trouvant au dessous de transparaître au travers. Paser d’un mode audio à un autre (mono, stereo, double language) Cette fonction n’est pas disponible pour ce produit. Cette fonction n’est pas disponible pour ce produit. 3.2 Personnaliser la configuration de l’image Si vous souhaitez ajuster la qualité de l’image télévisuelle ou vidéo, appuyez sur le bouton PICTURE de la télécommande. Puis, utilisez les boutons CH▲ ou CH▼ pour sélectionner les éléments du menu PICTURE et utilisez les boutons Vol◄ ou Vol► pour effectuer les ajustements. Pour revenir à la configuration par défaut de l’image, sélectionnez DEFAULT puis appuyez sur Vol►. FRA-6 Ce guide d’utilisation Remarque Taux de rafraîchissement (Hz) 1024x768 60 1280x768 60 1280x1024 60 1360x768 60 1440x900 60 1600x1200 60 1680x1050 60 1920x1200 60 Si la resolution n’est pas 4:3 ou 16:9, cette image sera conserve au format 4:3 ou 16:3 (avec des bandes noires sur les côtés) pour un meilleur confort. 3.4 Personnaliser la configuration de l’image Le tableau de reference ci-dessous dresse la liste des résolutions et des taux de rafraîchissement supportés par AVerMedia Hybrid TVBox 11. Remarque 1. Si le moniteur ne supporte pas ou n’est pas correctement réglé pour ce type d’affichage, il reviendra automatiquement en mode TV/Vidéo. 2. Si l’ordinateur est placé en veille, il reviendra automatiquement en mode TV/Vidéo Résolution Taux de rafraîchissement (Hz) 1024 x 768 1280 x 768 1280 x 1024 1440 x 900 1360 x 768 1680 x 1050 1600 x1200 1920x1200 1920x1200 60, 70, 75 60, 75 60, 75 60, 75 60 60 60 60 (Réduction des Blancs) 60 (VGA uniquement) FRA-7 Español Résolution Français Le tableau de reference ci-dessous dresse la liste des résolutions et des taux de rafraîchissement supportés par AVerMedia Hybrid TVBox 11. English 3.3 Personnaliser la configuration de l’image AVerMedia Hybrid TVBox 11 Chapitre 4 Paramètres du menu OSD 4.1 APPELER UN MENU Appuyez sur le bouton MENU de la télécommande pour appeler et quitter le menu principal ou un sous-menu. Puis, utilisez les boutons CH▲ ou CH▼ pour sélectionner les éléments de la liste du menu et utilisez les boutons Vol◄ ou Vol►/OK pour ajuster ou effectuer une sélection. Appuyer sur le bouton EXIT pour sortir du menu. Le tableau ci-dessous dresse la liste des fonctions que vous trouverez dans le menu. 4.2 Menu Setup Closed Caption Picture Brightness PIP size Contrast Resolution Saturation Menu Transparency Hue Component Output Default Factory Default Parental Control Channel Lock TV Parental Guide TV Source Show / Hide Channels MPAA PIN Auto Program 4.3 Menu d’installation 4.3.1 Activer/Désactiver la fonction closed caption Ce produit a la capacité de decoder et d’afficher les commentaries en closed caption. Vous pouvez activer/désactiver la fonction close caption et sélectionner le service closed caption à partir du menu closed caption. 1. Appuyez sur le bouton MENU pour afficher le menu. 2. Appuyez sur CH▲ ou CH▼ pour sélectionner le menu “Closed Caption” et pressez sur Vol►/OK. 3. Appuyez sur CH▲ ou CH▼pour sélectionner “Mode” et presser sur Vol►/OK. 4. Pressez OK avec “On”, “Off” ou “OnMute” surlignés pour mettre la closed caption en mode on, off, ou on et silence. 4.3.2 Sélectionnez le Service de Caption La Caption Analogique et la Caption Numérique peuvent lister différentes langues ou différents contenus ou services en fonction de l’émetteur. 1. Appuyez sur le bouton MENU pour afficher le menu. 2. Appuyez sur CH▲ ou CH▼ pour sélectionner le menu “Closed Caption” et pressez sur Vol►/OK. FRA-8 4.3.4 Changer la taille de la fenêtre PIP 1. Appuyez sur le bouton MENU pour afficher le menu. 2. Appuyez sur CH▲ ou CH▼ pour sélectionner le menu “Setup” et pressez sur Vol►/OK. 3. Appuyez sur CH▲ ou CH▼pour sélectionner “PIP Size” et presser sur Vol►/OK. 4. Utlisez les boutons CH▲ ou CH▼ pour surligner la taille de la fenêtre PIP souhaitée. Le système fournit “1/4”, “1/9” et “1/16” pour votre selection. Par exemple, lorque vous choisissez le mode PIP ¼, le système afficher un petit écran d’1/4 sur l’écran principal. 5. Appuyez sur Vol►/OK pour sauvegarder le changement. 4.3.5 Changement de resolution Dans le menu résolution, vous pouvez changer la résolution de la vidéo. 1. Appuyez sur le bouton MENU pour afficher le menu. 2. Appuyez sur CH▲ ou CH▼ pour sélectionner le menu “Setup” et pressez sur Vol►/OK. 3. Appuyez sur CH▲ ou CH▼pour sélectionner “Resolution” et presser sur Vol►/OK. 4. Utilisez les boutons CH▲ ou CH▼ pour changer la résolution. 5. Appuyez sur le bouton Vol►/OK pour sauvegarder le changement. 4.3.6 Menu Transparent 1. 2. 3. 4. Appuyez sur le bouton MENU pour afficher le menu. Appuyez sur CH▲ ou CH▼ pour sélectionner le menu “Setup” et pressez sur Vol►/OK. Utilisez les boutons CH▲ ou CH▼ pour surligner le mode “Menu Transparency”. Appuyez sur Vol◄ ou Vol► sur la télécommande pour ajuster la transparence. Appuyez sur la télécommande pour ajuster le pourcentage de transparence à l’écran. FRA-9 Español La fonction PIP peut montrer le principal signal et le signal d’entrée auxiliaire simultanément, de façon à ce que vous puissiez regarder la TV et travailler sur votre PC en même temps. Pressez sur le bouton PIP sur la télécommande pour passer du mode PIP au mode PIP transparent et en mode plein écran. Français 4.3.3 Regarder la TV avec le PIP English Ce guide d’utilisation 3. Pressez le bouton CH▲ ou CH▼ pour sélectionner “Analog Caption(Capture Analogique)” ou “Digital Caption(Capture Numérique)” and pressez sur Vol►/OK. 4. Utilisez les boutons CH▲ ou CH▼ pour surligner un service de closed caption et pressez sur Vol►/OK. Ou sélectionnez “Off” pour désactiver la fonction closed caption analogique ou numérique. AVerMedia Hybrid TVBox 11 4.3.7 Sortie Composante Avec un signal numérique TNT, vous pouvez choisir la résolution de sortie entre 480i, 720p ou 1080i. Merci de noter que seules les résolutions 720p et1080i sont supportées par le mode sortie video YPbPr 1. Appuyez sur le bouton MENU pour afficher le menu. 2. Appuyez sur CH▲ ou CH▼ pour sélectionner le menu “Setup” et appuyez sur Vol►/OK. 3. Utilisez les boutons CH▲ ou CH▼ pour surliger “Component Output(Sortie Composante)”. 4. Appuyez sur Vol◄ ou Vol► sur la télécommande pour sélectionner la résolution de Appuyez sur le bouton OK pour sauvegarder le changement. 4.3.8 Paramètres par défaut Cette fonction vous permet de changer les paramètres par défaut. 1. Appuyez sur le bouton MENU pour afficher le menu. 2. Appuyez sur CH▲ ou CH▼ pour sélectionner le menu “Setup” et appuyez sur Vol►/OK. 3. Appuyez sur CH▲ ou CH▼pour sélectionner “Factory Default” et presser sur Vol►/OK. 4. Une boîte de dialogue de confirmation va apparaître. Utilisez les boutons Vol◄ ou Vol► pour sélectionner “OK” et appuyez sur OK pour confirmer l’opération, ou sélectionnez “Cancel(Annulez)” et appuyez sur OK pour sortir de la boîte de dialogue. 4.4 Menu des Chaînes 4.4.1 Paramètrer la source TV 1. Appuyez sur le bouton MENU pour afficher le menu. 2. Appuyez sur CH▲ ou CH▼ pour sélectionner le menu “Channel” et appuyez sur Vol►/OK. 3. Appuyez sur CH▲ ou CH▼pour sélectionner “TV Source” et presser sur Vol►/OK. 4. Utilisez les boutons CH▲ ou CH▼ pour surligner une source TV (Antenne, Câble-STD, Câble-HRC, Câble-IRC) et appuyez sur Vol►/OK. 4.4.2 Scan des Chaînes 1. 2. 3. 4. Après avoir determine la source du signal TV, appuyez sur bouton MENU pour afficher le menu. Appuyez sur CH▲ ou CH▼ pour sélectionner le menu “Channel” et appuyez sur Vol►/OK. Appuyez sur CH▲ ou CH▼pour sélectionner “Auto Program” et presser sur Vol►/OK. Un message d’avertissement va apparaître. 5. Si vous voulez effacer la liste des programmes précédente, vous pouvez utiliser les boutons Vol◄ ou Vol► pour surligner OK et appuyez sur le bouton OK. Pour éviter cette operation, sélectionnez simplement “Cancel” et appuyez sur le bouton OK. FRA-10 Ce guide d’utilisation 1. Appuyez sur CH▲ ou CH▼ pour sélectionner le menu “Channel” et appuyez sur Vol►/OK. 2. Appuyez sur CH▲ ou CH▼pour sélectionner “Show /Hide Channels” et presser sur Vol►/OK. 3. Utilisez les boutons CH▲ ou CH▼ pour surligner une chaîne sélectionnée et appuryez sur Vol►/OK. La marque va apparaître, indiquant que la chaîne a été masquée. 4. Si vous voulez masquer plus de chaînes, revenez à l’étape 3 de la procédure. Español Après avoir scanné, les chaînes disponibles seront listées. Maintenant, vous pouvez decider de masquer les programmes qui ne vous intéressent pas en cochantou décochant les cases situées à côté du nom de chaque chaîne. English 4.4.3 Montrer/Cacher les Chaînes 4.5.1 Ajuster les paramètres de l’image Vous pouvez adjuster la qualité d’image, la netteté, le contraste, la saturation dans le menu Image. 1. Appuyez sur le bouton MENU pour afficher le menu. 2. Appuyez sur CH▲ ou CH▼ pour sélectionner le menu “Picture(Image)” et appuyez sur Vol►/OK. 3. Utlisez les boutons CH▲ or CH▼ pour sélectionner un élément. 4. Appuyez sur Vol◄ or Vol ► pour faire une modification. 5. Pour restaurer les parameters de l’image par défaut, sélectionnez “Default” , puis appuyez sur Vol►/OK. 6. Utilisez les boutons Vol◄ ou Vol► pour surligner “OK” et appuyez sur OK sur la télécommande pour restaurer les paramètres par défaut. 7. Ou vous pouvez surligner “Cancel(Annuler)” et appuyer sur OK pour annuler cette opération. 4.6 Menu de Contrôle Parental Sur le menu de contrôle parental, vous pouvez activer/désactiver la fonction de contrôle parental, utilisez le Guide TV Parental ou la méthode MPAA to limiter l’accès à certaines chaînes, et paramètrer votre PIN. 4.6.1 Paramètrer votre PIN (Numéro d’identification Personnel) 1. Appuyez sur le bouton MENU pour afficher le menu. 2. Appuyez sur CH▲ ou CH▼ pour sélectionner le menu “Parental Control” et appuyez sur Vol►/OK. 3. Appuyez sur CH▲ ou CH▼pour sélectionner “PIN” et presser sur Vol►/OK. 4. Appuyez sur le bouton numéric sur la télécommande pour entrer le nouveau mot de passe. 5. Entrer à nouveau le même mot de passe pour confirmation. Le mot de passé par défaut est 0000 (quatre zéro). FRA-11 Français 4.5 Menu Image AVerMedia Hybrid TVBox 11 4.6.2 Activer/Désactiver le Contrôle Parental Appuyez sur le bouton MENU pour afficher le menu. Appuyez sur CH▲ ou CH▼ pour sélectionner le menu “Parental Control” et appuyez sur Vol►/OK. Appuyez sur CH▲ ou CH▼pour sélectionner “Lock” et presser sur Vol►/OK. Appuyez sur le bouton numeric sur la télécommande pour entrer votre code PIN. Appuyez sur CH▲ ou CH▼ pour surligner “On” et sur Vol►/OK pour activer la fonction de contrôle parental (TV Parental Guide(Guide TV parental) et MPAA). 6. Si vous voulez désactiver la fonction de contrôle parental, sélectionnez “Off”. Tous les programmes bloqués deviendront visibles. 1. 2. 3. 4. 5. 4.6.3 Paramètrer la système de notation du “TV Parental Guide(Guide TV parental) ” 1. 2. 3. 4. Appuyez sur le bouton MENU pour afficher le menu. Appuyez sur CH▲ ou CH▼ pour sélectionner le menu “Parental Control” et appuyez sur Vol►/OK. Appuyez sur Vol◄ ou Vol ►pour sélectionner “TV Parental Guide” et presser sur Vol►/OK. Appuyez sur le bouton numeric sur la télécommande pour rentrer vore code PIN. 5. Appuyez sur CH▲ ou CH▼ pour choisir un niveau de restriction spécifique, appuyez ensuite sur Vol►/OK. 6. Appuyez sur Vol►/OK pour le débloquer. 4.6.4 Paramètrez le système de notation “MPAA” 1. 2. 3. 4. Appuyez sur le bouton MENU pour afficher le menu. Appuyez sur CH▲ ou CH▼ pour sélectionner le menu “Parental Control” et appuyez sur Vol►/OK. Appuyez sur Vol◄ ou Vol ►pour sélectionner “MPAA” et presser sur Vol►/OK. Appuyez sur le bouton numeric sur la télécommande pour rentrer votre code PIN 5. Appuyez sur CH▲ ou CH▼ pour sélectionner un niveau de restriction particulier, appuyez ensuite sur Vol►/OK. FRA-12 P/N 300AA200-CSA M a d e i n Ta i w a n
AVerTV DVI Box 1080i является ТВ-тюнером от компании AVerMedia Technologies, который основан на DVI-интерфейсе, позволяющем устройству работать автономно без включения компьютера. Работоспособность ТВ-тюнера напрямую зависит от правильности его подключения. Выполнить это можно двумя способами — посредством DVI или VGA кабелей.
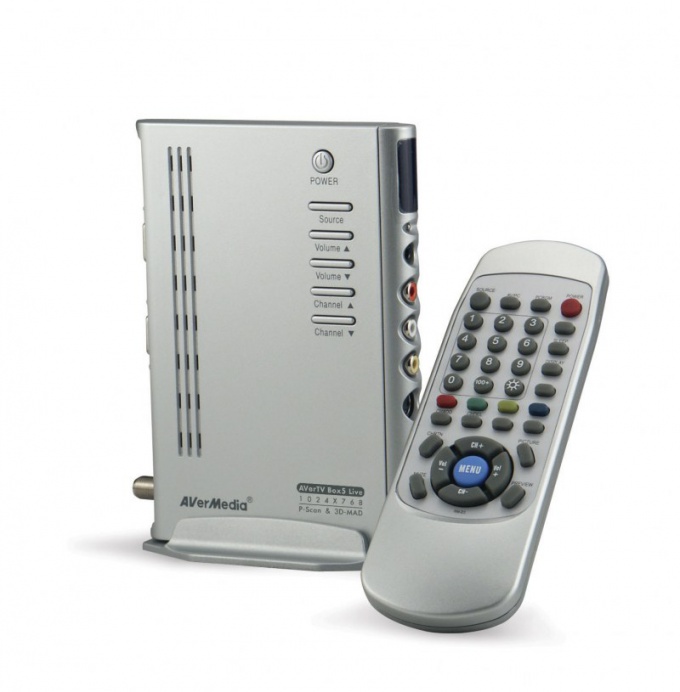
Вам понадобится
- — тюнер AVerTV DVI Box 1080i;
- — ПК;
- — монитор;
- — DVI или VGA кабели.
Инструкция
Изучите внимательно устройство ТВ-тюнера AVerTV DVI Box 1080i. У него имеется две группы разъемов. Первая используется для подключения внешних устройств и состоит из компонентного и композитного видеовхода, S-video входа, а также входа и выхода для звука и наушников. Вторая группа разъемов предназначена для обеспечения работоспособности устройства и состоит из входа для источника питания, звука, телевизионной антенны и DVI-входа, а также DVI-выхода для подключения к дисплею и выхода звука для подключения усилителя или колонок.
Выберите способ подключения ТВ-тюнера AVerTV DVI Box 1080i к компьютеру или монитору. Можно воспользоваться VGA или DVI соединительными кабелями. При этом стоит отметить, что их ни в коем случае нельзя смешивать, иначе это приведет к потере сигнала.
Возьмите DVI-кабель и соедините между собой DVI-выход видеокарты вашего компьютера и DVI-вход ТВ-тюнера для подключения к компьютеру. После этого аналогичным кабелем необходимо соединить DVI-выход тюнера и DVI-вход монитора вашего ПК. После этого можете перейти к непосредственной настройке тюнера.
Воспользуйтесь VGA-подключением тюнера AVerTV DVI Box 1080i, если ваш компьютер оборудован видеокартой, в которой имеется только VGA-выход, при этом монитор должен быть оснащен VGA-входом. В противном случае вы не сможете корректно выполнить подключение и настройку тюнера.
Также стоит отметить, что при таком подключении необходимо приобрести дополнительно переходники VGA-DVI, поскольку они понадобятся для соединения через VGA-кабель DVI-входа и выхода тюнера с VGA-входом и выходом вашего ПК. В остальном соединение аналогично предыдущему способу.
Включите тюнер AVerTV DVI Box 1080i и проверьте его работоспособность. Зайдите в меню «Настройки», укажите требуемые параметры и настройте каналы.
Войти на сайт
или
Забыли пароль?
Еще не зарегистрированы?
This site is protected by reCAPTCHA and the Google Privacy Policy and Terms of Service apply.