

Установка процессорного кулера
Защитное покрытие на нижней части кулера должно быть удалено перед
установкой на процессор.
Внимание: термопаста опасна для человеческого организма. В случае
проглатывании, выпейте много воды и срочно обратитесь за медицинской
помощью. Храните ее в недоступном для детей месте. Избегайте попадания
на кожу и глаза.
Расположите крепежный мост для кулера по центру кулера. Установите
кулер на процессор. Вставьте винты крепежного моста в отверстия
крепежного моста для кулера и попеременно затяните их.
Intel: LGA 2011(-3) square ILM / LGA 2066
Сборка крепежной рамки кулера
Сначала навинтите крепежные гайки Intel A на резьбу рамки сокета.Поместите
кронштейны Intel поверх крепежных гаек Intel и закрутите их крепко с помощью
винтов крепежных кронштейнов. Используйте для этого крестообразную
отвертку.
Введение: Спасибо за выбор в пользу be quiet! Инструкция поможет вам в процессе установки. Если возникнут
трудности при установке, пожалуйста свяжитесь с нашей службой поддержки с помощью электронной почты
(service@bequiet.com). Обратите внимание: be quiet! не несет ответственности за повреждения, возникшие из-за
проблем совместимости.
Гарантия:
• 3 года гарантии от производителя для конечного покупателя (от первоначальной покупки у официального дилера be
quiet!)
• Гарантийный ремонт может быть выполнен только при наличии копии документа о покупке устройства у официального
дилера be quiet!
• Манипуляции и структурные изменения любого рода, а также наличие внешних механических повреждений
автоматически приводит к лишению гарантии
• На продукт распространяются наши стандартные условия гарантии, которые можно посмотреть в интернете на сайте
www.bequiet.com
Listan GmbH
Wilhelm-Bergner-Straße 11c
.
21509 Glinde
.
Germany
Для получения дополнительной информации вы можете связаться с нами по электронной почте:
service@bequiet.com
Наименование Количество
Процессорный кулер
be quiet! Pure Rock 2
1
120мм вентилятор
1
Задняя пластина Intel
1
Кронштейны Intel
2
Кронштейны Intel LGA 1700
2
Крепежный мост для кулера
1
Длинные кронштейны AMD
2
Крепежные гайки Intel A
4
НАБОР АКСЕССУАРОВ
Наименование Количество
Крепежные гайки Intel B
4
Распорные гайки AMD
4
Винты крепежных кронштейнов 4
Винты крепежного моста 2
Винты задней пластины Intel
4
Винты задней пластины AMD
4
Уплотнительные кольца
4
Клипсы для вентилятора
4
2
12
16
Необходимы следующие крепежные элементы:
1x Процессорный кулер be quiet! Pure Rock 2 (1), 1x 120мм вентилятор (2), 2x Кронштейны Intel (4), 1x Крепежный мост для кулера (6), 4x Крепежные гайки Intel A (8),
4x Винты крепежных кронштейнов (11), 2x Винты крепежного моста (12), 2x Клипсы для вентилятора (16)
Закрепите 120мм вентилятор на кулере с помощью клипс для вентилятора.
Подключите вентилятор к PWM разъему материнской платы.
Для демонтажа 120мм вентилятора вытащите клипсы для вентилятора с
отверстий рамки вентилятора.
V1/22
» Product information for this CPU cooler
» Produktinformationen zu diesem CPU-Kühler
» Informations produit pour ce système de refroidissement
» Información del producto para este refrigerador de CPU
» Informacje produktowe dla tego coolera CPU
» Engelstalige productinformatie voor deze processorkoeler
» Produktinformation för den här processorkylaren, på
engelska
» Подробная информация о данном кулере для
процессора
» 此CPU散熱器的產品資訊
» 此CPU散热器的产品信息
» 製品情報CPUクーラー
NL
SE
www.bequiet.com/bk007
» Product information for this CPU cooler
» Produktinformationen zu diesem CPU-Kühler
» Informations produit pour ce système de refroidissement
» Información del producto para este refrigerador de CPU
» Informacje produktowe dla tego coolera CPU
» Engelstalige productinformatie voor deze processorkoeler
» Produktinformation för den här processorkylaren, på
engelska
» Подробная информация о данном кулере для
процессора
» 此CPU散熱器的產品資訊
» 此CPU散热器的产品信息
» 製品情報CPUクーラー
NL
SE
www.bequiet.com/bk006
BlackSilver
3
4
5
6
7
8
9
10
11
13
14
15
Мы рекомендуем демонтировать кулер перед транспортировкой.
!
Смотреть руководство для Be Quiet! Pure Rock 2 ниже. Все руководства на ManualsCat.com могут просматриваться абсолютно бесплатно. Нажав кнопку «Выбор языка» вы можете изменить язык руководства, которое хотите просмотреть.

MANUALSCAT | RU
Вопросы и ответы
У вас есть вопрос о Be Quiet! Pure Rock 2, но вы не можете найти ответ в пользовательском руководстве? Возможно, пользователи ManualsCat.com смогут помочь вам и ответят на ваш вопрос. Заполните форму ниже — и ваш вопрос будет отображаться под руководством для Be Quiet! Pure Rock 2. Пожалуйста, убедитесь, что вы опишите свои трудности с Be Quiet! Pure Rock 2 как можно более детально. Чем более детальным является ваш вопрос, тем более высоки шансы, что другой пользователь быстро ответит на него. Вам будет автоматически отправлено электронное письмо, чтобы проинформировать вас, когда кто-то из пользователей ответит на ваш вопрос.
Задать вопрос о Be Quiet! Pure Rock 2
- Бренд:
- Be Quiet!
- Продукт:
- подставки для ноутбуков с охлаждением
- Модель/название:
- Pure Rock 2
- Тип файла:
- Доступные языки:
- русский, Болгарский
Сопутствующие товары Be Quiet! Pure Rock 2
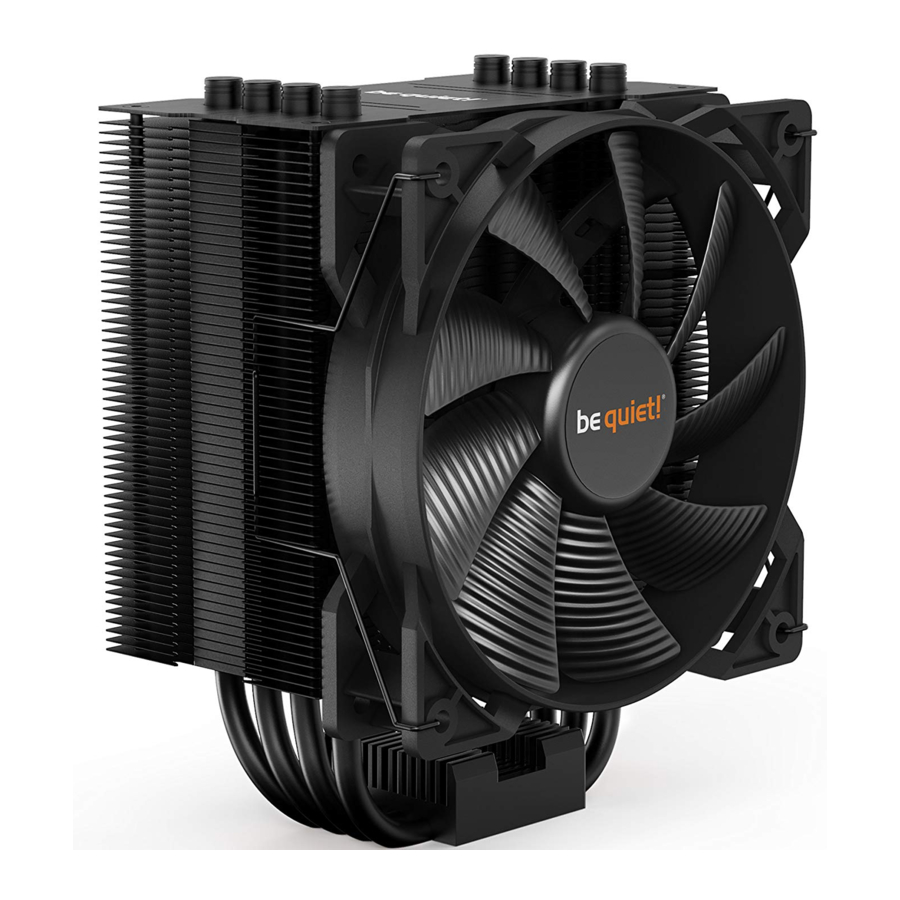
BE QUIET! PURE ROCK 2 — CPU Cooler Manual
Introduction
The following instructions will guide you through the installation process. If you do encounter installation problems, please don’t hesitate to contact our customer services by mailing service@bequiet.com. Please note that be quiet! cannot accept liability for damage caused by compatibility problems.
SCOPE OF DELIVERY
Intel: LGA 2011(-3) square ILM / LGA 2066 installation
The following parts are needed for this:
1x Pure Rock 2 CPU cooler (1), 1x 120mm fan (2), 2x Intel mounting brackets (4), 1x cooler mounting bridge (7), 4x Intel spacer nut A (8), 4x mounting bracket fastening screws (11), 2x mounting bridge fastening screws (12), 2x fan clips (16)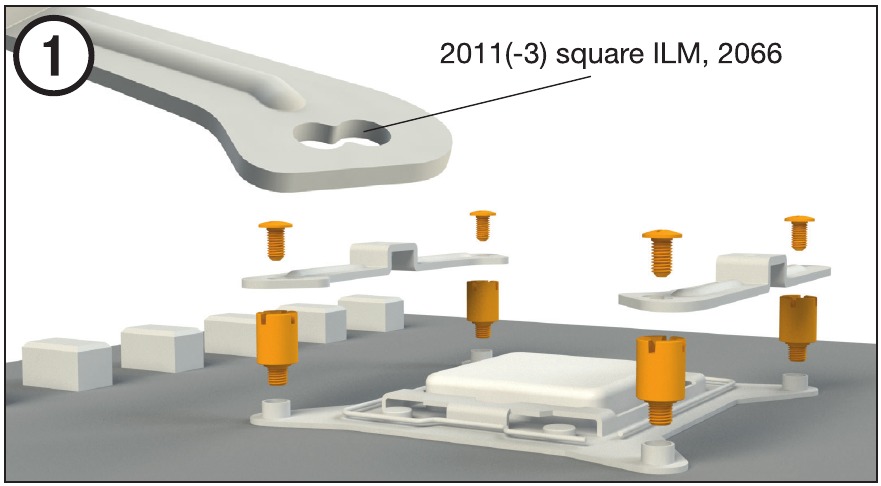
Assembly of the cooler mounting frame
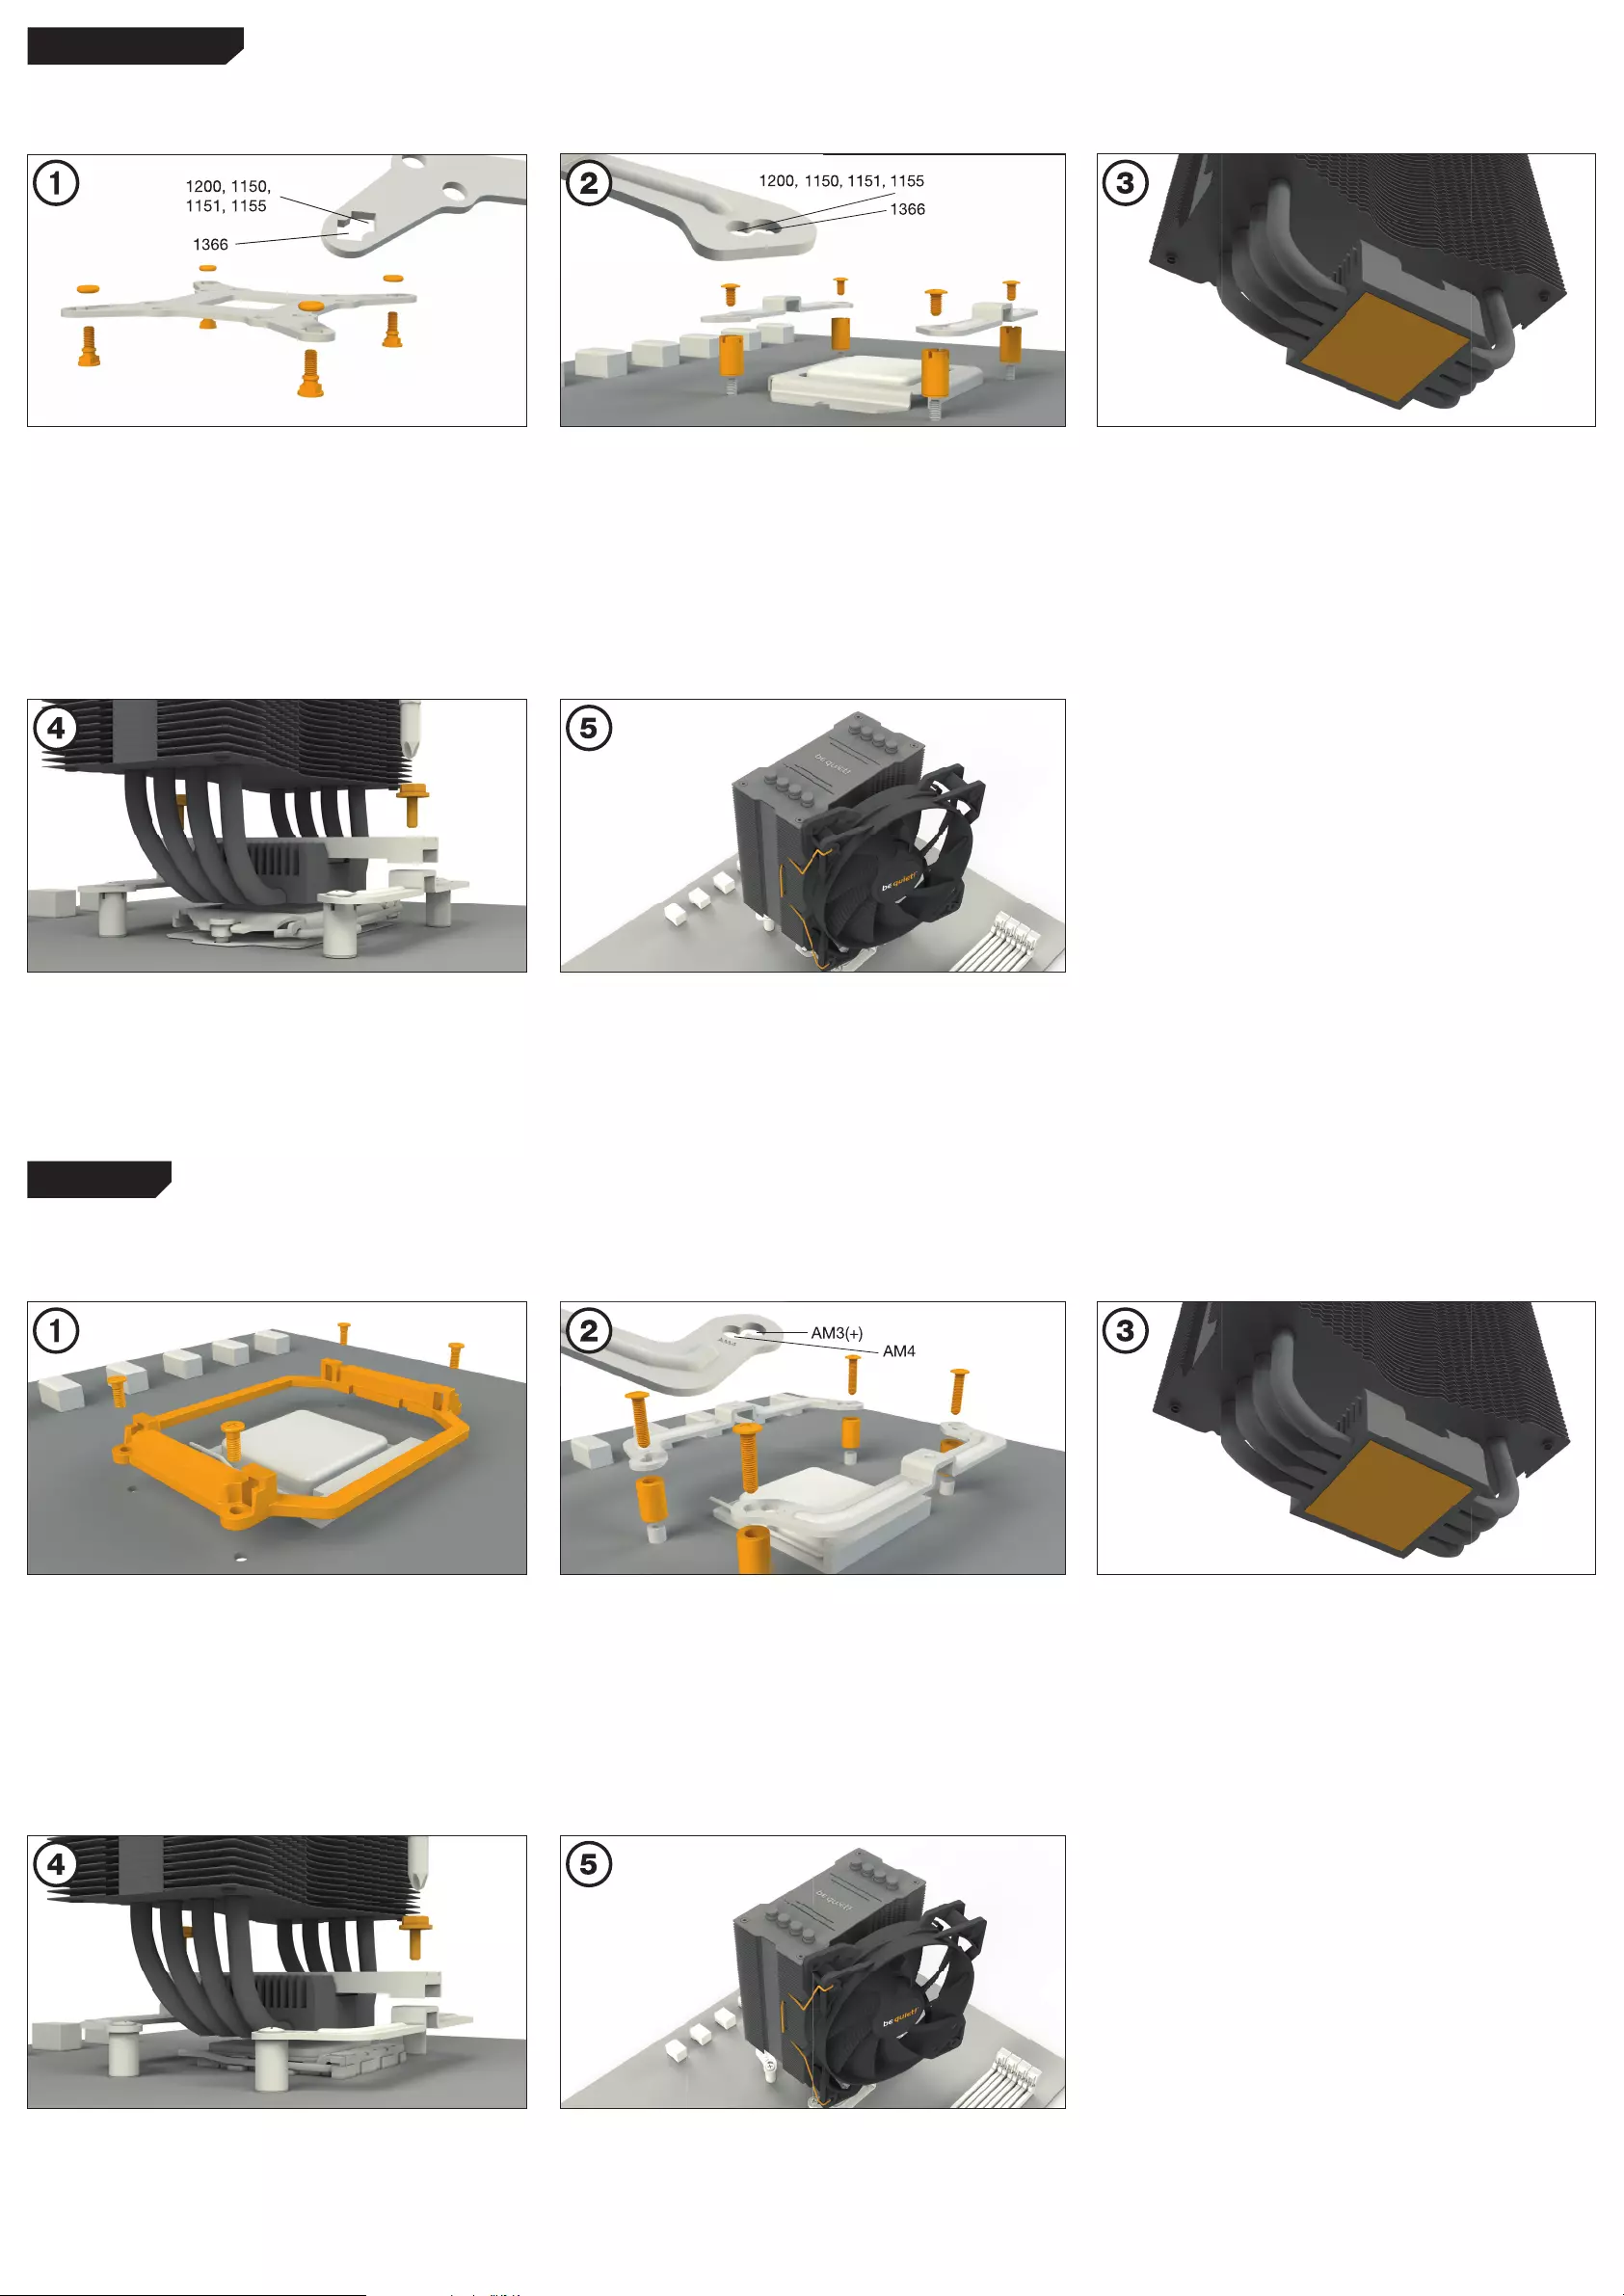
First screw the Intel spacer nut A (8) onto the threads of the socket frame. Place the Intel mounting brackets (4) over the Intel spacer nuts and screw these tight with the mounting bracket fastening screws (11). You can use any cross-tip screwdriver for this.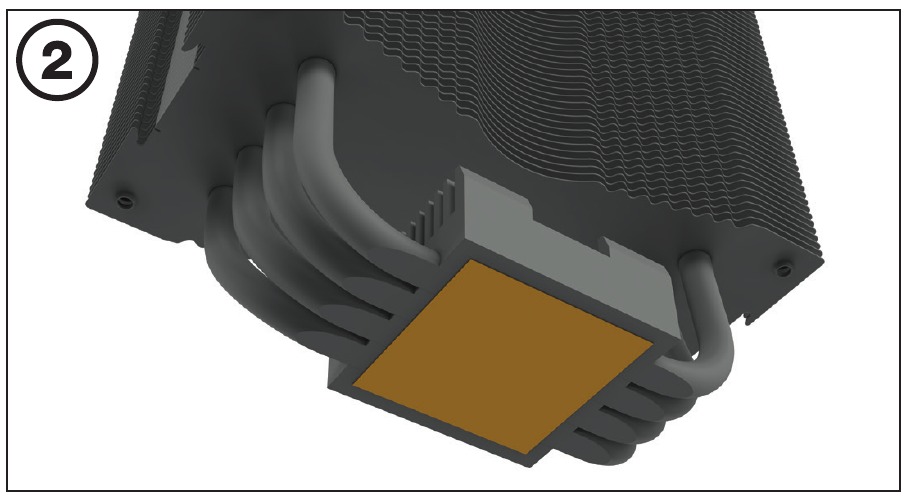
Mounting the CPU cooler
The protective covering on the underneath of the cooler (1) must be removed prior to installation against the CPU.
The preapplied thermal paste is not suitable for human consumption. If swallowed, drink lots of water and urgently seek medical attention. Keep it out of the reach of children. Avoid contact with skin and eyes.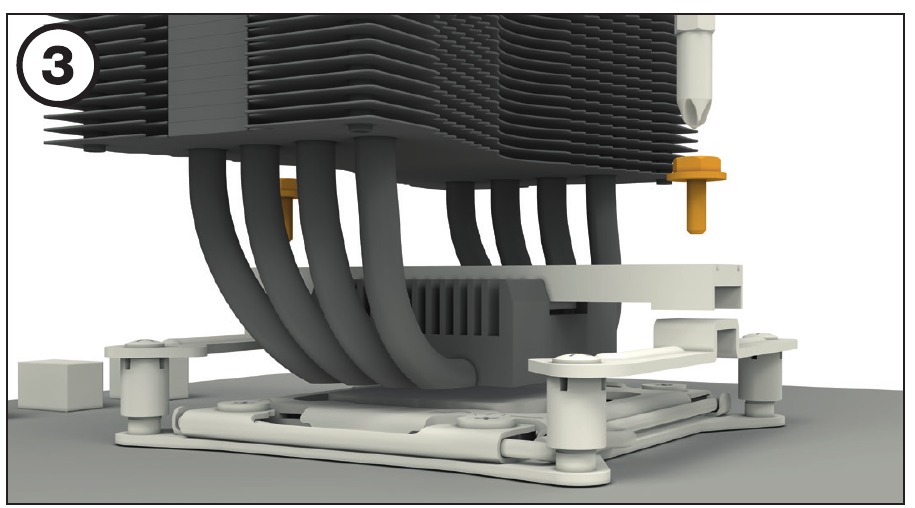
Position the cooler mounting bridge (7) centrally on the cooler (1). Next place the cooler unit (1) onto the CPU. Insert the mounting bridge fastening screws (12) from above into the cooler mounting bridge (7) and then screw these alternately tight. You can use any cross-tip screw-driver for this.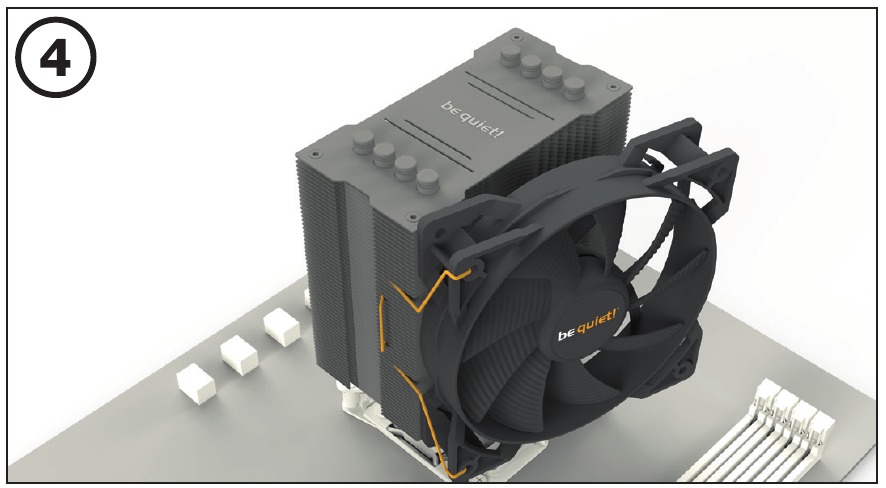
Fasten the 120mm fan (2) onto the cooler unit (1) using fan clips (16). Connect the fan to the motherboard’s PWM signal.
When dismantling the fan (2), push the notches of the fan clips (16) away from the fan.
Intel: LGA 1700 / 1200 / 1150 / 1151 / 1155 installation
The following parts are needed for this:
1x Pure Rock 2 CPU cooler (1), 1x 120mm fan (2), 1x Intel backplate (3), 2x Intel mounting brackets (4), 2x Intel mounting brackets LGA 1700 (5) 1x cooler mounting bridge (6), 4x Intel spacer nut B (9), 4x mounting bracket fastening screws (11), 2x mounting bridge fastening screws (12), 4x Intel backplate screws (13), 4x O-rings (15), 2x fan clips (16)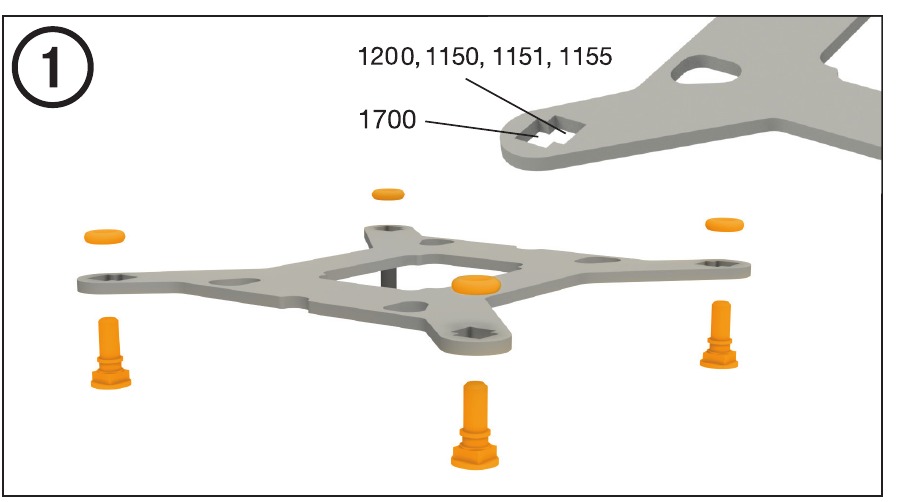
Mounting the backplate
Position the Intel backplate screws (13) in the notches situated on the rear side of the Intel backplate (3). Pay attention in so doing to align with the holes drilled for each socket.
For fixing the backplate screws (13) onto the Intel backplate (3) use the O-rings (15). Once assembly of the Intel back- plate (3) for the respective Intel socket has been completed, position it under the motherboard. In so doing make sure that the backplate screws (13) are precisely located within the motherboard holes.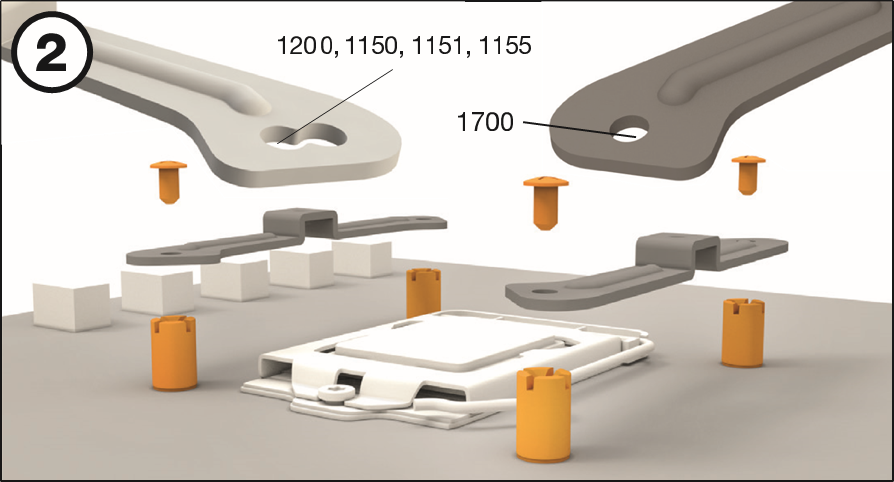
Installation of the mounting brackets
Screw the Intel spacer nut B (9) onto the previously positioned Intel backplate (3). Then position, depending on your socket, the Intel mounting brackets (4) or Intel mounting brackets LGA 1700 (5) over the Intel spacer nut B (9) and affix these with the mounting bracket fastening screws (11). You can use any cross-tip screwdriver for this.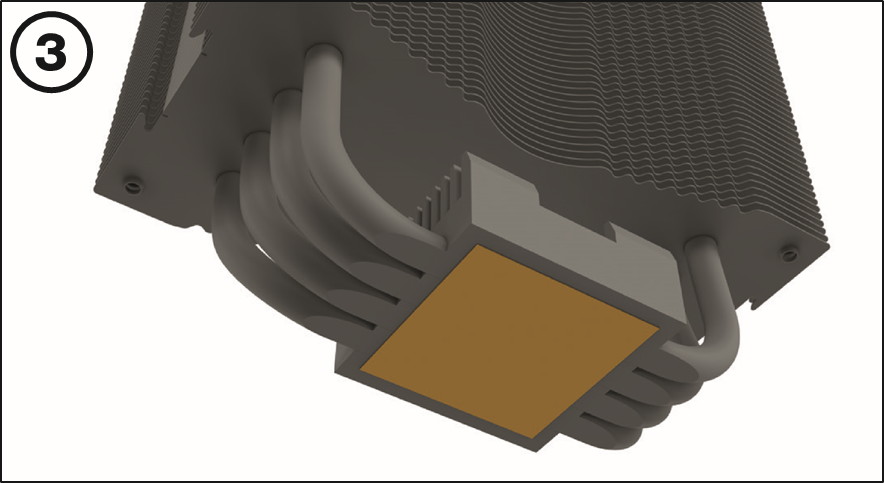
Mounting the CPU cooler
The protective covering on the underneath of the cooler (1) must be removed prior to installation against the CPU.
The preapplied thermal paste is not suitable for human consumption. If swallowed, drink lots of water and urgently seek medical attention. Keep it out of the reach of children. Avoid contact with skin and eyes.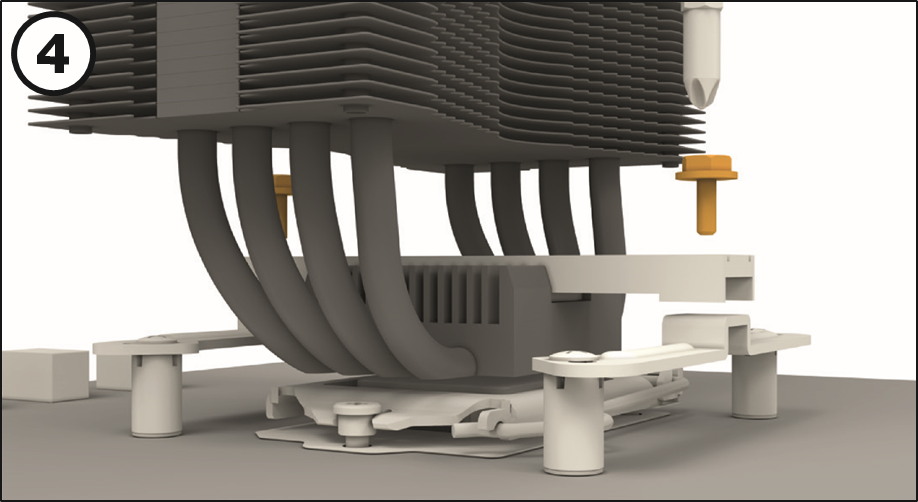
Position the cooler mounting bridge (6) centrally on the cooler (1). Next place the cooler unit (1) onto the CPU. Insert the mounting bridge fastening screws (12) from above into the cooler mounting bridge (6) and then screw these alter- nately tight. You can any cross-tip screwdriver for this.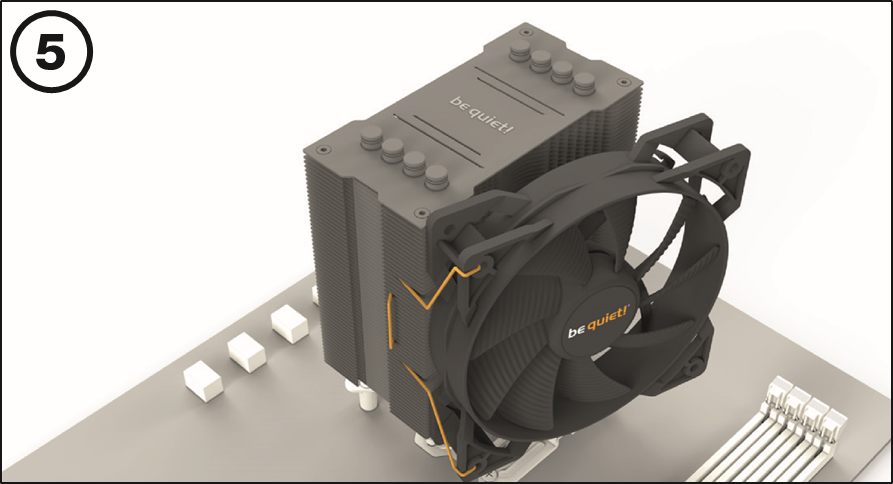
Fasten the 120mm fan (2) onto the cooler unit (1) using fan clips (16). Connect the fan to the motherboard’s PWM signal.
When dismantling the fan (2), push the notches of the fan clips (16) away from the fan.
AMD: AM4 installation
The following parts are needed for this:
1x Pure Rock 2 CPU cooler (1), 1x 120mm fan (2), 2x long AMD mounting brackets (6), 1x cooler mounting bridge (7), 4x AMD spacer nuts (10), 2x mounting bridge fastening screws (12), 4x AMD backplate screws (14), 2x fan clips (16)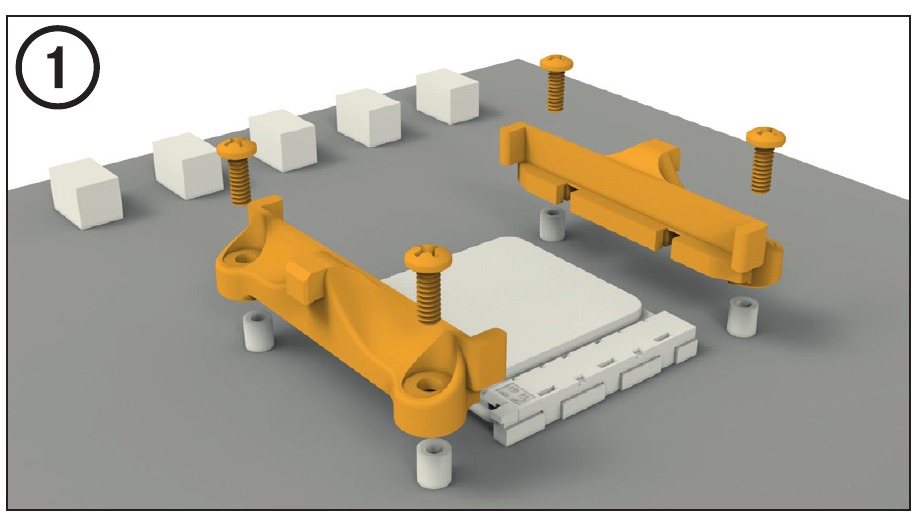
Assembly of the cooler mounting frame
To permit mounting of the cooler (1) please remove both the plastic retainers of the AMD retention module. The factoryfitted backplate affixed to the rear side of the motherboard will be needed for sub-sequent installation of the cooler (1).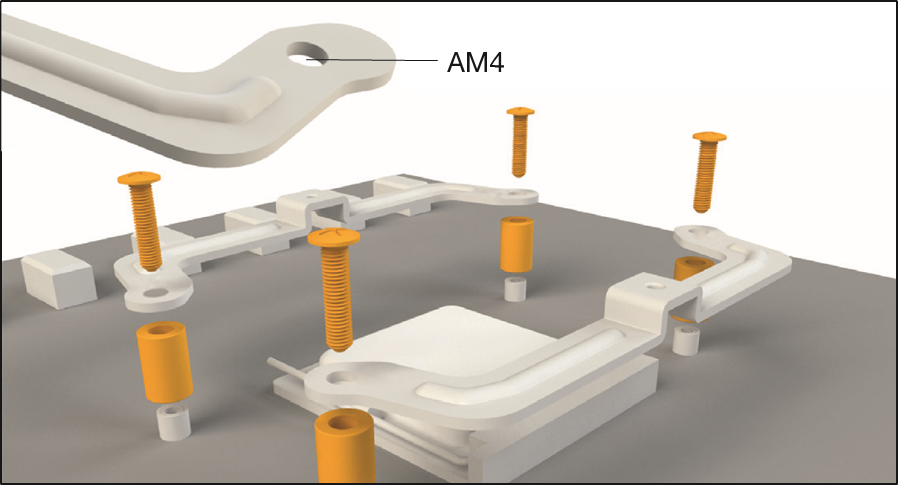
Place the four AMD spacer nuts (10) onto the backplate bolts protruding through the front side and affix both long AMD mounting brackets (6) with the AMD backplate screws (14).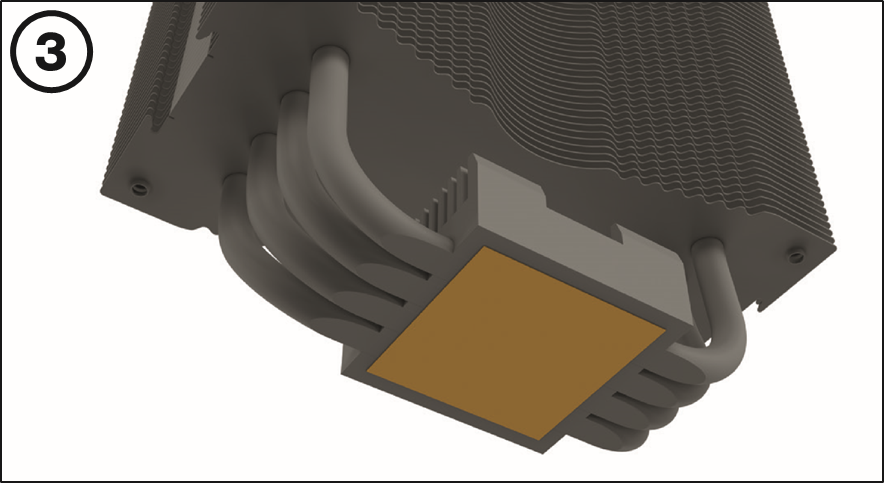
Mounting the CPU cooler
The protective covering on the underneath of the cooler (1) must be removed prior to installation against the CPU.
The preapplied thermal paste is not suitable for human consumption. If swallowed, drink lots of water and urgently seek medical attention. Keep it out of the reach of children. Avoid con- tact with skin and eyes.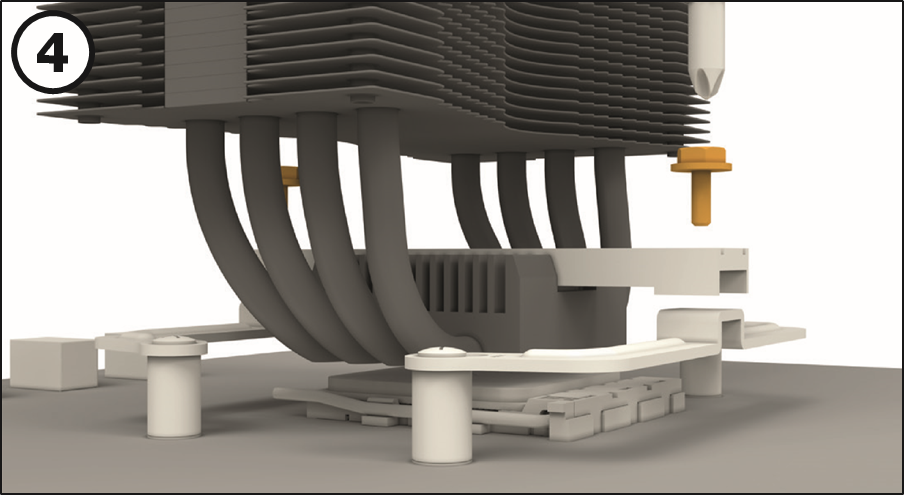
Position the cooler mounting bridge (6) centrally on the cooler (1). Next place the cooler unit (1) onto the CPU. Insert the mounting bridge fastening screws (12) from above into the cooler mounting bridge (6) and then screw these alternatively tight. You can use any cross-tip screwdriver for this.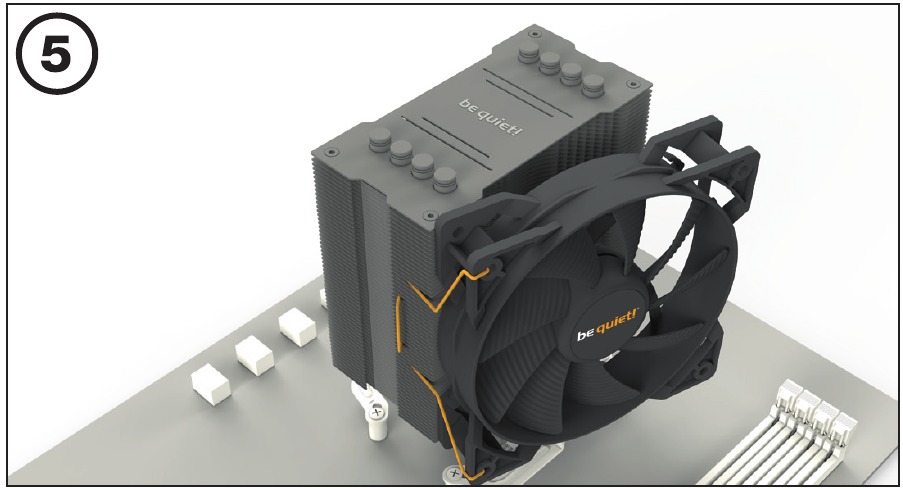
Fasten the 120mm fan (2) onto the cooler unit (1) using fan clips (16). Connect the fan to the motherboard’s PWM signal.
When dismantling the fan (2), push the notches of the fan clips (16) away from the fan.

www.bequiet.com/bk006
Silver

www.bequiet.com/bk007
Black
Warranty
- 3-year manufacturer guarantee for consumers (original purchase from authorized be quiet! dealers only)
- Guarantee work can only be processed with a copy included of the purchase receipt from an authorized be quiet! dealer
- Manipulation and structural changes of any kind, including any damage caused by external mechanical force, will lead to a complete voiding of the guarantee
- Our General Warranty Conditions apply, which can be viewed on bequiet.com
Listan GmbH
Wilhelm-Bergner-Straße 11c. 21509 Glinde. Germany
For further information contact us via e-mail: service@bequiet.comWe recommend preparatory mounting of the cooler outside the PC case for subsequent installation. The cooler should be removed prior to transportation as well.

Documents / Resources
References
Download manual
Here you can download full pdf version of manual, it may contain additional safety instructions, warranty information, FCC rules, etc.
Download BE QUIET! PURE ROCK 2 — CPU Cooler Manual

Mounting the CPU cooler
The protective covering on the under—
neath of the cooler must be removed
prior to installation against the CPU.
Caution: The thermal paste supplied
is not suitable for human consumption.
If swallowed, drink lots of water and
urgently seek medical attention. Keep
it out of the reach of children. Avoid
contact with skin and eyes.
Montage des CPU-Kühlers
Vor der Montage muss zunächst die
Schutzkappe von der Unterseite des
CPU-Kühlers entfernt werden.
Vorsicht: Die mitgelieferte Wärmeleitpaste
ist nicht zum Verzehr geeignet. Bei Ver-
zehr ausreichend Wasser trinken und um-
gehend einen Arzt aufsuchen. Außerhalb
der Reichweite von Kindern aufbewahren.
Vermeiden Sie Haut- und Augenkontakt.
Position the cooler mounting bridge (6)
centrally on the cooler (1). Next place
the cooler unit onto the CPU. Insert the
mounting bridge fastening screws (11)
from above into the cooler mounting
bridge and then screw these alternately
tight. You can use any cross-tip screw-
driver for this.
Legen Sie die Kühler-Montagebrücke
(6) mittig auf den Kühler (1). Anschlie-
ßend platzieren Sie den Kühler auf der
CPU. Stecken Sie die Schrauben der
Kühler-Montagebrücke (11) von oben
auf die Kühler-Montagebrücke (6) und
schrauben Sie diese abwechselnd fest.
Dazu können Sie einen handelsüblichen
Kreuz Schraubendreher verwenden.
Intel LGA 2011(-3) square ILM / LGA 2066
Einleitung: Vielen Dank, dass Sie sich für ein be quiet!
Produkt entschieden haben. Diese Anleitung wird Ihnen beim
Installationsprozess behilfl ich sein. Sollten bei der Installation
Schwierigkeiten auftreten, kontaktieren Sie bitte unseren
Kundenservice unter service@bequiet.com. be quiet! kann
keinerlei Haftung für durch Kompatibilitätsprobleme bedingte
Schäden übernehmen.
Garantie:
• 3 Jahre Herstellergarantie für Endkonsumenten (nur Erst-
erwerb vom autorisierten be quiet! Händler), ab Datum des
Kaufbelegs
• Eine Garantieabwicklung ist nur in Verbindung mit einer
beigefügten Kopie des Kaufbeleges eines autorisierten
be quiet! Händlers möglich
• Manipulationen und bauliche Veränderungen jeglicher
Art, sowie Beschädigungen durch äußere mechanische
Einwirkungen führen zum totalen Garantieverlust
• Es gelten unsere allgemeinen Garantiebestimmungen, die
Sie unter www.bequiet.com im Internet abrufen können
Listan GmbH . Wilhelm-Bergner-Straße 11c . 21509 Glinde
Germany
Für weitere Unterstützung erreichen Sie uns via E-Mail:
service@bequiet.com
Für die Montage des Kühlers empfehlen wir die Installation
außerhalb des Gehäuses. Für einen Transport sollte der Kühler
ausgebaut werden.
!
Assembly of the cooler mounting
frame
First screw the Intel spacer nut A (7) onto
the threads of the socket frame. Place
the Intel mounting brackets (4) over the
Intel spacer nuts and screw these tight
with the mounting bracket fastening
screws (10). You can use any cross-tip
screwdriver for this.
Aufbau des
Kühlerbefestigungsrahmens
Schrauben Sie zuerst die Intel Gewinde-
bolzen A (7) in die Gewinde des Sockel-
rahmens. Platzieren Sie die beiden Intel
Montagebrücken (4) auf den Intel Gewin-
debolzen und schrauben Sie diese mit
den Befestigungsschrauben für die Intel
Montagebrücken (10) fest. Hierfür kön-
nen Sie einen Kreuzschraubenzieher ver—
wenden.
Introduction: Thank you for deciding to purchase a be quiet!
product. The following instructions will guide you through the
installation process. If you do encounter installation problems,
please don’t hesitate to contact our customer services by
mailing service@bequiet.com. Please note that be quiet!
cannot accept liability for damage caused by compatibility
problems.
Warranty:
• 3-year manufacturer guarantee for consumers (original
purchase from authorized be quiet! dealers only)
• Guarantee work can only be processed with a copy
included of the purchase receipt from an authorized be
quiet! dealer
• Manipulation and structural changes of any kind, including
any damage caused by external mechanical force, will lead
to a complete voiding of the guarantee
• Our General Warranty Conditions apply, which can be
viewed on bequiet.com
Listan GmbH . Wilhelm-Bergner-Straße 11c . 21509 Glinde
Germany
For further information contact us via e-mail:
service@bequiet.com
We recommend preparatory mounting of the cooler outside
the PC case for subsequent installation. The cooler should be
removed prior to transportation as well.
!
SCOPE OF DELIVERY / LIEFERUMFANG
Part name Quantity
be quiet! Pure Rock 2
CPU cooler
be quiet! Pure Rock 2
CPU-Kühler
1
120mm fan
120mm Lüfter 1
Intel backplate
Intel Backplate 1
Intel mounting brackets
Intel Montagebrücken 2
Long AMD mounting brackets
Lange AMD Montagebrücken 2
Cooler mounting bridge
Kühler-Montagebrücke 1
Intel spacer nut A
Intel Gewindebolzen A 4
2
3
4
5
6
7
Part name Quantity
Intel spacer nut B
Intel Gewindebolzen B 4
AMD spacer nuts
AMD Abstandsbolzen 4
Mounting bracket fastening
screws
Befestigungsschrauben für
die Montagebrücke
4
Mounting bridge fastening
screws
Schrauben für die Kühler—
Montagebrücke
2
Intel backplate screws
Intel Backplate-Schrauben 4
AMD backplate screws
AMD Backplate-Schrauben 4
O-rings
O-Ringe 4
Fan clips
Lüfterklammern 4
AM3 washers
AM3 Unterlegscheiben 4
8
9
10
11
12
13
14
15
16
The following parts are needed for this:
1x Pure Rock 2 CPU cooler (1), 1x 120mm fan (2), 2x Intel mounting brackets (4), 1x cooler mounting bridge (6), 4x Intel spacer
nut A (7), 4x mounting bracket fastening screws (10), 2x mounting bridge fastening screws (11), 2x fan clips (15)
Es werden folgende Bauteile benötigt:
1x Pure Rock 2 CPU-Kühler (1), 1x 120mm Lüfter (2), 2x Intel Montagebrücken (4),1x Kühler-Montagebrücke (6), 4x Intel Gewinde-
bolzen A (7), 4x Befestigungsschrauben für die Montagebrücke (10), 2x Schrauben für die Kühler-Montagebrücke (11), 2x Lüfter—
klammern (15)
Fasten the 120mm fan (2) onto the cooler
unit (1) using fan clips (15). Connect the
fan to the motherboard’s PWM signal.
When dismantling the fan (2), push the
notches of the fan clips (15) away from
the fan.
Befestigen Sie den 120mm Lüfter (2)
mit Hilfe der Lüfterklammern (15) am
Kühler (1). Anschließend verbinden Sie
den Lüfter mit dem CPU-Lüfteranschluss
des Mainboards.
Zur Demontage des 120mm Lüfters
(2) drücken Sie die Kerben der Lüfter—
klammern (15) vom Lüfter weg.
01/2020
» Product information for this CPU cooler
» Produktinformationen zu diesem CPU-Kühler
» Informations produit pour ce système de refroidissement
» Información del producto para este refrigerador de CPU
» Informacje produktowe dla tego coolera CPU
» Engelstalige productinformatie voor deze processorkoeler
» Produktinformation för den här processorkylaren, på
engelska
» Подробная информация о данном кулере для
процессора
» 此CPU散熱器的產品資訊
» 此CPU散热器的产品信息
» 製品情報CPUクーラー
NL
SE
www.bequiet.com/bk007
» Product information for this CPU cooler
» Produktinformationen zu diesem CPU-Kühler
» Informations produit pour ce système de refroidissement
» Información del producto para este refrigerador de CPU
» Informacje produktowe dla tego coolera CPU
» Engelstalige productinformatie voor deze processorkoeler
» Produktinformation för den här processorkylaren, på
engelska
» Подробная информация о данном кулере для
процессора
» 此CPU散熱器的產品資訊
» 此CPU散热器的产品信息
» 製品情報CPUクーラー
NL
SE
www.bequiet.com/bk006
BlackSilver
Intel LGA 1200 / 1150 / 1151 / 1155
Installation of the mounting
brackets
Screw the Intel spacer nut B (8) onto the
previously positioned Intel backplate
(3). Then position the Intel mounting
brackets (4) over the Intel spacer nut B (8)
and affi x these with the mounting bracket
fastening srews (10). You can use any
cross-tip screw-driver for this.
Fasten the 120mm fan (2) onto the cooler
unit (1) using fan clips (15). Connect the
fan to the motherboard’s PWM signal.
When dismantling the fan (2), push the
notches of the fan clips (15) away from
the fan.
Installation der Montagebrücken
Schrauben Sie die Intel Gewindebolzen B
(8) auf die zuvor platzierte Intel-Back—
plate (3). Dann platzieren Sie die Intel
Montagebrücken (4) auf den Intel Gewinde-
bolzen B, um sie dann mit den Befesti-
gungsschrauben für die Montagebrücke
(10) zu fi xieren. Hierfür können Sie einen
Kreuzschrau-benzieher verwenden.
Befestigung der Backplate
Platzieren Sie die Intel Backplate Schrauben
(12) in die auf der Rückseite der Intel-
Backplate (3) befi ndlichen Aussparungen.
Beachten Sie hierzu die Bohrlöcher für den
jeweiligen Sockel.
Verwenden Sie zur Befestigung der Back-
plate-Schrauben auf der Intel-Backplate
die O-Ringe (14). Sobald die Intel-Back-
plate für den jeweiligen Intel-Sockel zu-
sammengebaut ist, positionieren Sie
es unter dem Mainboard. Achten Sie
dabei darauf, dass die Intel Backplate-
Schrauben (12) genau in den Main-
boardlöchern positioniert sind.
Befestigen Sie den 120mm Lüfter (2)
mit Hilfe der Lüfterklammern (15) am
Kühler (1). Anschließend verbinden Sie
den Lüfter mit dem CPU-Lüfteranschluss
des Mainboards.
Zur Demontage des 120mm Lüfters (2)
drücken Sie die Kerben der Lüfterklam-
mern (15) vom Lüfter weg.
Mounting the CPU cooler
The protective covering on the under—
neath of the cooler must be removed
prior to installation against the CPU.
Caution: The thermal paste supplied
is not suitable for human consumption.
If swallowed, drink lots of water and
urgently seek medical attention. Keep
it out of the reach of children. Avoid
contact with skin and eyes.
Montage des CPU-Kühlers
Vor der Montage muss zunächst die
Schutzkappe von der Unterseite des
CPU-Kühlers entfernt werden.
Vorsicht: Die mitgelieferte Wärmeleit-
paste ist nicht zum Verzehr geeignet.
Bei Verzehr ausreichend Wasser trinken
und umgehend einen Arzt aufsuchen.
Außerhalb der Reichweite von Kindern
aufbewahren. Vermeiden Sie Haut- und
Augenkontakt.
Position the cooler mounting bridge (6)
centrally on the cooler (1). Next place
the cooler unit onto the CPU. Insert the
mounting bridge fastening screws (11)
from above into the cooler mounting
bridge and then screw these alternately
tight. You can any cross-tip screwdriver
for this.
Legen Sie die Kühler-Montagebrücke
(6) mittig auf den Kühler (1). Anschlie-
ßend platzieren Sie den Kühler auf der
CPU. Stecken Sie die Schrauben für die
Kühler-Montagebrücke (11) von oben
auf die Kühler-Montagebrücke (6) und
schrauben Sie diese abwechselnd fest.
Dazu können sie einen handelsüblichen
Kreuz Schraubendreher verwenden.
Place the four AMD spacer nuts (9) onto
the backplate bolts protruding through
the front side and affi x both long AMD
mounting brackets (5) with the AMD
backplate screws (13).
Assembly of the cooler mounting
frame
To permit mounting of the cooler please
remove both the plastic retainers of the
AMD retention module. The factoryfi tted
backplate affi xed to the rear side of the
motherboard will be needed for sub-
sequent installation of the cooler.
Note: To mount the Pure Rock 2 (1) on an
AM3 motherboard, please use the four
AM3 washers (16), placing these below
the backplate bolts protruding through
the front side of the motherboard.
Position the cooler mounting bridge (6)
centrally on the cooler (1). Next place
the cooler unit onto the CPU. Insert
the mounting bridge fastening screws
(11) from above into the cooler moun-
ting bridge and then screw these alter—
natively tight. You can use any cross-tip
screwdriver for this.
Fasten the 120mm fan (2) onto the
cooler unit (1) using fan clips (15).
Connect the fan to the motherboard’s
PWM signal.
When dismantling the fan (2), push the
notches of the fan clips (15) away from
the fan.
Platzieren Sie über die Vorderseite die
vier AMD Abstandsbolzen (9) auf die
Bolzen der Backplate und fi xieren die
beiden langen AMD Montagebrücken (5)
mit Hilfe der AMD Backplate-Schrauben
(13).
Legen Sie die Kühler-Montagebrücke
(6) mittig auf den Kühler (1). Anschlie-
ßend platzieren Sie den Kühler auf der
CPU. Stecken Sie die Schrauben für die
Kühler-Montagebrücke (11) von oben
auf die Kühler-Montagebrücke (6) und
schrauben Sie diese abwechselnd fest.
Dazu können sie einen handelsüblichen
Kreuz-Schraubendreher verwenden
Befestigen Sie den 120mm Lüfter (2) mit
Hilfe der Lüfterklammern (15) am Kühler
(1). Anschließend verbinden Sie den
Lüfter mit dem CPU-Lüfteranschluss
des Mainboards.
Zur Demontage des 120mm Lüfters
(2) drücken Sie die Kerben der Lüfter—
klammern (15) vom Lüfter weg.
Mounting the CPU cooler
The protective covering on the under—
neath of the cooler must be removed
prior to installation against the CPU.
Caution: The thermal paste supplied
is not suitable for human consumption.
If swallowed, drink lots of water and
urgently seek medical attention. Keep it
out of the reach of children. Avoid con-
tact with skin and eyes.
Montage des CPU-Kühlers
Vor der Montage muss zunächst die
Schutzkappe von der Unterseite des
CPU-Kühlers entfernt werden.
Vorsicht: Die mitgelieferte Wärmeleit-
paste ist nicht zum Verzehr geeignet.
Bei Verzehr ausreichend Wasser trinken
und umgehend einen Arzt aufsuchen.
Außerhalb der Reichweite von Kindern
aufbewahren. Vermeiden Sie Haut- und
Augenkontakt.
Aufbau des Kühlerbefestigungs-
rahmens
Bitte entfernen Sie zur Kühlermontage
die beiden Künststoffhalterungen des
AMD-Retentionmoduls. Die werkseitig
auf der Mainboard-Rückseite befestigte
Backplate wird für die weitere Instal-
lation des Kühlers benötigt.
Hinweis: Zur Installation des Pure Rock 2
(1) auf einem AM3 Mainboard nutzen
Sie bitte die vier AM3 Unterlegscheiben
(16) und legen diese auf die Bolzen der
werkseitig montierten Backplate über
die Mainboard Vorderseite.
AMD: AM4 / AM3(+)
The following parts are needed for this:
1x Pure Rock 2 CPU cooler (1), 1x 120mm fan (2), 1x Intel backplate (3), 2x Intel mounting brackets (4), 1x cooler mounting
bridge (6), 4x Intel spacer nut B (8), 4x mounting bracket fastening screws (10), 2x mounting bridge fastening screws (11), 4x Intel
backplate screws (12), 4x O-rings (14), 2x fan clips (15)
Es werden folgende Bauteile benötigt:
1x Pure Rock 2 CPU-Kühler (1), 1x 120mm Lüfter (2), 1x Intel Backplate (3), 2x Intel Montagebrücken (4), 1x Kühler-Montagebrücke (6),
4x Intel Gewindebolzen B (8), 4x Befestigungsschrauben für die Montagebrücke (10), 2x Schrauben für die Kühler-Montagebrücke
(11), 4x Intel Backplate-Schrauben (12), 4x O-Ringe (14), 2x Lüfterklammern (15)
Mounting the backplate
Position the Intel backplate screws (12)
in the notches situated on the rear side
of the Intel backplate (3). Pay attention
in so doing to align with the holes drilled
for each socket.
For fi xing the backplate screws onto
the Intel backplate use the O-rings (14).
Once assembly of the Intel backplate
for the respective Intel socket has been
completed, position it under the mother—
board. In so doing make sure that the
backplate screws are precisely located
within the motherboard holes.
The following parts are needed for this:
1x Pure Rock 2 CPU cooler (1), 1x 120mm fan (2), 2x long AMD mounting brackets (5), 1x cooler mounting bridge (6), 4x AMD
spacer nuts (9), 2x mounting bridge fastening screws (11), 4x AMD backplate screws (13), 2x fan clips (15), 4x AM3 washers (16)
Es werden folgende Bauteile benötigt:
1x Pure Rock 2 CPU-Kühler (1), 1x 120mm Lüfter (2), 2x Lange AMD Montage-brücken (5), 1x Kühler-Montagebrücke (6), 4x AMD
Abstandsbolzen (9), 2x Schrauben für die Kühler-Montagebrücke (11), 4x AMD Backplate-Schrauben (13), 2x Lüfterklammern (15),
4x AM3 Unterlegscheiben (16)

150W TDP
|
IDEAL APPLICATIONS |
HIGHLIGHTS |
|
|
High resolution multimedia systems |
High cooling efficiency |
|
|
Demanding graphics applications |
Quiet Pure Wings 2 120mm PWM fan |
|
|
Advanced gaming |
Available in silver and black color |
|
Quiet and effective cooling
be quiet! Pure Rock 2 is excellent for quiet multimedia and graphics applications, and for anyone who wants a categorybeating price-to-performance ratio.
Highlights »
▪A high 150W TDP cooling efficiency
▪Four high-performance 6mm heat pipes with HDT technology
▪Asymmetrical construction avoids blocking memory slots
▪Pure Wings 2 120mm PWM fan for silent operation of up to 26.8 dB(A)
▪Airflow-optimized fan blades reduce noise-generating turbulence
▪Rifle bearing for a very long lifespan
▪Brushed aluminum finish or elegant black surface
▪Easily installable installation kit can be mounted from atop the motherboard
▪Three-year manufacturer´s warranty
Version: 04/2020
We do not take responsibility for typographical errors. Similar Image.