
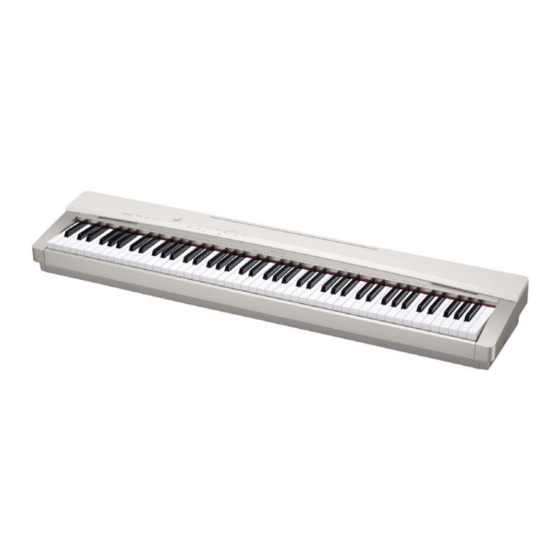
Перед Вами Инструкция — Privia PX-130. Вы можете ознакомиться и скачать данное руководство по эксплуатации бесплатно.
Инструкция по применению на русском языке, предложенная производителем, позволяет
правильно использовать Вашу бытовую технику и электронику.
-
 1
1
-
2
-
3
-
4
-
5
-
6
-
7
-
8
-
9
-
10
-
11
-
12
-
13


-
Contents
-
Table of Contents
-
Troubleshooting
-
Bookmarks
Quick Links
USER’S GUIDE
GUÍA DEL USUARIO
Please keep all information for future reference.
Guarde toda información para tener como referencia futura.
PX130ES1B
Safety Precautions
Before trying to use the piano, be sure to read
the separate «Safety Precautions».
Precauciones de seguridad
Antes de intentar usar el piano, asegúrese de
leer las «Precauciones de seguridad» separadas.
ES
Related Manuals for Casio PRIVIA PX-130
Summary of Contents for Casio PRIVIA PX-130
(скачивание инструкции бесплатно)
Формат файла: PDF
Доступность: Бесплатно как и все руководства на сайте. Без регистрации и SMS.
Дополнительно: Чтение инструкции онлайн

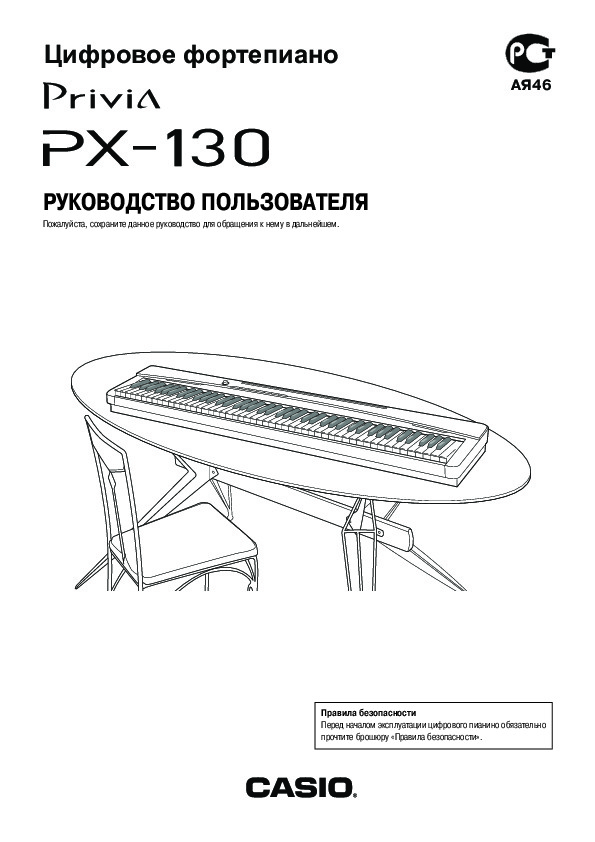
РУКОВОДСТВО ПОЛЬЗОВАТЕЛЯ
Пожалуйста, сохраните данное руководство для обращения к нему в дальнейшем.
Правила безопасности
Перед началом эксплуатации цифрового пианино обязательно
прочтите брошюру «Правила безопасности».
АЯ46
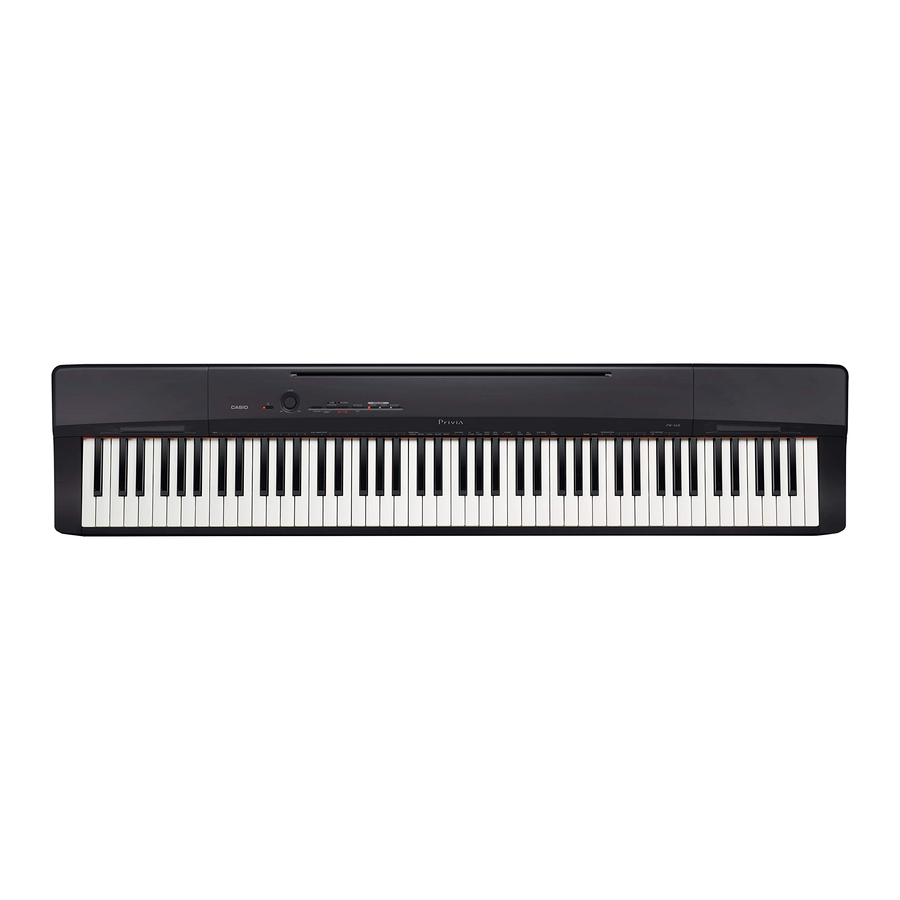
Цифровое фортепиано
Страница:
(1 из 40)
навигация

1

2

3

4

5

6

7

8

9

10

11

12

13

14

15

16

17

18

19

20

21

22

23

24

25

26

27

28

29

30

31

32

33

34

35

36

37

38

39

40
Оглавление инструкции
- Страница 1 из 41
Цифровое фортепиано АЯ46 РУКОВОДСТВО ПОЛЬЗОВАТЕЛЯ Пожалуйста, сохраните данное руководство для обращения к нему в дальнейшем. Правила безопасности Перед началом эксплуатации цифрового пианино обязательно прочтите брошюру «Правила безопасности». - Страница 2 из 41
В ЦЕЛЯХ СНИЖЕНИЯ ОПАСНОСТИ ВОЗГОРАНИЯ ИЛИ ПОРАЖЕНИЯ ЭЛЕКТРИЧЕСКИМ ТОКОМ ПОРУЧАЙТЕ ТЕХНИЧЕСКОЕ ОБСЛУЖИВАНИЕ УСТРОЙСТВА ТОЛЬКО КВАЛИФИЦИРОВАННОМУ СЕРВИСНОМУ ПЕРСОНАЛУ. ВАЖНЫЕ ПРАВИЛА БЕЗОПАСНОСТИ 1. 2. 3. 4. 5. 6. 7. 8. 9. Прочтите данное руководство. Сохраните данное руководство. Обращайте особое - Страница 3 из 41
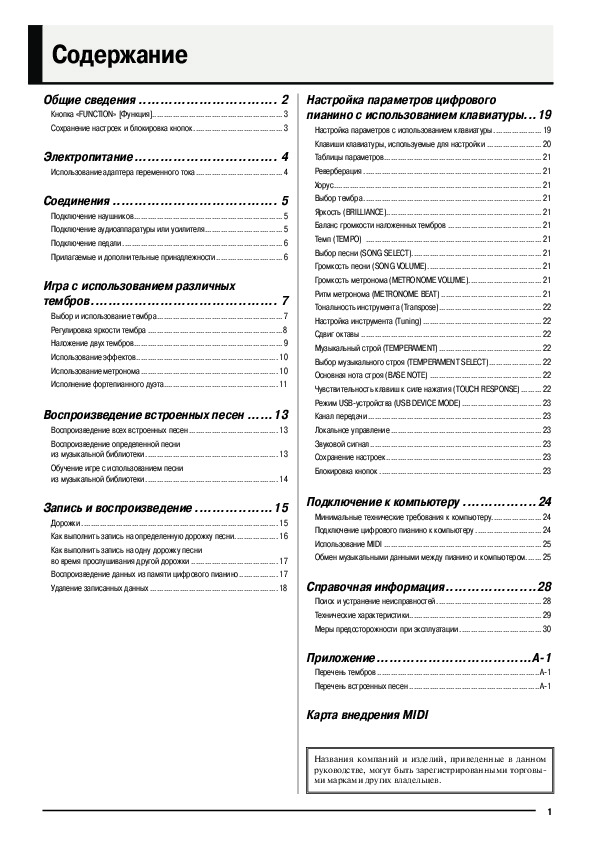
Содержание Общие сведения ………………………….. 2 Кнопка «FUNCTION» [Функция]………………………………………………… 3 Настройка параметров цифрового пианино с использованием клавиатуры…19 Сохранение настроек и блокировка кнопок ………………………………… - Страница 4 из 41
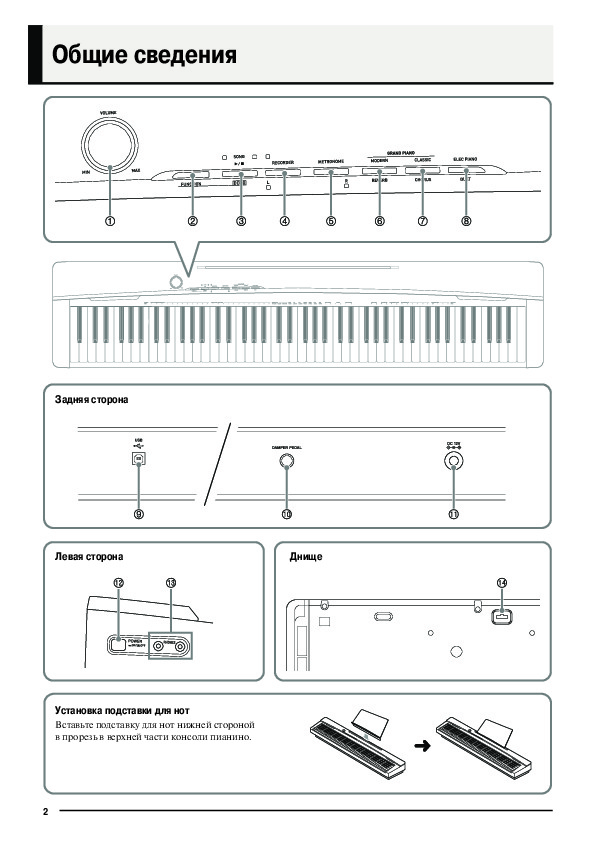
Общие сведения Задняя сторона Левая сторона Установка подставки для нот Вставьте подставку для нот нижней стороной в прорезь в верхней части консоли пианино. 2 Днище - Страница 5 из 41
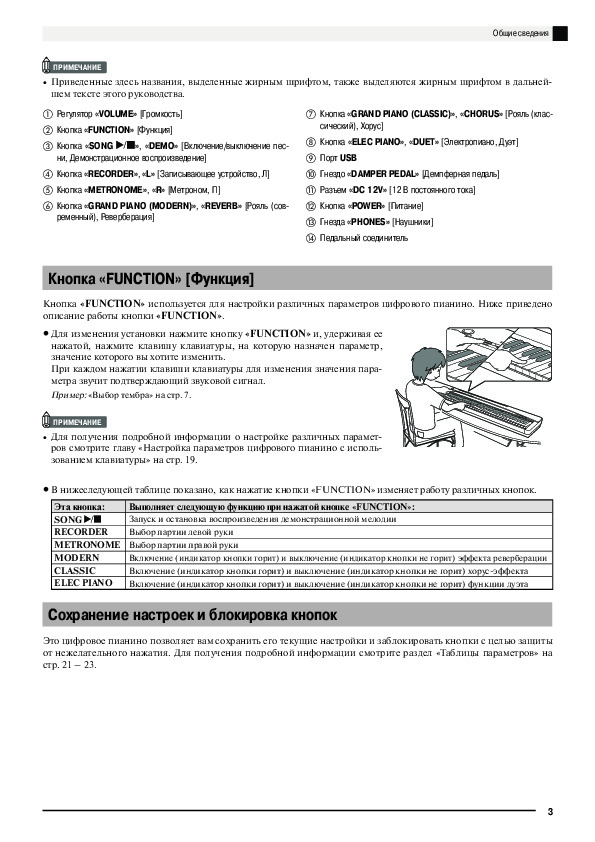
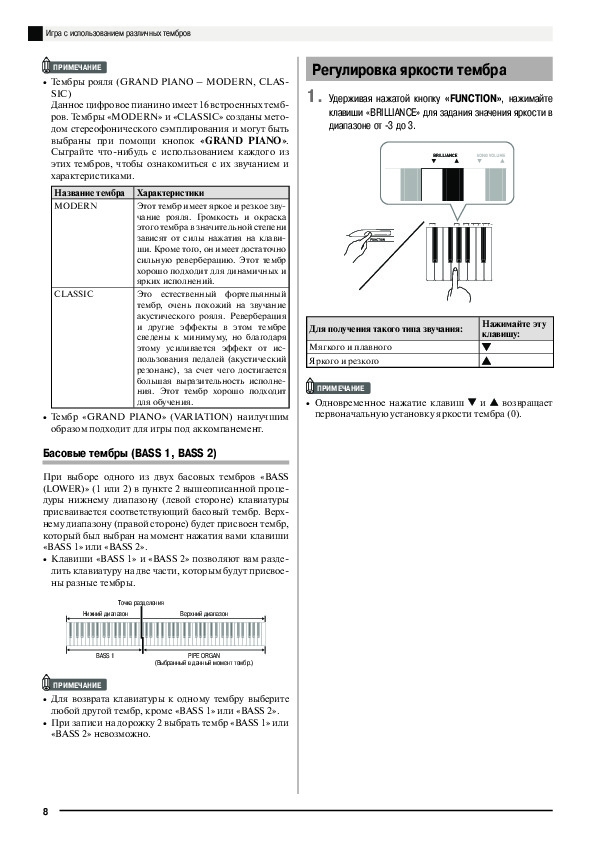
Общие сведения ПРИМЕЧАНИЕ • Приведенные здесь названия, выделенные жирным шрифтом, также выделяются жирным шрифтом в дальнейшем тексте этого руководства. ቢ Регулятор «VOLUME» [Громкость] ባ Кнопка «FUNCTION» [Функция] ቨ Кнопка «GRAND PIANO (CLASSIC)», «CHORUS» [Рояль (классический), Хорус] », «DEMO» - Страница 6 из 41
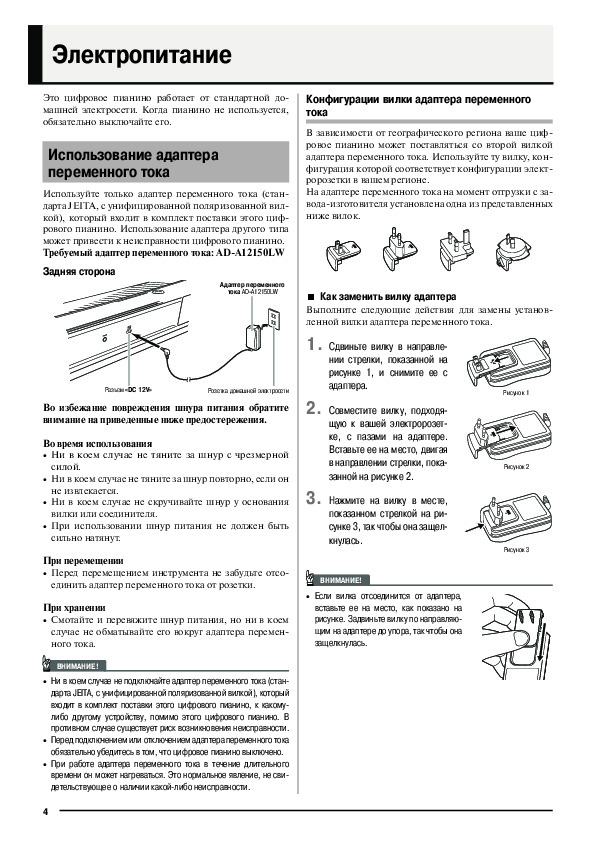
Электропитание Это цифровое пианино работает от стандартной домашней электросети. Когда пианино не используется, обязательно выключайте его. Использование адаптера переменного тока Используйте только адаптер переменного тока (стандарта JEITA, с унифицированной поляризованной вилкой), который входит - Страница 7 из 41
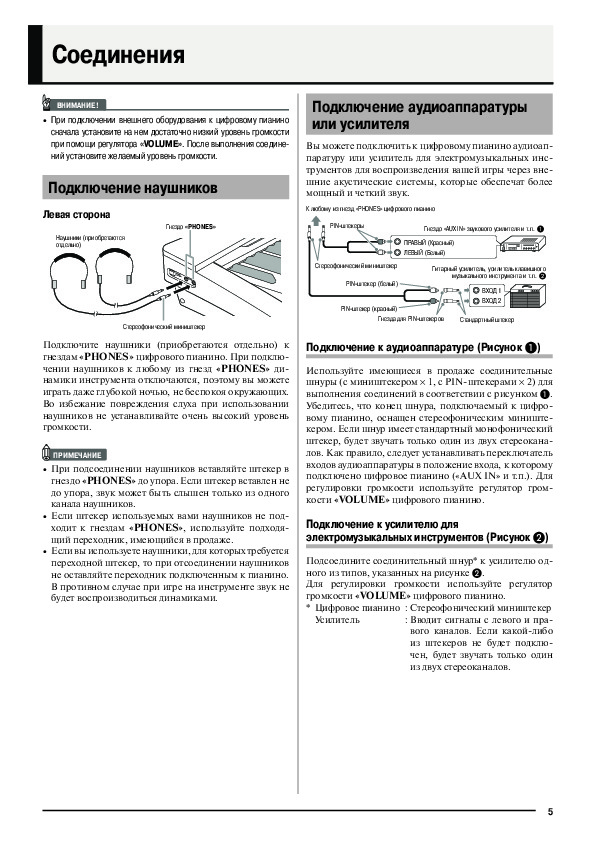
Соединения ВНИМАНИЕ! • При подключении внешнего оборудования к цифровому пианино сначала установите на нем достаточно низкий уровень громкости при помощи регулятора «VOLUME». После выполнения соединений установите желаемый уровень громкости. Подключение наушников Подключение аудиоаппаратуры или - Страница 8 из 41
Соединения Gen Функции педалей SP-32 Подключение педали • Демпферная педаль При подключении прилагаемой педали (SP-3) к гнезду «DAMPER PEDAL» вы можете использовать ее в качестве демпферной педали. Нажатие этой педали во время игры вызывает длительную реверберацию исполняемых нот. • При - Страница 9 из 41
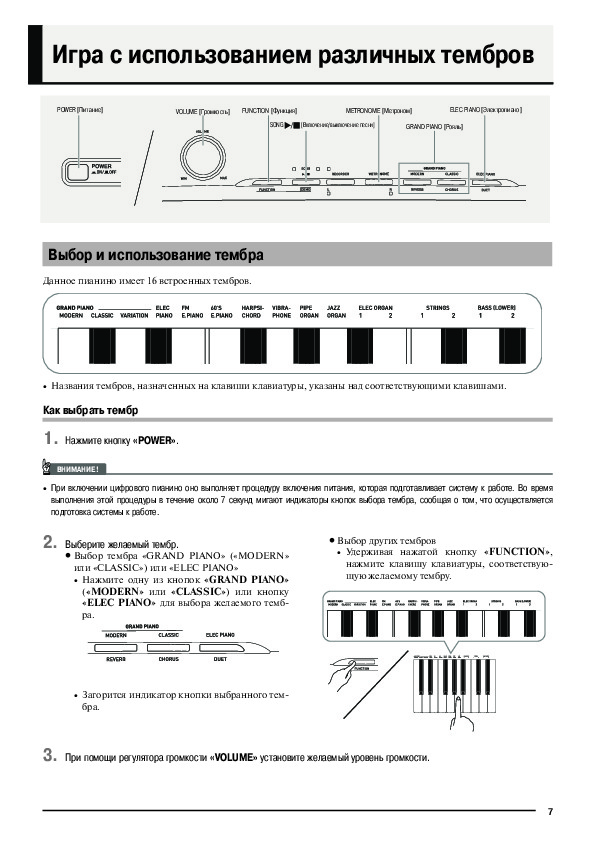
Игра с использованием различных тембров POWER [Питание] VOLUME [Громкость] FUNCTION [Функция] SONG METRONOME [Метроном] [Включение/выключение песни] ELEC PIANO [Электропиано] GRAND PIANO [Рояль] Выбор и использование тембра Данное пианино имеет 16 встроенных тембров. • Названия тембров, назначенных - Страница 10 из 41
Игра с использованием различных тембров Регулировка яркости тембра ПРИМЕЧАНИЕ • Тембры рояля (GRAND PIANO – MODERN, CLASSIC) Данное цифровое пианино имеет 16 встроенных тембров. Тембры «MODERN» и «CLASSIC» созданы методом стереофонического сэмплирования и могут быть выбраны при помощи кнопок «GRAND - Страница 11 из 41
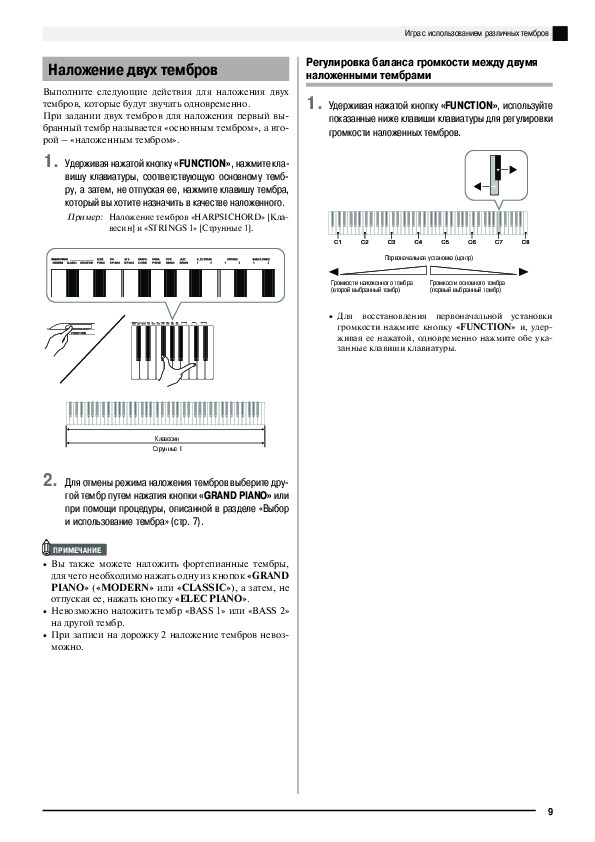
Игра с использованием различных тембров Наложение двух тембров Выполните следующие действия для наложения двух тембров, которые будут звучать одновременно. При задании двух тембров для наложения первый выбранный тембр называется «основным тембром», а второй – «наложенным тембром». 1. Регулировка - Страница 12 из 41
Игра с использованием различных тембров Использование эффектов Реверберация Хорус : Заставляет звуки резонировать. : Добавляет звучанию широту. Включение и выключение эффекта реверберации 1. Удерживая нажатой кнопку «FUNCTION», нажмите кнопку «MODERN» для включения (индикатор горит) или выключения - Страница 13 из 41
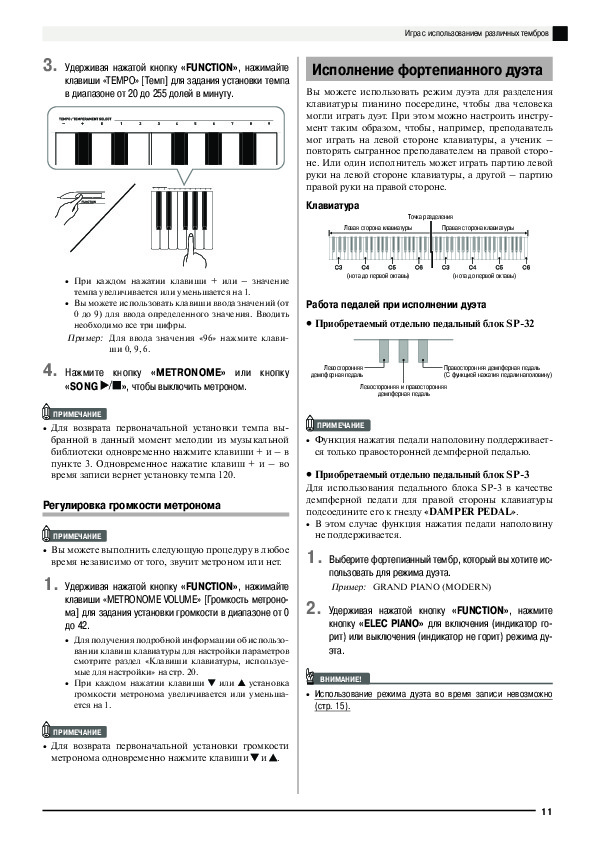
Игра с использованием различных тембров 3. Удерживая нажатой кнопку «FUNCTION», нажимайте клавиши «TEMPO» [Темп] для задания установки темпа в диапазоне от 20 до 255 долей в минуту. Исполнение фортепианного дуэта Вы можете использовать режим дуэта для разделения клавиатуры пианино посередине, чтобы - Страница 14 из 41
Игра с использованием различных тембров Изменение октав клавиатуры в режиме дуэта Вы можете изменить первоначальные диапазоны левой и правой сторон клавиатуры. Это удобно, например, в случае, если первоначальный диапазон недостаточен, когда один человек играет партию левой руки, а второй – партию - Страница 15 из 41
Воспроизведение встроенных песен FUNCTION [Функция] RECORDER [Записывающее устройство] SONG [Включение/ выключение песни] Ваше цифровое пианино имеет музыкальную библиотеку, включающую 60 встроенных песен. Вы можете последовательно воспроизвести все 60. ВНИМАНИЕ! • После выбора встроенной песни - Страница 16 из 41
Воспроизведение встроенных песен 3. Нажмите кнопку «SONG ». Обучение игре с использованием песни из музыкальной библиотеки • При этом начнется воспроизведение песни. 4. Для остановки воспроизведения еще раз нажмите кнопку «SONG ». • При достижении конца песни воспроизведение оста- новится - Страница 17 из 41
Запись и воспроизведение FUNCTION [Функция] RECORDER [Записывающее устройство] SONG Включение/ выключение песни] Вы можете сохранить исполняемые вами ноты в памяти цифрового пианино для последующего воспроизведения. Дорожки Дорожка содержит записанные данные. Каждая песня состоит из двух дорожек: - Страница 18 из 41
Запись и воспроизведение Как выполнить запись на определенную дорожку песни После записи на любую из дорожек песни вы можете выполнить запись на другую дорожку одновременно с воспроизведением данных первой дорожки. 1. 4. • Запись начнется автоматически. 5. ER» и индикаторные лампы дорожки, на - Страница 19 из 41
Запись и воспроизведение Как выполнить запись на одну дорожку песни во время прослушивания другой дорожки Воспроизведение данных из памяти цифрового пианино 1. 1. Нажмите кнопку «RECORDER», чтобы загорелась ее индикаторная лампа. 2. Удерживая нажатой кнопку «FUNCTION», нажмите кнопку «RECORDER (L)» - Страница 20 из 41
Запись и воспроизведение Удаление записанных данных Ниже описана процедура удаления данных с определенной дорожки песни. ВНИМАНИЕ! • Описанная ниже процедура позволяет удалить все данные выбранной дорожки. Учтите, что операцию удаления невозможно отменить. Перед выполнением нижеследующих действий - Страница 21 из 41
Настройка параметров цифрового пианино с использованием клавиатуры FUNCTION [Функция] Помимо выбора тембров и мелодий из музыкальной библиотеки, вы можете использовать кнопку «FUNCTION» в сочетании с клавишами клавиатуры для настройки различных параметров цифрового пианино, таких как эффекты, - Страница 22 из 41
Настройка параметров цифрового пианино с использованием клавиатуры Клавиши клавиатуры, используемые для настройки • Номера с ቢ по 21 соответствуют номерам в разделе «Таблицы параметров» на стр. 21 – 23. [Левая часть клавиатуры] ቢ Реверберация ባ Хорус ቤ Тональность инструмента (Transpose) ብ - Страница 23 из 41
Настройка параметров цифрового пианино с использованием клавиатуры Таблицы параметров Тембры Параметр Тип операции (стр. 19) Установки Описание ቢ Реверберация От 1 до 4 По умолчанию: 2 А Задает установку эффекта реверберации нот. (стр. 10) ባ Хорус От 1 до 4 По умолчанию: 2 А Управляет широтой - Страница 24 из 41
Настройка параметров цифрового пианино с использованием клавиатуры Клавиатура Параметр Установки Тип операции (стр. 19) Описание Примечания ቤ Тональность инсОт -12 до 0 до 12 B трумента (Transpose) По умолчанию: 0 • Установка транспонирования не Повышает или поможет быть изменена во время воснижает - Страница 25 из 41
Настройка параметров цифрового пианино с использованием клавиатуры MIDI и другие параметры Тип операции (стр. 19) Параметр Установки ቱ Режим USB-устройства (USB DEVICE MODE) MIDI, Хранение По умолчанию: MIDI — Цифровое пианино вхо- • Когда выбрана установка хранения, индикаторы кнопок «GRAND PIAдит - Страница 26 из 41
Подключение к компьютеру Вы можете подключить цифровое пианино к компьютеру и осуществлять обмен MIDI-данными между ними. Вы можете передавать данные с цифрового пианино на программное обеспечение для работы с музыкальными данными, работающее на вашем компьютере, или передавать MIDI-данные с - Страница 27 из 41
Подключение к компьютеру Использование MIDI 2. Переключите цифровое пианино из режима USB-устройства в режим хранения. Что такое MIDI? MIDI (Musical Instrument Digital Interface – Цифровой интерфейс музыкальных инструментов) – это международный стандарт для цифровых сигналов и соединительных - Страница 28 из 41
Подключение к компьютеру 4. Как отобразить расширения имен файлов в Windows Vista Дважды щелкните по иконке «PIANO». • «PIANO» содержит папки с именами «MUSICLIB» и «RECORDER». Используйте папку «MUSICLIB» для загрузки песни в память пользовательской песни инструмента (Музыкальная библиотека 61), а - Страница 29 из 41
Подключение к компьютеру 5. После завершения операции копирования файла переключите инструмент с режима USB-устройства в режим MIDI. • Если вы используете компьютер Macintosh, выпол- ните операцию удаления (перетащите данные в корзину). • Удерживая нажатой кнопку «FUNCTION», нажмите требуемую - Страница 30 из 41
Справочная информация Поиск и устранение неисправностей Проблема Причина Действие Страница Нет звука при нажатии клавиш 1. Регулятор громкости «VOLUME» установлен на 1. Поверните регулятор громкости «VOLUME» в наклавиатуры. значение «MIN» [Минимум]. правлении отметки «MAX» [Максимум]. 7 2. К одному - Страница 31 из 41
Справочная информация Технические характеристики Модель PX-130BK/PX-130WE Клавиатура 88 фортепьянных клавиш с функцией чувствительности к силе нажатия Максимальная полифония 128 нот Тембры 16 • Функция наложения тембров (кроме басовых тембров) • Функция разделения клавиатуры (только для басовых - Страница 32 из 41
Справочная информация Меры предосторожности при эксплуатации Обязательно прочтите и соблюдайте следующие меры предосторожности. Размещение инструмента Не размещайте инструмент в следующих местах: • в местах, подверженных воздействию прямых солнечных лучей и высокой влажности; • в местах, - Страница 33 из 41
Справочная информация Меры предосторожности при обращении с адаптером переменного тока Модель: AD-A12150LW 1. Прочтите данное руководство. 2. Сохраните данное руководство. 3. Обращайте особое внимание на предупреждения. 4. Следуйте всем указаниям. 5. Не используйте данное устройство вблизи воды. 6. - Страница 34 из 41
- Страница 35 из 41
Приложение Перечень тембров Название тембра Смена программы Перечень встроенных песен Старший бит выбора банка № Название песни A-1 - Страница 36 из 41
Карта внедрения MIDI Модель PX-130 Функция Версия: 1.0 Передаваемые Распознаваемые Basic Channel [Основной канал] По умолчанию Измененный 1 – 16 1 – 16 1 – 16 1 – 16 Mode [Режим] По умолчанию Сообщения Измененный Режим 3 Х Режим 3 Х ******* ******* Note Number [Номер ноты] True Voice [Реальный - Страница 37 из 41
- Страница 38 из 41
- Страница 39 из 41
- Страница 40 из 41
- Страница 41 из 41
- Manuals
- Brands
- Casio Manuals
- Electronic Keyboard
- PRIVIA PX-130
- Service manual & parts manual
-
Contents
-
Table of Contents
-
Bookmarks
Quick Links
(without price)
PX-130
JUL. 2009
PX-130WE
ELECTRONIC KEYBOARD
INDEX
Ver. 5 : Jan. 2011
Related Manuals for Casio PX-130
Summary of Contents for Casio PX-130
-
Page 1
(without price) PX-130 JUL. 2009 PX-130WE ELECTRONIC KEYBOARD INDEX Ver. 5 : Jan. 2011… -
Page 2: Table Of Contents
CONTENTS SPECIFICATIONS ……………………1 BLOCK AND WIRING DIAGRAM ……………….. 2 PCB LAYOUT ……………………… 3 CIRCUIT DESCRIPTION ………………….4 PRINTED CIRCUIT BOARDS ………………..6 DISASSEMBLY ……………………11 DIAGNOSTIC PROGRAM …………………. EXPLODED VIEW ……………………PARTS LIST ……………………..SCHEMATIC DIAGRAMS …………………..
-
Page 3: Specifications
sPECIfICATIONs Keyboard 88-key piano keyboard, with Touch Response Maximum Polyphony 128 notes Tones Layer (excluding bass tones) Split (Low-range bass tones only) Effects Brilliance (–3 to 0 to 3), Reverb (4 types), Chorus (4 types), DSP, Acoustic Resonance Metronome Beats: 0, 2, 3, 4, 5, 6 Tempo Range: 20 to 255 Duet Adjustable tone range (−1 to 2 octaves)
-
Page 4: Block And Wiring Diagram
BLOCK AND WIRING DIAGRAM KEYBORAD PCB KEYBORAD PCB KEYBORAD PCB KEYBORAD PCB (MACP-KYB2) (MACP-KYA1) (MACP-KYC1) (MACP-KYC2) CN803 (14 pin) CN601 (14 pin) CN601 (12 pin) CN602 (12 pin) KEYBORAD PCB CN602 (14 pin) CN801 (12 pin) CN803 (12 pin) (MACP-KYA2) KEYBORAD PCB CN603 (20 pin) CN802 (20 pin)
-
Page 5: Pcb Layout
PCB LAYOUT M900-CNA2 M900-CNA1 M900-PSA1 M900-MDA1 MACP-KYA1 MACP-KYA2 MACP-KYB1 MACP-KYB2 MACP-KYC1 MACP-KYD1 MACP-KYC2 MACP-KYC1, MACP-KYD1, Left side MACP-KYC2 MACP-KYA1, MACP-KYA2, MACP-KYB1, MACP-KYB2 M900-HPA1 PCBs Components Main PCB M900-MDA1 MPU, Reset IC, SDRAM (256 Mbit), Flash Memory (256 Mbit), PSRAM (32 Mbit), Power Supply Circuit, Key Controller, USB Port Sub PCB M900-PSA1 DC 12 V Terminal, Power Supply Circuit, Filter, Power Amplifier,…
-
Page 6: Circuit Description
CIRCUIT DEsCRIPTION KEY MATRIX …
-
Page 7
NOMENCLATURE Of KEYs F#3G#3 A#3 C#4D#4 F#4G#4A#4 C#5D#5 F#5G#5A#5 A0 B0 C1 D1 E1 F1 G1 A1 B1 C2 D2 E2 F2 G2 A2 B2 C3 D3 E3 F3 G3 A3 B3 C4 D4 E4 F4 G4 A4 B4 C5 D5 E5 F5 G5 A5 B5 C6 BUTTON MATRIX FUNCTION METRONOME (R) -
Page 8: Printed Circuit Boards
PRINTED CIRCUIT BOARDs Main PCB M900-MDA1 sub PCB M900-PsA1 Top View Top View Bottom View Bottom View Jack PCB M900-hPA1 Top View Bottom View – 6 –…
-
Page 9
Console PCB M900-CNA1 Volume PCB M900-CNA2 Top View Top View Bottom View Bottom View KEYBOARD PCB MACP-KYA1 Top View Bottom View – 7 –… -
Page 10
KEYBOARD PCB MACP-KYA2 Top View Bottom View KEYBOARD PCB MACP-KYB1 – 8 –… -
Page 11
KEYBOARD PCB MACP-KYB2 Top View Bottom View KEYBOARD PCB MACP-KYC1 – 9 –… -
Page 12
KEYBOARD PCB MACP-KYC2 Top View Bottom View KEYBOARD PCB MACP-KYD1 Top View Bottom View – 10 –… -
Page 13: Disassembly
DIsAssEMBLY The photos show a prototype. The appearance of the instrument, such as color, may differ from the actual model. Removing the main panel „ Remove 16 screws and eight L-COVERs on the bottom surface of the main unit. L-COVER You will see a screw inside when you remove an L-COVER.
-
Page 14
Place the main unit with the keys facing up. Undo three screws on the right side case. Remove the right side case. Right side case Undo three screws on the left side case. Remove the left side case. NOTE: The power switch and the M900-HPA1 PCB are assembled to the left side case. Do not pull the left side case forcibly. -
Page 15
Remove the main panel. – 13 –… -
Page 16
Removing the main PCB (M900-MDA1) „ Release the lock and remove two FFCs. Remove two connectors. Remove the pedal connector connected to the lower case. FFC (Keyboard) FFC (Keyboard) Pedal connector Connector (M900-CNA1) Connector (M900-PSA1) Remove the screw below the USB jack on the back of the main unit. Remove five screws and then the main PCB (M900-MDA1). -
Page 17
Removing the sub PCB (M900-PsA1) „ Remove four connectors. Unsolder the FFC connected to the M900-CNB2 PCB shown on the top right. Connector (Left speaker) Connector (Power switch) FFC (M900-PSA1) Connector (Right speaker) Connector (M900-HPA1) M900-CNA2 PCB Remove six screws and then the sub PCB (M900-PSA1). –… -
Page 18
Removing the console PCB (M900-CNA1) and the volume PCB (M900-CNA2) „ Remove 10 screws and then the console PCB (M900-CNA1). Once the console PCB (M900-CNA1) is removed, you may disengage the button, the LED cover, the LED spacer, and the nonwoven band. Disengage the volume knob on the front of the main panel. -
Page 19
Removing the power switch and the jack PCB (M900-hPA1) „ Remove four screws on the left side case, and disengage the jack PCB (M900-HPA1) and the power switch. Power switch M900-HPA1 PCB Removing the speakers „ Remove three screws. Remove two hooks and then the speaker cover. Speaker cover Hooks Remove four screws and then the speaker. -
Page 20
Removing the KY-ASSY „ Remove all three screws from either side case (S-CASE-IL and S-CASE-IR), and then remove both side cases1 Remove 26 screws on the bottom of the main unit1 Remove three screws and then the KY-ASSY1 KY-ASSY – 18 –… -
Page 21
„ Removing the keys <Removing the keys> To remove the keys, you will need two of the tools described below. Before removing a black key, you must first remove both white keys on either side of the black key. White keys may be removed with the same procedures as removing black keys. <Tool>… -
Page 22
1. Insert the two tools between the rib of the chassis and a key. 2. When the tools are inserted to a certain depth, the key begins to be lifted and can then be removed. <Cross-section image> Tool Rib of the chassis Tools Chassis –… -
Page 23
<Installing the keys> Refer to the illustration below for the location of each white key. Be sure to install each key at its designated location. All black keys are the same. A black key may be installed at any correct black-key location. A code is indicated at the foot of each key. -
Page 24
„ About the hammers The design of the hammers installed in the PX-130BK/PX-130WE was modified after the mass production. The operation of the newly designed hammer is completely compatible with that of the old one. New and old hammers may be installed in one single unit. The installation and removal procedures are the same. NOTE: When an old type of hammers is to be replaced, the new type of hammers has priority in shipping. -
Page 25
<Kinds of hammers> There are several kinds of hammers. The type of a hammer may be identified by the code engraved on it. Type of Hammer (for a white key) Hammer Code (for a white key) Type of Hammer (for a black key) Hammer Code (for a black key) Type of Hammer: «W»… -
Page 26
<Installing the hammers> Be sure to install each hammer at its designated location. If a hammer does not move smoothly, check if it is installed at the correct location. Follow the same procedures shown below to install a hammer for both black and white keys. 1. -
Page 27
„ Removing the keyboard PCBs (MACP-KYC1/KYC2, KYD1) 1. Remove eight rubber keys. NOTE: One rubber key is shorter than the others. Rubber keys Short rubber key Rubber keys Short rubber key 2. Remove the nonwoven tape. 3. Remove 23 screws. Nonwoven tape MACP-KYC1 PCB MACP-KYD1 PCB… -
Page 28
4. Locate the FFC connected on the back of the MACP-KYD1 PCB. Unlock the connector to remove the FFC, and then disengage the MACP-KYC1 PCB, the KYC2 PCB, and the MACP-KYD1 PCB. MACP-KYD1 PCB MACP-KYC1 PCB MACP-KYD1 PCB MACP-KYC2 PCB –… -
Page 29
<Installing the keyboard PCBs (MACP-KYC1/KYC2, KYD1)> 1. Connect the FFC to the MACP-KYD1 PCB and lock the connector. Be sure to connect it securely. 2. Install eight rubber keys. Be sure to install the short rubber key at the correct location. Lightly insert the tip of a rubber key into the PCB first, and then, press it in using the end of a paper clip. -
Page 30
„ Removing the keyboard PCBs (MACP-KYA1/KYA2, KYB1/KYB2) 1. Remove the nonwoven tape. Unlock the connector and disengage the FFC connecting the MACP- KYA2 PCB and the MACP-KYB1. Nonwoven tape MACP-KYA1 PCB MACP-KYA2 PCB MACP-KYB1 PCB MACP-KYB2 PCB 2. Remove 26 screws. 3. -
Page 31
<If the PLATE comes off> The PLATE is a transparent plastic plate. If the plate comes off, put it on the place where the FFC is, and insert its end into place where the blue line is shown in the image. NOTE: The design of the PLATE was modified after the mass production. -
Page 32
<Installing the keyboard PCBs (MACP-KYA1/KYA2, KYB1/KYB2)> 1. Place eight rubber keys on the chassis. Be sure to place the short rubber key in the correct location. 2. Connect the FFC to the MACP-KYB1 PCB and lock the connector. NOTE: When connecting the FFC, be careful not to pull it too much in the direction of the red arrow in the illustration, or the PLATE on the back may come loose. -
Page 33
3. Insert the MACP-KYA1/KYA2 PCB and MACP-KYB1/KYB2 PCB at an angle against the chassis, and place them while paying attention not to misalign the rubber keys. 4. While placing the PCBs, the contact with the rubber keys may come out of alignment. Align them against the red dotted line in the illustration below, lift the PCB once in the direction of the red arrow, and then place them again. -
Page 34: Diagnostic Program
Even if a pedal unit is unavailable for the test, all the tests except for the pedal check may be performed. * SP-3 is the pedal unit that comes with PX-130. Connect it to the DAMPER PEDAL terminal in the back of the main unit.
-
Page 35
The LEDs illuminate repeatedly until the «2. Model check» is performed. 2. Model check 1. Press the «FUNCTION» button to perform the «MODEL check». The confirmation chords C4, E4, G4 sound. If the model is PX-130, the «L» LED flashes. – 33 –… -
Page 36
3. ROM Version check (Internal/External) The numbers necessary in the ROM version check are expressed by the combination of the illuminated LEDs. <Combinations of LEDs> 0: All LEDs OFF 5: «ELEC PIANO» + «MODERN» LED 1: «ELEC PIANO» LED 6: «MODERN» + «CLASSIC» LED 2: «CLASSIC»… -
Page 37
3. Press the «FUNCTION» button to perform the «ROM Version check (External)». The confirmation chords C4, E4, G4 sound. The «ELEC PIANO», «CLASSIC», «MODERN», «RECORDER» LEDs illuminate and the «R» LED flashes while on stand-by. * If you don’t wish to perform the «ROM version check (External)», go on to the step (1) of the «4. Button check». -
Page 38
1. Press the «FUNCTION» button to perform the «USB check». The confirmation chords C4, E4, G4 sound. 2. Connect PX-130 to the PC with a USB cable. 3. Press the «MODERN» button. The «R» LED illuminates instantaneously, and the confirmation chord C6 sounds. -
Page 39
8. Key check 1. Press the «FUNCTION» button. The confirmation chords C4, E4, G4 sound. 2. Press the «FUNCTION» button. The confirmation chords C4, E4, G4 sound twice. 3. Press the «FUNCTION» button to perform the «Key check». 4. Confirm that a test tone (approx. 500 Hz) sounds from the left speaker while a key is pressed half way. Check all white and black keys. -
Page 40
Operation after replacing the main PCB or the keyboard parts Make sure to perform the following procedure after replacing the main PCB or the keyboard parts. Applicable parts number on the Parts List: No.1 for the main PCB, No. for the KY-ASSY or the KY-ASSY component parts Procedure 1. -
Page 41: Exploded View
EXPLODED VIEW LEFT SPEAKER 60±10 mm 190 mm RIGHT SPEAKER 50±10 mm 480 mm 50 mm MDA1 100 mm 510 mm 10~15 mm – 39 –…
-
Page 42
KEYBOARD ASSY – 40 –… -
Page 43: Parts List
PARTS LIST PX-130 Notes: 1. Prices and specifications are subject to change without prior notice. 2. Refer to the latest “Parts Price Code” at “PARTS FINDER” on the Casio Service WEB site (https://www.servicecasio.com). 3. As for spare parts order and supply, refer to the “GUIDEBOOK for Spare parts Supply”, published separately. 4. The numbers in item column correspond to the same numbers in drawing. – 41 –…
-
Page 44
1: PX-130BK_DI 1: PX-130BK_DI 5: PX-130WE_DI 5: PX-130WE_DI 9: PX-130RD_DI 9: PX-130RD_DI 2: PX-130BK_EU 2: PX-130BK_EU 6: PX-130WE_EU 6: PX-130WE_EU 10: PX-130RD_EU 10: PX-130RD_EU 3: PX-130BK_UK 3: PX-130BK_UK 7: PX-130WE_UK 7: PX-130WE_UK 11: PX-130RD_UK 11: PX-130RD_UK 4: PX-130BK_US 4: PX-130BK_US 8: PX-130WE_US 8: PX-130WE_US 12: PX-130RD_US… -
Page 45
1: PX-130BK_DI 5: PX-130WE_DI 9: PX-130RD_DI 2: PX-130BK_EU 6: PX-130WE_EU 10: PX-130RD_EU 3: PX-130BK_UK 7: PX-130WE_UK 11: PX-130RD_UK 4: PX-130BK_US 8: PX-130WE_US 12: PX-130RD_US Q’ty Price Item Code No. Parts Name Specification Remarks Code 10 11 12 CONSOLE PCB (CNA1) 10340879 PCB ASSY/CNA1 TK-RJM509832*001 X CNA1 PCB… -
Page 46
1: PX-130BK_DI 5: PX-130WE_DI 9: PX-130RD_DI 2: PX-130BK_EU 6: PX-130WE_EU 10: PX-130RD_EU 3: PX-130BK_UK 7: PX-130WE_UK 11: PX-130RD_UK 4: PX-130BK_US 8: PX-130WE_US 12: PX-130RD_US Q’ty Price Item Code No. Parts Name Specification Remarks Code 10 11 12 10341066 HAMMER ASSY/B1 TK-RJM509604*001 10341067 HAMMER ASSY/B2 TK-RJM509605*001… -
Page 47
1: PX-130BK_DI 5: PX-130WE_DI 9: PX-130RD_DI 2: PX-130BK_EU 6: PX-130WE_EU 10: PX-130RD_EU 3: PX-130BK_UK 7: PX-130WE_UK 11: PX-130RD_UK 4: PX-130BK_US 8: PX-130WE_US 12: PX-130RD_US Q’ty Price Item Code No. Parts Name Specification Remarks 10 11 12 Code 10337059 LED COVER/A RJM509418-001V01 10337060 LED COVER/A RJM509418-002V01… -
Page 48
C for EU (X-5 & X-7) 10341082 ADAPTOR-ASSY TK-RJM509860*003 C for UK (X-5 & X-8) 10336165 AC-ADAPTOR AD-A12150LW-F1 A without AC PLUG 10332921 AC-PLUG TEU-001-CASIO A US type 10323563 AC-PLUG TEV-001 A EU type 10323564 AC-PLUG TEB-001 A UK type… -
Page 49: Schematic Diagrams
SCHEMATIC DIAGRAMS Main PCB M900-MDA1 (1/2) PEDAL Not used (to PSA1/CN202) Not used Not used Not used (to CNA1/ CN601) Not used Not used : Not used – 47 –…
-
Page 50
Main PCB M900-MDA1 (2/2) Not used : Not used (to KYD1/CN802) (to KYB1/CN804) – 48 –… -
Page 51
Sub PCB M900-PSA1 (1/2) DAMPER PEDAL (to POWER SWITCH) : Not used (to MDA1/ CN12) Not used: 10 pin to 14 pin (to LEFT SPEAKER) (to HPA1/ CN601) (to RIGHT SPEAKER) (to CNA2/CN602) – 49 –… -
Page 52
Sub PCB M900-PSA1 (2/2) Not used : Not used – 50 –… -
Page 53
Console PCB M900-CNA1 (to MDA1/CN4) Not used Not used – 51 –… -
Page 54
Volume PCB M900-CNA2 Jack PCB M900-HPA1 (to PSA1/CN201) Not used (to PSA1/CN206) – 52 –… -
Page 55
Keyboard PCB MACP-KYA1 (to KYA2/CN602) – 53 –… -
Page 56
Keyboard PCB MACP-KYA2 (to KYA1/CN601) (to KYB1/CN801) – 54 –… -
Page 57
Keyboard PCB MACP-KYB1 (to KYB2/CN803) (to KYA2/CN603) (to MDA1/CN1) – 55 –… -
Page 58
Keyboard PCB MACP-KYB2 (to KYB1/CN802) – 56 –… -
Page 59
Keyboard PCB MACP-KYC1 (to KYD1/CN801) – 57 –… -
Page 60
Keyboard PCB MACP-KYC2 (to KYD1/CN803) – 58 –… -
Page 61
Keyboard PCB MACP-KYD1 (to KYC1/CN601) (to MDA1/CN2) (to KYC2/CN602) – 59 –… -
Page 62
• Correction of the DIAGNOSTIC PROGRAM (P35) Ver. 2 : Sep. 2009 • Correction of the DISASSEMBLY (P22) Ver. 3 : Oct. 2009 • Correction of the CONTENTS • Correction of the DISASSEMBLY (P28, P30) • Correction of the DIAGNOSTIC PROGRAM (P38) • Correction of the PARTS LIST (P43 and P44) Ver. 4 : Nov. 2009 • Correction of the DISASSEMBLY (P23) Ver. 5 : Jan. 2011 • Addition of the new model (PX-130RD) • Correction of the CONTENTS • Correction of the DISASSEMBLY (P21 to P24, P29 and P30) • Correction of the DIAGNOSTIC PROGRAM (P32, P34, P35 and P38) • Correction of the EXPLODED VIEW (P39 and P40) • Correction of the PARTS LIST (P41 to P46) CASIO COMPUTER CO.,LTD. Overseas Service Division 6-2, Hon-machi 1-Chome Shibuya-ku, Tokyo 151-8543, Japan…
Краткое содержание страницы № 1
ES
USER’S GUIDE
GUÍA DEL USUARIO
Please keep all information for future reference.
Guarde toda información para tener como referencia futura.
Safety Precautions
Before trying to use the piano, be sure to read
the separate “Safety Precautions”.
Precauciones de seguridad
Antes de intentar usar el piano, asegúrese de
leer las “Precauciones de seguridad” separadas.
PX130ES1B
Español English
Краткое содержание страницы № 2
TO REDUCE THE RISK OF FIRE OR ELECTRIC SHOCK, REFER SERVICING TO QUALIFIED SERVICE PERSONNEL. IMPORTANT SAFETY INSTRUCTIONS 1. Read these instructions. 2. Keep these instructions. 3. Heed all warnings. 4. Follow all instructions. 5. Do not use this apparatus near water. 6. Clean only with dry cloth. 7. Do not block any ventilation openings. Install in accordance with the manufacturer’s instructions. 8. Do not install near any heat sources such as radiators, heat registers, stoves, or other appar
Краткое содержание страницы № 3
Contents General Guide …………………………….. E-2 Configuring Settings with the FUNCTION Button……………………………………………… E-3 Keyboard ………………………………….. E-19 Saving Settings and Using Operation Lock ……………. E-3 To configure settings with the keyboard………………..E-19 Keyboard Keys Used for Configuring Settings………. E-20 Power Outlet……………………………….. E-4 Parameter List………………….
Краткое содержание страницы № 4
General Guide 1 2 3 4 5 6 7 8 Back 9 bk bl Left Side Bottom bm bn bo Installing the Music Stand Insert the bottom of the music stand into the groove on the top of the digital piano’s console. E-2
Краткое содержание страницы № 5
General Guide NOTE � The names shown here are always indicated in bold when they appear within the text of this manual. 1 VOLUME controller 8 ELEC PIANO, DUET button 2 FUNCTION button 9 USB port 3 SONG a, DEMO button bk DAMPER PEDAL jack 4 RECORDER (L) button bl DC 12V terminal 5 METRONOME (R) button bm POWER button 6 GRAND PIANO (MODERN), REVERB button bn PHONES jacks 7 GRAND PIANO (CLASSIC), CHORUS button bo Pedal connector FUNCTION Button The FUNCTION button is used when configuring a variety
Краткое содержание страницы № 6
Power Outlet Your digital piano runs on standard household power. Be sure to turn off power whenever you are not using the digital piano. Using an AC Adaptor Use only the AC adaptor (JEITA Standard, with unified polarity plug) that comes with this digital piano. Use of a different type of AC adaptor can cause malfunction of the digital piano. Specified AC Adaptor: AD-A12150LW � Use the supplied power cord to connect the AC adaptor as shown in the illustration below. Household power outlet
Краткое содержание страницы № 7
Connections IMPORTANT! Connecting Audio Equipment � Whenever connecting something to the digital piano, or an Amplifier first use the VOLUME controller to set the volume to a low level. After connecting, you can adjust the You can connect audio equipment or a music amplifier volume to the level you want. to the digital piano and then play through external speakers for more powerful volume and better sound quality. Connecting Headphones To either of the digital piano’s PHONES jack Pin plug
Краткое содержание страницы № 8
Connections SP-32 Pedal Functions Connecting a Pedal Damper Pedal Connecting the supplied pedal (SP-3) to the DAMPER In addition to the damper pedal functions described in PEDAL jack makes it possible to use the pedal as a the column to the left, the SP-32 pedal also supports damper pedal. half-pedal operation, so pressing the pedal part way Pressing the damper pedal while playing will cause the applies only a partial damper effect. notes you play to reverberate for a very long time. Soft
Краткое содержание страницы № 9
Playing with Different Tones POWER VOLUME FUNCTION METRONOME ELEC PIANO SONG a GRAND PIANO Selecting and Playing a Tone The piano comes with 16 built-in tones. � The names of the tones are marked above the keyboard keys to which they are assigned. To select a tone 1. Press the POWER button. IMPORTANT! � When you turn on the digital piano, it performs a power up operation in order to initialize its system. During system initialization the tone button lamps cycle on and off in the sequence for ab
Краткое содержание страницы № 10
Playing with Different Tones NOTE To adjust the brilliance of a � GRAND PIANO tones (MODERN, CLASSIC) tone Your digital piano has a total of 16 built-in tones. The MODERN and CLASSIC tones are stereo 1. While holding down the FUNCTION button, sampled tones that can be selected using the use the BRILLIANCE keys to specify a GRAND PIANO buttons. Try using the GRAND PIANO tones to familiarize yourself with their brilliance value in the range of –3 to 0 to 3. distinctive sounds and character
Краткое содержание страницы № 11
Playing with Different Tones To adjust the volume balance between Layering Two Tones two layered tones Use the following procedure to layer two tones, so they sound at the same time. 1. While holding down the FUNCTION button, When specifying two tones for layering, first tone you use the keyboard keys shown below to adjust select will be the main tone, while the second tone will the volume of the layered tones. be the layered tone. 1. While holding down the FUNCTION button, hold down the
Краткое содержание страницы № 12
Playing with Different Tones ■ About DSP Using Effects DSP makes it possible to digitally produce complex acoustic effects. The DSP is assigned to each tone Reverb : Makes your notes resonate. whenever you turn on digital piano power. Chorus : Adds more breadth to your notes. To turn reverb on and off Using the Metronome 1. While holding down the FUNCTION button, 1. Press the METRONOME button. press the MODERN button to toggle reverb � This starts the metronome. � The lamp above the SONG a bu
Краткое содержание страницы № 13
Playing with Different Tones 3. While holding down the FUNCTION button, Playing a Piano Duet use the TEMPO keys to specify a tempo value in the range of 20 to 255 beats per You can use the Duet Mode to split the piano’s keyboard in the center so two people can play a duet. minute. This makes it possible to configure the keyboard so, for example, the teacher can play on the left and the student can follow along on the right. Or one person can play the left hand part on the left, while anoth
Краткое содержание страницы № 14
Playing with Different Tones Changing the Octaves of the duet keyboards You can change the ranges of the left and right keyboards in octave units from their initial default settings. This comes in handy, for example, if the initial default range is not enough when one person is playing the left hand part and another person is playing the right hand part. 1. While holding down the FUNCTION and ELEC PIANO buttons, press the keyboard C key that you want located at C4 (middle C) of the left
Краткое содержание страницы № 15
Playing Back Built-in Songs FUNCTION RECORDER SONG a METRONOME Your digital piano comes with a Music Library of 60 Playing Back a Specific Music built-in tunes. You can play all 60 tunes in sequence, from beginning to end. Library Song The Music Library includes both built-in songs (01 to IMPORTANT! 60), plus one song (61) that have been saved to digital � After you select a built-in song, it can take a number piano memory from a computer*. You can use the of seconds for the song data to
Краткое содержание страницы № 16
Playing Back Built-in Songs 3. Press the SONG a button. Practicing with a Music Library � This starts the playback of the song. Song 4. To stop playback, press the SONG a You can turn off the left hand part or right hand part of button again. a song and play along on the piano. � Playback will stop automatically when the end of the song is reached. NOTE � The Music Library includes a number of duets. NOTE While a duet is selected, you can turn off the first � Pressing the + and – keys at t
Краткое содержание страницы № 17
Recording and Play Back FUNCTION RECORDER SONG a METRONOME You can store the notes you play in digital piano Recording Data Storage memory for later playback. � Starting a new recording deletes any data that was previously recorded in memory. � Should power fail during recording, all of the data in Tracks the track you are recording will be deleted. A track is a container of recorded data, and a song IMPORTANT! consists of two tracks: Track 1 and Track 2. You can record each track separatel
Краткое содержание страницы № 18
Recording and Play Back 4. Start playing something on the keyboard. To record to a specific track of � Recording will start automatically. a song 5. To stop recording, press the SONG a After recording to either of the tracks of a song, you can button. record to the other track while listening to playback � This will cause the RECORDER button lamp and the what you recorded in the first track. lamp of the track you recorded to change from flashing to lit. 1. Press the RECORDER button twice s
Краткое содержание страницы № 19
Recording and Play Back To record to one track of a Playing Back from Digital song while listening to the Piano Memory playback of the other track 1. Press the RECORDER button so its lamp is lit. 1. Press the RECORDER button so its lamp is lit. NOTE � When a song has something recorded in both tracks, 2. While holding down the FUNCTION button, you can turn off one track and play back just the press the RECORDER (L) button or other track, if you want. METRONOME (R) button to select the tra
Краткое содержание страницы № 20
Recording and Play Back Deleting Recorded Data The following procedure deletes a specific track of a song. IMPORTANT! � The procedure below deletes all of the data of the selected track. Note that the delete operation cannot be undone. Check to make sure you really do not need the data in digital piano memory before you perform the following steps. 1. Press the RECORDER button twice so its lamp is flashing. 2. While holding down the FUNCTION button, press the RECORDER (L) button or METRO