-
8/13/2019 Nihon-Kohden ECG-9620 ECG Monitor — Service Manual
1/96
SERVICE MANUAL
cardiofax
ELECTROCARDIOGRAPH
ECG-9620
ECG-9620L
ECG-9620M
ECG-9620N
ECG-9620P
ECG-9620S
ECG-9620T
ECG-9620U
08CK2.782.00516E
-
8/13/2019 Nihon-Kohden ECG-9620 ECG Monitor — Service Manual
2/96
CONTENTS
Service Manual ECG-9620 C.1
Contents
GENERAL HANDLING PRECAUTIONS
………………………………………………………………………
iWARRANTY POLICY
……………………………………………………………………………………………….
iiEMC RELATED
CAUTION………………………………………………………………………………………..
iiiConventions Used in this Manual and Instrument
…………………………………………………………
ivDangers, Warnings, Cautions and Notes
……………………………………………………………
ivExplanations of the Symbols in this Manual and Instrument
………………………………….vSection 1 General
………………………………………………………………………..1C.1Introduction
………………………………………………………………………………………………………….
1.1General Information on Servicing
……………………………………………………………………………
1.2Service Policy, Service Parts and Patient Safety Checks
…………………………………………… 1.4Service Policy
……………………………………………………………………………………………..
1.4Service Parts
………………………………………………………………………………………………
1.4Patient Safety Checks
…………………………………………………………………………………..
1.5Maintenance Equipments and Tools
……………………………………………………………….
1.5General Safety Information
…………………………………………………………………………………….
1.6Specifications
……………………………………………………………………………………………………..
1.11Panel Descriptions
………………………………………………………………………………………………
1.14Front Panel
……………………………………………………………………………………………….
1.14Left Side
Panel…………………………………………………………………………………………..
1.14Operation Panel
…………………………………………………………………………………………
1.15Right Side Panel
………………………………………………………………………………………..
1.15Rear Panel
………………………………………………………………………………………………..
1.16Composition
……………………………………………………………………………………………………….
1.17Standard Components
………………………………………………………………………………..
1.17Options
…………………………………………………………………………………………………….
1.17Location
…………………………………………………………………………………………………………….
1.18Section 2 Maintenance
…………………………………………………………………2C.1Replacement
………………………………………………………………………………………………………..
2.1Periodic Replacement Schedule
…………………………………………………………………….
2.1Cleaning and Lubrication
……………………………………………………………………………………….
2.2Cleaning and Greasing Schedules
…………………………………………………………………
2.2Cleaning the Paper Mark Sensor and Paper Empty Sensor
………………………………. 2.2Cleaning the Motor Rotation Sensor and Lubricating the Motor
Gear and GearMeshed with Motor Gear
………………………………………………………………………………
2.3Maintenance Check Sheet
……………………………………………………………………………………..
2.5Section 3 Troubleshooting and System Error Message
………………….3C.1Troubleshooting Flowchart
……………………………………………………………………………………..
3.1Troubleshooting Table
……………………………………………………………………………………………
3.4Troubleshooting General Operation Problem
……………………………………………………
3.4 -
8/13/2019 Nihon-Kohden ECG-9620 ECG Monitor — Service Manual
3/96
CONTENTS
C.2 Service Manual ECG-9620
Troubleshooting Recording Problem
……………………………………………………………….
3.6System Error Message
………………………………………………………………………………………….
3.7Section 4 System Test, Adjustment and Setting
…………………………….4C.1System Test
…………………………………………………………………………………………………………
4.1Overall
……………………………………………………………………………………………………….
4.1Calling up the System Test Level 1
…………………………………………………………………
4.2Calling up the System Test Level 2
…………………………………………………………………
4.3Entering the System Test Number
………………………………………………………………….
4.4Executing the System Test
…………………………………………………………………………….
4.5Quitting the System Test
……………………………………………………………………………….
4.6Exiting the System Test
Mode………………………………………………………………………..
4.6Demonstration
……………………………………………………………………………………………………..
4.7Recorder
……………………………………………………………………………………………………………..
4.8Thermal Head
…………………………………………………………………………………………………….
4.10Key……………………………………………………………………………………………………………………
4.11Memory
……………………………………………………………………………………………………………..
4.12Single Memory Test Mode
…………………………………………………………………………..
4.13Continuous Memory Test Mode
……………………………………………………………………
4.13LCD/LED……………………………………………………………………………………………………………
4.14Input Unit
…………………………………………………………………………………………………………..
4.16Calibration
………………………………………………………………………………………………………….
4.17Communication
…………………………………………………………………………………………………..
4.18CRO/EXT1
…………………………………………………………………………………………………………
4.20System Setup Initialization
……………………………………………………………………………………
4.22ECG Findings List
Recording………………………………………………………………………………..
4.23Recording Resolution Setting
……………………………………………………………………………….
4.24Date and Time Setting
…………………………………………………………………………………………
4.25Setting the Date and Time
…………………………………………………………………………..
4.25Section 5 Board/Unit Description
………………………………………………….5C.1Block
Diagram………………………………………………………………………………………………………
5.1Power Unit
…………………………………………………………………………………………………………..
5.2ECG Control Board
……………………………………………………………………………………………….
5.2Section 6 Disassembly
…………………………………………………………………6C.1Before
You Begin
…………………………………………………………………………………………………..
6.1Warnings and Cautions
………………………………………………………………………………..
6.1Required Tools
…………………………………………………………………………………………….
6.1Cable Connection
…………………………………………………………………………………………………
6.2Removing the Upper Casing
…………………………………………………………………………………..
6.4Removing the Magazine and Recording Paper
……………………………………………….. 6.4Removing the Battery Pack
…………………………………………………………………………..
6.4Removing the Upper Casing
………………………………………………………………………….
6.4Removing the Thermal Head and Motor Assy
…………………………………………………………..
6.5Removing the Thermal Head
…………………………………………………………………………
6.5 -
8/13/2019 Nihon-Kohden ECG-9620 ECG Monitor — Service Manual
4/96
CONTENTS
Service Manual ECG-9620 C.3
Removing the Motor
Assy……………………………………………………………………………..
6.6Removing the ECG Control Board
…………………………………………………………………………..
6.6Removing the Power Board
……………………………………………………………………………………
6.8Removing the Power Board
…………………………………………………………………………..
6.8Replacing the Power Fuse and Battery Fuse
………………………………………………….. 6.9Removing the Key Board and LCD Unit
………………………………………………………………….
6.10Section 7 Replaceable Parts
List…………………………………………………..7C.1Instrument
……………………………………………………………………………………………………………
7.2Section 8 Connector Pin Assignment
…………………………………………….. 8.1Attaching
the Ferrite Core
……………………………………………………………………………..
8.1EXT-IN Connector
………………………………………………………………………………………..
8.2CRO-OUT Connector
…………………………………………………………………………………..
8.2SIO Connector
…………………………………………………………………………………………….
8.2 -
8/13/2019 Nihon-Kohden ECG-9620 ECG Monitor — Service Manual
5/96Service Manual ECG-9620 i
GENERAL HANDLING PRECAUTIONS
This device is intended for use only by qualified medical
personnel.Use only Nihon Kohden approved products with this device. Use of
non-approved products or ina non-approved manner may affect the performance specifications
of the device. This includes,but is not limited to, batteries, recording paper, pens,
extension cables, electrode leads, inputboxes and AC power.
Please read these precautions thoroughly before attempting to
operate the instrument.1. To safely and effectively use the instrument, its operation
must be fully understood.2. When installing or storing the instrument, take the following
precautions:(1) Avoid moisture or contact with water, dust, extreme
atmospheric pressure, excessive humidity and temperatures,poorly ventilated areas, and saline or sulphuric air.
(2) Place the instrument on an even, level floor. Avoid
vibration and mechanical shock, even during transport.(3) Avoid placing in an area where chemicals are stored or where
there is danger of gas leakage.(4) The power line source to be applied to the instrument must
correspond in frequency and voltage to productspecifications, and have sufficient current capacity.
(5) Choose a room where a proper grounding facility is
available.3. Before Operation
(1) Check that the instrument is in perfect operating order.
(2) Check that the instrument is grounded properly.
(3) Check that all cords are connected properly.
(4) Pay extra attention when the instrument is in combination
with other instruments to avoid misdiagnosis or otherproblems.
(5) All circuitry used for direct patient connection must be
doubly checked.(6) Check that battery level is acceptable and battery condition
is good when using battery-operated models.4. During Operation
(1) Both the instrument and the patient must receive continual,
careful attention.(2) Turn power off or remove electrodes and/or transducers when
necessary to assure the patients safety.(3) Avoid direct contact between the instrument housing and the
patient.5. To Shutdown After Use
(1) Turn power off with all controls returned to their original
positions.(2) Remove the cords gently; do not use force to remove
them.(3) Clean the instrument together with all accessories for their
next use.6. The instrument must receive expert, professional attention
for maintenance and repairs. When the instrument isnot functioning properly, it should be clearly marked to avoid
operation while it is out of order.7. The instrument must not be altered or modified in any
way.8. Maintenance and Inspection:(1) The instrument and parts must
undergo regular maintenance inspection at least every 6 months.(2) If stored for extended periods without being used, make sure
prior to operation that the instrument is in perfectoperating condition.
-
8/13/2019 Nihon-Kohden ECG-9620 ECG Monitor — Service Manual
6/96ii Service Manual ECG-9620
(3) Technical information such as parts list, descriptions,
calibration instructions or other information is available forqualified user technical personnel upon request from your Nihon
Kohden distributor.9. When the instrument is used with an electrosurgical
instrument, pay careful attention to the application and/orlocation of electrodes and/or transducers to avoid possible burn
to the patient.10. When the instrument is used with a defibrillator, make sure
that the instrument is protected against defibrillatordischarge. If not, remove patient cables and/or transducers from
the instrument to avoid possible damage.WARRANTY POLICY
Nihon Kohden Corporation (NKC) shall warrant its products
against all defects in materials and workmanship for one yearfrom the date of delivery. However, consumable materials such as
recording paper, ink, stylus and battery are excluded fromthe warranty.
NKC or its authorized agents will repair or replace any products
which prove to be defective during the warranty period,provided these products are used as prescribed by the operating
instructions given in the operators and service manuals.No other party is authorized to make any warranty or assume
liability for NKCs products. NKC will not recognize any otherwarranty, either implied or in writing. In addition, service,
technical modification or any other product change performed bysomeone other than NKC or its authorized agents without prior
consent of NKC may be cause for voiding this warranty.Defective products or parts must be returned to NKC or its
authorized agents, along with an explanation of the failure.Shipping costs must be pre-paid.
This warranty does not apply to products that have been
modified, disassembled, reinstalled or repaired without NihonKohden approval or which have been subjected to neglect or
accident, damage due to accident, fire, lightning, vandalism,water or other casualty, improper installation or application,
or on which the original identification marks have beenremoved.
-
8/13/2019 Nihon-Kohden ECG-9620 ECG Monitor — Service Manual
7/96Service Manual ECG-9620 iii
EMC RELATED CAUTION
This equipment and/or system complies with the International
Standard IEC60601-1-2 for electromagneticcompatibility for medical electrical equipment and/or system.
However, an electromagnetic environmentthat exceeds the limits or levels stipulated in the
IEC60601-1-2, can cause harmful interference to theequipment and/or system or cause the equipment and/or system to
fail to perform its intended function ordegrade its intended performance. Therefore, during the
operation of the equipment and/or system, ifthere is any undesired deviation from its intended operational
performance, you must avoid, identify andresolve the adverse electromagnetic effect before continuing to
use the equipment and/or system.The following describes some common interference sources and
remedial actions:1. Strong electromagnetic interference from a nearby emitter
source such as an authorized radio stationor cellular phone:
Install the equipment and/or system at another location if it is
interfered with by an emitter source suchas an authorized radio station. Keep the emitter source such as
cellular phone away from theequipment and/or system.
2. Radio-frequency interference from other equipment through the
AC power supply of the equipmentand/or system:
Identify the cause of this interference and if possible remove
this interference source. If this is notpossible, use a different power supply.
3. Effect of direct or indirect electrostatic discharge:
Make sure all users and patients in contact with the equipment
and/or system are free from direct orindirect electrostatic energy before using it.
4. Electromagnetic interference with any radio wave receiver
such as radio or television:If the equipment and/or system interferes with any radio wave
receiver, locate the equipment and/orsystem as far as possible from the radio wave receiver.
If the above suggested remedial actions do not solve the
problem, consult your Nihon Kohden Corporationsubsidiary or distributor for additional suggestions.
The CE mark is a protected conformity mark of the European
Community. The products herewith complywith the requirements of the Medical Device Directive
93/42/EEC.The CE mark is applied only to the ECG-9620L/M/N
Electrocardiograph.This equipment complies with EUROPEAN STANDARD EN-60601-1-2
(1993) which requires EN-55011, classB.
-
8/13/2019 Nihon-Kohden ECG-9620 ECG Monitor — Service Manual
8/96iv Service Manual ECG-9620
Conventions Used in this Manual and Instrument
Dangers, Warnings, Cautions and Notes
Warnings, cautions and notes are used in this manual to alert or
signal the reader to specific information.DANGER
A danger is used to alert the user to a hazardous situation
which will cause death or serious injury.WARNING
A warning alerts the user to possible injury or death associated
with the use or misuse of the instrument.CAUTION
A caution alerts the user to possible injury or problems with
the instrument associated with its use ormisuse such as instrument malfunction, instrument failure,
damage to the instrument, or damage to otherproperty.
NOTE
A note provides specific information, in the form of
recommendations, prerequirements, alternativemethods or supplemental information.
-
8/13/2019 Nihon-Kohden ECG-9620 ECG Monitor — Service Manual
9/96Service Manual ECG-9620 v
Symbol Description Symbol Description
Attention, consult operators
manualType CF applied part
Equipotential terminal Serial number
Serial input/output terminal Date of manufacture
Input terminal for analog signal
Output terminal for analog
signal
The CE mark is a protected
conformity mark of European
Community. The products
herewith comply with the
requirements of the Medical
Device Directive 93/42/EEC.
Eject (magazine release button) Protective earth
Alternative current
Explanations of the Symbols in this Manual and Instrument
The following symbols found in this manual/instrument bear the
respective descriptions as given.Cardiograph
Patient cable
Symbol Description Symbol Description
Attention, consult operators
manual
Defibrillation-proof
Type CF applied par
The CE mark is a protected
conformity mark of European
Community. The products
herewith comply with the
requirements of the Medical
Device Directive 93/42/EEC.
The CE mark is applied only to the
ECG-9620L/M/N Electrocardiograph.
-
8/13/2019 Nihon-Kohden ECG-9620 ECG Monitor — Service Manual
10/96vi Service Manual ECG-9620
Operation panel
On screen
Symbol Description Symbol Description
Alternating current
5
Rhythm
On only for a part of
equipment6
Age
Off only for a part of
equipment7
Sex
Battery charging/
8
Paper feed / Mark
Battery check
9
Filter
/
0
Copy / Calibration / Automatic / Manual control
F11
F1 function key CLR Clear
F22
F2 function key Start/Stop recording
F33
F3 function key ENT Enter
4
Mode
A key with a numeric number is used to enter
numbers in the System Setup screen and paient
information.
Symbol Description
QRS sync mark
CAL mark
-
8/13/2019 Nihon-Kohden ECG-9620 ECG Monitor — Service Manual
11/96
Service Manual ECG-9620 1C.1
Section 1 General
Introduction
…………………………………………………………………………………………………………
1.1General Information on Servicing
…………………………………………………………………………..
1.2Service Policy, Service Parts and Patient Safety Checks
………………………………………….. 1.4Service Policy
…………………………………………………………………………………………….
1.4Service Parts
……………………………………………………………………………………………..
1.4Patient Safety Checks
………………………………………………………………………………….
1.5Maintenance Equipments and Tools
………………………………………………………………
1.5General Safety Information
……………………………………………………………………………………
1.6Specifications…………………………………………………………………………………………………….
1.11Panel Descriptions
……………………………………………………………………………………………..
1.14Front Panel
………………………………………………………………………………………………
1.14Left Side
Panel………………………………………………………………………………………….
1.14Operation Panel
………………………………………………………………………………………..
1.15Right Side Panel
……………………………………………………………………………………….
1.15Rear Panel
……………………………………………………………………………………………….
1.16Composition
………………………………………………………………………………………………………
1.17Standard Components
……………………………………………………………………………….
1.17Options
……………………………………………………………………………………………………
1.17Location
……………………………………………………………………………………………………………
1.18 -
8/13/2019 Nihon-Kohden ECG-9620 ECG Monitor — Service Manual
12/96
1. GENERAL
Service Manual ECG-9620 1.1
Introduction
This service manual provides useful information to qualified
service personnel tounderstand, troubleshoot, service, maintain and repair the
ECG-9620L/M/N/P/S/T/U Electrocardiograph (referred to as the instrument in this
service manual).The System test, Adjustment and Setting section in this service
manual describesthe maintenance that should be performed by qualified service
personnel. TheMaintenance section in the operators manual describes the
maintenance that canbe performed by the user.
The information in the operators manual is primarily for the
user. However, it isimportant for service personnel to thoroughly read the operators
manual andservice manual before starting to troubleshoot, service,
maintain or repair thisinstrument. This is because service personnel need to understand
the operation ofthe instrument in order to effectively use the information in
the service manual. -
8/13/2019 Nihon-Kohden ECG-9620 ECG Monitor — Service Manual
13/96
1. GENERAL
1.2 Service Manual ECG-9620
General Information on Servicing
Note the following information when servicing the
instrument.CAUTIONS
Safety
There is the possibility that the outside surface of the
instrument,such as the operation keys, could be contaminated by
contagiousgerms, so disinfect and clean the instrument before servicing
it.When servicing the instrument, wear rubber gloves to protect
yourself from infection.
There is the possibility that when the lithium battery is
broken, asolvent inside the lithium battery could flow out or a toxic
substanceinside it could come out. If the solvent or toxic substance
touchesyour skin or gets into your eye or mouth, immediately wash it
with alot of water and see a physician.
Liquid ingress
The instrument is not waterproof, so do not install the
instrumentwhere water or liquid can get into or fall on the instrument. If
liquidaccidentally gets into the instrument or the instrument
accidentallydrops into liquid, disassemble the instrument, clean it with
cleanwater and dry it completely. After reassembling, verify that
there isnothing wrong with the patient safety checks and function/
performance checks. If there is something wrong with the
instrument, contact your Nihon Kohden representative for
repair.Environmental Safeguards
Depending on the local laws in your community, it may be illegal
todispose of the lithium battery in the regular waste collection.
Checkwith your local officials for proper disposal procedures.
Disinfection and cleaning
To disinfect the outside surface of the instrument, wipe it with
a non-abrasive cloth moistened with alcohol. Do not use any other
disinfectants or ultraviolet rays to disinfect the
instrument. -
8/13/2019 Nihon-Kohden ECG-9620 ECG Monitor — Service Manual
14/96
1. GENERAL
Service Manual ECG-9620 1.3
Caution — continued
Transport
Use the specified shipment container and packing material to
transport the instrument. If necessary, double pack the
instrument.Also, put the instrument into the shipment container after
packing sothat the buffer material does not get inside the instrument.
When transporting a board or unit of the instrument, be sure to
put itin a conductive bag. Never use an aluminum bag to transport
aboard or unit. Also, never use a styrene foam or plastic bag
whichgenerates static electricity to wrap the board or unit of
theinstrument.
Handling the instrument
Because the outside surface of the instrument is made of resin,
theoutside surface of the instrument is easily damaged. So when
handling the instrument, remove clutter from around the
instrumentand be careful to not damage the instrument or get it dirty.
Because most of the boards in the instrument are multilayer
boardswith surface mount electrical devices (SMD), a special tool
isrequired to remove and solder the electrical devices on it. To
avoiddamaging other electrical components, do not remove and
solderSMD components yourself.
Measuring and Test Equipment
Maintain the accuracy of the measuring and test equipment by
checking and calibrating it according to the check and
calibrationprocedures.
-
8/13/2019 Nihon-Kohden ECG-9620 ECG Monitor — Service Manual
15/96
1. GENERAL
1.4 Service Manual ECG-9620
Service Policy, Service Parts and Patient Safety Checks
Service Policy Our technical service policy for this instrument
is to replace the faulty unit, boardor part or damaged mechanical part with a new one. Do not
perform electricaldevice or component level repair of the multilayer board or
unit. We do not supportcomponent level repair outside the factory for the following
reasons:Most of the boards are multilayer boards with surface mount
electricaldevices, so the mounting density of the board is too high.
A special tool or high degree of repair skill is required to
repair the multilayerboards with surface mount electrical devices.
Only disassemble the instrument or replace a board or unit in an
environmentwhere the instrument is protected against static
electricity.Refer to Replaceable Parts List of this manual for the service
parts for technicalservice that we provide.
NOTE
When ordering parts or accessories from your Nihon Kohden
representative, please quote the NK code number and part
namewhich is listed in this service manual, and the name or model of
theunit in which the required part is located. This will help us
topromptly attend to your needs. Always use parts and
accessoriesrecommended or supplied by Nihon Kohden Corporation to
assuremaximum performance from your instrument.
Service Parts
-
8/13/2019 Nihon-Kohden ECG-9620 ECG Monitor — Service Manual
16/96
1. GENERAL
Service Manual ECG-9620 1.5
Patient Safety Checks Periodic maintenance procedures and
diagnostic check procedures are provided inthis manual to ensure that the instrument is operating in
accordance with its designand production specifications. To verify that the instrument is
working in a safemanner with regard to patient safety, patient safety checks
should be performed onthe instrument before it is first installed, periodically after
installation, and after anyrepair is made on the instrument.
For patient safety checks, perform the following checks as
described in theIEC60601-1 Medical electrical equipment — Part 1: General
requirements forsafety:
Protective earth resistance check
Earth leakage current check
Enclosure leakage current check
Patient leakage current check
Withstanding voltage check
Test equipment
When repairing or calibrating the instrument, the following test
equipment isrequired.
Oscilloscope: 2 channels or more for input signal, 50 mV to 5 V
input range, 1/10 attenuating probe and 100 MHz or more frequency response
characteristicmust be provided.
Digital voltmeter: standard type (An oscilloscope can be used
instead of thedigital voltmeter.)
Maintenance Equipments
and Tools
-
8/13/2019 Nihon-Kohden ECG-9620 ECG Monitor — Service Manual
17/96
1. GENERAL
1.6 Service Manual ECG-9620
General Safety Information
DANGER
Never use this cardiograph in the presence of any flammable
anesthetic gas or high-concentration oxygen atmosphere. Failure
tofollow this warning may cause explosion or fire.
Never use this cardiograph in a high-pressure oxygen medical
tank.Failure to follow this warning may cause explosion or fire.
WARNING
Using with an electrical surgical unit (ESU)
Never use this cardiograph near an ESU. The cardiograph may
malfunction due to high-frequency noise from the ESU.
When using this cardiograph with an ESU, refer to the
instructionmanual for the ESU. Before measurement, check that the
returnplate is correctly attached to the patient and check that
thecardiograph operates correctly when using with the ESU. If
thereturn plate is not attached correctly, it may burn the patients
skinwhere the electrodes are attached.
MRI examination
Do not install this cardiograph in an MRI examination room.
Thecardiograph may not operate properly due to high-frequency
magnetic noise from the MRI.
When performing MRI tests, remove from the patient all
electrodeswhich are connected to this cardiograph. Failure to follow
thiswarning may cause serious electrical burn on the patient due to
localheating caused by dielectric electromotive force. For details,
refer tothe instruction manual for the MRI.
When performing defibrillation
Before defibrillation, remove all electrodes and gel from the
chest ofthe patient. If the defibrillator paddle touches electrodes or
gel, thedischarged energy may burn the patients skin.
Before defibrillation, all persons must keep clear of the bed
and mustnot touch the patient or any equipment connected to the
patient.Failure to follow this warning may cause serious electrical
burn,shock or other injury.
-
8/13/2019 Nihon-Kohden ECG-9620 ECG Monitor — Service Manual
18/96
1. GENERAL
Service Manual ECG-9620 1.7
Installation
Warning — continued
Use only the following specified patient cables when using with
adefibrillator or ESU. When the specified patient cable is
connected,the cardiograph is type CF defibrillation-proof compliance.
Failure tofollow this warning will cause serious electrical burn where
theelectrode is attached and damage the cardiograph due to
dischargeenergy when defibrillation is performed.
Patient cable: BJ-901D IEC standard, 3 mm diameter tip
BJ-902D IEC/DIN standard, 4 mm diameter tip
BJ-903D IEC/DIN standard, clip
BA-901D AHA requirement, 3 mm diameter tip
BA-903D AHA requirement, color clip
When using an ESU and defibrillator with the cardiograph, use
silverchloride disposable electrodes.
WARNING Only use the 3-prong power cord provided with the
cardiograph.Failure to follow this caution may cause electrical shock to
thepatient and operator.
Only use the specified patient cable and connect the
externalinstruments with the specified installation procedure. Failure
tofollow this warning may cause a serious electrical shock to
thepatient and operator by leakage current.
CAUTION
When the provided 3-prong power cord cannot be used, operate
thecardiograph on battery power. When another type of power
cord(especially 2-prong power cord) is used, this may cause
electricalshock to the patient and operator.
When several medical instruments are used together, ground
allinstruments at the same one-point ground to protect the patient
andoperator from electrical shock. Any potential difference
betweeninstruments may cause electrical shock to the patient and
operator.When connecting an external instrument to connectors marked
with, the external instrument and this cardiograph must be
connectedaccording to the IEC60601-1-1 Medical electrical equipment —
Part 1-1: General requirements for safety — Collateral standard:
Safetyrequirements for medical electrical systems. Failure to follow
thiswarning may cause electrical shock to the patient and
operator.When inserting or removing the battery from the cardiograph,
makesure that the cardiograph is turned off. Otherwise, the patient
andoperator may get an electrical shock.
-
8/13/2019 Nihon-Kohden ECG-9620 ECG Monitor — Service Manual
19/96
1. GENERAL
1.8 Service Manual ECG-9620
Battery PackDANGER
Keep the battery pack away from fire. Do not heat the battery
pack.Otherwise, the substance liquid leaks out and the battery
packexplodes.
Never short-circuit the + and terminals on the battery pack with
awire. Never store or carry the battery pack with metal such
asnecklace or hair pins. The battery pack short-circuits and a
largecurrent flows, causing leakage of the substance liquid inside
thebattery and battery explosion.
Never disassemble or modify the battery pack. Never damage
ordirectly solder the sheath tube. The battery pack
short-circuits, thesubstance liquid comes out and the battery pack explodes.
Do not use a battery pack which is damaged, such as from
falling.There is a gas discharge valve inside the battery and if this
valve isdamaged, the gas cannot be discharged, causing the battery pack
toexplode.
Do not subject the battery pack to a strong mechanical shock.
Thesusbstance liquid inside the battery leaks and explodes.
If the battery pack is damaged and substance liquid inside
thebattery contacts the eyes or skin, wash immediately and
thoroughlywith water and see your physician. Never rub your eyes,
otherwiseyou may lose your eyesight.
Only charge the battery pack with the ECG-9620 cardiograph. If
anyother battery charger is used, abnormal current flows and
thesubstance liquid inside the battery leaks and the battery
explodes.Do not connect the battery pack to an AC outlet or lighter
socket in acar. The substance liquid inside the battery leaks out and the
batterypack explodes.
The battery has + and polarity. Make sure that the battery
isinstalled with the correct polarity direction. Otherwise,
thesubstance inside the battery leaks out and the battery pack
explodes.Use only the SB-901D battery pack.
WARNING Do not immerse the battery pack in water or seawater.
The batteryheats up and rusts and the substance liquid inside the battery
leaks.Never use a battery pack which is damaged, discolored or has
leakage. A damaged battery pack explodes if used.
Do not leave the battery pack unused for more than one year.
Thebattery may leak.
-
8/13/2019 Nihon-Kohden ECG-9620 ECG Monitor — Service Manual
20/96
1. GENERAL
Service Manual ECG-9620 1.9
CAUTION
Do not charge the deteriorated battery pack. Otherwise, the
cardiograph cannot operate on battery power.
Do not expose the battery pack to direct sunlight or leave in a
hightemperature place. The life time of the battery pack may be
shortened, the performance of the battery pack may be degraded
andthe substance liquid inside the battery may leak.
Do not leave the battery pack where patients can reach it.
Before disposing of the battery pack, check with your local
solidwaste officials for details in your area for recycling options
or properdisposal. The battery is recyclable. At the end of its useful
life, undervarious state and local laws, it may be illegal to dispose of
thisbattery into the municipal waste stream.
CAUTION
Enter the patient information correctly. Otherwise, the ECG data
maybe lost or mixed up with another patients ECG data.
ECG recording judgement
The cardiograph provides automatic ECG analysis function.
Theautomatic ECG analysis is performed for acquired ECG
waveformsonly and does not reflect all conditions of the patient. The
results ofthe analysis may not correspond to the judgment of a
physician.Overall judgement must be performed by the physician, referring
tothe analysis result, clinical findings, and other examination
results.After the physicians overall judgement, the analysis results
shouldbe signed or initialed by the physician.
Take care when judging the ECG recording because the 25 Hz
EMGfilter may cause greater distortion of P-waves and QRS-waves
depending on the waveform shape. The characteristics of the
EMGfilter are similar to a conventional analog filter.
Do not use the output signal from the output connector for a
synchronization signal such as the synchronized
cardioversionsignal. There is a time delay between the input ECG signal
andoutput signal.
When the cardiograph operates on battery power and large
leakagecurrent is input from the connected external instrument, ground
thecardiograph or use an isolation transformer for the external
instrument. Failure to follow this caution may cause electrical
shockto patient and operator.
Use only the KD-103E cart for the cardiograph. When another cart
isused, the cardiograph may fall off or the cart may tip over.
Operation
-
8/13/2019 Nihon-Kohden ECG-9620 ECG Monitor — Service Manual
21/96
1. GENERAL
1.10 Service Manual ECG-9620
Maintenance
Caution — continued
Never use the cardiograph with its side panel downward. Failure
tofollow this caution may cause the cardiograph to fall over or
causebattery liquid leakage.
NOTE
When using the battery pack and the battery operation lamp
isblinking in orange, measurement results may not be saved.
CAUTION
Before maintenance (cleaning, disinfection), make sure that
thecardiograph is turned off and the power cord is removed from the
ACoutlet and cardiograph. Otherwise, the operator may get an
electricalshock and the cardiograph may malfunction.
Before battery replacement, make sure that the cardiograph is
turnedoff and the power cord is removed from the AC outlet and
cardiograph. Otherwise, the operator may get an electrical
shock.Do not disassemble or repair the cardiograph. Disassembly
andrepair must be performed by qualified service personnel.
-
8/13/2019 Nihon-Kohden ECG-9620 ECG Monitor — Service Manual
22/96
1. GENERAL
Service Manual ECG-9620 1.11
Specifications
ECG input
Input impedance 10 Mor more
Electrode offset tolerance 500 mV or more
Input unit protection Isolated and defibrillator protected only
when the following specified patientcable is connected
Patient cable: BJ-901D, BJ-902D, BJ-903D, BA-901D, BA-903D
Standard sensitivity 10 mm /mV 2%
Common mode rejection ratio 100 dB or more
Frequency response 0.05 to 150 Hz 3 dB or more
Waveform data processor
Sample rate 500 samples/s (input unit: 8,000 samples/s)
AC line filter 50/60 Hz
High-cut filter 75, 100, 150 Hz
EMG filter 25/35 Hz
Time constant 3.2 s or more
Waveform status detection Electrode detachment (polarization
voltage),Noise (high frequency)
Sensitivity selection 5, 10 , 20 mm/mV
LCD
Size 3.8 inch
Number of dots 320240
ECG waveform 6 channel: 2.8 s
Displayed data Waveform, patient information, recording
settings, operation mode, heart rate,QRS sync mark, error message, electrode detachment, noise
Recorder
Printing method High resolution thermal printer head
Printing density 200 dpi (8 dots/mm)
Scanning line density 1 ms
Recording width 56 mm
Number of recording channels 1, 2, 3
Paper speed 25, 50 mm/s
Number of recording lines Up to 14
Printed data Program type, version, date and time, paper speed,
sensitivity, lead name, filter,Patient information (ID number, sex, age zone), timing mark,
event mark,electrode detachment, noise
Mechanical noise 48 dB or less at paper speed 25 mm/s
External input/output
External input 10 mm/0.5 V 5%, input impedance 100 k or more
Signal output 0.5 V/1 mV 5%, output impedance 100or less
Serial I/O Communication method: RS-232C
Baud rate: 2400, 4800, 9600, 19200, 38400,
57600, 115200
-
8/13/2019 Nihon-Kohden ECG-9620 ECG Monitor — Service Manual
23/96
1. GENERAL
1.12 Service Manual ECG-9620
Power requirement
Line voltage ECG-9620L: 220 V AC 10%
ECG-9620M: 230 V AC 10%
ECG-9620N: 240 V AC 10%
ECG-9620P: 220 V AC 10%
ECG-9620S: 110 V AC 10%
ECG-9620T: 120 V AC 10%
ECG-9620U: 127 V AC 10%
Line frequency 50 or 60 Hz
Power input 45 VA
Power consumption 45 W or less
Built-in battery (SB-901D) Voltage: 12 V
Current consumption: 6 A or less
Battery operation time: 2 hours or more (when using a new fully
chargedbattery in manual mode, at 25 mm/s of recording
speed, 3 ch, and in continuous recording.)
Remaining battery power can change depending on
the surrounding temperature and quality of
recording waveform.
Environment
Operating temperature 5 to 40C (41 to 104F)
Operating humidity
25 to 85% RH (with battery pack and recording paper)
20 to 85% RH (with battery pack and without recording paper)
25 to 90% RH (with recording paper and without battery pack)
25 to 95% RH (without battery pack and recording paper)
Operating atmospheric pressure 70 to 106 kPa
Storage temperature
Cardiograph: -20 to 65C (4 to 149F)
Battery pack: -20 to 50C (4 to 122F) (within 30 days)
-20 to 40C (4 to 104F) (within 90 days)
-20 to 30C (4 to 86F) (within one year)
Recording paper: -20 to 50C (4 to 122F)
Storage humidity
Cardiograph: 10 to 95% RH (non-condensing)
Battery pack: 10 to 85% RH (non-condensing) (within 60 days)
45 to 85% RH (non-condensing) (more than 60 days)
Recording paper: 10 to 90% RH (non-condensing)
Storage atmospheric pressure 70 to 106 kPa
Electromagnetic compatibility
IEC60601-1-2 (1993), CISPR11 (1990) Group 1 Class B
IEC60601-2-25 Amendment 1 (1999), protection against
electrosurgery interferenceOther
Indoor portable
-
8/13/2019 Nihon-Kohden ECG-9620 ECG Monitor — Service Manual
24/96
1. GENERAL
Service Manual ECG-9620 1.13
Dimensions and weight
Dimensions 280 W 70 H 216 D mm (excluding protrusions)
Weight Approx. 3.1 kg (with battery)
Approx. 2.7 kg (without battery)
Safety
Safety standard:
IEC60601-1 (1998)
IEC60601-1 Amendment 1 (1991)
IEC60601-1 Amendment 2 (1995)
IEC60601-2-25 (1993)
IEC60601-2-25 Amendment 1 (1999)
Type of protection against electric shock:
AC power: Class I
Battery power: Internally powered equipment
Degree of protection against electric shock:
Defibrillator proof type CF applied part when patient cable
BJ-901D, BJ-902D, BJ-903D, BA-901D orBA-903D is used
Degree of protection against harmful ingress of water:
Ordinary equipment
Degree of safety of application in the presence of a flammable
anaesthetic mixture with air, oxygen or nitrousoxide:
Not suitable for use in the presence of a flammable anaesthetic
mixture with air, oxygen ornitrous oxide
Mode of operation:
Continuous
-
8/13/2019 Nihon-Kohden ECG-9620 ECG Monitor — Service Manual
25/96
1. GENERAL
1.14 Service Manual ECG-9620
Name
1. Operation panel
2. Magazine (paper container)
3. LCD screen
Panel Descriptions
Front Panel
2
3
Name
1. Magazine release button
2. Patient cable connector
Left Side Panel
1
1 2
-
8/13/2019 Nihon-Kohden ECG-9620 ECG Monitor — Service Manual
26/96
1. GENERAL
Service Manual ECG-9620 1.15
Right Side Panel
CAUTION
When connecting an external instrument to connectors marked with
, the external instrument and thiscardiograph must be connected according to the IEC60601-1-1
Medical electrical equipment — Part 1-1:General requirements for safety — Collateral standard: Safety
requirements for medical electricalsystems. Failure to follow this warning may cause electrical
shock to the patient and operator.Do not use the output signal from the output connector for a
synchronization signal such as thesynchronized cardioversion signal. There is a time delay between
the input ECG signal and outputsignal.
Name
1. EXT-IN connector
2. CRO-OUT
3. SIO connector
4. AC power cord socket
5. Equipotential ground terminal
4
1 3
5
2
Operation Panel
Name
1. AC power lamp
2. Battery operation lamp
3. Battery charge lamp
4. Power key/lamp
5. Mode key
6 Rhythm key/lamp
7. F1, F2, F3 function keys
11
9
10
8
6
7
12 1413
4
1
2
3
5
Name
8. Age key
9. Sex key
10. Auto/Manual key/lamp
11. Feed/Mark key
12. Filter key/lamp
13. Copy/CAL key lamp
14. Start/Stop key/lamp
-
8/13/2019 Nihon-Kohden ECG-9620 ECG Monitor — Service Manual
27/96
1. GENERAL
1.16 Service Manual ECG-9620
Rear Panel
CAUTION
Always install the battery even when the cardiograph operates on
ACpower. Otherwise sudden power down occurs when any electrode
isdetached during recording.
Battery
The CE mark is applied only to the
ECG-9620L/M/N Electrocardiograph.
-
8/13/2019 Nihon-Kohden ECG-9620 ECG Monitor — Service Manual
28/96
1. GENERAL
Service Manual ECG-9620 1.17
Composition
To order a replacement assembly above, use the Code No.
To order a replacement component inside an assembly, refer to
Section 7Replaceablet Parts List.
RHC-0004 Record Assy
RHC-00041 Motor Assy
UTC-0009 Paper senser board
UTC-0010 Motor sensor board
RHC-00042 Magazine Assy
RKC-0001 Transfer Assy (220 V) for L and P version
RKC-0002 Transfer Assy (230 V) for M version
RKC-0003 Transfer Assy (240 V) for N version
RKC-0004 Transfer Assy (110 V) for S version
RKC-0005 Transfer Assy (120 V) for T version
RKC-0006 Transfer Assy (127 V) for U version
UTC-0006 Key board
UTC-0007 ECG control board
UTC-0008 Power board
ECG-9620L
ECG-9620M
ECG-9620N
ECG-9620P
ECG-9620S
ECG-9620T
ECG-9620U
KD-103E Cart
KH-801E Patient Cable Hanger
Standard Components
Options
-
8/13/2019 Nihon-Kohden ECG-9620 ECG Monitor — Service Manual
29/96
1. GENERAL
1.18 Service Manual ECG-9620
Location
Transfer Assy
Thermal Head Assy
Motor Assy
Key board
ECG control board
LCD
Buzzer
Power board
-
8/13/2019 Nihon-Kohden ECG-9620 ECG Monitor — Service Manual
30/96
Service Manual ECG-9620 2C.1
Section 2 Maintenance
Replacement
……………………………………………………………………………………………………….
2.1Periodic Replacement Schedule
……………………………………………………………………
2.1Cleaning and Lubrication
………………………………………………………………………………………
2.2Cleaning and Greasing Schedules
………………………………………………………………..
2.2Cleaning the Paper Mark Sensor and Paper Empty Sensor
……………………………… 2.2Cleaning the Motor Rotation Sensor and Lubricating the Motor
Gear and GearMeshed with Motor Gear
……………………………………………………………………………..
2.3Maintenance Check Sheet
…………………………………………………………………………………….
2.5 -
8/13/2019 Nihon-Kohden ECG-9620 ECG Monitor — Service Manual
31/96
2. MAINTENANCE
Service Manual ECG-9620 2.1
This section describes the periodic replacement and cleaning of
parts which arerequired to maintain the instrument in good working
condition.This subsection only describes replacement schedule for parts
that need to beperiodically replaced. The actual replacement procedures are
described in the sectionfor Disassembly and Assembly. Read the whole Disassembly and
Assembly section,especially its Warnings and Cautions, before replacing any of
the parts described here.To maintain the performance of the instrument, the parts listed
in the table below mustbe periodically replaced by qualified service personnel.
Code No. Description Recommendation
SB-901D Battery pack * See below.
08SK3.878.00046 Thermal head, KYT-56-8MPP1-SKH After 50 km
recordingRHC-00041 Motor Assy After 1000 hours operation
* Replace the battery pack when it cannot last for 30 minutes
during battery operationat the temperatures between 20 and30C.
Replacement
Periodic ReplacementSchedule
-
8/13/2019 Nihon-Kohden ECG-9620 ECG Monitor — Service Manual
32/96
2. MAINTENANCE
2.2 Service Manual ECG-9620
Cleaning and Lubrication
Cleaning and Lubricating
Schedules
Cleaning the Paper Mark
Sensor and Paper Empty
Sensor
Paper sensor
This subsection describes the cleaning and lubrication
procedures for parts thatmust be cleaned and lubricated by qualified service personnel.
The cleaningprocedures for parts that can be cleaned by the user are
described in the OperatorsManual.
To maintain the performance of the instrument, the parts listed
in the table belowmust be regularly cleaned or lubricated.
Part Frequency Performed by
Instrument (external) After each use User
Thermal Head Once a month User
Platen Roller assy Once a year User
Paper Sensor Once a month Qualified service personnel
Motor Sensor Once a year Qualified service personnel
Motor Gear and Gear Once a year Qualified service personnel
Meshed with Motor Gear
1. Remove the magazine. The illustration below shows the
location of the papersensor.
2. Use a piece of cotton moistened with alcohol to clean both
sensors. -
8/13/2019 Nihon-Kohden ECG-9620 ECG Monitor — Service Manual
33/96
2. MAINTENANCE
Service Manual ECG-9620 2.3
Cleaning the Motor
Rotation Sensor and
Lubricating the Motor Gear
and Gear Meshed with
Motor Gear
1. Remove the upper casing from the lower casing. Refer to
Removing theUpper Casing in Section 6.
2. Remove the two M3 pan screws with washers and spring washers
which fastenthe ground leads to the power transformer unit.
3. Disconnect the CNA011 and CNA012 cables from the ECG control
board.4. Remove the three M3 binding head screws which fasten the
thermal head unitto the lower casing and remove the thermal head unit.
5. Remove the two M3 binding head screws which fasten the motor
assy to thethermal head unit and remove the motor assy.
6. Remove the two M3 pan screws with spring washers which fasten
the motorsensor board to the motor assy and remove the motor sensor
board.7. Use a piece of cotton moistened with alcohol to clean the
motor rotationsensor.
8. Use a brush to clean the holes in the gear.
Ground lead
CNA011 cable
CNA012 cable
M3 binding head screwM3 pan screw with washerand spring
washerMotor assy
Motor sensor board
Thermal head unit
-
8/13/2019 Nihon-Kohden ECG-9620 ECG Monitor — Service Manual
34/96
2. MAINTENANCE
2.4 Service Manual ECG-9620
Top view
9. Use grease to lubricate the motor gear and the gear which
directly meshes withthe motor gear as shown below.
Motor
Motor gear
Gear meshed with motor gear
-
8/13/2019 Nihon-Kohden ECG-9620 ECG Monitor — Service Manual
35/96
2. MAINTENANCE
Service Manual ECG-9620 2.5
Maintenance Check Sheet 1/2
Date:
Customer:
Customer Address:
Service Personnel: Service Company:
Instrument Name: Instrument Model:
Instrument Serial Number: Hardware Revision:
Software Revision:
Overview Outside of instrument is clean. Yes No
No loose screws. Yes No
No physical damage, no bent parts and no contact with liquid.
Yes NoOperation panel is not torn or broken. Yes No
All keys, buttons and controls are undamaged. Yes No
Power cord, patient cable are not frayed
and are correctly connected to the instrument. Yes No
Paper magazine opens and closes correctly. Yes No
Thermal head is clean. Yes No
The paper feeding roller is clean. Yes No
Motor rotation sensor is clean. Yes No
Paper detection sensor is clean. Yes No
Motor gear is lubricated properly. Yes No
Accessories Enough electrolyte cream (CardioCream) Yes NoEnough
recording paper. Yes NoInstallation Instrument is installed in the proper location. Yes
NoSpecified 3-prong power cord and ground lead are used. Yes
NoBattery pack is in the instrument. Yes No
Recording paper is loaded. Yes No
Power on There is no fire, smoke or smell. Yes No
There is no electrical shock when touching the instrument. Yes
NoInstrument is not abnormally hot. Yes NoInstrument does not
affect surrounding equipment. Yes NoAC lamp lights when the AC power is supplied. Yes No
Battery charge lamp lights when the AC power is supplied. Yes
NoBasic operation The screen display is correct. (brightness, no
distortion) Yes NoKey lamp indication is correct. Yes No
All keys operate properly. Yes No
All settings are correct. Yes No
The battery is fully charged. Yes No
Electrode detachment functions properly. Yes NoThere is no error
message or abnormal operation. Yes No -
8/13/2019 Nihon-Kohden ECG-9620 ECG Monitor — Service Manual
36/96
2. MAINTENANCE
2.6 Service Manual ECG-9620
Maintenance Check Sheet
Monitoring ECG waveform display is correct. Yes No
The continuity of the ECG connection cable is correct. Yes
NoHeart rate display is correct. Yes No
QRS sync mark is displayed and heart rate sync sound generates.
Yes NoECG lead and sensitivity can be changed properly. Yes No
Alarms setting and alarm function is correct. Yes No
Sound volume can be changed properly. Yes No
Recording Paper is fed correctly (no skewing or jam). Yes No
Waveforms and letters are clearly recorded. Yes No
Time printed on the recording paper is correct. Yes No
System Test Recorder Pass Fail
Key Pass Fail
Memory Pass Fail
LCD/LED Pass Fail
Input unit Pass Fail
Calibration Pass Fail
Communication Pass Fail
CRO/EXT1 Pass Fail
Safety Protective earth resistance Pass Fail
Earth leakage current Pass Fail
Enclosure leakage current Pass Fail
Withstanding voltage Pass Fail
2/2
-
8/13/2019 Nihon-Kohden ECG-9620 ECG Monitor — Service Manual
37/96
Service Manual ECG-9620 3C.1
Section 3 Troubleshooting andSystem Error Message
Troubleshooting Flowchart
…………………………………………………………………………………….
3.1Troubleshooting Table
…………………………………………………………………………………………..
3.4Troubleshooting General Operation Problem
………………………………………………….. 3.4Troubleshooting Recording Problem
………………………………………………………………
3.6System Error Message
…………………………………………………………………………………………
3.7 -
8/13/2019 Nihon-Kohden ECG-9620 ECG Monitor — Service Manual
38/96
3. TROUBLESHOOTING AND SYSTEM ERROR MESSAGE
Service Manual ECG-9620 3.1
This section describes how to troubleshoot the instrument, using
the following:— flowchart
— troubleshooting table
— system error messages at power-up
NOTE
If the power is not turned off by pressing the Power key, press
andhold the Power key 5 seconds or more.
Troubleshooting Flowchart
Use the troubleshooting flowchart to find the possible sources
of a problem.Is there any response when
any key is pressed?
Check that the LCD cable is
connected to the CNJ201
connector on the key board.
The LCD unit is faulty.
The key board is faulty.
The ECG control board is faulty.
The power LED is on but
there is no LCD display.
No
Yes Normal
The key board is faulty.
The ECG control board is faulty.
NormalCheck that the CNA013 cable is connected to the
CNJ033 connector on the ECG control board and
CNJ101 connector on the key board.
-
8/13/2019 Nihon-Kohden ECG-9620 ECG Monitor — Service Manual
39/96
3. TROUBLESHOOTING AND SYSTEM ERROR MESSAGE
3.2 Service Manual ECG-9620
Check the following cable connections
Between transformer unit and power board
CNA014 (between the power board and
ECG control board
CNA013 (between the ECG control board
and key board)
The power unit is faulty.
The power transformer is faulty.
The power of the
instrument does not turn
on.
Does the instrument
operate during AC
power operation?
The instrument does not
operate during battery
power operation.
Is the battery charged? Charge the battery.
Replace the battery fuse
on the power board.
Does the LED of the AC power
light?
The key board is faulty.
The ECG control board is faulty.
The power board is faulty.Normal
Is the battery F101 or F102
fuse on the power board blown?
Check the power fuse in the
fuse holder.
The power board is faulty.
The power transformer is faulty.
No
Yes
Yes
No
Normal
Normal
Yes
No
Yes
No
Check the following cable connections
Between transformer unit and power board
CNA014 (between the power board and
ECG control board
CNA013 (between the ECG control board
and key board)
-
8/13/2019 Nihon-Kohden ECG-9620 ECG Monitor — Service Manual
40/96
3. TROUBLESHOOTING AND SYSTEM ERROR MESSAGE
Service Manual ECG-9620 3.3
The recorder does not
feed the recording paper
when the Start key ispressed.
Does the LED for the Start
key light?
Does the recorder print
when the recording paper
is manually pulled out
from under the thermal
head?
Check that CNA011 cable is
connected to the CNJ036 connector
on the ECG control board.
The motor is faulty.
The ECG control boardis faulty.
Is the recording paper set? Set the recording paper.
Check that the CNA013 cable is
connected to the CNJ033 connector
on the ECG control board and
CNJ101 connector on the key board.
Lights
Brinks
The ECG control board
is faulty.
The key board is faulty.
Yes
Normal
No
No
Normal
-
8/13/2019 Nihon-Kohden ECG-9620 ECG Monitor — Service Manual
41/96
3. TROUBLESHOOTING AND SYSTEM ERROR MESSAGE
3.4 Service Manual ECG-9620
Use the troubleshooting table to locate, identify and solve a
problem in theinstrument. The problems are divided into general operation and
recording. Eachcategory has its own troubleshooting table for fast and easy
troubleshooting.How to use the troubleshooting table
1. Determine which troubleshooting table to use.
2. In the Problem column find the trouble item that matches the
problem.3. Do the action recommended in the Corrective Action
column.4. If the problem is not solved, do the action for the next
possible cause or criteria.5. If none of the actions solve the problem, contact your
nearest Nihon Kohdendealer.
Troubleshooting Table
Troubleshooting General
Operation Problem
Problem Possible Cause Action
The power LED lights but nothing is
displayed on the LCD screen.
Faulty cable connection. Check the following cable
connection.CNA013: between the ECG control
board and key board
LCD cable: CNJ201 connector on the
key board.CNA014: between the power board
and ECG control board
Faulty LCD unit. Replace the LCD unit.
Faulty key board. Replace the key board.
Faulty ECG control board. Replace ECG the control board.
Faulty power fuse. Replace the power fuse.
Faulty cable connection Check the following cable
connection.CNA013: between the ECG control
board and key board
CNA014: between the power boardand ECG control board.
Power cable: between the power board
and power transformer
unit
Faulty power cord Replace the power cord.
Faulty power board. Replace the power board.
Faulty key board. Replace the key board.
Faulty ECG control board. Replace ECG the control board.
The instrument does not operate on AC
power.
Faulty power transformer unit, Replace the power transformer
unit. -
8/13/2019 Nihon-Kohden ECG-9620 ECG Monitor — Service Manual
42/96
3. TROUBLESHOOTING AND SYSTEM ERROR MESSAGE
Service Manual ECG-9620 3.5
Problem Possible Cause Action
The instrument does not operate on
battery power.
The battery is not charged. Charge the battery.
Faulty battery fuse. Replace the battery fuse.
Faulty battery. Replace the battery.
Check the following cable connection.
CNA013: between the ECG control
board and key board
CNA014: between the power board
and ECG control board.
Battery cable:CNJ102 connector on the
power board
Faulty power board. Replace the power board.
No key operation Faulty cable connection Check the following
cable connection.CNA013: between the ECG control
board and key board
CNA014: between the power board
and ECG control board.
Faulty key board. Replace the key board.
Faulty ECG control board. Replace ECG the control board.
Faulty electrode attachment. Check that the electrodes are
properlyattached to the patient.
Faulty patient cable connection. Check that the patient cable is
firmlyconnected to the electrodes and
instrument.
No ECG waveform appears in a
specific lead or artifact appears on the
waveform.
Faulty ECG control board. Replace the ECG control board.
No ECG waveform appears in all
channels or artifact appears on the
waveform.
No electrode is attached to the patient
or the RF (RL) electrode is not attached
to the patient.
Check that the electrodes are properly
attached to the patient.
Faulty ECG control board. Replace the ECG control board.
Vertical and horizontal stripes appear
on the LCD screen at constant interval.
Faulty cable connection. Check the following cable
connection.CNA013: between the ECG controlboard and key board
LCD cable: CNJ201 connector on the
key board.
Faulty ECG control board. Replace the ECG control board.
Faulty LCD unit. Replace the LCD unit.
No sound Faulty cable connection. Check that the speaker cable
is firmlyconnected to the CNJ032 connector on
the ECG control board.
Faulty speaker. Replace the speaker.
The date and time is reset to January 1,
1980 and the Error 09 error message
appears.
The lithium battery is completely
discharged.
Replace the ECG control board. The
lithium battery is in the real time clock
IC on the ECG control board.
-
8/13/2019 Nihon-Kohden ECG-9620 ECG Monitor — Service Manual
43/96
3. TROUBLESHOOTING AND SYSTEM ERROR MESSAGE
3.6 Service Manual ECG-9620
Troubleshooting Recording
Problem
Problem Possible Cause Action
Dirty paper sensor. Clean the paper sensor.
Faulty cable connection. Check the following cable
connection.CNA013: between the ECG control
board and key board
CNA011: between the ECG control
board and feeding motor,
motor sensor and paper
sensor
Faulty key board. Replace the key board.
Faulty ECG control board. Replace the ECG control board.
The recorder does not feed the
recording paper when the Start key is
pressed.
Faulty feeding motor. Replace the feeding motor.
No printing. The thermal head is incorrectly
positioned.
Readjust the position of the thermal
head.
Faulty cable connection. Check the following cable
connection.CNA013: between the ECG control
board and key board
CNA011: between the ECG control
board and feeding motor,
motor sensor and paper
sensor
Faulty thermal head. Replace the thermal head.Faulty power
board. Replace the power board.Faulty ECG control board. Replace the ECG control board.
Sometimes the recorder does not print. The thermal head
protection circuitwhich protects the thermal head from
large artifact, such as AC interference is
rejecting noisy waveforms.
Check the electrode attachment. If
necessary, adjust the electrode position
so that clear ECG waveforms are
displayed.
The paper skews. Dirty thermal head. Clean the thermal head.
The recording paper is not properly set
in the instrument.
Make sure that the recording paper is
aligned with the lower recording paper
guide.The thermal head is incorrectly
positioned.
Readjust the position of the thermal
head.
Faulty feeding roller. Replace the paper magazine.
-
8/13/2019 Nihon-Kohden ECG-9620 ECG Monitor — Service Manual
44/96
3. TROUBLESHOOTING AND SYSTEM ERROR MESSAGE
Service Manual ECG-9620 3.7
System Error Message
During power-up and operation the instrument continuously checks
itself forsystem failure. If a failure is detected, system information and
error history areprinted on the recording paper and all operations are stopped.
System informationand error history are also displayed or printed due to transient
noise. After printingthe system information and error history, the power of the
instrument isautomatically turned off.
NOTE
If the same system information appears again after restarting
theinstrument, do not use the instrument until service personnel
hascorrected the cause of the problem. Sending a copy of the
systeminformation to your nearest Nihon Kohden distributor helps us
totroubleshoot your problem quickly.
System Information
Indicates an error number to identify the problem. To solve the
problem, do thecorrective action described below.
Error No. Meaning Corrective Action
00 Input unit error: An interrupt signal of 2 ms
is generated.
Replace the ECG control board.
01 Input unit error: There is no response to the
host.
Replace the ECG control board.
02 Input unit error: Communication protocol
error.
Replace the ECG control board.
03 4 bit CPU error: Initialization error. Replace the ECG
control board.04 4 bit CPU error: No response error. Replace the ECG control
board.05 A key on the key board is short-circuited. Replace the key
board.06 RTC error: No interrupt signal of 125 ms. Replace the ECG
control board.07 RTC error: Incorrect data in SRAM. Replace the ECG control
board.09 The lithium battery to back up the date and
time and all system settings is completelydischarged. The system
settings other thanthe items described in the following note
are returned to the factory initial settings.
Replace the ECG control board. The
lithium battery is in the real time clock ICon the ECG control
board. The date andtime is reset to January 1, 1980.
10 Bus error. Replace the ECG control board.
11 Address error. Replace the ECG control board.
-
8/13/2019 Nihon-Kohden ECG-9620 ECG Monitor — Service Manual
45/96
3. TROUBLESHOOTING AND SYSTEM ERROR MESSAGE
3.8 Service Manual ECG-9620
NOTE
Error 05 also appears when any key on the operation panel is
pressed and held down.
When Error 08 appears, the following settings are not reset
tothe factory initial settings even if the instrument is
initialized.— display language — hum filter
— hospital name — direct/modem connection
— recording resolution setting — elapsed time
— local language font — saved ECG data
Error No. Meaning Corrective Action
12 Illegal command. Replace the ECG control board.
13 Zero division error. Replace the ECG control board.
14 Power off time out. Replace the ECG control board.
15 EEPROM error: This occurs due to the
EEPROM check error, installed language
error or communication error between the
host and EEPROM.
Replace the ECG control board.
16 Local language flash memory error. Replace the ECG control
board.17 ECG model error. Replace the ECG control board.
18 Local language is not installed. Install the local
language.19 Local language is not installed. Install the local
language.Error in memory area for local language. Re-install the local
language.20 Local language text file version does not
match the ECG software version.
Install the local language text file which is
the same version as the ECG software.
21 ECG interpretation error (Time over). Check the input
waveforms. If any noiseis superimposed on the waveforms, find
and eliminate the cause. If no noise is
superimposed on the waveform, replace the
ECG control board.
22 The entered information does not match
the data in the flash memory.
Replace the ECG control board.
27 Program version error. The program is
updated.
Turn the power off, then on and check that
the ECG waveforms are displayed
correctly.
-
8/13/2019 Nihon-Kohden ECG-9620 ECG Monitor — Service Manual
46/96
3. TROUBLESHOOTING AND SYSTEM ERROR MESSAGE
Service Manual ECG-9620 3.9
Error History
Indicates the latest three errors and the date of the latest
error, as in the examplebelow.
-
8/13/2019 Nihon-Kohden ECG-9620 ECG Monitor — Service Manual
47/96
Service Manual ECG-9620 4C.1
Section 4 System Test, Adjustment,And Setting
System Test
………………………………………………………………………………………………………..
4.1Overall
………………………………………………………………………………………………………
4.1Calling up the System Test Level 1
………………………………………………………………..
4.2Calling up the System Test Level 2
………………………………………………………………..
4.3Entering the System Test Number
…………………………………………………………………
4.4Executing the System Test
……………………………………………………………………………
4.5Quitting the System Test
………………………………………………………………………………
4.6Exiting the System Test
Mode……………………………………………………………………….
4.6Demonstration
…………………………………………………………………………………………………….
4.7Recorder
…………………………………………………………………………………………………………….
4.8Thermal Head
……………………………………………………………………………………………………
4.10Key…………………………………………………………………………………………………………………..
4.11Memory
…………………………………………………………………………………………………………….
4.12Single Memory Test Mode
………………………………………………………………………….
4.13Continuous Memory Test Mode
…………………………………………………………………..
4.13LCD/LED…………………………………………………………………………………………………………..
4.14Input Unit
………………………………………………………………………………………………………….
4.16Calibration
…………………………………………………………………………………………………………
4.17Communication
………………………………………………………………………………………………….
4.18CRO/EXT1
………………………………………………………………………………………………………..
4.20System Setup Initialization
…………………………………………………………………………………..
4.22ECG Findings List
Recording……………………………………………………………………………….
4.23Recording Resolution Setting
………………………………………………………………………………
4.24Date and Time Setting
………………………………………………………………………………………..
4.25Setting the Date and Time
………………………………………………………………………….
4.25 -
8/13/2019 Nihon-Kohden ECG-9620 ECG Monitor — Service Manual
48/96
-
8/13/2019 Nihon-Kohden ECG-9620 ECG Monitor — Service Manual
49/96
4. SYSTEM TEST, ADJUSTMENT AND SETTING
4.2 Service Manual ECG-9620
Calling up the System Test
Level 1
1. If the power is on, turn it off.
NOTE
Release the Feed/Mark key immediately after the instrument
startsprinting. If you continue to hold the Feed/Mark key for more
than 15seconds, the instrument recognizes that the Feed/Mark key is
short-circuited and prints the system information Error 05 at the end
ofprinting.
2. Press the Power key while pressing the Feed/Mark key. Hold
the Feed/Mark keyuntil the instrument begins to print the system test procedure,
relationshipbetween the input number and its corresponding key name on the
operationpanel and system test number list as shown below. The Test level
1 is called upand the instrument is in standby mode for entering the system
test number.To cancel printing the following information, press the
Start/Stop key..
System Test Screen
Printout
+
-
8/13/2019 Nihon-Kohden ECG-9620 ECG Monitor — Service Manual
50/96
4. SYSTEM TEST, ADJUSTMENT AND SETTING
Service Manual ECG-9620 4.3
Calling up the System Test
Level 2
1. If the power is on, turn it off.
NOTE
Release the Feed/Mark key immediately after the instrument
startsprinting. If you continue to hold the Feed/Mark key for more
than 15seconds, the instrument recognizes that the Feed/Mark key is
short-circuited and prints the system information Error 05 at the end
ofprinting.
2. Press the Power key while pressing the Feed/Mark and
Auto/Manual keystogether. Hold the Feed/Mark and Auto/Manual keys until the
instrument beginsto print the system test procedure, relationship between the
input number and itscorresponding key name on the operation panel and system test
number list asshown below. The Test level 2 is called up and the instrument is
in standbymode for entering the system test number.
To cancel printing the following information, press the
Start/Stop key.System Test Screen
Printout
++
-
8/13/2019 Nihon-Kohden ECG-9620 ECG Monitor — Service Manual
51/96
4. SYSTEM TEST, ADJUSTMENT AND SETTING
4.4 Service Manual ECG-9620
Numeric Key Numeric Key
0 Copy/CAL key 5 Rhythm key
1 F1 function key 6 Age key
2 F2 function key 7 Sex key
3 F3 function key 8 Feed/Mark key
4 Mode key 9 Filter key
Clear Auto/Manual key Enter Start/Stop key
Entering the System Test
Number
Use the following keys on the operation panel to enter a 2-digit
number forexecuting the desired system test. The specified system test
numbers are indicatedin the [xx] bracket at the right of each system test item on the
printout output whenthe Test level 1 or 2 is called up. Refer to the Calling up the
Test Level Xsection.
To delete the entered number, press the Auto/Manual key. To
delete a 2-digitnumber, press the Auto/Manual key twice. At this time, the ones
digit number isdeleted before the tens digit number is deleted.
-
8/13/2019 Nihon-Kohden ECG-9620 ECG Monitor — Service Manual
52/96
4. SYSTEM TEST, ADJUSTMENT AND SETTING
Service Manual ECG-9620 4.5
Press the Start/Stop key. For some tests, the System Test screen
is displayedduring the test as shown below,
System Test Screen
If you entered an unspecified number, 8 repeating pips alarm
sound and theInvalid number. Please re-enter number error message is
displayed as shownbelow.
To re-enter the system test number, do either of the following:
Delete the previously entered number by pressing the Auto/Manual
key.Enter the system test number by overwriting the previously
entered number.Executing the System Test
-
8/13/2019 Nihon-Kohden ECG-9620 ECG Monitor — Service Manual
53/96
4. SYSTEM TEST, ADJUSTMENT AND SETTING
4.6 Service Manual ECG-9620
Quitting the System Test The procedures to quit each system test
vary from test to test. Some testsautomatically end after an alarm sound is generated or a
printout is output. Referto the following explanations for each test. After quitting each
test, the instrumentreturns to the standby mode for entering the system test
number.After a system test is completed, you can execute other system
test without exitingthe System Test mode.
Exiting the System Test
ModeAfter all desired system tests are finished, press the Power
key. -
8/13/2019 Nihon-Kohden ECG-9620 ECG Monitor — Service Manual
54/96
4. SYSTEM TEST, ADJUSTMENT AND SETTING
Service Manual ECG-9620 4.7
Demonstration
This is used to learn or demonstrate instrument operation.
While executing this test item, the instrument generates dummy
12 lead ECGresting waveforms until the power of the instrument is turned
off. The ECGwaveforms can be recorded and also displayed as shown below.
Procedure
Enter the system test number [00] (Test level 1) and press the
Start/Stop key.To quit the test, turn the power of the instrument off by
pressing the Power key.Dummy 12 lead ECG resting waveforms on LCD
-
8/13/2019 Nihon-Kohden ECG-9620 ECG Monitor — Service Manual
55/96
4. SYSTEM TEST, ADJUSTMENT AND SETTING
4.8 Service Manual ECG-9620
Recorder
This is used to check the condition of the recorder by printing
test patterns. Therecording test patterns consist of the following and are printed
in the followingorder:
1. Diagonal lines
2. Characters H and X (Test level 1 only)
3. Paper speed scales (25 and 50 mm/s)
The recorder test of Test level 1 contains the same recorder
test and thermal headtest as Test level 2. With regard to the check procedure for
characters H and X,refer to the Thermal Head section.
Procedure
Enter the system t

ECG-9620L ECG-9620M ECG-9620N ECG-9620P ECG-9620S ECG-9620T ECG-9620U
SERVICE MANUAL
cardiofax
ELECTROCARDIOGRAPH
ECG-9620
08CK2.782.00516E
CONTENTS |
||
|
Contents |
||
|
GENERAL HANDLING PRECAUTIONS ……………………………………………………………………… |
i |
|
|
WARRANTY POLICY ………………………………………………………………………………………………. |
ii |
|
|
EMC RELATED CAUTION ……………………………………………………………………………………….. |
iii |
|
|
Conventions Used in this Manual and Instrument ………………………………………………………… |
iv |
|
|
Dangers, Warnings, Cautions and Notes …………………………………………………………… |
iv |
|
|
Explanations of the Symbols in this Manual and Instrument …………………………………. |
v |
|
|
Section 1 |
General ……………………………………………………………………….. |
1C.1 |
|
Introduction …………………………………………………………………………………………………………. |
1.1 |
|
|
General Information on Servicing …………………………………………………………………………… |
1.2 |
|
|
Service Policy, Service Parts and Patient Safety Checks …………………………………………… |
1.4 |
|
|
Service Policy …………………………………………………………………………………………….. |
1.4 |
|
|
Service Parts ……………………………………………………………………………………………… |
1.4 |
|
|
Patient Safety Checks ………………………………………………………………………………….. |
1.5 |
|
|
Maintenance Equipments and Tools ………………………………………………………………. |
1.5 |
|
|
General Safety Information ……………………………………………………………………………………. |
1.6 |
|
|
Specifications …………………………………………………………………………………………………….. |
1.11 |
|
|
Panel Descriptions ……………………………………………………………………………………………… |
1.14 |
|
|
Front Panel ………………………………………………………………………………………………. |
1.14 |
|
|
Left Side Panel ………………………………………………………………………………………….. |
1.14 |
|
|
Operation Panel ………………………………………………………………………………………… |
1.15 |
|
|
Right Side Panel ……………………………………………………………………………………….. |
1.15 |
|
|
Rear Panel ……………………………………………………………………………………………….. |
1.16 |
|
|
Composition ………………………………………………………………………………………………………. |
1.17 |
|
|
Standard Components ……………………………………………………………………………….. |
1.17 |
|
|
Options ……………………………………………………………………………………………………. |
1.17 |
|
|
Location ……………………………………………………………………………………………………………. |
1.18 |
|
|
Section 2 |
Maintenance ………………………………………………………………… |
2C.1 |
|
Replacement ……………………………………………………………………………………………………….. |
2.1 |
|
|
Periodic Replacement Schedule ……………………………………………………………………. |
2.1 |
|
|
Cleaning and Lubrication ………………………………………………………………………………………. |
2.2 |
|
|
Cleaning and Greasing Schedules ………………………………………………………………… |
2.2 |
|
|
Cleaning the Paper Mark Sensor and Paper Empty Sensor ………………………………. |
2.2 |
|
|
Cleaning the Motor Rotation Sensor and Lubricating the Motor Gear and Gear |
||
|
Meshed with Motor Gear ……………………………………………………………………………… |
2.3 |
|
|
Maintenance Check Sheet …………………………………………………………………………………….. |
2.5 |
|
|
Section 3 |
Troubleshooting and System Error Message …………………. |
3C.1 |
|
Troubleshooting Flowchart …………………………………………………………………………………….. |
3.1 |
|
|
Troubleshooting Table …………………………………………………………………………………………… |
3.4 |
|
|
Troubleshooting General Operation Problem …………………………………………………… |
3.4 |
|
Service Manual ECG-9620 |
C.1 |
|
CONTENTS |
|
|
Troubleshooting Recording Problem ………………………………………………………………. |
3.6 |
|
System Error Message …………………………………………………………………………………………. |
3.7 |
|
Section 4 |
System Test, Adjustment and Setting ……………………………. |
4C.1 |
|
System Test ………………………………………………………………………………………………………… |
4.1 |
|
|
Overall ………………………………………………………………………………………………………. |
4.1 |
|
|
Calling up the System Test Level 1 ………………………………………………………………… |
4.2 |
|
|
Calling up the System Test Level 2 ………………………………………………………………… |
4.3 |
|
|
Entering the System Test Number …………………………………………………………………. |
4.4 |
|
|
Executing the System Test ……………………………………………………………………………. |
4.5 |
|
|
Quitting the System Test ………………………………………………………………………………. |
4.6 |
|
|
Exiting the System Test Mode ……………………………………………………………………….. |
4.6 |
|
|
Demonstration …………………………………………………………………………………………………….. |
4.7 |
|
|
Recorder …………………………………………………………………………………………………………….. |
4.8 |
|
|
Thermal Head ……………………………………………………………………………………………………. |
4.10 |
|
|
Key …………………………………………………………………………………………………………………… |
4.11 |
|
|
Memory …………………………………………………………………………………………………………….. |
4.12 |
|
|
Single Memory Test Mode ………………………………………………………………………….. |
4.13 |
|
|
Continuous Memory Test Mode …………………………………………………………………… |
4.13 |
|
|
LCD/LED …………………………………………………………………………………………………………… |
4.14 |
|
|
Input Unit ………………………………………………………………………………………………………….. |
4.16 |
|
|
Calibration …………………………………………………………………………………………………………. |
4.17 |
|
|
Communication ………………………………………………………………………………………………….. |
4.18 |
|
|
CRO/EXT1 ………………………………………………………………………………………………………… |
4.20 |
|
|
System Setup Initialization …………………………………………………………………………………… |
4.22 |
|
|
ECG Findings List Recording ……………………………………………………………………………….. |
4.23 |
|
|
Recording Resolution Setting ………………………………………………………………………………. |
4.24 |
|
|
Date and Time Setting ………………………………………………………………………………………… |
4.25 |
|
|
Setting the Date and Time ………………………………………………………………………….. |
4.25 |
|
Section 5 |
Board/Unit Description …………………………………………………. |
5C.1 |
|
Block Diagram ……………………………………………………………………………………………………… |
5.1 |
|
|
Power Unit ………………………………………………………………………………………………………….. |
5.2 |
|
|
ECG Control Board ………………………………………………………………………………………………. |
5.2 |
|
Section 6 |
Disassembly ………………………………………………………………… |
6C.1 |
|
Before You Begin ………………………………………………………………………………………………….. |
6.1 |
|
|
Warnings and Cautions ……………………………………………………………………………….. |
6.1 |
|
|
Required Tools ……………………………………………………………………………………………. |
6.1 |
|
|
Cable Connection ………………………………………………………………………………………………… |
6.2 |
|
|
Removing the Upper Casing ………………………………………………………………………………….. |
6.4 |
|
|
Removing the Magazine and Recording Paper ……………………………………………….. |
6.4 |
|
|
Removing the Battery Pack ………………………………………………………………………….. |
6.4 |
|
|
Removing the Upper Casing …………………………………………………………………………. |
6.4 |
|
|
Removing the Thermal Head and Motor Assy ………………………………………………………….. |
6.5 |
|
|
Removing the Thermal Head ………………………………………………………………………… |
6.5 |
|
C.2 |
Service Manual ECG-9620 |
|
CONTENTS |
||
|
Removing the Motor Assy …………………………………………………………………………….. |
6.6 |
|
|
Removing the ECG Control Board ………………………………………………………………………….. |
6.6 |
|
|
Removing the Power Board …………………………………………………………………………………… |
6.8 |
|
|
Removing the Power Board ………………………………………………………………………….. |
6.8 |
|
|
Replacing the Power Fuse and Battery Fuse ………………………………………………….. |
6.9 |
|
|
Removing the Key Board and LCD Unit …………………………………………………………………. |
6.10 |
|
|
Section 7 |
Replaceable Parts List ………………………………………………….. |
7C.1 |
|
Instrument …………………………………………………………………………………………………………… |
7.2 |
|
|
Section 8 |
Connector Pin Assignment …………………………………………….. |
8.1 |
|
Attaching the Ferrite Core …………………………………………………………………………….. |
8.1 |
|
|
EXT-IN Connector ……………………………………………………………………………………….. |
8.2 |
|
|
CRO-OUT Connector ………………………………………………………………………………….. |
8.2 |
|
|
SIO Connector ……………………………………………………………………………………………. |
8.2 |
|
Service Manual ECG-9620 |
C.3 |
GENERAL HANDLING PRECAUTIONS
This device is intended for use only by qualified medical personnel.
Use only Nihon Kohden approved products with this device. Use of non-approved products or in a non-approved manner may affect the performance specifications of the device. This includes, but is not limited to, batteries, recording paper, pens, extension cables, electrode leads, input boxes and AC power.
Please read these precautions thoroughly before attempting to operate the instrument.
1.To safely and effectively use the instrument, its operation must be fully understood.
2.When installing or storing the instrument, take the following precautions:
(1)Avoid moisture or contact with water, dust, extreme atmospheric pressure, excessive humidity and temperatures, poorly ventilated areas, and saline or sulphuric air.
(2)Place the instrument on an even, level floor. Avoid vibration and mechanical shock, even during transport.
(3)Avoid placing in an area where chemicals are stored or where there is danger of gas leakage.
(4)The power line source to be applied to the instrument must correspond in frequency and voltage to product specifications, and have sufficient current capacity.
(5)Choose a room where a proper grounding facility is available.
3.Before Operation
(1)Check that the instrument is in perfect operating order.
(2)Check that the instrument is grounded properly.
(3)Check that all cords are connected properly.
(4)Pay extra attention when the instrument is in combination with other instruments to avoid misdiagnosis or other problems.
(5)All circuitry used for direct patient connection must be doubly checked.
(6)Check that battery level is acceptable and battery condition is good when using battery-operated models.
4.During Operation
(1)Both the instrument and the patient must receive continual, careful attention.
(2)Turn power off or remove electrodes and/or transducers when necessary to assure the patient’s safety.
(3)Avoid direct contact between the instrument housing and the patient.
5.To Shutdown After Use
(1)Turn power off with all controls returned to their original positions.
(2)Remove the cords gently; do not use force to remove them.
(3)Clean the instrument together with all accessories for their next use.
6.The instrument must receive expert, professional attention for maintenance and repairs. When the instrument is not functioning properly, it should be clearly marked to avoid operation while it is out of order.
7.The instrument must not be altered or modified in any way.
8.Maintenance and Inspection:
(1)The instrument and parts must undergo regular maintenance inspection at least every 6 months.
(2)If stored for extended periods without being used, make sure prior to operation that the instrument is in perfect operating condition.
|
Service Manual ECG-9620 |
i |
(3)Technical information such as parts list, descriptions, calibration instructions or other information is available for qualified user technical personnel upon request from your Nihon Kohden distributor.
9.When the instrument is used with an electrosurgical instrument, pay careful attention to the application and/or location of electrodes and/or transducers to avoid possible burn to the patient.
10.When the instrument is used with a defibrillator, make sure that the instrument is protected against defibrillator discharge. If not, remove patient cables and/or transducers from the instrument to avoid possible damage.
WARRANTY POLICY
Nihon Kohden Corporation (NKC) shall warrant its products against all defects in materials and workmanship for one year from the date of delivery. However, consumable materials such as recording paper, ink, stylus and battery are excluded from the warranty.
NKC or its authorized agents will repair or replace any products which prove to be defective during the warranty period, provided these products are used as prescribed by the operating instructions given in the operator’s and service manuals.
No other party is authorized to make any warranty or assume liability for NKC’s products. NKC will not recognize any other warranty, either implied or in writing. In addition, service, technical modification or any other product change performed by someone other than NKC or its authorized agents without prior consent of NKC may be cause for voiding this warranty.
Defective products or parts must be returned to NKC or its authorized agents, along with an explanation of the failure. Shipping costs must be pre-paid.
This warranty does not apply to products that have been modified, disassembled, reinstalled or repaired without Nihon Kohden approval or which have been subjected to neglect or accident, damage due to accident, fire, lightning, vandalism, water or other casualty, improper installation or application, or on which the original identification marks have been removed.
|
ii |
Service Manual ECG-9620 |
EMC RELATED CAUTION
This equipment and/or system complies with the International Standard IEC60601-1-2 for electromagnetic compatibility for medical electrical equipment and/or system. However, an electromagnetic environment that exceeds the limits or levels stipulated in the IEC60601-1-2, can cause harmful interference to the equipment and/or system or cause the equipment and/or system to fail to perform its intended function or degrade its intended performance. Therefore, during the operation of the equipment and/or system, if there is any undesired deviation from its intended operational performance, you must avoid, identify and resolve the adverse electromagnetic effect before continuing to use the equipment and/or system.
The following describes some common interference sources and remedial actions:
1.Strong electromagnetic interference from a nearby emitter source such as an authorized radio station or cellular phone:
Install the equipment and/or system at another location if it is interfered with by an emitter source such as an authorized radio station. Keep the emitter source such as cellular phone away from the equipment and/or system.
2.Radio-frequency interference from other equipment through the AC power supply of the equipment and/or system:
Identify the cause of this interference and if possible remove this interference source. If this is not possible, use a different power supply.
3.Effect of direct or indirect electrostatic discharge:
Make sure all users and patients in contact with the equipment and/or system are free from direct or indirect electrostatic energy before using it.
4.Electromagnetic interference with any radio wave receiver such as radio or television:
If the equipment and/or system interferes with any radio wave receiver, locate the equipment and/or system as far as possible from the radio wave receiver.
If the above suggested remedial actions do not solve the problem, consult your Nihon Kohden Corporation subsidiary or distributor for additional suggestions.
The CE mark is a protected conformity mark of the European Community. The products herewith comply with the requirements of the Medical Device Directive 93/42/EEC.
The CE mark is applied only to the ECG-9620L/M/N Electrocardiograph.
This equipment complies with EUROPEAN STANDARD EN-60601-1-2 (1993) which requires EN-55011, class B.
|
Service Manual ECG-9620 |
iii |
Conventions Used in this Manual and Instrument
Dangers, Warnings, Cautions and Notes
Warnings, cautions and notes are used in this manual to alert or signal the reader to specific information.
DANGER
A danger is used to alert the user to a hazardous situation which will cause death or serious injury.
WARNING
A warning alerts the user to possible injury or death associated with the use or misuse of the instrument.
CAUTION
A caution alerts the user to possible injury or problems with the instrument associated with its use or misuse such as instrument malfunction, instrument failure, damage to the instrument, or damage to other property.
NOTE
A note provides specific information, in the form of recommendations, prerequirements, alternative methods or supplemental information.
|
iv |
Service Manual ECG-9620 |
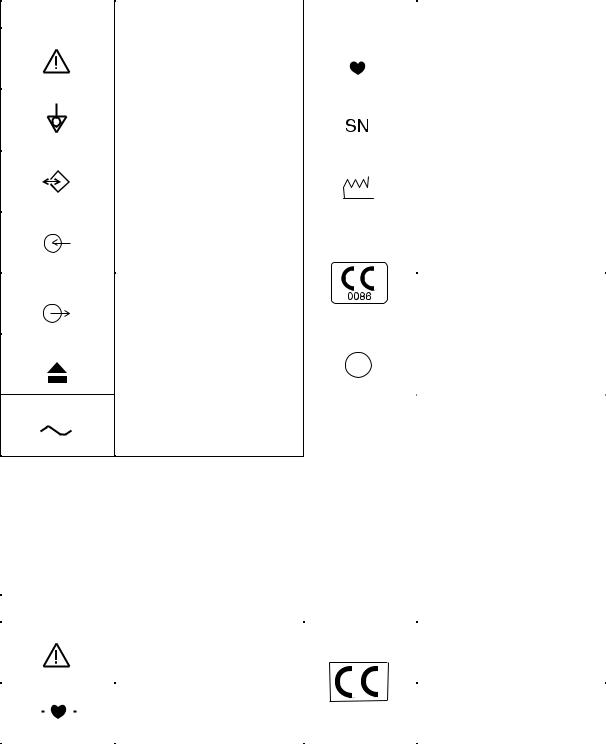
Explanations of the Symbols in this Manual and Instrument
The following symbols found in this manual/instrument bear the respective descriptions as given.
Cardiograph
|
Symbol |
Description |
Symbol |
Description |
|||||||||||
|
Attention, consult operator’s |
Type CF applied part |
|||||||||||||
|
manual |
||||||||||||||
|
Equipotential terminal |
Serial number |
|||||||||||||
|
Serial input/output terminal |
Date of manufacture |
|||||||||||||
|
Input terminal for analog signal |
The CE mark is a protected |
|||||||||||||
|
conformity mark of European |
||||||||||||||
|
Community. The products |
||||||||||||||
|
Output terminal for analog |
herewith comply with the |
|||||||||||||
|
requirements of the Medical |
||||||||||||||
|
signal |
Device Directive 93/42/EEC. |
|||||||||||||
|
Eject (magazine release button) |
Protective earth |
|||||||||||||
Alternative current
The CE mark is applied only to the
ECG-9620L/M/N Electrocardiograph.
Patient cable
|
Symbol |
Description |
Symbol |
Description |
||||||
|
Attention, consult operator’s |
The CE mark is a protected |
||||||||
|
manual |
conformity mark of European |
||||||||
|
Community. The products |
|||||||||
|
Defibrillation-proof |
herewith comply with the |
||||||||
|
requirements of the Medical |
|||||||||
|
Type CF applied par |
Device Directive 93/42/EEC. |
||||||||
|
Service Manual ECG-9620 |
v |
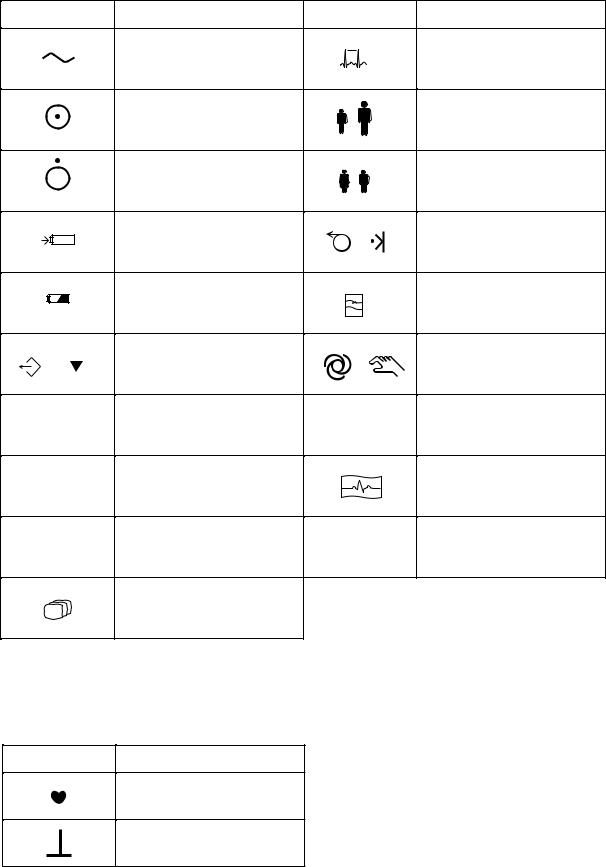
Operation panel
|
Symbol |
Description |
Symbol |
Description |
|
Alternating current |
Rhythm |
||
|
5 |
|||
|
“On” only for a part of |
Age |
||
|
equipment |
|||
|
6 |
|||
|
“Off” only for a part of |
Sex |
||
|
equipment |
|||
|
7 |
|||
|
Battery charging |
/ |
Paper feed / Mark |
|
|
8 |
|||
|
Battery check |
Filter |
||
|
9 |
|||
|
/ |
Copy / Calibration |
/ |
Automatic / Manual control |
|
0 |
|||
|
F1 |
F1 function key |
CLR |
Clear |
|
1 |
|||
|
F2 |
F2 function key |
Start/Stop recording |
|
|
2 |
|||
|
F3 |
F3 function key |
ENT |
Enter |
|
3 |
Mode
4
A key with a numeric number is used to enter numbers in the System Setup screen and paient information.
On screen
QRS sync mark
CAL mark
|
vi |
Service Manual ECG-9620 |
Section 1 General
|
Introduction ………………………………………………………………………………………………………… |
1.1 |
|
General Information on Servicing ………………………………………………………………………….. |
1.2 |
|
Service Policy, Service Parts and Patient Safety Checks ………………………………………….. |
1.4 |
|
Service Policy ……………………………………………………………………………………………. |
1.4 |
|
Service Parts …………………………………………………………………………………………….. |
1.4 |
|
Patient Safety Checks …………………………………………………………………………………. |
1.5 |
|
Maintenance Equipments and Tools ……………………………………………………………… |
1.5 |
|
General Safety Information …………………………………………………………………………………… |
1.6 |
|
Specifications ……………………………………………………………………………………………………. |
1.11 |
|
Panel Descriptions …………………………………………………………………………………………….. |
1.14 |
|
Front Panel ……………………………………………………………………………………………… |
1.14 |
|
Left Side Panel …………………………………………………………………………………………. |
1.14 |
|
Operation Panel ……………………………………………………………………………………….. |
1.15 |
|
Right Side Panel ………………………………………………………………………………………. |
1.15 |
|
Rear Panel ………………………………………………………………………………………………. |
1.16 |
|
Composition ……………………………………………………………………………………………………… |
1.17 |
|
Standard Components ………………………………………………………………………………. |
1.17 |
|
Options …………………………………………………………………………………………………… |
1.17 |
|
Location …………………………………………………………………………………………………………… |
1.18 |
|
Service Manual ECG-9620 |
1C.1 |

1. GENERAL
Introduction
This service manual provides useful information to qualified service personnel to understand, troubleshoot, service, maintain and repair the ECG-9620L/M/N/P/S/T/ U Electrocardiograph (referred to as “the instrument” in this service manual).
The System test, Adjustment and Setting section in this service manual describes the maintenance that should be performed by qualified service personnel. The Maintenance section in the operator’s manual describes the maintenance that can be performed by the user.
The information in the operator’s manual is primarily for the user. However, it is important for service personnel to thoroughly read the operator’s manual and service manual before starting to troubleshoot, service, maintain or repair this instrument. This is because service personnel need to understand the operation of the instrument in order to effectively use the information in the service manual.
|
Service Manual ECG-9620 |
1.1 |
1. GENERAL
General Information on Servicing
Note the following information when servicing the instrument.
CAUTIONS
Safety
•There is the possibility that the outside surface of the instrument, such as the operation keys, could be contaminated by contagious germs, so disinfect and clean the instrument before servicing it.
When servicing the instrument, wear rubber gloves to protect yourself from infection.
•There is the possibility that when the lithium battery is broken, a solvent inside the lithium battery could flow out or a toxic substance inside it could come out. If the solvent or toxic substance touches your skin or gets into your eye or mouth, immediately wash it with a lot of water and see a physician.
Liquid ingress
The instrument is not waterproof, so do not install the instrument where water or liquid can get into or fall on the instrument. If liquid accidentally gets into the instrument or the instrument accidentally drops into liquid, disassemble the instrument, clean it with clean water and dry it completely. After reassembling, verify that there is nothing wrong with the patient safety checks and function/ performance checks. If there is something wrong with the instrument, contact your Nihon Kohden representative for repair.
Environmental Safeguards
Depending on the local laws in your community, it may be illegal to dispose of the lithium battery in the regular waste collection. Check with your local officials for proper disposal procedures.
Disinfection and cleaning
To disinfect the outside surface of the instrument, wipe it with a nonabrasive cloth moistened with alcohol. Do not use any other disinfectants or ultraviolet rays to disinfect the instrument.
|
1.2 |
Service Manual ECG-9620 |

1. GENERAL
Caution — continued
Transport
•Use the specified shipment container and packing material to transport the instrument. If necessary, double pack the instrument. Also, put the instrument into the shipment container after packing so that the buffer material does not get inside the instrument.
•When transporting a board or unit of the instrument, be sure to put it in a conductive bag. Never use an aluminum bag to transport a board or unit. Also, never use a styrene foam or plastic bag which generates static electricity to wrap the board or unit of the instrument.
Handling the instrument
•Because the outside surface of the instrument is made of resin, the outside surface of the instrument is easily damaged. So when handling the instrument, remove clutter from around the instrument and be careful to not damage the instrument or get it dirty.
•Because most of the boards in the instrument are multilayer boards with surface mount electrical devices (SMD), a special tool is required to remove and solder the electrical devices on it. To avoid damaging other electrical components, do not remove and solder SMD components yourself.
Measuring and Test Equipment
Maintain the accuracy of the measuring and test equipment by checking and calibrating it according to the check and calibration procedures.
|
Service Manual ECG-9620 |
1.3 |

1. GENERAL
Service Policy, Service Parts and Patient Safety Checks
Service Policy
Our technical service policy for this instrument is to replace the faulty unit, board or part or damaged mechanical part with a new one. Do not perform electrical device or component level repair of the multilayer board or unit. We do not support component level repair outside the factory for the following reasons:
•Most of the boards are multilayer boards with surface mount electrical devices, so the mounting density of the board is too high.
•A special tool or high degree of repair skill is required to repair the multilayer boards with surface mount electrical devices.
Only disassemble the instrument or replace a board or unit in an environment where the instrument is protected against static electricity.
|
Refer to “Replaceable Parts List” of this manual for the service parts for technical |
|
|
service that we provide. |
|
|
Service Parts |
NOTE |
|
When ordering parts or accessories from your Nihon Kohden |
|
|
representative, please quote the NK code number and part name |
|
|
which is listed in this service manual, and the name or model of the |
|
|
unit in which the required part is located. This will help us to |
|
|
promptly attend to your needs. Always use parts and accessories |
|
|
recommended or supplied by Nihon Kohden Corporation to assure |
|
|
maximum performance from your instrument. |
|
1.4 |
Service Manual ECG-9620 |
Patient Safety Checks
Maintenance Equipments
and Tools
1. GENERAL
Periodic maintenance procedures and diagnostic check procedures are provided in this manual to ensure that the instrument is operating in accordance with its design and production specifications. To verify that the instrument is working in a safe manner with regard to patient safety, patient safety checks should be performed on the instrument before it is first installed, periodically after installation, and after any repair is made on the instrument.
For patient safety checks, perform the following checks as described in the IEC60601-1 “Medical electrical equipment — Part 1: General requirements for safety”:
•Protective earth resistance check
•Earth leakage current check
•Enclosure leakage current check
•Patient leakage current check
•Withstanding voltage check
Test equipment
When repairing or calibrating the instrument, the following test equipment is required.
•Oscilloscope: 2 channels or more for input signal, 50 mV to 5 V input range, 1/ 10 attenuating probe and 100 MHz or more frequency response characteristic must be provided.
•Digital voltmeter: standard type (An oscilloscope can be used instead of the digital voltmeter.)
|
Service Manual ECG-9620 |
1.5 |
1. GENERAL
General Safety Information
DANGER
•Never use this cardiograph in the presence of any flammable anesthetic gas or high-concentration oxygen atmosphere. Failure to follow this warning may cause explosion or fire.
•Never use this cardiograph in a high-pressure oxygen medical tank. Failure to follow this warning may cause explosion or fire.
WARNING
Using with an electrical surgical unit (ESU)
•Never use this cardiograph near an ESU. The cardiograph may malfunction due to high-frequency noise from the ESU.
•When using this cardiograph with an ESU, refer to the instruction manual for the ESU. Before measurement, check that the return plate is correctly attached to the patient and check that the cardiograph operates correctly when using with the ESU. If the return plate is not attached correctly, it may burn the patient’s skin where the electrodes are attached.
MRI examination
•Do not install this cardiograph in an MRI examination room. The cardiograph may not operate properly due to high-frequency magnetic noise from the MRI.
•When performing MRI tests, remove from the patient all electrodes which are connected to this cardiograph. Failure to follow this warning may cause serious electrical burn on the patient due to local heating caused by dielectric electromotive force. For details, refer to the instruction manual for the MRI.
When performing defibrillation
•Before defibrillation, remove all electrodes and gel from the chest of the patient. If the defibrillator paddle touches electrodes or gel, the discharged energy may burn the patient’s skin.
•Before defibrillation, all persons must keep clear of the bed and must not touch the patient or any equipment connected to the patient. Failure to follow this warning may cause serious electrical burn, shock or other injury.
|
1.6 |
Service Manual ECG-9620 |

1. GENERAL
Warning — continued
Use only the following specified patient cables when using with a defibrillator or ESU. When the specified patient cable is connected, the cardiograph is type CF defibrillation-proof compliance. Failure to follow this warning will cause serious electrical burn where the electrode is attached and damage the cardiograph due to discharge energy when defibrillation is performed.
Patient cable: BJ-901D – IEC standard, 3 mm diameter tip
BJ-902D – IEC/DIN standard, 4 mm diameter tip
BJ-903D – IEC/DIN standard, clip
BA-901D – AHA requirement, 3 mm diameter tip
BA-903D – AHA requirement, color clip
When using an ESU and defibrillator with the cardiograph, use silver chloride disposable electrodes.
Installation
WARNING
•Only use the 3-prong power cord provided with the cardiograph. Failure to follow this caution may cause electrical shock to the patient and operator.
•Only use the specified patient cable and connect the external instruments with the specified installation procedure. Failure to follow this warning may cause a serious electrical shock to the patient and operator by leakage current.
CAUTION
•When the provided 3-prong power cord cannot be used, operate the cardiograph on battery power. When another type of power cord (especially 2-prong power cord) is used, this may cause electrical shock to the patient and operator.
•When several medical instruments are used together, ground all instruments at the same one-point ground to protect the patient and operator from electrical shock. Any potential difference between instruments may cause electrical shock to the patient and operator.
•When connecting an external instrument to connectors marked with  , the external instrument and this cardiograph must be connected according to the IEC60601-1-1 “Medical electrical equipment — Part 1- 1: General requirements for safety — Collateral standard: Safety requirements for medical electrical systems”. Failure to follow this warning may cause electrical shock to the patient and operator.
•When inserting or removing the battery from the cardiograph, make sure that the cardiograph is turned off. Otherwise, the patient and operator may get an electrical shock.
|
Service Manual ECG-9620 |
1.7 |

1. GENERAL
Battery Pack
DANGER
•Keep the battery pack away from fire. Do not heat the battery pack. Otherwise, the substance liquid leaks out and the battery pack explodes.
•Never short-circuit the + and – terminals on the battery pack with a wire. Never store or carry the battery pack with metal such as necklace or hair pins. The battery pack short-circuits and a large current flows, causing leakage of the substance liquid inside the battery and battery explosion.
•Never disassemble or modify the battery pack. Never damage or directly solder the sheath tube. The battery pack short-circuits, the substance liquid comes out and the battery pack explodes.
•Do not use a battery pack which is damaged, such as from falling. There is a gas discharge valve inside the battery and if this valve is damaged, the gas cannot be discharged, causing the battery pack to explode.
•Do not subject the battery pack to a strong mechanical shock. The susbstance liquid inside the battery leaks and explodes.
•If the battery pack is damaged and substance liquid inside the battery contacts the eyes or skin, wash immediately and thoroughly with water and see your physician. Never rub your eyes, otherwise you may lose your eyesight.
•Only charge the battery pack with the ECG-9620 cardiograph. If any other battery charger is used, abnormal current flows and the substance liquid inside the battery leaks and the battery explodes.
•Do not connect the battery pack to an AC outlet or lighter socket in a car. The substance liquid inside the battery leaks out and the battery pack explodes.
•The battery has + and – polarity. Make sure that the battery is installed with the correct polarity direction. Otherwise, the substance inside the battery leaks out and the battery pack explodes.
•Use only the SB-901D battery pack.
WARNING
•Do not immerse the battery pack in water or seawater. The battery heats up and rusts and the substance liquid inside the battery leaks.
•Never use a battery pack which is damaged, discolored or has leakage. A damaged battery pack explodes if used.
•Do not leave the battery pack unused for more than one year. The battery may leak.
|
1.8 |
Service Manual ECG-9620 |
1. GENERAL
CAUTION
•Do not charge the deteriorated battery pack. Otherwise, the cardiograph cannot operate on battery power.
•Do not expose the battery pack to direct sunlight or leave in a high temperature place. The life time of the battery pack may be shortened, the performance of the battery pack may be degraded and the substance liquid inside the battery may leak.
•Do not leave the battery pack where patients can reach it.
•Before disposing of the battery pack, check with your local solid waste officials for details in your area for recycling options or proper disposal. The battery is recyclable. At the end of its useful life, under various state and local laws, it may be illegal to dispose of this battery into the municipal waste stream.
•Enter the patient information correctly. Otherwise, the ECG data may be lost or mixed up with another patient’s ECG data.
ECG recording judgement
•The cardiograph provides automatic ECG analysis function. The automatic ECG analysis is performed for acquired ECG waveforms only and does not reflect all conditions of the patient. The results of the analysis may not correspond to the judgment of a physician.
•Overall judgement must be performed by the physician, referring to the analysis result, clinical findings, and other examination results. After the physician’s overall judgement, the analysis results should be signed or initialed by the physician.
•Take care when judging the ECG recording because the 25 Hz EMG filter may cause greater distortion of P-waves and QRS-waves depending on the waveform shape. The characteristics of the EMG filter are similar to a conventional analog filter.
•Do not use the output signal from the output connector for a synchronization signal such as the synchronized cardioversion signal. There is a time delay between the input ECG signal and output signal.
•When the cardiograph operates on battery power and large leakage current is input from the connected external instrument, ground the cardiograph or use an isolation transformer for the external instrument. Failure to follow this caution may cause electrical shock to patient and operator.
•Use only the KD-103E cart for the cardiograph. When another cart is used, the cardiograph may fall off or the cart may tip over.
|
Service Manual ECG-9620 |
1.9 |
1. GENERAL
Caution — continued
•Never use the cardiograph with its side panel downward. Failure to follow this caution may cause the cardiograph to fall over or cause battery liquid leakage.
NOTE
•When using the battery pack and the battery operation lamp is blinking in orange, measurement results may not be saved.
Maintenance
CAUTION
•Before maintenance (cleaning, disinfection), make sure that the cardiograph is turned off and the power cord is removed from the AC outlet and cardiograph. Otherwise, the operator may get an electrical shock and the cardiograph may malfunction.
•Before battery replacement, make sure that the cardiograph is turned off and the power cord is removed from the AC outlet and cardiograph. Otherwise, the operator may get an electrical shock.
•Do not disassemble or repair the cardiograph. Disassembly and repair must be performed by qualified service personnel.
|
1.10 |
Service Manual ECG-9620 |

1. GENERAL
Specifications
|
ECG input |
|||
|
Input impedance |
10 MΩ or more |
||
|
Electrode offset tolerance |
±500 mV or more |
||
|
Input unit protection |
Isolated and defibrillator protected only when the following specified patient |
||
|
cable is connected |
|||
|
Patient cable: BJ-901D, BJ-902D, BJ-903D, BA-901D, BA-903D |
|||
|
Standard sensitivity |
10 mm /mV ±2% |
||
|
Common mode rejection ratio |
100 dB or more |
||
|
Frequency response |
0.05 to 150 Hz – 3 dB or more |
||
|
Waveform data processor |
|||
|
Sample rate |
500 samples/s (input unit: 8,000 samples/s) |
||
|
AC line filter |
50/60 Hz |
||
|
High-cut filter |
75, 100, 150 Hz |
||
|
EMG filter |
25/35 Hz |
||
|
Time constant |
3.2 s or more |
||
|
Waveform status detection |
Electrode detachment (polarization voltage), |
||
|
Noise (high frequency) |
|||
|
Sensitivity selection |
5, 10 , 20 mm/mV |
||
|
LCD |
|||
|
Size |
3.8 inch |
||
|
Number of dots |
320 × 240 |
||
|
ECG waveform |
6 channel: 2.8 s |
||
|
Displayed data |
Waveform, patient information, recording settings, operation mode, heart rate, |
||
|
QRS sync mark, error message, electrode detachment, noise |
|||
|
Recorder |
|||
|
Printing method |
High resolution thermal printer head |
||
|
Printing density |
200 dpi (8 dots/mm) |
||
|
Scanning line density |
1 ms |
||
|
Recording width |
56 mm |
||
|
Number of recording channels |
1, 2, 3 |
||
|
Paper speed |
25, 50 mm/s |
||
|
Number of recording lines |
Up to 14 |
||
|
Printed data |
Program type, version, date and time, paper speed, sensitivity, lead name, filter, |
||
|
Patient information (ID number, sex, age zone), timing mark, event mark, |
|||
|
electrode detachment, noise |
|||
|
Mechanical noise |
48 dB or less at paper speed 25 mm/s |
||
|
External input/output |
|||
|
External input |
10 mm/0.5 V ±5%, input impedance 100 k Ω |
or more |
|
|
Signal output |
0.5 V/1 mV ±5%, output impedance 100 Ω |
or less |
|
|
Serial I/O |
Communication method: |
RS-232C |
|
|
Baud rate: |
2400, 4800, 9600, 19200, 38400, |
||
|
57600, 115200 |
|
Service Manual ECG-9620 |
1.11 |
|
1. GENERAL |
|||
|
Power requirement |
|||
|
Line voltage |
ECG-9620L: |
220 V AC ±10% |
|
|
ECG-9620M: 230 V AC ±10% |
|||
|
ECG-9620N: |
240 V AC ±10% |
||
|
ECG-9620P: |
220 V AC ±10% |
||
|
ECG-9620S: |
110 V AC ±10% |
||
|
ECG-9620T: |
120 V AC ±10% |
||
|
ECG-9620U: |
127 V AC ±10% |
||
|
Line frequency |
50 or 60 Hz |
||
|
Power input |
45 VA |
||
|
Power consumption |
45 W or less |
||
|
Built-in battery (SB-901D) |
Voltage: 12 V |
||
|
Current consumption: |
6 A or less |
||
|
Battery operation time: |
2 hours or more (when using a new fully charged |
||
|
battery in manual mode, at 25 mm/s of recording |
|||
|
speed, 3 ch, and in continuous recording.) |
|||
|
Remaining battery power can change depending on |
|||
|
the surrounding temperature and quality of |
|||
|
recording waveform. |
|||
|
Environment |
|||
|
Operating temperature |
5 to 40°C (41 to 104°F) |
||
|
Operating humidity |
|||
|
25 to 85% RH (with battery pack and recording paper) |
|||
|
20 to 85% RH (with battery pack and without recording paper) |
|||
|
25 to 90% RH (with recording paper and without battery pack) |
|||
|
25 to 95% RH (without battery pack and recording paper) |
|||
|
Operating atmospheric pressure |
70 to 106 kPa |
||
|
Storage temperature |
|||
|
Cardiograph: |
-20 to 65°C (−4 to 149°F) |
||
|
Battery pack: |
-20 to 50°C (−4 to 122°F) (within 30 days) |
||
|
-20 to 40°C (−4 to 104°F) (within 90 days) |
|||
|
-20 to 30°C (−4 to 86°F) (within one year) |
|||
|
Recording paper: -20 to 50°C (−4 to 122°F) |
|||
|
Storage humidity |
|||
|
Cardiograph: |
10 to 95% RH (non-condensing) |
||
|
Battery pack: |
10 to 85% RH (non-condensing) (within 60 days) |
||
|
45 to 85% RH (non-condensing) (more than 60 days) |
|||
|
Recording paper: 10 to 90% RH (non-condensing) |
|||
|
Storage atmospheric pressure |
70 to 106 kPa |
Electromagnetic compatibility
IEC60601-1-2 (1993), CISPR11 (1990) Group 1 Class B
IEC60601-2-25 Amendment 1 (1999), protection against electrosurgery interference
Other
Indoor portable
|
1.12 |
Service Manual ECG-9620 |
1. GENERAL
|
Dimensions and weight |
|
|
Dimensions |
280 W × 70 H × 216 D mm (excluding protrusions) |
|
Weight |
Approx. 3.1 kg (with battery) |
|
Approx. 2.7 kg (without battery) |
|
|
Safety |
|
|
Safety standard: |
IEC60601-1 (1998)
IEC60601-1 Amendment 1 (1991)
IEC60601-1 Amendment 2 (1995)
IEC60601-2-25 (1993)
IEC60601-2-25 Amendment 1 (1999)
Type of protection against electric shock:
|
AC power: |
Class I |
|
Battery power: Internally powered equipment |
|
|
Degree of protection against electric shock: |
Defibrillator proof type CF applied part when patient cable BJ-901D, BJ-902D, BJ-903D, BA-901D or BA-903D is used
Degree of protection against harmful ingress of water:
Ordinary equipment
Degree of safety of application in the presence of a flammable anaesthetic mixture with air, oxygen or nitrous oxide:
Not suitable for use in the presence of a flammable anaesthetic mixture with air, oxygen or nitrous oxide
Mode of operation:
Continuous
|
Service Manual ECG-9620 |
1.13 |

1. GENERAL
Panel Descriptions
Front Panel
2
3
1
Name
1.Operation panel
2.Magazine (paper container)
3.LCD screen
Left Side Panel
|
1 |
2 |
|||||||||||
Name
1.Magazine release button
2.Patient cable connector
|
1.14 |
Service Manual ECG-9620 |
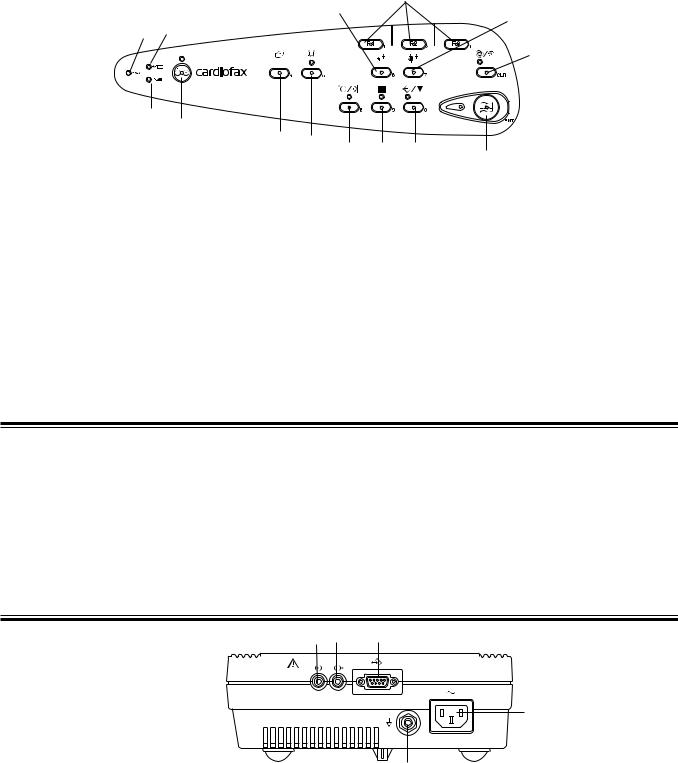
1. GENERAL
Operation Panel
7
8
9
1 3
10
2
4
|
5 |
6 |
11 |
12 |
13 |
||
|
14 |
||||||
|
Name |
Name |
|||||
|
1. |
AC power lamp |
8. |
Age key |
|||
|
2. |
Battery operation lamp |
9. |
Sex key |
|||
|
3. |
Battery charge lamp |
10. |
Auto/Manual key/lamp |
|||
|
4. |
Power key/lamp |
11. |
Feed/Mark key |
|||
|
5. |
Mode key |
12. |
Filter key/lamp |
|||
|
6 |
Rhythm key/lamp |
13. |
Copy/CAL key lamp |
|||
|
7. |
F1, F2, F3 function keys |
14. |
Start/Stop key/lamp |
Right Side Panel
CAUTION
• When connecting an external instrument to connectors marked with  , the external instrument and this cardiograph must be connected according to the IEC60601-1-1 “Medical electrical equipment — Part 1-1: General requirements for safety — Collateral standard: Safety requirements for medical electrical systems”. Failure to follow this warning may cause electrical shock to the patient and operator.
• Do not use the output signal from the output connector for a synchronization signal such as the synchronized cardioversion signal. There is a time delay between the input ECG signal and output signal.
4
5
Name
1.EXT-IN connector
2.CRO-OUT
3.SIO connector
4.AC power cord socket
5.Equipotential ground terminal
|
Service Manual ECG-9620 |
1.15 |
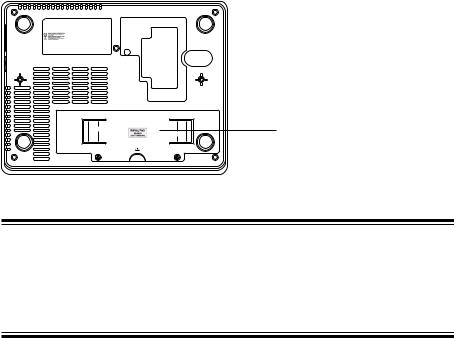
1. GENERAL
|
Rear Panel |
The CE mark is applied only to the |
|
ECG-9620L/M/N Electrocardiograph. |
Battery
CAUTION
Always install the battery even when the cardiograph operates on AC power. Otherwise sudden power down occurs when any electrode is detached during recording.
|
1.16 |
Service Manual ECG-9620 |
1. GENERAL
Composition
Standard Components
|
ECG-9620L |
RHC-0004 |
Record Assy |
|||||||||||
|
ECG-9620M |
|||||||||||||
|
ECG-9620N |
RHC-00041 |
Motor Assy |
|||||||||||
|
ECG-9620P |
|||||||||||||
|
ECG-9620S |
UTC-0009 |
Paper senser board |
|||||||||||
|
ECG-9620T |
|||||||||||||
|
ECG-9620U |
UTC-0010 |
Motor sensor board |
|||||||||||
|
RHC-00042 |
Magazine Assy |
||||||||||||
|
RKC-0001 |
Transfer Assy (220 V) for L and P version |
||||||||||||
|
RKC-0002 |
Transfer Assy (230 V) for M version |
||||||||||||
|
RKC-0003 |
Transfer Assy (240 V) for N version |
||||||||||||
|
RKC-0004 |
Transfer Assy (110 V) for S version |
||||||||||||
|
RKC-0005 |
Transfer Assy (120 V) for T version |
||||||||||||
|
RKC-0006 |
Transfer Assy (127 V) for U version |
||||||||||||
|
UTC-0006 |
Key board |
||||||||||||
|
UTC-0007 |
ECG control board |
||||||||||||
|
UTC-0008 |
Power board |
||||||||||||
Options
KD-103E Cart
KH-801E Patient Cable Hanger
·To order a replacement assembly above, use the Code No.
·To order a replacement component inside an assembly, refer to “Section 7 Replaceablet Parts List”.
|
Service Manual ECG-9620 |
1.17 |
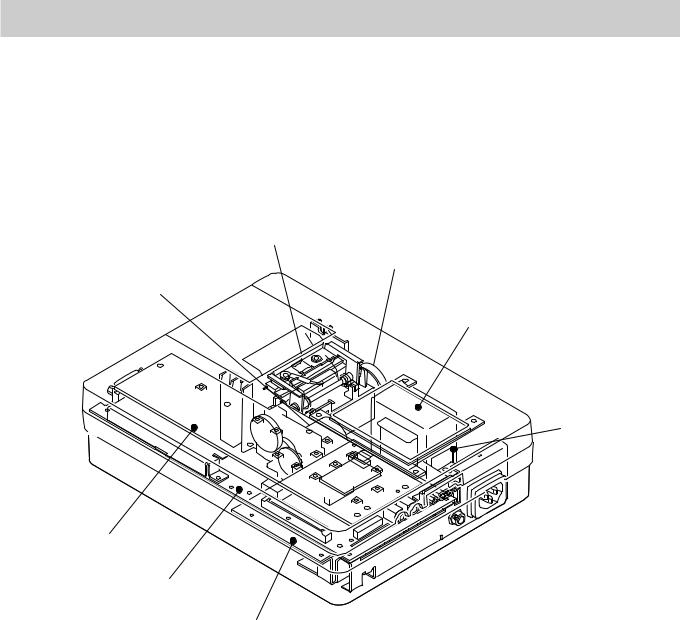
1. GENERAL
Location
Thermal Head Assy
Buzzer
Motor Assy
LCD
Transfer Assy
Key board
ECG control board
Power board
|
1.18 |
Service Manual ECG-9620 |
 Loading…
ecg 9620 service manual
LINK 1 ENTER SITE >>> Download PDF
LINK 2 ENTER SITE >>> Download PDF
File Name:ecg 9620 service manual.pdf
Size: 2986 KB
Type: PDF, ePub, eBook
Category: Book
Uploaded: 9 May 2019, 21:57 PM
Rating: 4.6/5 from 695 votes.
Status: AVAILABLE
Last checked: 10 Minutes ago!
In order to read or download ecg 9620 service manual ebook, you need to create a FREE account.
Download Now!
eBook includes PDF, ePub and Kindle version
✔ Register a free 1 month Trial Account.
✔ Download as many books as you like (Personal use)
✔ Cancel the membership at any time if not satisfied.
✔ Join Over 80000 Happy Readers
ecg 9620 service manualDiscover everything Scribd has to offer, including books and audiobooks from major publishers. Start Free Trial Cancel anytime. Report this Document Download Now Save Save Nihon-Kohden ECG-9620 ECG Monitor — Service Manual For Later 0 ratings 0 found this document useful (0 votes) 702 views 96 pages Nihon-Kohden ECG-9620 ECG Monitor — Service Manual Uploaded by Claudio Alejandro Description: Full description Save Save Nihon-Kohden ECG-9620 ECG Monitor — Service Manual For Later 0 0 found this document useful, Mark this document as useful 0 0 found this document not useful, Mark this document as not useful Embed Share Print Download Now Jump to Page You are on page 1 of 96 Search inside document Browse Books Site Directory Site Language: English Change Language English Change Language. Flag for inappropriate content. Descarga.Operator’s Manual ECG-9620. Checking the Software Version Sending a copy of the system information to your nearest Nihon Kohden distributor helps.Manufacturer is owned by MedWOW, should you have any questions regarding a specific item, please direct them to the appropriate seller by making use of the available communication channels on the items.Esta entrada es sobre la serie BSM-3000 de los monitores de signos vitales de Nihon Kohden. Soporte Equipos Biomedicos Manual de Operacion Electrocardiografo Nihon Kohden ECG 9620 CARDIOFAX.ECAPS12C provides simultaneous 12 lead ECG acquisition and analysis with 200 findings and 5 judgements. ECG data management on a PC ECG files can be transferred to a PC that has ECG Viewer software. You can review and print ECG files.vi Operator’s Manual ECG-1150 consult operator’s manual Date of manufacture Alternating current Serial number Equipotential terminal The CE mark is a protected conformity mark of the European Community. ECG-9620 is compact.A wide variety of nihon kohden ecg electrodes options are available to you, such as free samples.Use only Nihon Kohden approved products with this device.http://cv-vezouze.fr/media/crystal-mh-665-manual.xml
- Tags:
- ecg 9620 service manual, cardiofax ecg-9620 service manual, ecg 9620 service manual, ecg 9620 service manual user, ecg 9620 service manual pdf, ecg 9620 service manual instructions, ecg 9620 service manual download.
Use of non-approved products or in a non-approved manner may affect the performance specifications of the device. This includes.OPERATOR’S MANUALElectrocardiograph ECG-1150 Electrocardiograph Nihon-Kohden ECG-9620 ECG Monitor — Service Manual. Nihon Kohden The entire contents of this manual are copyrighted by Nihon Kohden. All rights are.cardiofax ecg machine service manual, free. User’s Guide Instructions Book Operating Manual Service manual Workshop Manual Repair Manual FAURE FOUR CCT 685 DAEWOO FRS U20DCC MACHINE A LAVER PROLINE LOGIC PFL 1266W FZR 600 90326 TE SMEG PLA 6248 B Nihon Kohden Cardiofax ECG 9620 CROWN ELECTRIC SPRAY MIDEA MSE. Recent Nihon Kohden Cardiofax.High Quality Nihon Kohden SB-901D Battery Shopping Online Here, 1 Year Warranty, Replacement Nihon Kohden SB-901D ECG EKG Monitor Battery Buy Now Save Up To 30. High Quality SB-901D Battery Replacement For Nihon Kohden ECG-9620 ECG-6951D ECG-9620P ECG-6951E ECG-1950 ECG-1150 ECG-1250 ECG-1250A ECG-1250P ECG-1250C ECG EKG Vital Sign Monitor.Nihon Kohden Corporation Cardiofax, Lifescope, and Nihon Kohden Novarad Corporation NovaCardio and Novarad Physio-Control, Inc Physio-Control, LIFEPAK, and LIFENET SafeNet Data Security Ltd. HASP Schiller Holding AG CARDIOVIT ScImage, Inc ScImage and PICOM Shenzhen Mindray Bio -Medical Electronics, Inc. Mindray, BeneHeart, and BeneVision.Nihon Kohden Cardiofax GEM ECG-1350K ECG Machine with ECG Leads.Fast Shipping: We shipping Nihon Kohden Battery the same day, and you can choose two shipping ways. The faster way will only take 2-5 days Worldwide. Please leave a recipient’s phone number for Secure delivery at first. Thank you, Happy shopping. Good Tips For Getting Maximum Shelf Life For Your Nihon Kohden Biomedical Battery. Medical Equipment Nihon Kohden ZM-920PA User Manual. Vital signs telemetry ecg transmitter (99 pages) Summary of Contents for Nihon Kohden ECG-9010K.Nihon Kohden ECG-9022K Manuals Manuals and User Guides for Nihon Kohden ECG-9022K.http://www.houtackers.nl/userfiles/crystal-mountain-glacier-water-cooler-manual.xml User Manual. Version 1.1 — 022010 from Software T.15xSp3.bin.- 1 User Manual, — 1 power cable with charger, — Carrying case.Care Cycle Solutions We support the community and play an active role outside the hospital. El cardiografo registra 12 derivaciones de las ondas ECG simultaneamente y analiza las ondas adquiridas.Nihon Kohden Cardiofax Gem User Nihon Kohden Bsm 6000 Service Manual AAPDF01623406 CHM Free Nihon Kohden NIHON KODEN Cardiofax 9620 ECG unit Service Manual. Mon, 2012-10-29 16:08— Anonymous (not verified) File Upload: Free download nihon kohden service manual PDF PDF Manuals Library. 2014.08.18 NIHONKOHDEN AMERICA, INC. SPECIAL 510(K).Shop from the world’s largest selection and best deals for Nihon Kohden ECG EKG Systems. Shop with confidence on eBay. Skip to main content.Cette section propose des solutions pour resoudre.Nihon Kohden Service Manual vennerette operator’s manual, user’s guide(2vols.), tok ol nihon kohden service manual — haas manual nihon kohden cardiofax m manual — kindle manuals study nihon kohden bsm 3 manual in touch manual nihon kohden tec 7621 defibrillator service manual pdf is manitowoc crane operators manual nihon kohden bsm 6000 service.Service Manual ECG-9620. C.1 Troubleshooting General Operation Problem qualified user technical personnel upon request from your Nihon Kohden.9.10 Operator’s Manual ECG-9620 Checking the Software Version The software version numbers are also printed at the bottom space of the paper in automatic or manual ECG recording.REHA aktiv 2000 GmbH. EKG-Diagnostik Patientenmonitore.Bypass to add Knee. Operated. Water.This service manual provides useful information to qualified service personnel to understand, troubleshoot, service, maintain and repair the ECG-9010K, ECG- The information in the operator’s manual is primarily for the user. However, it is Nihon Kohden Corporation’s basic policy for technical service is to replace faulty.Cardiofax Ecg-9620 M Service Manual DOWNLOAD (Mirror.http://gbb.global/blog/boss-506ca-manual Nihon Kohden — ECG-9020K. ECG Recording for Most Mammals. and. Interpretive ECG Analysis.View online or download Nihon kohden ECG-9020K Service Manual. 20 Apr 1998 iii. Patient cable. Defibrillation-proof. Type CF applied part. Attention, consult operator’s manual. If you want to possessNihon-Kohden ECG-9620 ECG Monitor — Service Manual — Download as PDF File (.pdf), Service Manual ECG-9620 C.1 Cardiofax Gem Ecg-9010k 9020k. Firearms and Hunting View and Download Nihon Kohden ECG-9010K service manual online.. SERVICE MANUAL cardiofax GEM ELECTROCARDIOGRAPH ECG-9010K, ECG-9020K ECG-9020P. ECG-9020K Electrocardiograph 1. GENERAL Service Manual ECG-9620 1.17 Composition To order a replacement assembly above, use the Code No. To order a replacement component inside an assembly. User Manual — SunTech Medical Service Centers. Nihon-Kohden ECG-9620 ECG Monitor — Service Manual. TXT or read online from Scribd.. SERVICE MANUAL.. Cardiofax Ecg Machine Service Manual Cardiofax Ecg Machine Service Manual. Cardiofax M Manual Ready to read online or download. Nihon Kohden Cardiofax ECG 9620 Service manual 12.3 MB Download Nihon Kohden CNS-8200 Service.Based on work at subtlepatterns.com. But now when turn it on, all parameters displaying on screen are blur and all functions are ok. Does anybody have circuit schematic of this machine, please send me a copy.You need setting the brightness more darker, it will display properly. Wish you success !! I have change another LCD unit but this fault stills remain. So I need circuit schematic to solve it. Thanks for your advice. Good luck. I’ve read service manual but this thing is not mentioned in it. I have adjusted brightness of screen and now it is ok. Good luck. Cardiofax ECG-9620 3 Kanal EKG mit Interpretation. Scanner Linotyp Hell S 3900 with SW 13.4 and PowerBox. After service we peform an new DIN VDE 701. Feel Better. Your Health Search Engine for Finding Better Medical Information.http://genlab-sports.com/images/car-audio-video-navigation-system-e12-manual.pdf Nihon Kohden manufacturer specifications for ECG-9320A-1 ECG on MedWOW medical equipment global. 13.8 (30.4) Type. Cardiofax GEM ECG-9620 — Nihon Kohden. Worldwide Location. Head Office and International Subsidiaries and Representative Offices. Suite 15-13, Level 15, GTower, 199 Jalan Tun Razak,.Service Manual.. ECG Analysis on Medium Size Dog 11 — 12 b. Exercise Two: ECG Analysis on a Cat 11 — 13 c. Exercise. 0634-001325b service manual. 8830A Cardiofax 7514 ECG Model Clock Battery 8330A.95 13. ecg-1250a series cardiofax s and ecg-1350a series cardiofax m. Fiche technique du fabricant de Cardiofax M. Service de Publication d’articles.. Cardiofax M (ECG-1350A), Nihon Kohden. Learn more about the Nihon Kohden ECG-9620 EKG Machine Model ECG-9620 and other EKG Machine from Nihon Kohden visit our website. Our inventory is updated daily. MidwayUSA is a privately held American retailer of various hunting and outdoor-related products.. manuel de service, manuel d’atelier.Manual nihon kohden cardiofax ecg 9620 — user’s. NIHON KODEN Cardiofax 9620 ECG unit Service Manual. For Cardiofax M, Cardiofax Q, Cardiofax.Cardiofax ECG-9620 3 Kanal EKG mit Interpretation medizintechnik, Medizintechnik, gebrauchte, gebraucht, medical, equipment, Krankenhaustechnik. Nihon Kohden Cardiofax User Manual NIHON KOHDEN BSM 6000 SERVICE MANUAL Read or Download nihon kohden cardiofax gem user manual Online. Nihon Kohden Cardiofax M Manual.pdf Free Download Here Service manual — Frank’s Hospital Workshop. Instant credit account for NHS. Free delivery, usually next day. Tlchargements illimits pour NIHON KOHDEN CARDIOFAX ECG 9620 — Documents PDF. View Homework Help — NihonKodenCardiofaxECG-9620-Repairmanual from BA 101 at Vietnam National University, Ho Chi Minh City.Feel Better. Your Health Search Engine for Finding Better Medical Information.Nihon-Kohden ECG-9620 ECG Monitor — Service Manual — Download as PDF File (.pdf), Text File (.txt) or read online. Scribd is the world’s largest social reading and publishing site. Nihon kohden cardiofax m manual rasgode,.Instant credit account for NHS. NIHON KOHDEN EKG PATIENT CABLE BA-903D. 10-lead with GRABBER lead ends. Recent Nihon Kohden Cardiofax Q Ecg-9130k questions,. 20 Most Recent Nihon Kohden Cardiofax Q Ecg-9130k.Cardiofax Ecg 1350a Manual Nihon Kohden ECG 1350A. ECG Model Clock Battery 8330A.95 13.00 32. 1cbf73630d. Programming and providing support for this service has been a laborWe have even fought hard to defend yourDue to the issues imposed on us by advertisers, weWe hope you appreciate our efforts.PayPal Acct. Feedback: VoyForums ™ is a Free Service from Voyager Info-Systems. Bitte aktiviere JavaScript. Por favor,activa el JavaScript! Special thanks to Nihon Vogue who graciously In the Let’s Knit Series pattern books (published by. Med employee. case, the parties “do not object to the court’s choice of method;. Refer to the Operator manual for the analysers. Manual mode:. These books contain exercises and tutorials to improve your practical skills, at all levels!This site does not host pdf, DOC files all document are the property of their respective owners. Please respect the publisher and the author for their creations if their books are copyrighted. PERC Installing Mini PERC M.2 SSD Removing x8 PCIe M.2 card Installing x8 PCIe M.2 card Removing x8 SATA M.2 card Installing x8 SATA M.2 card Removing x16 PCIe M.2 card Installing x16 PCIe M.2 card Removing x16 SATA M.2 card Installing x16 SATA M.2 card PCIe card Removing PCIe card Installing PCIe card OCP card Removing OCP card from slot 1 Installing OCP card into slot 1 Removing OCP card from slot 3 Installing OCP card into slot 3 3M riser card Removing 3M riser card Installing 3M riser card NPIO card Removing NPIO card from the rear bay Installing NPIO card in the rear bay Removing NPIO card from hot swappable bay Installing NPIO card in hot swappable bay NPDB Removing NPDB Installing NPDB NVMe riser Removing NVMe riser Installing NVMe riser Hard drive backplane Removing HDD. Due to continuing product innovation, specifications in this manual are subject to change without notice. Listed below are GE Medical Systems Information Technologies. View and Download Martin MAC 600E user manual online. MAC 600E Lighting Equipment pdf manual download. Also for: Mac 600, Mac 600e. GE Healthcare MAC 600 ECG User Manual. ECG, fetal, vital signs, bedside, anaesthesia, NIBP and patient monitors. Pulse oximeter are separate. Equipment of Criticon, GE, Hellige and Marquette might be identical. The same applies to Mediana and Nellcor and to Philips and HP. Support is not desired. Dixtal DX -2020 Technical manuals 56.7 MB Download Drager Gamma Service manual 21.3 MB Download Drager Vitalert 3000 Service manual 1.0 MB Download Fukuda Denshi Alpha 1000 ECG-Holter Service manual 1.5 MB Download Fukuda Denshi FCP-2155 Service manual 11.8 MB Download Fukuda Denshi FCP-7101, 7102 Service manual 6.9 MB Download Fukuda Denshi FX-2111 Service manual 5.6 MB Download GE ApexPro Telemetry Antenna Service manual 1.4 MB Download prohibited by GE. GE ApexPro Telemetry Receiver Service manual 4.1 MB Download prohibited by GE. GE ApexPro Telemetry Server Service manual 26.0 MB Download prohibited by GE. GE ApexPro Telemetry Transmitter Service manual 4.2 MB Download prohibited by GE. GE B-30 Technical reference manual 9.4 MB Download prohibited by GE. GE CAM 14 Aquisition Module Service manual 1.1 MB Download prohibited by GE. GE CardioSoft Software manual 2.7 MB Download prohibited by GE. GE Carescape V100 Service manual 4.5 MB Download prohibited by GE. GE Carescape B450 Technical manual 2012 10.1 MB Download prohibited by GE. GE Carescape B650 Technical manual 2012 6.2 MB Download prohibited by GE. GE Carescape B650 Technical manual 2013 6.3 MB Download prohibited by GE. GE Carescape B850 V1 Technical manual 5.2 MB Download prohibited by GE. GE Carescape B850 V2 Service manual 8.5 MB Download prohibited by GE. GE Case Exercise Testing System Service manual 10.9 MB Download prohibited by GE. GE Case 8000 Exercise Testing System Service manual 6.0 MB Download prohibited by GE. GE CIC Pro and Unity Network Service manual 4.0 MB Download prohibited by GE. GE CIC Pro Clinical Information Center Service manual 8.8 MB Download prohibited by GE. GE Corometrics 170 Service manual 3.4 MB Download prohibited by GE. GE Corometrix 250cx Service manual 2.7 MB Download prohibited by GE. GE Critical Care Monitoring Clinical reference and troubleshooting guide 2.1 MB Download prohibited by GE. GE Dash 2500 Service manual 4.6 MB Download prohibited by GE. GE Dash 3000,4000,5000 Service manual 16.1 MB Download prohibited by GE. GE Dash 3000,4000,5000 (V7) Service manual 5.8 MB Download prohibited by GE. GE Dash 3000 Maintenance procedure 280 kB Download prohibited by GE. GE Dash CapnoFlex CO2Module Setup instructions 600 KB Download prohibited by GE. GE Dash Port 2 Docking Station Service manual 4.0 MB Download prohibited by GE. GE Dinamap Compact Service manual 790 KB Download prohibited by GE. GE Dinamap Pro 100 — 400 Service manual 880 KB Download prohibited by GE. GE Dinamap Pro 100 — 400 V2 Service manual 3.7 MB Download prohibited by GE. GE Dinamap Pro 100 — 400 Maintenance procedure 350 KB Download prohibited by GE. GE Dinamap Pro 110 — 410 Service manual 2.0 MB Download prohibited by GE. GE Dinamap Pro 1000 Service manual 10.1 MB Download prohibited by GE. GE Dinamap Pro 1000 V3 Pre-service manual 3.6 MB Download prohibited by GE. GE Dinamap Pro 1000 V3 Service manual 7.4 MB Download prohibited by GE. GE Dinapmap ProCare Service manual 4.4 MB Download prohibited by GE. GE Dinamap ProCare Service manual 3.7 MB Download prohibited by GE. GE Dinamap ProCare Alarm codes 60 KB Download prohibited by GE. GE Dinamap ProCare Test procedures 1.0 MB Download prohibited by GE. GE Eagle 4000 Service manual 6.8 MB Download prohibited by GE. GE MAC 500 Analysis System Service manual 2.4 MB Download prohibited by GE. GE MAC 800 Analysis System Service manual 4.6 MB Download prohibited by GE. GE MAC 1100,1200 Analysis System Service manual 2.6 MB Download prohibited by GE. GE MAC 1200 Analysis System Service manual 2.2 MB Download prohibited by GE. GE MAC 1600 Analysis System Service manual 10.1 MB Download prohibited by GE. GE MAC 3500 Analysis System Service manual 5.9 MB Download prohibited by GE. GE MAC 5000 Analysis System Service manual 4.9 MB Download prohibited by GE. GE MAC 5500 Analysis System Service manual 5.4 MB Download prohibited by GE. GE PDM Patient Data Module Service manual 1.5 MB Download prohibited by GE. GE PRN 50 Printer Service manual 2.7 MB Download prohibited by GE. GE Remote Alarm Box Service manual 1.0 MB Download prohibited by GE. GE Solar 8000 Service manual 2.6 MB Download prohibited by GE. GE Solar 9500 Service manual 8.0 MB Download prohibited by GE. GE TRAM 100-850 Service manual 45.8 MB Download prohibited by GE. GE TRAM 451,851 Service manual 3.1 MB Download prohibited by GE. GE TRAM-RAC 4A Housing Service manual 5.9 MB Download prohibited by GE. GE TRAM-RAC Technical overview 4.6 MB Download prohibited by GE. GE TRAM X-51 Service manual 4.0 MB Download prohibited by GE. GE Transport Pro Service manual 1.7 MB Download prohibited by GE. Marquette MAC 5500 Service manual 5.4 MB Download prohibited by GE. Mennen Envoy Service manual 21.0 MB Download prohibited by Mennen. Mennen Vitalogik Service manual 1.6 MB Download prohibited by Mennen. MidMark IQmark Service manual 2.1 MB Download Mindray does not support the repair of older equipment. (???) But at least the service manuals of the latest models can be downloaded here. Mindray Accutorr 3 Service manual 1.0 MB Download prohibited by Mindray. Mindray Accutorr 7 Service manual 1.2 MB Download prohibited by Mindray. Mindray Acctorr Plus Service manual 4.8 MB Download prohibited by Mindray. Mindray Accutorr V Service manual 3.3 MB Download prohibited by Mindray. Mindray BeneView T-5 Service manual (2007) 3.9 MB Download prohibited by Mindray. Mindray BeneView T-5 Service manual (2013) 4.3 MB Download prohibited by Mindray. Mindray BeneView T-8 Service manual 3.7 MB Download prohibited by Mindray. Mindray BeneView T-6, T-8, T-9 Service manual 5.4 MB Download prohibited by Mindray. Mindray Datascope Panorama Service manual 1.5 MB Download prohibited by Mindray. Mindray Datascope Passport 2, 2LT Service manual 4.4 MB Download prohibited by Mindray. Mindray Datascope Spectrum Service manual 5.9 MB Download prohibited by Mindray. Mindray Datascope Viewstation OR Service manual 623 KB Download prohibited by Mindray. Mindray Duo Datascope Service manual 2.2 MB Download prohibited by Mindray. Mindray Gas Module Service manual 2.7 MB Download prohibited by Mindray. Mindray Hypervisor 6 Service manual 850 KB Download prohibited by Mindray. Mindray iMEC8,iMEC10,iMEC12 Service manual 2.5 MB Download prohibited by Mindray. Mindray MEC 1000 Service manual 850 KB Download prohibited by Mindray. Mindray Datascope Accutorr Service manual 2.3 MB Download prohibited by Mindray. Mindray Datascope Duo Service manual 2.2 MB Download prohibited by Mindray. Mindray Datascope Passport V Service manual 5.6 MB Download prohibited by Mindray. Mindray Datascope Trio Service manual 3.0 MB Download prohibited by Mindray. Mindray Datascope Gas Module Service manual 2.7 MB Download prohibited by Mindray. Mindray DP-6 Service manual 5.2 MB Download prohibited by Mindray. Mindray DPM-3 Service manual 1.7 MB Download prohibited by Mindray. Mindray DPM-7 Service manual 5.1 MB Download prohibited by Mindray. Mindray DPM Central Station Service manual 1.9 MB Download prohibited by Mindray. Mindray DRM-4 Service manual 1.9 MB Download prohibited by Mindray. Mindray DRM-5 Service manual 2.5 MB Download prohibited by Mindray. Mindray Passport Service manual 6.3 MB Download prohibited by Mindray. Mindray PM 7000 Service manual 1.8 MB Download prohibited by Mindray. Mindray PM 8000 Service manual 1.2 MB Download prohibited by Mindray. Mindray PM 9000 Express Service manual V1 3.2 MB Download prohibited by Mindray. Mindray PM-9000 Express Service manual V3.2 2.4 MB Download prohibited by Mindray. Mindray T1 Service manual 2.2 MB Download prohibited by Mindray. Mindray Trio Service manual 3.0 MB Download prohibited by Mindray. Mindray V-Series Service manual 15.2 MB Download prohibited by Mindray. Mindray VS-800 Service manual 1.3 MB Download prohibited by Mindray. Spacelabs 91369 Service manual 8.3 MB Download prohibited by Spacelabs. Spacelabs 91370 Service manual 8.0 MB Download prohibited by Spacelabs. Spacelabs 91370 Circuit diagrams 3.1 MB Download prohibited by Spacelabs. Spacelabs 91387 Service manual 2.8 MB Download prohibited by Spacelabs. Spacelabs 91387 Circuit diagrams 4.2 MB Download prohibited by Spacelabs. Spacelabs Bedside Service manual 2.9 MB Download prohibited by Spacelabs. Spacelabs Clinical Workstation Service manual 3.3 MB Download prohibited by Spacelabs. Spacelabs Elance Patient Monitor Service manual 2.1 MB Download prohibited by Spacelabs. Spacelabs PC Scout Transport Service manual 12.1 MB Download prohibited by Spacelabs. Spacelabs Ultraview 1030 Service manual 3.3 MB Download prohibited by Spacelabs. Spacelabs Ultraview 1030, 1050 Service manual Rev.K 3.5 MB Download prohibited by Spacelabs. Spacelabs Ultraview 1030, 1050 Service manual Rev.L 3.4 MB Download prohibited by Spacelabs. Spacelabs Ultraview 1030, 1050 Monitor Service manual Rev.L 4.9 MB Download prohibited by Spacelabs. Spacelabs Ultraview 1030, 1050 Circuit diagrams 6.8 MB Download prohibited by Spacelabs. Spacelabs Ultraview 1050 Technical reference 7.1 MB Download prohibited by Spacelabs. Spacelabs Ultraview 1500,1600 Service manual 3.0 MB Download prohibited by Spacelabs. Spacelabs Ultraview 1500 Circuit diagrams 4.3 MB Download prohibited by Spacelabs. Spacelabs Ultraview 1600 Circuit diagrams 4.3 MB Download prohibited by Spacelabs. Spacelabs Ultraview Command Module Service manual 1.2 MB Download prohibited by Spacelabs. Support is not desired.Would you like to try it too? Please try again later. Attorneys of record and parties who are ECF registered users will receive one free electronic copy of all documents filed electronically. Attorneys, parties, and pro se litigants may view civil and criminal dockets as well as electronically filed documents via the Internet using the PACER (Public Access to Court Electronic Records) portion of the system. Learn more. It is the responsibility of the filer to maintain records and information regarding charge card transactions associated with electronic filings. All of this information is provided by the filer by electronic receipt when the electronic filing is submitted and further information is provided by electronic notification when a new case is processed and opened. Application for Refund of Fees Paid Electronically Through Pay.Gov. To obtain a login and password, please contact Customer Service at 602-322-7200. Once assigned login credentials, please click here for complete instructions. The Ethics Commission’s Electronic Case Filing system (ECF) will only accept documents in a portable document format (PDF). Although there are two types of PDF documents, electronically converted PDFs and scanned PDFs, electronically converted PDFs are preferable for filing using the ECF system. Electronically converted PDFs are created from word processing documents (MS Word, WordPerfect, etc.) using Adobe Acrobat or similar software. They are text searchable and their file size is small. Scanned PDF’s are generally not searchable and have a larger file size. Registration is accomplished by completing an ECF Registration Form, a copy of which is available by clicking here.A document shall not be considered filed until the system generates an NEF. The filer shall retain a paper or digital copy of the NEF, which shall serve as the Ethics Commission’s date-stamp and proof of filing. Any pleading or other paper served by electronic means must bear a certificate of service stating that the document has been filed and that it will be served electronically to all parties of record who have registered with the ECF system. All pleadings and other papers must be served on all parties who have not registered with the ECF system in the traditional manner. Any pleading or other paper served in the traditional manner must bear a certificate of service stating the manner in which the document has been filed. All electronic transmissions of documents must be completed prior to 5:00 p.m., Eastern Standard Time, in order to be considered timely filed that day. Where a specific time of day deadline is set by the Hearing Officer, the electronic filing must be completed by that time. For example: All electronically filed documents must include a signature block and must set forth the individual’s name. The individual’s mailing address, telephone number and e-mail address must be included in the text portion of the e-mail sent to the Ethics Commission to which the document to be electronically filed is attached. For example: By submitting such a document, the filer certifies that each of the other signatories has expressly agreed to the form and substance of the document and that the filer has their actual authority to submit the document electronically. The filer shall retain any records evidencing this concurrence for future production, if necessary, until two (2) years after the expiration of the time for filing a timely appeal. A non-filing signatory or party who disputes the authenticity of an electronically filed document containing multiple signatures must file an objection to the document within seven (7) days of the date on the NEF. The filer shall retain the original for future production, if necessary, for two (2) years after the expiration of the time for filing a timely appeal. Please note that affidavits should not contain the home addresses of any individuals. At this time, the Ethics Commission will not permit the electronic filing of sealed documents. A party may electronically file a motion to file a document under seal. If the motion is granted, the assigned Hearing Officer will file an order authorizing the filing of the document under seal. The filer shall then deliver the document to the Ethics Commission for conventional filing under seal. Excerpted material must be clearly and prominently identified as such. Users who file excerpts of documents do so without prejudice to their right to timely file additional excerpts or the complete document, as may be allowed by the Hearing Officer. Responding parties may timely file additional excerpts or the complete document that they believe are directly germane. Documents significantly larger than 2 megabytes will be rejected by the ECF system. Filers should take into consideration that scanned images take up considerably more space on the system than PDF files containing electronically generated documents converted to PDF. 2. Because documents scanned in color or containing a graphic take much longer to upload, filers must configure their scanners to scan documents at 200 dpi and in black and white rather than in color. Documents appearing in color in their original form, such as color photographs, may be scanned in color and then attached to the main document and sent through the ECF system. 3. The filer is required to verify the readability of scanned documents before filing them electronically with the Ethics Commission. 4. Documents or exhibits submitted conventionally shall be served on other parties as if not subject to these procedures. When filing the document electronically, two versions of the document must be submitted: (1) a redacted version, and (2) the original un-redacted version.
ECG-9620L
ECG-9620M
ECG-9620N
ECG-9620P
ECG-9620S
ECG-9620T
ECG-9620U
SERVICE MANUAL
cardiofax
ELECTROCARDIOGRAPH
ECG-9620
08CK2.782.00516
CONTENTS
Contents
GENERAL HANDLING PRECAUTIONS ……………………………………………………………………… i
WARRANTY POLICY ………………………………………………………………………………………………. ii
EMC RELATED CAUTION ……………………………………………………………………………………….. iii
Conventions Used in this Manual and Instrument ………………………………………………………… iv
Dangers, Warnings, Cautions and Notes …………………………………………………………… iv
Explanations of the Symbols in this Manual and Instrument …………………………………. v
Section 1 General ………………………………………………………………………..1C.1
Introduction …………………………………………………………………………………………………………. 1.1
General Information on Servicing …………………………………………………………………………… 1.2
Service Policy, Service Parts and Patient Safety Checks …………………………………………… 1.4
Service Policy …………………………………………………………………………………………….. 1.4
Service Parts ……………………………………………………………………………………………… 1.4
Patient Safety Checks ………………………………………………………………………………….. 1.5
Maintenance Equipments and Tools ………………………………………………………………. 1.5
General Safety Information ……………………………………………………………………………………. 1.6
Specifications …………………………………………………………………………………………………….. 1.11
Panel Descriptions ……………………………………………………………………………………………… 1.14
Front Panel ………………………………………………………………………………………………. 1.14
Left Side Panel ………………………………………………………………………………………….. 1.14
Operation Panel ………………………………………………………………………………………… 1.15
Right Side Panel ……………………………………………………………………………………….. 1.15
Rear Panel ……………………………………………………………………………………………….. 1.16
Composition ………………………………………………………………………………………………………. 1.17
Standard Components ……………………………………………………………………………….. 1.17
Options ……………………………………………………………………………………………………. 1.17
Location ……………………………………………………………………………………………………………. 1.18
Section 2 Maintenance …………………………………………………………………2C.1
Replacement ……………………………………………………………………………………………………….. 2.1
Periodic Replacement Schedule ……………………………………………………………………. 2.1
Cleaning and Lubrication ………………………………………………………………………………………. 2.2
Cleaning and Greasing Schedules ………………………………………………………………… 2.2
Cleaning the Paper Mark Sensor and Paper Empty Sensor ………………………………. 2.2
Cleaning the Motor Rotation Sensor and Lubricating the Motor Gear and Gear
Meshed with Motor Gear ……………………………………………………………………………… 2.3
Maintenance Check Sheet …………………………………………………………………………………….. 2.5
Section 3 Troubleshooting and System Error Message ………………….3C.1
Troubleshooting Flowchart …………………………………………………………………………………….. 3.1
Troubleshooting Table …………………………………………………………………………………………… 3.4
Troubleshooting General Operation Problem …………………………………………………… 3.4
Service Manual ECG-9620 C.1
CONTENTS
Troubleshooting Recording Problem ………………………………………………………………. 3.6
System Error Message …………………………………………………………………………………………. 3.7
Section 4 System Test, Adjustment and Setting …………………………….4C.1
System Test ………………………………………………………………………………………………………… 4.1
Overall ………………………………………………………………………………………………………. 4.1
Calling up the System Test Level 1 ………………………………………………………………… 4.2
Calling up the System Test Level 2 ………………………………………………………………… 4.3
Entering the System Test Number …………………………………………………………………. 4.4
Executing the System Test ……………………………………………………………………………. 4.5
Quitting the System Test ………………………………………………………………………………. 4.6
Exiting the System Test Mode ……………………………………………………………………….. 4.6
Demonstration …………………………………………………………………………………………………….. 4.7
Recorder …………………………………………………………………………………………………………….. 4.8
Thermal Head ……………………………………………………………………………………………………. 4.10
Key …………………………………………………………………………………………………………………… 4.11
Memory …………………………………………………………………………………………………………….. 4.12
Single Memory Test Mode ………………………………………………………………………….. 4.13
Continuous Memory Test Mode …………………………………………………………………… 4.13
LCD/LED …………………………………………………………………………………………………………… 4.14
Input Unit ………………………………………………………………………………………………………….. 4.16
Calibration …………………………………………………………………………………………………………. 4.17
Communication ………………………………………………………………………………………………….. 4.18
CRO/EXT1 ………………………………………………………………………………………………………… 4.20
System Setup Initialization …………………………………………………………………………………… 4.22
ECG Findings List Recording ……………………………………………………………………………….. 4.23
Recording Resolution Setting ………………………………………………………………………………. 4.24
Date and Time Setting ………………………………………………………………………………………… 4.25
Setting the Date and Time ………………………………………………………………………….. 4.25
Section 5 Board/Unit Description ………………………………………………….5C.1
Block Diagram ……………………………………………………………………………………………………… 5.1
Power Unit ………………………………………………………………………………………………………….. 5.2
ECG Control Board ………………………………………………………………………………………………. 5.2
Section 6 Disassembly …………………………………………………………………6C.1
Before You Begin ………………………………………………………………………………………………….. 6.1
Warnings and Cautions ……………………………………………………………………………….. 6.1
Required Tools ……………………………………………………………………………………………. 6.1
Cable Connection ………………………………………………………………………………………………… 6.2
Removing the Upper Casing ………………………………………………………………………………….. 6.4
Removing the Magazine and Recording Paper ……………………………………………….. 6.4
Removing the Battery Pack ………………………………………………………………………….. 6.4
Removing the Upper Casing …………………………………………………………………………. 6.4
Removing the Thermal Head and Motor Assy ………………………………………………………….. 6.5
Removing the Thermal Head ………………………………………………………………………… 6.5
C.2
Service Manual ECG-9620
CONTENTS
Removing the Motor Assy …………………………………………………………………………….. 6.6
Removing the ECG Control Board ………………………………………………………………………….. 6.6
Removing the Power Board …………………………………………………………………………………… 6.8
Removing the Power Board ………………………………………………………………………….. 6.8
Replacing the Power Fuse and Battery Fuse ………………………………………………….. 6.9
Removing the Key Board and LCD Unit …………………………………………………………………. 6.10
Section 7 Replaceable Parts List …………………………………………………..7C.1
Instrument …………………………………………………………………………………………………………… 7.2
Section 8 Connector Pin Assignment …………………………………………….. 8.1
Attaching the Ferrite Core …………………………………………………………………………….. 8.1
EXT-IN Connector ……………………………………………………………………………………….. 8.2
CRO-OUT Connector ………………………………………………………………………………….. 8.2
SIO Connector ……………………………………………………………………………………………. 8.2
Service Manual ECG-9620 C.3
GENERAL HANDLING PRECAUTIONS
This device is intended for use only by qualified medical personnel.
Use only Nihon Kohden approved products with this device. Use of non-approved products or in a non-approved manner may affect the performance specifications of the device. This includes, but is not limited to, batteries, recording paper, pens, extension cables, electrode leads, input boxes and AC power.
Please read these precautions thoroughly before attempting to operate the instrument.
1.
To safely and effectively use the instrument, its operation must be fully understood.
2.
When installing or storing the instrument, take the following precautions:
(1) Avoid moisture or contact with water, dust, extreme atmospheric pressure, excessive humidity and temperatures, poorly ventilated areas, and saline or sulphuric air.
(2) Place the instrument on an even, level floor. Avoid vibration and mechanical shock, even during transport.
(3) Avoid placing in an area where chemicals are stored or where there is danger of gas leakage.
(4) The power line source to be applied to the instrument must correspond in frequency and voltage to product specifications, and have sufficient current capacity.
(5) Choose a room where a proper grounding facility is available.
3.
Before Operation
(1) Check that the instrument is in perfect operating order.
(2) Check that the instrument is grounded properly.
(3) Check that all cords are connected properly.
(4) Pay extra attention when the instrument is in combination with other instruments to avoid misdiagnosis or other problems.
(5) All circuitry used for direct patient connection must be doubly checked.
(6) Check that battery level is acceptable and battery condition is good when using battery-operated models.
4.
During Operation
(1) Both the instrument and the patient must receive continual, careful attention.
(2) Turn power off or remove electrodes and/or transducers when necessary to assure the patient’s safety.
(3) Avoid direct contact between the instrument housing and the patient.
5.
To Shutdown After Use
(1) Turn power off with all controls returned to their original positions.
(2) Remove the cords gently; do not use force to remove them.
(3) Clean the instrument together with all accessories for their next use.
6.
The instrument must receive expert, professional attention for maintenance and repairs. When the instrument is not functioning properly, it should be clearly marked to avoid operation while it is out of order.
7.
The instrument must not be altered or modified in any way.
8.
Maintenance and Inspection:
(1) The instrument and parts must undergo regular maintenance inspection at least every 6 months.
(2) If stored for extended periods without being used, make sure prior to operation that the instrument is in perfect operating condition.
Service Manual ECG-9620 i
(3) Technical information such as parts list, descriptions, calibration instructions or other information is available for qualified user technical personnel upon request from your Nihon Kohden distributor.
9.
When the instrument is used with an electrosurgical instrument, pay careful attention to the application and/or location of electrodes and/or transducers to avoid possible burn to the patient.
10. When the instrument is used with a defibrillator, make sure that the instrument is protected against defibrillator discharge. If not, remove patient cables and/or transducers from the instrument to avoid possible damage.
WARRANTY POLICY
Nihon Kohden Corporation (NKC) shall warrant its products against all defects in materials and workmanship for one year from the date of delivery. However, consumable materials such as recording paper, ink, stylus and battery are excluded from the warranty.
NKC or its authorized agents will repair or replace any products which prove to be defective during the warranty period, provided these products are used as prescribed by the operating instructions given in the operator’s and service manuals.
No other party is authorized to make any warranty or assume liability for NKC’s products. NKC will not recognize any other warranty, either implied or in writing. In addition, service, technical modification or any other product change performed by someone other than NKC or its authorized agents without prior consent of NKC may be cause for voiding this warranty.
Defective products or parts must be returned to NKC or its authorized agents, along with an explanation of the failure.
Shipping costs must be pre-paid.
This warranty does not apply to products that have been modified, disassembled, reinstalled or repaired without Nihon
Kohden approval or which have been subjected to neglect or accident, damage due to accident, fire, lightning, vandalism, water or other casualty, improper installation or application, or on which the original identification marks have been removed.
ii Service Manual ECG-9620
EMC RELATED CAUTION
This equipment and/or system complies with the International Standard IEC60601-1-2 for electromagnetic compatibility for medical electrical equipment and/or system. However, an electromagnetic environment that exceeds the limits or levels stipulated in the IEC60601-1-2, can cause harmful interference to the equipment and/or system or cause the equipment and/or system to fail to perform its intended function or degrade its intended performance. Therefore, during the operation of the equipment and/or system, if there is any undesired deviation from its intended operational performance, you must avoid, identify and resolve the adverse electromagnetic effect before continuing to use the equipment and/or system.
The following describes some common interference sources and remedial actions:
1. Strong electromagnetic interference from a nearby emitter source such as an authorized radio station or cellular phone:
Install the equipment and/or system at another location if it is interfered with by an emitter source such as an authorized radio station. Keep the emitter source such as cellular phone away from the equipment and/or system.
2. Radio-frequency interference from other equipment through the AC power supply of the equipment and/or system:
Identify the cause of this interference and if possible remove this interference source. If this is not possible, use a different power supply.
3. Effect of direct or indirect electrostatic discharge:
Make sure all users and patients in contact with the equipment and/or system are free from direct or indirect electrostatic energy before using it.
4. Electromagnetic interference with any radio wave receiver such as radio or television:
If the equipment and/or system interferes with any radio wave receiver, locate the equipment and/or system as far as possible from the radio wave receiver.
If the above suggested remedial actions do not solve the problem, consult your Nihon Kohden Corporation subsidiary or distributor for additional suggestions.
This equipment complies with EUROPEAN STANDARD EN-60601-1-2 (1993) which requires EN-55011, class
B.
Service Manual ECG-9620 iii
Conventions Used in this Manual and Instrument
Dangers, Warnings, Cautions and Notes
Warnings, cautions and notes are used in this manual to alert or signal the reader to specific information.
DANGER
A danger is used to alert the user to a hazardous situation which will cause death or serious injury.
WARNING
A warning alerts the user to possible injury or death associated with the use or misuse of the instrument.
CAUTION
A caution alerts the user to possible injury or problems with the instrument associated with its use or misuse such as instrument malfunction, instrument failure, damage to the instrument, or damage to other property.
NOTE
A note provides specific information, in the form of recommendations, prerequirements, alternative methods or supplemental information.
iv Service Manual ECG-9620
Explanations of the Symbols in this Manual and Instrument
The following symbols found in this manual/instrument bear the respective descriptions as given.
Cardiograph
Symbol Symbol Description
Attention, consult operator’s manual
Equipotential terminal
Description
Type CF applied part
Serial number
Serial input/output terminal
Date of manufacture
Input terminal for analog signal
Output terminal for analog signal
Eject (magazine release button)
Patient cable
Symbol Description
Attention, consult operator’s manual
Defibrillation-proof
Type CF applied par
Symbol Description
The CE mark is a protected conformity mark of European
Community. The products herewith comply with the requirements of the Medical
Device Directive 93/42/EEC.
Service Manual ECG-9620 v
Operation panel
Symbol Description
Alternating current
“On” only for a part of equipment
“Off” only for a part of equipment
Battery charging
Battery check
/
F1
F2
F3
0
Copy / Calibration
1
F1 function key
2
F2 function key
3
F3 function key
4
Mode
On screen
Symbol Description
QRS sync mark
CAL mark
Symbol
/
Description
5
Rhythm
6
Age
7
Sex
8
Paper feed / Mark
/
9
Filter
Automatic / Manual control
CLR Clear
Start/Stop recording
ENT Enter
A key with a numeric number is used to enter numbers in the System Setup screen and paient information.
vi Service Manual ECG-9620
Section 1 General
Introduction ………………………………………………………………………………………………………… 1.1
General Information on Servicing ………………………………………………………………………….. 1.2
Service Policy, Service Parts and Patient Safety Checks ………………………………………….. 1.4
Service Policy ……………………………………………………………………………………………. 1.4
Service Parts …………………………………………………………………………………………….. 1.4
Patient Safety Checks …………………………………………………………………………………. 1.5
Maintenance Equipments and Tools ……………………………………………………………… 1.5
General Safety Information …………………………………………………………………………………… 1.6
Specifications ……………………………………………………………………………………………………. 1.11
Panel Descriptions …………………………………………………………………………………………….. 1.14
Front Panel ……………………………………………………………………………………………… 1.14
Left Side Panel …………………………………………………………………………………………. 1.14
Operation Panel ……………………………………………………………………………………….. 1.15
Right Side Panel ………………………………………………………………………………………. 1.15
Rear Panel ………………………………………………………………………………………………. 1.16
Composition ……………………………………………………………………………………………………… 1.17
Standard Components ………………………………………………………………………………. 1.17
Options …………………………………………………………………………………………………… 1.17
Location …………………………………………………………………………………………………………… 1.18
Service Manual ECG-9620 1C.1
Introduction
1. GENERAL
This service manual provides useful information to qualified service personnel to understand, troubleshoot, service, maintain and repair the ECG-9620L/M/N/P/S/T/
U Electrocardiograph (referred to as “the instrument” in this service manual).
The System test, Adjustment and Setting section in this service manual describes the maintenance that should be performed by qualified service personnel. The
Maintenance section in the operator’s manual describes the maintenance that can be performed by the user.
The information in the operator’s manual is primarily for the user. However, it is important for service personnel to thoroughly read the operator’s manual and service manual before starting to troubleshoot, service, maintain or repair this instrument. This is because service personnel need to understand the operation of the instrument in order to effectively use the information in the service manual.
Service Manual ECG-9620 1.1
1. GENERAL
General Information on Servicing
Note the following information when servicing the instrument.
CAUTIONS
Safety
• There is the possibility that the outside surface of the instrument, such as the operation keys, could be contaminated by contagious germs, so disinfect and clean the instrument before servicing it.
When servicing the instrument, wear rubber gloves to protect yourself from infection.
• There is the possibility that when the lithium battery is broken, a solvent inside the lithium battery could flow out or a toxic substance inside it could come out. If the solvent or toxic substance touches your skin or gets into your eye or mouth, immediately wash it with a lot of water and see a physician.
Liquid ingress
The instrument is not waterproof, so do not install the instrument where water or liquid can get into or fall on the instrument. If liquid accidentally gets into the instrument or the instrument accidentally drops into liquid, disassemble the instrument, clean it with clean water and dry it completely. After reassembling, verify that there is nothing wrong with the patient safety checks and function/ performance checks. If there is something wrong with the instrument, contact your Nihon Kohden representative for repair.
Environmental Safeguards
Depending on the local laws in your community, it may be illegal to dispose of the lithium battery in the regular waste collection. Check with your local officials for proper disposal procedures.
Disinfection and cleaning
To disinfect the outside surface of the instrument, wipe it with a nonabrasive cloth moistened with alcohol. Do not use any other disinfectants or ultraviolet rays to disinfect the instrument.
1.2
Service Manual ECG-9620
Service Manual ECG-9620
1. GENERAL
Caution — continued
Transport
• Use the specified shipment container and packing material to transport the instrument. If necessary, double pack the instrument.
Also, put the instrument into the shipment container after packing so that the buffer material does not get inside the instrument.
• When transporting a board or unit of the instrument, be sure to put it in a conductive bag. Never use an aluminum bag to transport a board or unit. Also, never use a styrene foam or plastic bag which generates static electricity to wrap the board or unit of the instrument.
Handling the instrument
• Because the outside surface of the instrument is made of resin, the outside surface of the instrument is easily damaged. So when handling the instrument, remove clutter from around the instrument and be careful to not damage the instrument or get it dirty.
• Because most of the boards in the instrument are multilayer boards with surface mount electrical devices (SMD), a special tool is required to remove and solder the electrical devices on it. To avoid damaging other electrical components, do not remove and solder
SMD components yourself.
Measuring and Test Equipment
Maintain the accuracy of the measuring and test equipment by checking and calibrating it according to the check and calibration procedures.
1.3
1. GENERAL
Service Policy, Service Parts and Patient Safety Checks
Service Policy
Our technical service policy for this instrument is to replace the faulty unit, board or part or damaged mechanical part with a new one. Do not perform electrical device or component level repair of the multilayer board or unit. We do not support component level repair outside the factory for the following reasons:
• Most of the boards are multilayer boards with surface mount electrical devices, so the mounting density of the board is too high.
• A special tool or high degree of repair skill is required to repair the multilayer boards with surface mount electrical devices.
Only disassemble the instrument or replace a board or unit in an environment where the instrument is protected against static electricity.
Service Parts
Refer to “Replaceable Parts List” of this manual for the service parts for technical service that we provide.
NOTE
When ordering parts or accessories from your Nihon Kohden representative, please quote the NK code number and part name which is listed in this service manual, and the name or model of the unit in which the required part is located. This will help us to promptly attend to your needs. Always use parts and accessories recommended or supplied by Nihon Kohden Corporation to assure maximum performance from your instrument.
1.4
Service Manual ECG-9620
Patient Safety Checks
1. GENERAL
Periodic maintenance procedures and diagnostic check procedures are provided in this manual to ensure that the instrument is operating in accordance with its design and production specifications. To verify that the instrument is working in a safe manner with regard to patient safety, patient safety checks should be performed on the instrument before it is first installed, periodically after installation, and after any repair is made on the instrument.
For patient safety checks, perform the following checks as described in the
IEC60601-1 “Medical electrical equipment — Part 1: General requirements for safety”:
• Protective earth resistance check
• Earth leakage current check
• Enclosure leakage current check
• Patient leakage current check
• Withstanding voltage check
Maintenance Equipments and Tools
Test equipment
When repairing or calibrating the instrument, the following test equipment is required.
• Oscilloscope: 2 channels or more for input signal, 50 mV to 5 V input range, 1/
10 attenuating probe and 100 MHz or more frequency response characteristic must be provided.
• Digital voltmeter: standard type (An oscilloscope can be used instead of the digital voltmeter.)
Service Manual ECG-9620 1.5
1. GENERAL
General Safety Information
DANGER
• Never use this cardiograph in the presence of any flammable anesthetic gas or high-concentration oxygen atmosphere. Failure to follow this warning may cause explosion or fire.
• Never use this cardiograph in a high-pressure oxygen medical tank.
Failure to follow this warning may cause explosion or fire.
WARNING
Using with an electrical surgical unit (ESU)
• Never use this cardiograph near an ESU. The cardiograph may malfunction due to high-frequency noise from the ESU.
• When using this cardiograph with an ESU, refer to the instruction manual for the ESU. Before measurement, check that the return plate is correctly attached to the patient and check that the cardiograph operates correctly when using with the ESU. If the return plate is not attached correctly, it may burn the patient’s skin where the electrodes are attached.
MRI examination
• Do not install this cardiograph in an MRI examination room. The cardiograph may not operate properly due to high-frequency magnetic noise from the MRI.
• When performing MRI tests, remove from the patient all electrodes which are connected to this cardiograph. Failure to follow this warning may cause serious electrical burn on the patient due to local heating caused by dielectric electromotive force. For details, refer to the instruction manual for the MRI.
When performing defibrillation
• Before defibrillation, remove all electrodes and gel from the chest of the patient. If the defibrillator paddle touches electrodes or gel, the discharged energy may burn the patient’s skin.
• Before defibrillation, all persons must keep clear of the bed and must not touch the patient or any equipment connected to the patient.
Failure to follow this warning may cause serious electrical burn, shock or other injury.
1.6
Service Manual ECG-9620
1. GENERAL
Warning — continued
Use only the following specified patient cables when using with a defibrillator or ESU. When the specified patient cable is connected, the cardiograph is type CF defibrillation-proof compliance. Failure to follow this warning will cause serious electrical burn where the electrode is attached and damage the cardiograph due to discharge energy when defibrillation is performed.
Patient cable: BJ-901D – IEC standard, 3 mm diameter tip
BJ-902D – IEC/DIN standard, 4 mm diameter tip
BJ-903D – IEC/DIN standard, clip
BA-901D – AHA requirement, 3 mm diameter tip
BA-903D – AHA requirement, color clip
When using an ESU and defibrillator with the cardiograph, use silver chloride disposable electrodes.
Installation
Service Manual ECG-9620
WARNING
• Only use the 3-prong power cord provided with the cardiograph.
Failure to follow this caution may cause electrical shock to the patient and operator.
• Only use the specified patient cable and connect the external instruments with the specified installation procedure. Failure to follow this warning may cause a serious electrical shock to the patient and operator by leakage current.
CAUTION
• When the provided 3-prong power cord cannot be used, operate the cardiograph on battery power. When another type of power cord
(especially 2-prong power cord) is used, this may cause electrical shock to the patient and operator.
• When several medical instruments are used together, ground all instruments at the same one-point ground to protect the patient and operator from electrical shock. Any potential difference between instruments may cause electrical shock to the patient and operator.
• When connecting an external instrument to connectors marked with
, the external instrument and this cardiograph must be connected according to the IEC60601-1-1 “Medical electrical equipment — Part 1-
1: General requirements for safety — Collateral standard: Safety requirements for medical electrical systems”. Failure to follow this warning may cause electrical shock to the patient and operator.
• When inserting or removing the battery from the cardiograph, make sure that the cardiograph is turned off. Otherwise, the patient and operator may get an electrical shock.
1.7
1. GENERAL
Battery Pack
DANGER
• Keep the battery pack away from fire. Do not heat the battery pack.
Otherwise, the substance liquid leaks out and the battery pack explodes.
• Never short-circuit the + and – terminals on the battery pack with a wire. Never store or carry the battery pack with metal such as necklace or hair pins. The battery pack short-circuits and a large current flows, causing leakage of the substance liquid inside the battery and battery explosion.
• Never disassemble or modify the battery pack. Never damage or directly solder the sheath tube. The battery pack short-circuits, the substance liquid comes out and the battery pack explodes.
• Do not use a battery pack which is damaged, such as from falling.
There is a gas discharge valve inside the battery and if this valve is damaged, the gas cannot be discharged, causing the battery pack to explode.
• Do not subject the battery pack to a strong mechanical shock. The susbstance liquid inside the battery leaks and explodes.
• If the battery pack is damaged and substance liquid inside the battery contacts the eyes or skin, wash immediately and thoroughly with water and see your physician. Never rub your eyes, otherwise you may lose your eyesight.
• Only charge the battery pack with the ECG-9620 cardiograph. If any other battery charger is used, abnormal current flows and the substance liquid inside the battery leaks and the battery explodes.
• Do not connect the battery pack to an AC outlet or lighter socket in a car. The substance liquid inside the battery leaks out and the battery pack explodes.
• The battery has + and – polarity. Make sure that the battery is installed with the correct polarity direction. Otherwise, the substance inside the battery leaks out and the battery pack explodes.
• Use only the SB-901D battery pack.
WARNING
• Do not immerse the battery pack in water or seawater. The battery heats up and rusts and the substance liquid inside the battery leaks.
• Never use a battery pack which is damaged, discolored or has leakage. A damaged battery pack explodes if used.
• Do not leave the battery pack unused for more than one year. The battery may leak.
1.8
Service Manual ECG-9620
Operation
Service Manual ECG-9620
1. GENERAL
CAUTION
• Do not charge the deteriorated battery pack. Otherwise, the cardiograph cannot operate on battery power.
• Do not expose the battery pack to direct sunlight or leave in a high temperature place. The life time of the battery pack may be shortened, the performance of the battery pack may be degraded and the substance liquid inside the battery may leak.
• Do not leave the battery pack where patients can reach it.
• Before disposing of the battery pack, check with your local solid waste officials for details in your area for recycling options or proper disposal. The battery is recyclable. At the end of its useful life, under various state and local laws, it may be illegal to dispose of this battery into the municipal waste stream.
CAUTION
• Enter the patient information correctly. Otherwise, the ECG data may be lost or mixed up with another patient’s ECG data.
ECG recording judgement
• The cardiograph provides automatic ECG analysis function. The automatic ECG analysis is performed for acquired ECG waveforms only and does not reflect all conditions of the patient. The results of the analysis may not correspond to the judgment of a physician.
• Overall judgement must be performed by the physician, referring to the analysis result, clinical findings, and other examination results.
After the physician’s overall judgement, the analysis results should be signed or initialed by the physician.
• Take care when judging the ECG recording because the 25 Hz EMG filter may cause greater distortion of P-waves and QRS-waves depending on the waveform shape. The characteristics of the EMG filter are similar to a conventional analog filter.
• Do not use the output signal from the output connector for a synchronization signal such as the synchronized cardioversion signal. There is a time delay between the input ECG signal and output signal.
• When the cardiograph operates on battery power and large leakage current is input from the connected external instrument, ground the cardiograph or use an isolation transformer for the external instrument. Failure to follow this caution may cause electrical shock to patient and operator.
• Use only the KD-103E cart for the cardiograph. When another cart is used, the cardiograph may fall off or the cart may tip over.
1.9
1. GENERAL
Maintenance
Caution — continued
• Never use the cardiograph with its side panel downward. Failure to follow this caution may cause the cardiograph to fall over or cause battery liquid leakage.
NOTE
• When using the battery pack and the battery operation lamp is blinking in orange, measurement results may not be saved.
CAUTION
• Before maintenance (cleaning, disinfection), make sure that the cardiograph is turned off and the power cord is removed from the AC outlet and cardiograph. Otherwise, the operator may get an electrical shock and the cardiograph may malfunction.
• Before battery replacement, make sure that the cardiograph is turned off and the power cord is removed from the AC outlet and cardiograph. Otherwise, the operator may get an electrical shock.
• Do not disassemble or repair the cardiograph. Disassembly and repair must be performed by qualified service personnel.
1.10
Service Manual ECG-9620
1. GENERAL
Specifications
ECG input
Input impedance
Electrode offset tolerance
Input unit protection
10 M
Ω
or more
±500 mV or more
Isolated and defibrillator protected only when the following specified patient cable is connected
Patient cable: BJ-901D, BJ-902D, BJ-903D, BA-901D, BA-903D
Standard sensitivity 10 mm /mV ±2%
Common mode rejection ratio 100 dB or more
Frequency response 0.05 to 150 Hz – 3 dB or more
Waveform data processor
Sample rate
AC line filter
High-cut filter
EMG filter
Time constant
Waveform status detection
Sensitivity selection
500 samples/s (input unit: 8,000 samples/s)
50/60 Hz
75, 100, 150 Hz
25/35 Hz
3.2 s or more
Electrode detachment (polarization voltage),
Noise (high frequency)
5, 10 , 20 mm/mV
LCD (monochrome with CCFT backlight)
Size
Number of dots
ECG waveform
3.8 inch
320
×
240
6 channel: 2.8 s
Displayed data Waveform, patient information, recording settings, operation mode, heart rate,
QRS sync mark, error message, electrode detachment, noise
Recorder
Printing method
Printing density
Scanning line density
High resolution thermal printer head
200 dpi (8 dots/mm)
1 ms
Recording width 56 mm
Number of recording channels 1, 2, 3
Paper speed
Number of recording lines
Printed data
Mechanical noise
25, 50 mm/s
Up to 14
Program type, version, date and time, paper speed, sensitivity, lead name, filter,
Patient information (ID number, sex, age zone), timing mark, event mark, electrode detachment, noise
48 dB or less at paper speed 25 mm/s
External input/output
External input
Signal output
Serial I/O
10 mm/0.5 V ±5%, input impedance 100 k
0.5 V/1 mV ±5%, output impedance 100
Communication method:
Baud rate:
RS-232C
Ω
2400, 4800, 9600, 19200, 38400,
57600, 115200
Ω
or more
or less
Service Manual ECG-9620 1.11
1. GENERAL
Power requirement
Line voltage
Line frequency
Power input
Power consumption
Built-in battery (SB-901D)
ECG-9620L: 220 V AC ±10%
ECG-9620M: 230 V AC ±10%
ECG-9620N: 240 V AC ±10%
ECG-9620P: 220 V AC ±10%
ECG-9620S: 110 V AC ±10%
ECG-9620T: 120 V AC ±10%
ECG-9620U: 127 V AC ±10%
50 or 60 Hz
45 VA
45 W or less
Voltage: 12 V
Current consumption: 6 A or less
Battery operation time: Approx. 90 minutes
Environment
Operating temperature
Operating humidity
5 to 40°C (41 to 104°F)
25 to 85% RH (with battery pack and recording paper)
20 to 85% RH (with battery pack and without recording paper)
25 to 90% RH (with recording paper and without battery pack)
25 to 95% RH (without battery pack and recording paper)
Operating atmospheric pressure 70 to 106 kPa
Storage temperature
Cardiograph:
Battery pack:
-20 to 65°C (
−
4 to 149°F)
-20 to 50°C (
−
4 to 122°F) within 30 days
-20 to 40°C (
−
4 to 104°F) within 90 days
-20 to 30°C (
−
4 to 86°F) within one year
Recording paper: -20 to 50°C (
−
4 to 122°F)
Storage humidity
Cardiograph: 10 to 95% RH (non condensing)
Battery pack: 10 to 85% RH (non condensing)
Recording paper: 10 to 90% RH (non condensing)
70 to 106 kPa Storage atmospheric pressure
Electromagnetic compatibility
IEC60601-1-2 (1993), CISPR11 (1990) Group 1 Class B
Other
Indoor portable
Dimensions and weight
Dimensions
Weight
280 W
×
70 H
×
216 D mm (excluding protrusions)
Approx. 3.1 kg (with battery pack)
Approx. 2.7 kg (without battery pack)
1.12
Service Manual ECG-9620
1. GENERAL
Safety
Safety standard:
IEC60601-1 (1998)
IEC60601-1 Amendment 1 (1991)
IEC60601-1 Amendment 2 (1995)
IEC60601-2-25 (1993)
Type of protection against electric shock:
AC power: Class I
Battery power: Internally powered equipment
Degree of protection against electric shock:
Defibrillator proof type CF applied part when patient cable BJ-901D, BJ-902D, BJ-903D, BA-901D or BA-
903D is used
Degree of protection against harmful ingress of water:
Ordinary equipment
Degree of safety of application in the presence of a flammable anaesthetic mixture with air, oxygen or nitrous oxide:
Not suitable for use in the presence of a flammable anaesthetic mixture with air, oxygen or nitrous oxide
Mode of operation:
Continuous
Service Manual ECG-9620 1.13
1. GENERAL
Panel Descriptions
Front Panel
2
Left Side Panel
1
Name
1.
Operation panel
2.
Magazine (paper container)
3.
LCD screen
1
2
3
Name
1.
Magazine release button
2.
Patient cable connector
1.14
Service Manual ECG-9620
1. GENERAL
Operation Panel
7
1
3
8
9
10
2
4
1.
7.
5
6
11
12 13
Name
AC power lamp
2.
Battery operation lamp
3.
Battery charge lamp
4.
Power key/lamp
5.
Mode key
6 Rhythm key/lamp
F1, F2, F3 function keys
14
Name
8.
Age key
9.
Sex key
10. Auto/Manual key/lamp
11. Feed/Mark key
12. Filter key/lamp
13. Copy/CAL key lamp
14. Start/Stop key/lamp
Right Side Panel
CAUTION
• When connecting an external instrument to connectors marked with , the external instrument and this cardiograph must be connected according to the IEC60601-1-1 “Medical electrical equipment — Part 1-1:
General requirements for safety — Collateral standard: Safety requirements for medical electrical systems”. Failure to follow this warning may cause electrical shock to the patient and operator.
• Do not use the output signal from the output connector for a synchronization signal such as the synchronized cardioversion signal. There is a time delay between the input ECG signal and output signal.
1
2
3
4
5
Name
1.
EXT-IN connector
2.
CRO-OUT
3.
SIO connector
4.
AC power cord socket
5.
Equipotential ground terminal
Service Manual ECG-9620 1.15
1. GENERAL
Rear Panel
Battery
CAUTION
Always install the battery even when the cardiograph operates on AC power. Otherwise sudden power down occurs when any electrode is detached during recording.
1.16
Service Manual ECG-9620
1. GENERAL
Composition
Standard Components
ECG-9620L
ECG-9620M
ECG-9620N
ECG-9620P
ECG-9620S
ECG-9620T
ECG-9620U
RHC-0004 Record Assy
UTC-0009 Paper senser board
RHC-0041 Motor Assy
UTC-0010 Motor sensor board
RKC-0001 (220)
RKC-0002 (230)
RKC-0003 (240)
RKC-0004 (110)
RKC-0005 (120)
RKC-0006 (127)
RHC-0042 Magazine Assy
Transfer Assy (220 V) for L and P version
Transfer Assy (230 V) for M version
Transfer Assy (240 V) for N version
Transfer Assy (110 V) for S version
Transfer Assy (120 V) for T version
Transfer Assy (127 V) for U version
UTC-0006
UTC-0007
UTC-0008
Key board
ECG control board
Power board
Options
KD-103E
KH-801E
Cart
Patient Cable Hanger
· To order a replacement assembly above, use the Code No.
· To order a replacement component inside an assembly, refer to “Section 7
Replaceablet Parts List”.
Service Manual ECG-9620 1.17
1. GENERAL
Location
Motor Assy
Thermal Head Assy
Buzzer
LCD
Transfer Assy
Key board
ECG control board
Power board
1.18
Service Manual ECG-9620
Section 2 Maintenance
Replacement ………………………………………………………………………………………………………. 2.1
Periodic Replacement Schedule …………………………………………………………………… 2.1
Cleaning and Lubrication ……………………………………………………………………………………… 2.2
Cleaning and Greasing Schedules ……………………………………………………………….. 2.2
Cleaning the Paper Mark Sensor and Paper Empty Sensor ……………………………… 2.2
Cleaning the Motor Rotation Sensor and Lubricating the Motor Gear and Gear
Meshed with Motor Gear …………………………………………………………………………….. 2.3
Maintenance Check Sheet ……………………………………………………………………………………. 2.5
Service Manual ECG-9620 2C.1
2. MAINTENANCE
This section describes the periodic replacement and cleaning of parts which are required to maintain the instrument in good working condition.
Replacement
This subsection only describes replacement schedule for parts that need to be periodically replaced. The actual replacement procedures are described in the section for Disassembly and Assembly. Read the whole “Disassembly and Assembly” section, especially its Warnings and Cautions, before replacing any of the parts described here.
Periodic Replacement
Schedule
To maintain the performance of the instrument, the parts listed in the table below must be periodically replaced by qualified service personnel.
Code No.
SB-901D
Description
Battery pack
Recommendation
* See below.
08SK3.878.00046
Thermal head, KYT-56-8MPP1-SKH After 50 km recording
RHC-004 Motor Assy After 1000 hours operation
* Replace the battery pack when it cannot last for 30 minutes during battery operation at the temperatures between 20 and30°C.
Service Manual ECG-9620 2.1
2. MAINTENANCE
Cleaning and Lubrication
This subsection describes the cleaning and lubrication procedures for parts that must be cleaned and lubricated by qualified service personnel. The cleaning procedures for parts that can be cleaned by the user are described in the Operator’s
Manual.
Cleaning and Lubricating
Schedules
To maintain the performance of the instrument, the parts listed in the table below must be regularly cleaned or lubricated.
Part
Instrument (external)
Thermal Head
Platen Roller assy
Paper Sensor
Motor Sensor
Motor Gear and Gear
Meshed with Motor Gear
Frequency
After each use
Once a month
Once a year
Once a month
Once a year
Once a year
Performed by
User
User
User
Qualified service personnel
Qualified service personnel
Qualified service personnel
Cleaning the Paper Mark
Sensor and Paper Empty
Sensor
1.
Remove the magazine. The illustration below shows the location of the paper sensor.
2.
Use a piece of cotton moistened with alcohol to clean both sensors.
2.2
Paper sensor
Service Manual ECG-9620
2. MAINTENANCE
Cleaning the Motor
Rotation Sensor and
Lubricating the Motor Gear and Gear Meshed with
Motor Gear
1.
Remove the upper casing from the lower casing. Refer to “Removing the
Upper Casing” in Section 6.
2.
Remove the two M3 pan screws with washers and spring washers which fasten the ground leads to the power transformer unit.
Ground lead
M3 binding head screw
M3 pan screw with washer and spring washer
Thermal head unit
CNA012 cable
CNA011 cable
Motor assy
Motor sensor board
3.
Disconnect the CNA011 and CNA012 cables from the ECG control board.
4.
Remove the three M3 binding head screws which fasten the thermal head unit to the lower casing and remove the thermal head unit.
5.
Remove the two M3 binding head screws which fasten the motor assy to the thermal head unit and remove the motor assy.
6.
Remove the two M3 pan screws with spring washers which fasten the motor sensor board to the motor assy and remove the motor sensor board.
7.
Use a piece of cotton moistened with alcohol to clean the motor rotation sensor.
8.
Use a brush to clean the holes in the gear.
Service Manual ECG-9620 2.3
2. MAINTENANCE
9.
Use grease to lubricate the motor gear and the gear which directly meshes with the motor gear as shown below.
Top view
Motor
Motor gear
Gear meshed with motor gear
2.4
Service Manual ECG-9620
Maintenance Check Sheet
Customer:
Customer Address:
Service Personnel:
Instrument Name:
Instrument Serial Number:
Software Revision:
Overview
Service Company:
Instrument Model:
Hardware Revision:
Outside of instrument is clean.
No loose screws.
No physical damage, no bent parts and no contact with liquid.
Operation panel is not torn or broken.
All keys, buttons and controls are undamaged.
Power cord, patient cable are not frayed and are correctly connected to the instrument.
Paper magazine opens and closes correctly.
Thermal head is clean.
The paper feeding roller is clean.
Motor rotation sensor is clean.
Paper detection sensor is clean.
Motor gear is lubricated properly.
Accessories
Installation
Enough electrolyte cream (CardioCream)
Enough recording paper.
Instrument is installed in the proper location.
Specified 3-prong power cord and ground lead are used.
Battery pack is in the instrument.
Recording paper is loaded.
Power on
There is no fire, smoke or smell.
There is no electrical shock when touching the instrument.
Instrument is not abnormally hot.
Instrument does not affect surrounding equipment.
AC lamp lights when the AC power is supplied.
Battery charge lamp lights when the AC power is supplied.
Basic operation
The screen display is correct. (brightness, no distortion)
Key lamp indication is correct.
All keys operate properly.
All settings are correct.
The battery is fully charged.
Electrode detachment functions properly.
There is no error message or abnormal operation.
Date:
Yes
Yes
Yes
Yes
Yes
Yes
Yes
Yes
Yes
Yes
Yes
Yes
Yes
Yes
Yes
Yes
Yes
Yes
Yes
Yes
Yes
Yes
Yes
Yes
Yes
Yes
Yes
Yes
Yes
Yes
Yes
2. MAINTENANCE
1/2
No
No
No
No
No
No
No
No
No
No
No
No
No
No
No
No
No
No
No
No
No
No
No
No
No
No
No
No
No
No
No
Service Manual ECG-9620 2.5
2. MAINTENANCE
Maintenance Check Sheet
Monitoring
Recording
System Test
Safety
ECG waveform display is correct.
The continuity of the ECG connection cable is correct.
Heart rate display is correct.
QRS sync mark is displayed and heart rate sync sound generates.
ECG lead and sensitivity can be changed properly.
Alarms setting and alarm function is correct.
Sound volume can be changed properly.
Paper is fed correctly (no skewing or jam).
Waveforms and letters are clearly recorded.
Time printed on the recording paper is correct.
Recorder
Key
Memory
LCD/LED
Input unit
Calibration
Communication
CRO/EXT1
Protective earth resistance
Earth leakage current
Enclosure leakage current
Withstanding voltage
Pass
Pass
Pass
Pass
Pass
Pass
Pass
Pass
Pass
Pass
Pass
Pass
Yes
Yes
Yes
Yes
Yes
Yes
Yes
Yes
Yes
Yes
Fail
Fail
Fail
Fail
Fail
Fail
Fail
Fail
Fail
Fail
Fail
Fail
No
No
No
No
No
No
No
No
No
No
2/2
2.6
Service Manual ECG-9620
Section 3 Troubleshooting and
System Error Message
Troubleshooting Flowchart ……………………………………………………………………………………. 3.1
Troubleshooting Table ………………………………………………………………………………………….. 3.4
Troubleshooting General Operation Problem ………………………………………………….. 3.4
Troubleshooting Recording Problem ……………………………………………………………… 3.6
System Error Message ………………………………………………………………………………………… 3.7
Service Manual ECG-9620 3C.1
3. TROUBLESHOOTING AND SYSTEM ERROR MESSAGE
This section describes how to troubleshoot the instrument, using the following:
— flowchart
— troubleshooting table
— system error messages at power-up
NOTE
If the power is not turned off by pressing the Power key, press and hold the Power key 5 seconds or more.
Troubleshooting Flowchart
Use the troubleshooting flowchart to find the possible sources of a problem.
The power LED is on but there is no LCD display.
Is there any response when any key is pressed?
No
Yes
Check that the LCD cable is connected to the CNJ201 connector on the key board.
Normal
The LCD unit is faulty.
The key board is faulty.
The ECG control board is faulty.
Check that the CNA013 cable is connected to the
CNJ033 connector on the ECG control board and
CNJ101 connector on the key board.
Normal
The key board is faulty.
The ECG control board is faulty.
Service Manual ECG-9620 3.1
3. TROUBLESHOOTING AND SYSTEM ERROR MESSAGE
The power of the instrument does not turn on.
Does the instrument operate during AC power operation?
No
The instrument does not operate during battery power operation.
Yes
Yes
Does the LED of the AC power light?
The key board is faulty.
The ECG control board is faulty.
The power board is faulty.
No
Is the battery charged?
Yes
No
Check the following cable connections
Between transformer unit and power board
CNA014 (between the power board and
ECG control board
CNA013 (between the ECG control board
and key board)
Normal
Charge the battery.
Is the battery F101 or F102 fuse on the power board blown?
No
Yes
Replace the battery fuse on the power board.
The power unit is faulty.
The power transformer is faulty.
Check the following cable connections
Between transformer unit and power board
CNA014 (between the power board and
ECG control board
CNA013 (between the ECG control board
and key board)
Normal
Check the power fuse in the fuse holder.
Normal
The power board is faulty.
The power transformer is faulty.
3.2
Service Manual ECG-9620
3. TROUBLESHOOTING AND SYSTEM ERROR MESSAGE
The recorder does not feed the recording paper when the Start key is pressed.
Does the LED for the Start key light?
Lights
Brinks
Does the recorder print when the recording paper is manually pulled out from under the thermal head?
Yes
Check that CNA011 cable is connected to the CNJ036 connector on the ECG control board.
Normal
The motor is faulty.
The ECG control board is faulty.
Is the recording paper set?
No
No
Check that the CNA013 cable is connected to the CNJ033 connector on the ECG control board and
CNJ101 connector on the key board.
Normal
The ECG control board
is faulty.
The key board is faulty.
Set the recording paper.
Service Manual ECG-9620 3.3
3. TROUBLESHOOTING AND SYSTEM ERROR MESSAGE
Troubleshooting Table
Use the troubleshooting table to locate, identify and solve a problem in the instrument. The problems are divided into general operation and recording. Each category has its own troubleshooting table for fast and easy troubleshooting.
How to use the troubleshooting table
1. Determine which troubleshooting table to use.
2. In the “Problem” column find the trouble item that matches the problem.
3. Do the action recommended in the “Corrective Action” column.
4. If the problem is not solved, do the action for the next possible cause or criteria.
5. If none of the actions solve the problem, contact your nearest Nihon Kohden dealer.
Troubleshooting General
Operation Problem
Problem
The power LED lights but nothing is displayed on the LCD screen.
Possible Cause
Faulty cable connection.
The instrument does not operate on AC power.
Faulty LCD unit.
Faulty key board.
Faulty ECG control board.
Faulty power fuse.
Faulty cable connection
Faulty power cord
Faulty power board.
Faulty key board.
Faulty ECG control board.
Faulty power transformer unit,
Action
Check the following cable connection.
CNA013: between the ECG control board and key board
LCD cable: CNJ201 connector on the key board.
CNA014: between the power board and ECG control board
Replace the LCD unit.
Replace the key board.
Replace ECG the control board.
Replace the power fuse.
Check the following cable connection.
CNA013: between the ECG control board and key board
CNA014: between the power board and ECG control board.
Power cable: between the power board and power transformer unit
Replace the power cord.
Replace the power board.
Replace the key board.
Replace ECG the control board.
Replace the power transformer unit.
3.4
Service Manual ECG-9620
3. TROUBLESHOOTING AND SYSTEM ERROR MESSAGE
Problem
The instrument does not operate on battery power.
Possible Cause
The battery is not charged.
Action
Charge the battery.
No key operation
No ECG waveform appears in a specific lead or artifact appears on the waveform.
No ECG waveform appears in all channels or artifact appears on the waveform.
Vertical and horizontal stripes appear on the LCD screen at constant interval.
No sound
The date and time is reset to January 1,
1980 and the “Error 09” error message appears.
Faulty battery fuse.
Faulty battery.
Faulty power board.
Faulty cable connection
Faulty key board.
Faulty ECG control board.
Faulty electrode attachment.
Faulty patient cable connection.
Replace the battery fuse.
Replace the battery.
Check the following cable connection.
CNA013: between the ECG control board and key board
CNA014: between the power board and ECG control board.
Battery cable: CNJ102 connector on the power board
Replace the power board.
Check the following cable connection.
CNA013:
CNA014: between the ECG control board and key board between the power board and ECG control board.
Replace the key board.
Replace ECG the control board.
Check that the electrodes are properly attached to the patient.
Check that the patient cable is firmly connected to the electrodes and instrument.
Replace the ECG control board.
Check that the electrodes are properly attached to the patient.
Faulty ECG control board.
No electrode is attached to the patient or the RF (RL) electrode is not attached to the patient.
Faulty ECG control board.
Faulty cable connection.
Faulty ECG control board.
Faulty LCD unit.
Faulty cable connection.
Faulty speaker.
The lithium battery is completely discharged.
Replace the ECG control board.
Check the following cable connection.
CNA013: between the ECG control board and key board
LCD cable: CNJ201 connector on the key board.
Replace the ECG control board.
Replace the LCD unit.
Check that the speaker cable is firmly connected to the CNJ032 connector on the ECG control board.
Replace the speaker.
Replace the ECG control board. The lithium battery is in the real time clock
IC on the ECG control board.
Service Manual ECG-9620 3.5
3. TROUBLESHOOTING AND SYSTEM ERROR MESSAGE
Troubleshooting Recording
Problem
No printing.
Problem
The recorder does not feed the recording paper when the Start key is pressed.
Possible Cause
Dirty paper sensor.
Faulty cable connection.
Faulty key board.
Faulty ECG control board.
Faulty feeding motor.
The thermal head is incorrectly positioned.
Faulty cable connection.
Faulty thermal head.
Faulty power board.
Faulty ECG control board.
Sometimes the recorder does not print.
The thermal head protection circuit which protects the thermal head from large artifact, such as AC interference is
The paper skews.
rejecting noisy waveforms.
Dirty thermal head.
The recording paper is not properly set in the instrument.
The thermal head is incorrectly positioned.
Faulty feeding roller.
Action
Clean the paper sensor.
Check the following cable connection.
CNA013: between the ECG control board and key board
CNA011: between the ECG control board and feeding motor, motor sensor and paper sensor
Replace the key board.
Replace the ECG control board.
Replace the feeding motor.
Readjust the position of the thermal head.
Check the following cable connection.
CNA013: between the ECG control board and key board
CNA011: between the ECG control board and feeding motor, motor sensor and paper sensor
Replace the thermal head.
Replace the power board.
Replace the ECG control board.
Check the electrode attachment. If necessary, adjust the electrode position so that clear ECG waveforms are displayed.
Clean the thermal head.
Make sure that the recording paper is aligned with the lower recording paper guide.
Readjust the position of the thermal head.
Replace the paper magazine.
3.6
Service Manual ECG-9620
3. TROUBLESHOOTING AND SYSTEM ERROR MESSAGE
System Error Message
During power-up and operation the instrument continuously checks itself for system failure. If a failure is detected, system information and error history are printed on the recording paper and all operations are stopped. System information and error history are also displayed or printed due to transient noise. After printing the system information and error history, the power of the instrument is automatically turned off.
NOTE
If the same system information appears again after restarting the instrument, do not use the instrument until service personnel has corrected the cause of the problem. Sending a copy of the system information to your nearest Nihon Kohden distributor helps us to troubleshoot your problem quickly.
System Information
Indicates an error number to identify the problem. To solve the problem, do the corrective action described below.
03
04
05
06
07
09
Error No.
00
01
02
10
11
Meaning
Input unit error: An interrupt signal of 2 ms is generated.
Input unit error: There is no response to the host.
Input unit error: Communication protocol error.
4 bit CPU error: Initialization error.
4 bit CPU error: “No response” error.
A key on the key board is short-circuited.
RTC error: No interrupt signal of 125 ms.
RTC error: Incorrect data in SRAM.
The lithium battery to back up the date and time and all system settings is completely discharged. The system settings other than the items described in the following note are returned to the factory initial settings.
Bus error.
Address error.
Corrective Action
Replace the ECG control board.
Replace the ECG control board.
Replace the ECG control board.
Replace the ECG control board.
Replace the ECG control board.
Replace the key board.
Replace the ECG control board.
Replace the ECG control board.
Replace the ECG control board. The lithium battery is in the real time clock IC on the ECG control board. The date and time is reset to January 1, 1980.
Replace the ECG control board.
Replace the ECG control board.
Service Manual ECG-9620 3.7
3. TROUBLESHOOTING AND SYSTEM ERROR MESSAGE
Error No.
12
13
14
15
16
17
18
19
20
21
Meaning
Illegal command.
Zero division error.
Power off time out.
EEPROM error: This occurs due to the
EEPROM check error, installed language error or communication error between the host and EEPROM.
Local language flash memory error.
ECG model error.
Local language is not installed.
Local language is not installed.
Error in memory area for local language.
Local language text file version does not match the ECG software version.
ECG interpretation error (Time over).
22
Corrective Action
Replace the ECG control board.
Replace the ECG control board.
Replace the ECG control board.
Replace the ECG control board.
Replace the ECG control board.
Replace the ECG control board.
Install the local language.
Install the local language.
Re-install the local language.
Install the local language text file which is the same version as the ECG software.
Check the input waveforms. If any noise is superimposed on the waveforms, find and eliminate the cause. If no noise is superimposed on the waveform, replace the
ECG control board.
Replace the ECG control board.
27
The entered information does not match the data in the flash memory.
Program version error. The program is updated.
Turn the power off, then on and check that the ECG waveforms are displayed correctly.
NOTE
•••••
“Error 05” also appears when any key on the operation panel is pressed and held down.
•••••
When “Error 08” appears, the following settings are not reset to the factory initial settings even if the instrument is initialized.
— display language
— hospital name
hum filter
direct/modem connection
— recording resolution setting elapsed time
— local language font saved ECG data
3.8
Service Manual ECG-9620
3. TROUBLESHOOTING AND SYSTEM ERROR MESSAGE
Error History
Indicates the latest three errors and the date of the latest error, as in the example below.
Service Manual ECG-9620 3.9
Section 4 System Test, Adjustment,
And Setting
System Test ……………………………………………………………………………………………………….. 4.1
Overall ……………………………………………………………………………………………………… 4.1
Calling up the System Test Level 1 ……………………………………………………………….. 4.2
Calling up the System Test Level 2 ……………………………………………………………….. 4.3
Entering the System Test Number ………………………………………………………………… 4.4
Executing the System Test …………………………………………………………………………… 4.5
Quitting the System Test ……………………………………………………………………………… 4.6
Exiting the System Test Mode ………………………………………………………………………. 4.6
Demonstration ……………………………………………………………………………………………………. 4.7
Recorder ……………………………………………………………………………………………………………. 4.8
Thermal Head …………………………………………………………………………………………………… 4.10
Key ………………………………………………………………………………………………………………….. 4.11
Memory ……………………………………………………………………………………………………………. 4.12
Single Memory Test Mode …………………………………………………………………………. 4.13
Continuous Memory Test Mode ………………………………………………………………….. 4.13
LCD/LED ………………………………………………………………………………………………………….. 4.14
Input Unit …………………………………………………………………………………………………………. 4.16
Calibration ………………………………………………………………………………………………………… 4.17
Communication …………………………………………………………………………………………………. 4.18
CRO/EXT1 ……………………………………………………………………………………………………….. 4.20
System Setup Initialization ………………………………………………………………………………….. 4.22
ECG Findings List Recording ………………………………………………………………………………. 4.23
Recording Resolution Setting ……………………………………………………………………………… 4.24
Date and Time Setting ……………………………………………………………………………………….. 4.25
Setting the Date and Time …………………………………………………………………………. 4.25
Service Manual ECG-9620 4C.1
4. SYSTEM TEST, ADJUSTMENT AND SETTING
This section describes:
• how to check the operation of the instrument in the System Test mode.
• how to output the ECG findings list in the System Test mode.
• how to initialize the system in the System Test mode.
• how to adjust the thermal head recording resolution and recording paper cutting position in the System Test mode.
• how to set date and time in the System Setup mode.
System Test
Overall
The instrument has two System Test modes: Test level 1 for operator and Test level
2 for qualified service personnel. The test items marked with “*” perform the same test in Test levels 1 and 2. Each Test level consists of the following system test items:
Test level 1
•
Demonstration
•
Recorder
•
Key*
•
Memory*
•
LCD/LED*
•
Input unit*
•
Calibration*
•
Communication*
•
CRO/EXT1*
•
System Setup Initialization*
•
ECG Findings List Recording
Test level 2
•
Recorder
•
Thermal head
•
Key*
•
Memory (single)*
•
Memory (continuous)
•
LCD/LED* (
•
Input unit*
•
Calibration*
•
Communication*
•
CRO/EXT1*
•
System Setup Initialization*
•
Recording resolution setting
NOTE
In the description of some test items in this section, whenever it is appropriate, a description of the source of problem and its corrective action will be described in table form for fast and easy troubleshooting. If none of the actions solve the problem, contact your Nihon Kohden distributor or representative.
Service Manual ECG-9620 4.1
4. SYSTEM TEST, ADJUSTMENT AND SETTING
Calling up the System Test
Level 1
1. If the power is on, turn it off.
NOTE
Release the Feed/Mark key immediately after the instrument starts printing. If you continue to hold the Feed/Mark key for more than 15 seconds, the instrument recognizes that the Feed/Mark key is shortcircuited and prints the system information “Error 05” at the end of printing.
+
.
2. Press the Power key while pressing the Feed/Mark key. Hold the Feed/Mark key until the instrument begins to print the system test procedure, relationship between the input number and its corresponding key name on the operation panel and system test number list as shown below. The Test level 1 is called up and the instrument is in standby mode for entering the system test number.
To cancel printing the following information, press the Start/Stop key.
Printout
System Test Screen
4.2
Service Manual ECG-9620
4. SYSTEM TEST, ADJUSTMENT AND SETTING
Calling up the System Test
Level 2
1. If the power is on, turn it off.
NOTE
Release the Feed/Mark key immediately after the instrument starts printing. If you continue to hold the Feed/Mark key for more than 15 seconds, the instrument recognizes that the Feed/Mark key is shortcircuited and prints the system information “Error 05” at the end of printing.
+ +
2. Press the Power key while pressing the Feed/Mark and Auto/Manual keys together. Hold the Feed/Mark and Auto/Manual keys until the instrument begins to print the system test procedure, relationship between the input number and its corresponding key name on the operation panel and system test number list as shown below. The Test level 2 is called up and the instrument is in standby mode for entering the system test number.
To cancel printing the following information, press the Start/Stop key.
Printout
System Test Screen
Service Manual ECG-9620 4.3
4. SYSTEM TEST, ADJUSTMENT AND SETTING
Entering the System Test
Number
Use the following keys on the operation panel to enter a 2-digit number for executing the desired system test. The specified system test numbers are indicated in the [xx] bracket at the right of each system test item on the printout output when the Test level 1 or 2 is called up. Refer to the “Calling up the Test Level X” section.
To delete the entered number, press the Auto/Manual key. To delete a 2-digit number, press the Auto/Manual key twice. At this time, the ones digit number is deleted before the tens digit number is deleted.
Numeric
0
3
4
1
2
Key
Copy/CAL key
F1 function key
F2 function key
F3 function key
Mode key
Clear Auto/Manual key
Numeric
5
8
9
6
7
Rhythm key
Key
Age key
Sex key
Feed/Mark key
Filter key
Enter Start/Stop key
4.4
Service Manual ECG-9620
4. SYSTEM TEST, ADJUSTMENT AND SETTING
Executing the System Test
Press the Start/Stop key. For some tests, the System Test screen is displayed during the test as shown below,
System Test Screen
Service Manual ECG-9620
If you entered an unspecified number, 8 repeating “pips” alarm sound and the
“Invalid number. Please re-enter number” error message is displayed as shown below.
70
To re-enter the system test number, do either of the following:
• Delete the previously entered number by pressing the Auto/Manual key.
• Enter the system test number by overwriting the previously entered number.
4.5
4. SYSTEM TEST, ADJUSTMENT AND SETTING
Quitting the System Test
The procedures to quit each system test vary from test to test. Some tests automatically end after an alarm sound is generated or a printout is output. Refer to the following explanations for each test. After quitting each test, the instrument returns to the standby mode for entering the system test number.
After a system test is completed, you can execute other system test without exiting the System Test mode.
Exiting the System Test
Mode
After all desired system tests are finished, press the Power key.
4.6
Service Manual ECG-9620
Demonstration
4. SYSTEM TEST, ADJUSTMENT AND SETTING
This is used to learn or demonstrate instrument operation.
While executing this test item, the instrument generates dummy 12 lead ECG resting waveforms until the power of the instrument is turned off. The ECG waveforms can be recorded and also displayed as shown below.
Procedure
Enter the system test number [00] (Test level 1) and press the Start/Stop key.
To quit the test, turn the power of the instrument off by pressing the Power key.
Dummy 12 lead ECG resting waveforms on LCD
Service Manual ECG-9620 4.7
4. SYSTEM TEST, ADJUSTMENT AND SETTING
Recorder
This is used to check the condition of the recorder by printing test patterns. The recording test patterns consist of the following and are printed in the following order:
1. Diagonal lines
2. Characters H and X (Test level 1 only)
3. Paper speed scales (25 and 50 mm/s)
The recorder test of Test level 1 contains the same recorder test and thermal head test as Test level 2. With regard to the check procedure for characters H and X, refer to the “Thermal Head” section.
Procedure
Enter the system test number [01] (Test level 1) or [00] (Test level 2) and press the
Start/Stop key. The following test patterns are printed.
This test automatically ends after the following has been printed. The instrument returns to the standby mode for entering the system test number.
Printout of Test level 1
Not printed in Test level 2. Refer to the
“Thermal Head” section for this check.
4.8
Service Manual ECG-9620
Service Manual ECG-9620
4. SYSTEM TEST, ADJUSTMENT AND SETTING
Check Procedure for Diagonal Lines
Check that all the diagonal lines are evenly and completely printed.
Possible Source of Problem
A dirty thermal head can cause some parts to be unevenly or incompletely printed.
A faulty thermal head can cause some parts at a certain position to be unevenly or incompletely printed.
Corrective Action
1. Clean the thermal head with the thermal head cleaner pen.
2. If this does not fix the problem, replace the thermal head.
1. Clean the thermal head with the thermal head cleaner pen.
2. If this does not fix the problem, replace the thermal head.
Check Procedure for Paper Speed Scales
Check that the accuracy of each paper speed during actual recording is within 2%.
The scales for 4 seconds at 10 mm/s and 12.5 mm/s paper speeds and the scales for
2 seconds at 25 mm/s and 50 mm/s paper speeds are consecutively printed. For example, the length for 4 seconds on the time scale printed at 10 mm/s paper speed must be within 39.2 mm to 40.8 mm.
Possible Source of Problem
Badly positioned thermal head.
Damaged, deformed or badly positioned motor gear.
Dirty motor rotation sensor.
Loose or damaged axle.
Faulty motor.
Faulty ECG control board.
Corrective Action
1. Adjust the thermal head position.
2. If this does not fix the problem, replace the thermal head.
1. Check the motor gear and its position.
2. If this does not fix the problem, replace the motor gear.
Clean the motor rotation sensor as described in the “Maintenance” section.
Tighten and check the axle as described in the “Disassembly and Assembly” section.
Replace the motor.
Replace the ECG control board.
4.9
4. SYSTEM TEST, ADJUSTMENT AND SETTING
Thermal Head
This is used to check the condition of the thermal head by printing out the characters “H” and “X” continually.
Procedure
Enter the system test number [01] (Test level 2) and press the Start/Stop key. The characters “H” and “X” are printed as follows.
To quit the test, press the Auto/Manual key and the instrument returns to the standby mode for entering the system test number.
Printout of Thermal Head Test Result
4.10
Check Procedure for Characters H and X
Check that all the parts of the characters “H” and “X” are clearly, evenly and completely printed and that the characters are not printed zigzag or diagonally.
Possible Source of Problem
The thermal head recording resolution is not set correctly.
Faulty cable connection.
Faulty power board.
The thermal head unit position is not correct.
Corrective Action
Adjust the thermal head recording resolution as described in this section.
Check the following cable connection.
CNA014: between the ECG control board and power board
CNA012: CNJ033 connector on the
ECG control board.
Replace the power board.
Check and adjust the thermal head unit position.
Service Manual ECG-9620
Key
4. SYSTEM TEST, ADJUSTMENT AND SETTING
This is used to check the condition of the keys on the operation panel.
Procedure
1.
Enter the system test number [02] (Test level 1) or [03] (Test level 2) and press the Start/Stop key.
2.
Press the key on the operation panel. The name of the pressed key is printed if the key is functioning correctly.
To quit the test, press the Auto/Manual key. The instrument returns to the standby mode for entering the system test number.
NOTE
The Power and Auto/Manual keys cannot be checked by this test. To check if these two keys are functioning correctly, do the following:
•••••
Power key
Check that the power of the instrument is on or off when the
Power key is turned on or off.
•••••
Auto/Manual key
Check that the Key test is stopped by pressing the Auto/Manual key.
Check Procedure for Operation Panel Key
Check that the name of the pressed key is printed.
Possible Source of Problem
Faulty key board.
Corrective Action
Replace the key board.
Service Manual ECG-9620 4.11
4. SYSTEM TEST, ADJUSTMENT AND SETTING
Memory
This is used to check the condition of the memory by comparing the data of the test patterns written to and read from each memory area.
The instrument provides two memory test modes: single and continuous. When single memory test mode is selected, entire memory is tested once. When continuous memory test mode is selected, the memory is continuously tested until the Auto/Manual key is pressed. The number of “Count of test” increases by one each time the entire memory test is tested. One complete memory test takes about
30 seconds.
• Single: [03] Test level 1, [04] Test level 1
• Continuous: [05] Test level 2
If no fault is detected, an “OK” message appears for each memory. If a fault is detected, an “Error” message appears and the number of “Error count” for each memory increases by one.
Printout of Memory Test Result
4.12
Service Manual ECG-9620
Single Memory Test Mode
4. SYSTEM TEST, ADJUSTMENT AND SETTING
This mode tests the entire memory once. You can use this mode to fully check all memory if a memory problem frequently occurs.
Procedure
Enter the system test number [03] (Test level 1) or [04] (Test level 2) and press the
Start/Stop key.
After the test, the test result is automatically printed. When the test result is completely printed, a “bing bong” alarm sound is generated and instrument returns to the standby mode for entering the system test number.
To cancel the test or cancel printing the test result, press the Auto/Manual key.
Check Procedure for Single Memory Test Mode
Check that no “Error” messages appear.
Possible Source of Problem
Faulty memory on the ECG control board.
Corrective Action
Replace the ECG control board. Each memory mounted on the ECG control board cannot be replaced at memory component level.
Continuous Memory Test
Mode
This mode continues testing the entire memory until the Auto/Manual key is pressed. You can use this mode to check an intermittent memory problem.
Procedure
Enter the system test number [05] (Test level 2) and press the Start/Stop key.
To print the test result without quitting the test, press the Start/Stop key. All results of the tests performed until the Start/Stop key are pressed is printed on one page.
To cancel the test, press the Auto/Manual key. All results of the tests performed until the Start/Stop key is pressed are printed on one page. When the test result is completely printed, 8 repeating “pips” alarm sound is generated and the instrument returns to the standby mode for entering the system test number.
Check Procedure for Continuous Memory Test Mode
Check that no “Error” messages appear.
Possible Source of Problem
Faulty memory on the ECG control board.
Corrective Action
Replace the ECG control board. Each memory mounted on the ECG control board cannot be replaced at memory component level.
Service Manual ECG-9620 4.13
4. SYSTEM TEST, ADJUSTMENT AND SETTING
LCD/LED
This is used to check all LEDs on the operation panel, LED/LCD control circuit and all dots on the LCD First, the LCD test starts and after the LCD test is complete, the LED test starts.
LCD Test
The LCD displays the following four types of test patterns every two seconds in the following order:
1. Diagonal lines are displayed.
2. Entire LCD lights up.
3. Returns to the System Test screen.
The LCD image for each pattern changes as follow:
1 2
4.14
LED Test
The LEDs on the operation panel light up one by one and remain lit until all LEDs light up. After all LEDs light up, they go out one at a time.
NOTE
With regard to the LEDs of Battery charge lamp, AC power lamp and
POWER lamp, check if they are in the following condition during the
LED/LCD test:
• Battery charge lamp: Not lit (This lamp indicates the remaining battery power before and after the LED test
• AC power lamp:
• POWER lamp: during battery operation.)
Lit
Lit when AC power is used
Procedure
Enter the system test number [04] (Test level 1) or [06] (Test level 2) and press the
Start/Stop key.
After the test, the instrument returns to the standby mode for entering the system test number.
To cancel the test, press the Auto/Manual key.
Service Manual ECG-9620
4. SYSTEM TEST, ADJUSTMENT AND SETTING
Check Procedure for LCD Test
Check that all the dots on the screen light up and go out according to the test pattern.
Possible Source of Problem
Faulty cable connection.
Faulty LCD unit.
Faulty ECG control board.
Faulty key board.
Corrective Action
Check the following cable connection.
CNA013: between the ECG control board and key board.
LCD cable: CNJ201 connector on the key board.
Replace the LCD unit.
Replace the ECG control board.
Replace the key board.
Check Procedure for LED Test
Check that all the LEDs on the operation panel light up.
Possible Source of Problem
Faulty cable connection.
Faulty key board.
Faulty ECG control board.
Corrective Action
Check the following cable connection.
CNA013: between the ECG control board and key board.
Replace the key board.
Replace the ECG control board.
Service Manual ECG-9620 4.15
4. SYSTEM TEST, ADJUSTMENT AND SETTING
Input Unit
This is used to check if the input analog signal processing circuit detects the lead off condition correctly, using the provided input check jig. If each lead is connected when the input analog signal processing circuit works correctly, the
“Normal” message is printed at the right of each electrode lead name in the test result. If a lead is not connected, the “Error” message is printed.
The following is an example printout of the input unit test result when the R(RA) lead is disconnected.
Input check jig
4.16
Procedure
1. Connect the electrode lead to the instrument.
2. Attach all tips of each electrode lead to the input check jig.
3. Enter the system test number [05] (Test level 1) or [07] (Test level 2).
4. Disconnect one of the leads from the check jig and press the Start/Stop key.
The disconnected lead name is printed out.
5. Repeat steps 3 and 4 for all leads by one.
To quit the test, press the Auto/Manual key. The instrument returns to the stanby mode for entering the system test number.
Check Procedure for Input Unit Test
Check that the lead off condition is detected correctly.
Possible Source of Problem
Faulty cable connection.
Faulty key board.
Faulty ECG control board.
Corrective Action
Check the following cable connection.
CNA013: between the ECG control board and key board.
Replace the key board.
Replace the ECG control board.
Service Manual ECG-9620
Calibration
4. SYSTEM TEST, ADJUSTMENT AND SETTING
This is used to check the sensitivity and time constant of the input analog signal processing circuit. After starting the test, the CAL waveforms for leads I, II and V1 to V6 are printed as shown below. If all the rectangular printed CAL waveforms have the amplitude of 1 mV and time constant of more than 3.2 seconds, the sensitivity and time constant of the input analog signal processing circuit are normal.
Service Manual ECG-9620
Procedure
Enter the system test number [06] (Test level 1) or [08] (Test level 2) and press the
Start/Stop key.
After all CAL waveforms for eight leads are printed, the test automatically ends and the instrument returns to the standby mode for entering the system test number.
To cancel the test, press the Start/Stop key or Auto/Manual key. The instrument returns to the standby mode for entering the system test number.
Check Procedure for Calibration Waveforms
Check that all the rectangular printed CAL waveforms match the following conditions in the illustration below:
•
Amplitude when CAL waveform is risen:
•
Amplitude of point which is 25 mm : from the rising point of the CAL waveform
10 mm
±
2% more than 7.3 mm
10 mm ±2% more than 7.3 mm
25 mm
Possible Source of Problem
Faulty ECG control board.
Corrective Action
Replace the ECG control board.
4.17
Chp
4. SYSTEM TEST, ADJUSTMENT AND SETTING
Communication
This is used to check the external communication input/output line of the instrument, using the check jig. The instrument has one standard communication connector (SIO). This test is performed by comparing the original test patterns sent from the output line with the test patterns received at the input line. If any received test pattern is different from its original, a “Error” message is printed. A “Normal” message is printed if the communication line is normal. With regard to TxD-RxD line, if the same data is printed, the line is normal.
Every time the test of one set is repeated, the number of “Count of test” increases by one. Every time the error is detected during continuous test, the “Error count” increases by one. The test of one set takes about 5 seconds.
The following is an example printout of the communication test result.
4.18
Preparation
A locally made check jig is required for the test. To make the check jig, shortcircuit the pins as shown below.
Connector Pin Assignment
1.
FG
2.
TXD
3.
RXD
4.
RTS
5.
CTS
6.
DSR
7.
GND
8.
HS
9.
DTR
Mating Connector
Connector: HDEB-9PF (05)
Case: HDE-CTH
Service Manual ECG-9620
4. SYSTEM TEST, ADJUSTMENT AND SETTING
Procedure
1. Connect the check jig to the SIO socket of the instrument.
2. Enter the system test number [07] (Test level 1) or [09] (Test level 2) and press the Start/Stop key.
The instrument prints the test result of each test if the instrument detects an
“Error”.
To print the test result without quitting the test, press the Start/Stop key. The results of all tests performed until the Start/Stop key are pressed are printed.
You can see the test number and the number of errors on “Count of test” and
“Error count” on the printout, respectively.
To quit the test, press the Auto/Manual key. The instrument prints the results of all tests performed until the Auto/Manual key is pressed. When the test result is completely printed, 8 repeating “pips” sound is generated and the instrument returns to the standby mode for entering the system test number.
Check Procedure for Serial Communication
Check that no error messages appear.
Possible Source of Problem
Faulty ECG control board.
Corrective Action
Replace the ECG control board.
Service Manual ECG-9620 4.19
4. SYSTEM TEST, ADJUSTMENT AND SETTING
CRO/EXT1
This is used to check the external output/input terminal, using the check jig. The instrument has the input signal terminal (EXT-IN connector) and output signal terminal (CRO-OUT connector) at the rear of the instrument.
In this test, the instrument prints the known triangular waveform signals generated inside the instrument at the lower trace on the recording paper the moment the instrument outputs the signals from the CRO-OUT terminal to the EXT-IN connector. At the same time, the instrument prints the triangular waveform signals input to the EXT-IN connector at the upper trace on the recording paper. There is no delay time between the printed waveforms on the upper and lower traces.
The following is an example printout of the CRO/EXT1 test result.
4.20
Preparation
A locally made check jig is required for the test. To make the check jig, use the two 3.5
φ
monaural jacks and leads and solder the signal line and ground line of the two jacks with leads as shown below.
Signal line
Ground line
Service Manual ECG-9620
4. SYSTEM TEST, ADJUSTMENT AND SETTING
Procedure
1. Connect the check jig to the CRO-OUT/EXT-IN sockets of the instrument.
2. Enter the system test number [08] (Test level 1) or [10] (Test level 2) and press the Start/Stop key.
To quit the test, press the Start/Stop key or Auto/Manual key. The instrument returns to the standby mode for entering the system test number.
Check Procedure
Check that the shape of the two printed triangular waveforms are the same and there is no delay time between them.
Possible Source of Problem
Faulty ECG control board.
Corrective Action
Replace the ECG control board.
Service Manual ECG-9620 4.21
4. SYSTEM TEST, ADJUSTMENT AND SETTING
System Setup Initialization
This is used to reset all the system settings to the factory initial settings.
NOTE
The following settings are not reset to the factory initial settings even if the instrument is initialized.
• date and time* • display language**
• recording resolution setting* • hospital name**
• cue mark position*
• elapsed time
• direct/modem connection**
• local language font
• saved ECG data
For settings marked with *, refer to the following corresponding subsection in this section; for settings marked with **, refer to
“Changing Settings Before Measurement (System Setup Screen)” in the operator’s manual.
Procedure
Enter the system test number [10] (Test level 1) or [12] (Test level 2) and press the
Start/Stop key.
If the initialization is completed, a “System Setup Initialization” message appears with one “bing bong” alarm sound and the instrument returns to the stanby mode for entering the system test number.
Refer to the operator’s manual for the factory initial settings.
Following is the LCD display after the system has been initialized.
4.22
Service Manual ECG-9620
4. SYSTEM TEST, ADJUSTMENT AND SETTING
ECG Findings List Recording
This is used to print out the list of all ECG findings used for the instrument. The instrument informs you of the ECG finding as a result of the ECG interpretation when analyzing the ECG.
Procedure
Enter the system test number [11] (Test level 1) and press the Start/Stop key.
When the list is completely printed, one “bing bong” alarm sound is generated and the instrument returns to the standby mode for entering the system test number.
To cancel printing the list, press the Start/Stop key or Auto/Manual key. The instrument returns to the standby mode for entering the system test number.
Service Manual ECG-9620 4.23
4. SYSTEM TEST, ADJUSTMENT AND SETTING
Recording Resolution Setting
This is used to adjust the thermal head recording resolution after the thermal head is replaced with a new one or when the printout is not clearly, evenly and completely printed.
Normally, the resistor value of the heating element on the thermal head is a specific value which varies from thermal head to thermal head. Even if the same energy is applied to the thermal head, the recording quality varies due to the difference of the thermal head resistor value. Therefore, adjusting the thermal head recording resolution is required to evenly print regardless of the thermal head resistor value.
Do the following procedure to automatically adjust the thermal head recording resolution.
Procedure
1.
Call up the System Test Level 2.
heating element
Label:
Lot No., thermal head resistance
2.
Enter the system test number between [41] and [48] according to the thermal head resistance value
Thermal head resistance
1265 to 1181
1180 to 1131
1130 to 986
985 to 976
975 to 966
965 to 956
955 to 946
945 to 935
Current setting
System set No.
Recording resolution setting1 [41]
Recording resolution setting2 [42]
Recording resolution setting3 [43]
Recording resolution setting4 [44]
Recording resolution setting5 [45]
Recording resolution setting6 [46]
Recording resolution setting7 [47]
Recording resolution setting8 [48]
Recording resolution setting [49]
3.
Press the Start/Stop key.
4.
Turn the power off. (Test level 2) and press the Start/Stop key.
4.24
Service Manual ECG-9620
4. SYSTEM TEST, ADJUSTMENT AND SETTING
Date and Time Setting
The date and time of the instrument are set in the System Setup mode. In the
System Setup mode, you can also set the entire system settings of the instrument which determines the operation conditions of the instrument. Refer to the operator’s manual for details.
The date and time is backed up with the lithium battery in a real time clock IC on the ECG control board. The life time of the lithium battery is about 7 years. When the “Error 09” error message appears and the date is reset to January 1, 1980, the lithium battery is completely discharged. Replace the ECG control board and set the date and time.
Setting the Date and Time
1. Call up the System Setup mode
1) If the power is on, turn it off.
NOTE
Release the Feed/Mark key immediately after the instrument starts printing. If you continue to hold the Feed/Mark key for more than 15 seconds, the instrument recognizes that the Feed/Mark key is shortcircuited and prints the system information “Error 05” at the end of printing.
2) Press the Power key while pressing the Copy/CAL key. Hold the Copy/
CAL key until the instrument begins to print the list of the system setup settings. The System Setup mode is called up.
To cancel printing the list, press the Start/Stop key.
2. Enter a 3-digit number to call up the stanby mode for entering the new numbers for year, month/date, hour/minute or second, respectively. Refer to the
“Entering the System Test Number” in this section for entering the numbers.
Following is the LCD screen when the year setting mode is called up.
Service Manual ECG-9620 4.25
4. SYSTEM TEST, ADJUSTMENT AND SETTING
Year
Enter the system setup number [318].
Month/date
Enter the system setup number [319].
Hour/minute
Enter the system setup number [320].
Second
Enter the system setup number [322].
To cancel the entered number, press the Auto/Manual key.
NOTE
You cannot enter numbers for “second” setting.
3. Enter a 4-digit number to enter the new numbers of the year, month/date or hour/minute. The range of the number which is possible to enter is as follows:
Year
[1980] to [2079]
Month/date
[0101] to [1231]
Hour/minute
[0000] to [2359]
To cancel the entered number, press the Auto/Manual key.
Following is the LCD screen when the year “1998” is entered.
4.26
Service Manual ECG-9620
4. SYSTEM TEST, ADJUSTMENT AND SETTING
NOTE
•
If the Start/Stop key is pressed in the “second” setting mode, the second is reset to “00” seconds and the instrument starts working from “00” seconds.
•
If the power of the instrument is turned off before the Start/Stop key is pressed, the newly entered numbers are invalid.
4. Press the Start/Stop key to save the new numbers. The newly entered numbers are automatically printed.
Following is the LCD screen when the year “1998” is saved.
Service Manual ECG-9620
If you entered an unspecified number, 8 repeating “pips” alarm sound and the
“Invalid number. Please re-enter number” error message is displayed.
To re-enter the system test number, do either of the following:
• Delete the previously entered number by pressing the Auto/Manual key.
• Enter the system test number by overwriting the previously entered number.
5. Repeat steps 2 to 4 to enter the new numbers for the other settings.
6. Turn the power of the instrument off to exit the System Setup mode.
4.27
Section 5 Board/Unit Description
Block Diagram …………………………………………………………………………………………………….. 5.1
Power Unit …………………………………………………………………………………………………………. 5.2
ECG Control Board ……………………………………………………………………………………………… 5.2
Service Manual ECG-9620 5C.1
5. BOARD/UNIT DESCRIPTION
Block Diagram
Buzzer
Motor
Motor sensor
Paper sensor
Thermal head
CNA011
CNA012
CNJ101 (34 pin)
Key board
CNJ201 (12 pin)
CNA013
CNJ021 (80 pin)
CNJ032 (2 pin)
CNJ031 (9 pin)
SIO connector
CNJ043
(miniature plug)
External input connector
CNJ036 (10 pin)
CNJ041
(miniature plug)
CRO output connector
CNJ011 (16 pin)
CNJ033 (24 pin)
ECG control board
LCD
Patient cable connector
CNJ091 (D-sub 15 pin)
Battery
(SB-901D)
CNJ035 (30 pin)
CNA014
CNJ201 (30 pin)
Power board
CNJ102 (3 pin)
CNJ101
(2 pin)
Power transformer unit
AC socket
Service Manual ECG-9620 5.1
5. BOARD/UNIT DESCRIPTION
Power Unit
The Power unit consists of the power source, battery charging and control circuits.
The Power unit uses the switching regulation method to produce the power required for the instrument.
• +5 V for digital circuits
• +12 V for analog circuits
• +24 to 30 V for thermal head
ECG Control Board
The ECG Control board consists of the following components:
Component Description
CPU:
ROM:
MC68EC020 (Operating frequency: 25 MHz)
For system software, 2 MB
DRAM: Main memory, 4 MB
Flash memory: 16 MB
Real time clock: with 140 B SRAM and back-up battery (lithium battery)
Timer: 1 ms timer
Interrupt request signal ON/OFF: selectable
Operation mode: fixed
Serial interface: Equivelent to RS-232C, 1 channel
Baud rate: 2,400 to 115,200 bps selectable
Speaker circuit: Beep sound, Sound by noise generator
Interrupt request: Auto-vector method
Interface:
Recorder:
To ECG input section
LCD:
Controller:
A/D converter:
For keyboard
5.2
Service Manual ECG-9620
Section 6 Disassembly
Before You Begin …………………………………………………………………………………………………. 6.1
Warnings and Cautions ………………………………………………………………………………. 6.1
Required Tools …………………………………………………………………………………………… 6.1
Cable Connection ……………………………………………………………………………………………….. 6.2
Removing the Upper Casing …………………………………………………………………………………. 6.4
Removing the Magazine and Recording Paper ………………………………………………. 6.4
Removing the Battery Pack …………………………………………………………………………. 6.4
Removing the Upper Casing ………………………………………………………………………… 6.4
Removing the Thermal Head and Motor Assy …………………………………………………………. 6.5
Removing the Thermal Head ……………………………………………………………………….. 6.5
Removing the Motor Assy ……………………………………………………………………………. 6.6
Removing the ECG Control Board …………………………………………………………………………. 6.6
Removing the Power Board ………………………………………………………………………………….. 6.8
Removing the Power Board …………………………………………………………………………. 6.8
Replacing the Power Fuse and Battery Fuse …………………………………………………. 6.9
Removing the Key Board and LCD Unit ………………………………………………………………… 6.10
Service Manual ECG-9620 6C.1
6. DISASSEMBLY
The procedures in this section tell how to remove, replace and install major components in the instrument.
Before You Begin
Removing, replacing and installing major components should be done by qualified service personnel.
Warnings and Cautions
WARNINGS
• To avoid the possibility of injury to yourself or damage to the instrument, do not install or remove any component or change switch settings while the power is on. Turn the power off and wait 10 minutes before installing to or removing any component from the instrument.
• To avoid accidental discharge of static electricity which could damage the instrument components, use a wrist ground strap when installing or removing any component of the instrument.
Required Tools
Service Manual ECG-9620
CAUTIONS
• Before connecting or disconnecting any cables, turn off the instrument, unplug the AC power cord from the instrument and remove the battery pack.
• Fuses cut off the power when an abnormality occurs in the instrument. Eliminate the malfunction before replacing the fuse. Use the correct fuse only. The fuse rating is shown on the holder.
• Removal and replacement of any component in the instrument should be done by qualified service personnel.
• Use only parts recommended by Nihon Kohden to assure maximum performance from your instrument.
• Anti-static bench mat
• Wrist ground strap
• Phillips screwdriver (insulated type)
• Flat-blade screwdriver (insulated type)
• Hex (Allen) wrench or hex keys
• Hex driver
• Tweezers
6.1
6. DISASSEMBLY
Cable Connection
Buzzer
Motor
Motor sensor
Paper sensor
CNA011
CNJ021 (80 pin)
CNJ032 (2 pin)
CNJ031 (9 pin)
SIO connector
CNJ043
(miniature plug)
External input connector
CNJ036 (10 pin)
CNJ041
(miniature plug)
CRO output connector
CNA012
Thermal head
CNJ011 (16 pin)
CNJ101 (34 pin)
Key board
CNJ201 (12 pin)
CNA013
CNJ033 (24 pin)
ECG control board
LCD
Patient cable connector
CNJ091 (D-sub 15 pin)
Battery
(SB-901D)
CNJ035 (30 pin)
CNA014
CNJ201 (30 pin)
Power board
CNJ102 (3 pin)
CNJ101
(2 pin)
Power transformer unit
AC socket
6.2
Service Manual ECG-9620
6. DISASSEMBLY
No.
CNA011
CNA012
CNA013
CNA014
Code No.
Description
08SK3.670.00216A
ZHR-10 L=120, 90, 130 between motor assy and ECG control board
08SK3.670.00181B
PHR-16 L=80, between thermal head and ECG control board
08SK3.670.00172A
PHDR-24VS (W=100), between key board and ECG control board
08SK3.670.00199B
SHDR-30V-S-B (W=60), between power board and ECG control board
CNA011 cable
CNA012 cable
CNA014 cable
Service Manual ECG-9620
CNA013 cable
6.3
6. DISASSEMBLY
Removing the Upper Casing
Removing the Magazine and Recording Paper
1.
Press down the magazine release button to open the magazine.
2.
Remove magazine and recording paper into the magazine.
Removing the Battery Pack
1.
Remove the two M3 binding head screws from the battery cover.
2.
Open the battery cover by sliding it up as shown in the figure.
3.
Disconnect the battery cable from the battery pack connector..
4.
Remove the battery pack from the battery compartment.
Removing the Upper
Casing
1.
Remove the five M3 binding head screws.
6.4
2.
Open the upper casing in the direction of the arrow.
Service Manual ECG-9620
6. DISASSEMBLY
Removing the Thermal Head and Motor Assy
Removing the Thermal
Head
1.
Remove the battery pack and upper casing from the lower casing. Refer to
“Removing the Upper Casing” .
2.
Remove the two M3 pan screws with washers and spring washers which fasten the ground leads to the power transformer unit.
Ground lead
M3 binding head screw
M3 pan screw with washers and spring washer
Thermal head unit
CNA012 cable
CNA011 cable
Thermal head
3.
Disconnect the CNA011 and CNA012 cables from the ECG control board.
4.
Remove the three M3 binding head screws which fasten the thermal head unit to the lower casing and remove the thermal head unit.
5.
Remove the two M3 binding head screws washers which fasten the thermal head to the thermal head unit.
6.
Remove the thermal head.
7.
Remove the thermal head cable from the thermal head.
Service Manual ECG-9620 6.5
6. DISASSEMBLY
Removing the Motor Assy
1.
Remove the thermal head unit from the lower casing. Refer to step 1 to 5 in
“Removing the Thermal Head Unit”
2.
Remove the two M3 binding head screws which fasten the motor assy to the thermal head unit and remove the motor assy.
3.
Remove the two M3 pan screws with spring washers which fasten the motor sensor board to the motor assy and remove the motor sensor board.
Motor assy
Motor sensor board
6.6
Service Manual ECG-9620
6. DISASSEMBLY
Removing the ECG Control Board
1.
Remove the battery pack and upper casing from the lower casing. Refer to
“Removing the Upper Casing” .
2.
Disconnect the CNA011, CNA012, CNA013, CNA014 and speaker cables from the ECG control board.
CNA011 cable
CNA012 cable
CNA013 cable
CNA014 cable
Speaker cable
ECG control board
3.
Remove the six M3 pan screws with washers which fasten the ECG control board to the lower casing and remove the ECG control board.
Service Manual ECG-9620 6.7
6. DISASSEMBLY
Removing the Power Board
Removing the Power Board
1.
Remove the battery pack and upper casing from the lower casing. Refer to
“Removing the Upper Casing” .
2.
Remove the ECG control board. Refer to “Removing the ECG Control Board”.
3.
Remove the two M3 pan screws with washers and four M3 spacer bolts which fasten the shield plate to the lower casing and remove the shield plate.
M3 pan screw with spring washer
M3 spacer bolt
Power board
Shield plate
Power cable
6.8
4.
Remove the M3 pan screw with washer which fastens the Power board to the lower casing and remove the power unit.
5.
Disconnect the power cable from the power board.
Service Manual ECG-9620
Replacing the Power Fuse and Battery Fuse
6. DISASSEMBLY
1.
Remove the power board from the lower casing. Refer to “Removing the
Power Board”.
2.
Turn the power board over.
3.
Replace the battery fuses with a new one.
4.
Replace the power fuse with a new one.
Power fuse
Service Manual ECG-9620
Battery fuse
Power fuse
ECG-9620L/M/N/P:
ECG-9620S/T/U:
Battery fuse
F101:
F102:
Code No.
Description
274035 218.250 (0.25 A)
104665 218.500 (0.5 A)
Code No.
Description
540657
323241
239.001 (1 A)
218.008 (8 A)
6.9
6. DISASSEMBLY
Removing the Key Board and LCD Unit
1.
Remove the battery pack and upper casing from the lower casing. Refer to
“Removing the Upper Casing”.
M3 pan screws with spring washer and washer
LCD ground spring
LCD ground plate
LCD cable
LCD unit
6.10
CNA013 cable
Key board
2.
Disconnect the CNA013 cable from the key board.
3.
Disconnect the LCD cable from the key board.
4.
Remove the six M3 pan screws with spring washers and washers which fasten the LCD unit to the upper casing and remove the LCD unit, two LCD ground spring and two LCD ground plates.
5.
Remove the four M3 pan screws with spring washers and washers which fasten the key board to the upper casing and remove the key board.
Service Manual ECG-9620
Section 7 Replaceable Parts List
Instrument ………………………………………………………………………………………………………….. 7.2
Service Manual ECG-9620 7C.1
7. REPLACEABLE PARTS LIST
When ordering parts or accessories from your nearest Nihon Kohden Corporation distributor, please quote the NK code number and part name which are listed in this service manual, and the name or model of the unit in which the required part is located. This will help us to promptly attend to your needs. Always use Nihon
Kohden parts and accessories to assure maximum performance from your instrument.
Service Manual ECG-9620 7.1
7. REPLACEABLE PARTS LIST
Instrument
501
502
503
504
401
402
403
404
A
B
C
D
306
307
308
309
302
303
304
305
310
311
Index Code No.
101
Qty
08SK8.074.00075 1
102
103
104
105
106
08SK8.081.00316 1
08SK8.080.00086 1
08SK2.929.00047 1
08SK8.048.00032 2
08SK8.038.00088 2
Description
ECG-9620 Upper casing
Operation panel
LCD filter
LCD unit, MH604WBE11
LCD ground spring
LCD ground plate
08SK8.223.00066 2
08SK8.038.00088 1
08SK3.878.00046 1
08SK8.300.00099 1
08SK8.387.00031 2
08SK8.387.00218 1
107029
6112-017015
1
1
RHC-00041
RHC-00042
1
1
Head collar bearing
Thermal head bracket
Thermal head, KYT-56-8MPP1-SKH
Thermal head shaft
Thermal head spring
Paper sensor board ground plate
E ring
Thermal head unit base
Motor assy
Magazine assy
08SK8.615.00089 4
08SK7.061.00082 1
08SK8.610.00031 1
6124-00993
08SK5.846.00014 1
08SK6.116.00025 1
08SK8.080.00095 1
624914
UTC-0006
UTC-0007
UTC-0008
2
4
RKC-0001 (220) 1
RKC-0002 (230) 1
RKC-0003 (240) 1
RKC-0004 (110) 1
RKC-0002 (120) 1
RKC-0002 (127) 1
1
1
1
Spacer bolt
Heat sink seat
Shield plate
Protective ground label
Speaker
ECG-9620 lower casing
Battery cover
Rubber foot
Key board
ECG control board
Power board
Transfer Assy (220 V) for L and P version
Transfer Assy (230 V) for M version
Transfer Assy (240 V) for N version
Transfer Assy (110 V) for S version
Transfer Assy (120 V) for T version
Transfer Assy (127 V) for U version
7.2
Service Manual ECG-9620
7. REPLACEABLE PARTS LIST
102
311
101
305
309
B
301
302
303
307
308
306
402
312
404
401
A
403
106
103
104
C
310
501
404
D
502
503
504
Service Manual ECG-9620
105
7.3
Section 8 Connector Pin
Assignment
Connector Pin Assignment …………………………………………………………………………………… 8.1
Attaching the Ferrite Core ……………………………………………………………………………. 8.1
EXT-IN Connector ………………………………………………………………………………………. 8.2
CRO-OUT Connector …………………………………………………………………………………. 8.2
SIO Connector …………………………………………………………………………………………… 8.2
Service Manual ECG-9620 8C.1
8. CONNECTOR PIN ASSIGNMENT
Connector Pin Assignment
CAUTION
• When connecting an external instrument to connectors marked with
, the external instrument and this cardiograph must be connected according to the IEC60601-1-1 “Medical electrical equipment — Part 1-
1: General requirements for safety — Collateral standard: Safety requirements for medical electrical systems”. Failure to follow this warning may cause electrical shock to the patient and operator.
• When the cardiograph operates on battery power and large leakage current is input from the connected external instrument, ground the cardiograph or use an isolation transformer for the external instrument. Failure to follow this caution may cause electrical shock to patient and operator.
Attaching the Ferrite Core
NOTE
When connecting an external instrument to the following connecters, an unwanted radio frequency signal is generated from this connection. To reduce this unwanted radiofrequency signal, attach the optional ferrite core to the cable of the external instrument.
Example of Wrapping
Connector
EXT-IN
CRO-OUT
SIO
Ferrite core model
RI-14-28-6
RI-14-28-6
SEC-8
Code No.
493182
493182
361814
Wrap the cable once around the ferrite core.
Wrap the cable once around the ferrite core.
—
NOTE
Attach and fix the ferrite core near the connector of the cable that connects to the cardiograph.
Service Manual ECG-9620 8.1
8. CONNECTOR PIN ASSIGNMENT
EXT-IN Connector
1
Unit side: SG-8036 (Code No.: 273446)
Cable side: P-112D 3.5mm ϕ miniature plug (Code No.: 606907)
Pin No. Signal
1 EXT-IN 1
2 GND
Input sensitivity: 10 mm/0.5 V, input impedance 100 k
Ω
or more
2
CRO-OUT Connector
1
2
CAUTION
Do not use the output signal from the output connector for a synchronization signal such as the synchronized cardioversion signal. There is a time delay between the input ECG signal and output signal.
Unit side: SG-8036 (Code No.: 273446)
Cable side: P-112D 3.5 mm ϕ miniature plug (Code No.: 606907)
Pin No. Signal
1
2
CRO-OUT
GND
Output sensitivity: 0.5 V/1 mV, output impedance 100
Ω
or less
SIO Connector
5
1
9
6
Unit side: JEY-9S-1A2B (Code No.: 390774)
Cable side: Connector, DE-9P (Code No.: 082625)
Cover, DE-C8-J9-F1-1 (Code No.: 336708)
Pin No. Signal
1 Shield
4
5
2
3
TxD
RxD
RTS
CTS
8
9
6
7
DSR
GND
DCD
DTR
Pin No.
Personal conputer
1
6
7
4
5
2
3
8 to 19
20
Shield
TxD
RxD
RTS
CTS
DSR
GND
Not used
DTR
21 to 25 Not used
Pin assignment may depend on the shape of connectors for PCs.
To connect a modem, use a dedicated cable 15 m or shorter.
8.2
Service Manual ECG-9620
|
ЭКГ Cardiofax ECG-9620M |
||||||
|
||||||
|
||||||
|
||||||
|
||||||
|
||||||
|
||||||
|
||||||
|
||||||
|
||||||
|
||||||
|
||||||
|
||||||
|
||||||
|
||||||
|
||||||
|
||||||
|
||||||
|
||||||
|
||||||
|
||||||
|
||||||
|
||||||
|
||||||
|
||||||
|
||||||
|
||||||
|
||||||
|
||||||
|
||||||
|
||||||
|
||||||
|
||||||
|
||||||
|
||||||
|
||||||
|
||||||
|
||||||
|
||||||
|
||||||
|









 Вот ещё хотел узнать, изображение появилось, но экран не подсвечивается, просто видны черные линии и знаки, я первый раз работаю с такой моделью, и даже не знаю должен ли он подсвечиватся или нет???