
FrSky 2.4GHz ACCST X8R Manual
Introduction
Thank you for purchasing FrSky X8R 8/16ch full duplex telemetry receiver.In order to fully enjoy the benefits of
this system, please read the instruction manual carefully and set up the device as described below.
Overview
Smart Port
F/S Button
LED
Specifications
Dimension: 46.47×26.78×14.12mm (L × W × H)
Weight: 16.6g
Number of Channels: 16CH (1~8ch from conventional channel outputs, 1~16ch from SBUS port
or combine two X8R to become a 16 channels receiver)
With RSSI PWM output (0~3.3V)
Operating Voltage Range: 4.0~10V
Operating Current: 100mA@5V
Operating Range: full range (>1.5km)
Firmware Upgradeable
Compatibility: FrSky DFT/DJT/DHT/DHT-U in D_mode
FrSky Taranis X9D Plus/XJT in D8 mode
FrSky Taranis X9D Plus/XJT in D16 mode
X8R-EU version only works with FrSky Taranis X9D Plus-EU version/XJT-EU version in D16-EU
mode.
What’s New!
More number of channels: 1~8ch from conventional channel outputs, 1~16ch from SBUS port,
or combine two X8R to become a 16 channels receiver.
Parallel two X8R to become a 16 channel receiver.
With RSSI PWM output (0~3.3V)
Smart Port enabled, realizing two-way full duplex transmission.
Smart Port (S. Port) is a signal wire full duplex digital transmission interface developed by FrSky
PORT
Electronic Co., Ltd. All products enabled with Smart Port (including XJT module, X8R receiver,
new hub-less sensors, new Smart Dashboard,etc), serial port user data and other user input/ output devices
can be connected without limitations for numbers or sequences at a high transmission speed.
Binding Procedure
Binding is the process of uniquely associating a particular receiver to a transmitter module. A transmitter module
can be bound to multiple receivers (not to be used simultaneously). A receiver can only be bound to one
transmitter module.
Follow the steps below to finish the binding procedure.
1. Turn on the transmitter while holding the F/S button on the module (please refer to the module instruction
manual for switch positions). Release the button. The RED LED on the XJT module will flash, indicating the
transmitter is ready to bind to the receiver.
2. Set X8R receiver in bind mode (see below chart for details), The RED LED on the receiver will flash,
indicating the binding process is completed.
3. Turn off both the transmitter and the receiver.
4. Turn on the transmitter and connect the battery. The GREEN LED on the receiver indicates the receiver is
receiving commands from the transmitter. The receiver/transmitter module binding will not have to be repeated,
unless one of the two is replaced.
FrSky Electronic Co., Ltd
Website:www.frsky-rc.com
E-mail:frsky@frsky-rc.com
www.frsky-rc.com
SBUS Port
Green LED
Red LED
Status
(CH1-CH16)
ON
Flashing
Binding
RSSI Outport
Flashing
OFF
Normal
OFF
Flashing
Signal Lost
Conventional Channel
Flash Twice
OFF
Failsafe Set
Outputs (CH1-CH8)
Technical Support: sales4tech@gmail.com
Note: After binding procedure is completed, recycle the power and check if the receiver is really under
control by linked transmitter.
Receiver Mode and Binding Operation:
Please be attention that the Smart Port Protocol is only running in D16 mode.
Mode of X8R
Telemetry
Channel Output
Jumped before Bind
Mode 1(D8)
√
CH1~CH8
Mode 2(D16)
×
CH1~CH8
Mode 3(D16)
×
CH9~CH16
Mode 4(D16)
√
CH9~CH16
CH1&CH2, CH3&CH4
Mode 5(D16)
√
CH1~CH8
When combine two X8R to become a 16CH receiver, you need to disable telemetry on either one of the
two X8R’s as above chart.
X8R-EU version only works with FrSky Taranis X9D Plus-EU version/XJT-EU version in D16-EU mode.
Range Check
A pre-flight range check should be done before each flying session. Reflections from nearby metal fences,
concrete buildings or tress can cause loss of signal both during range check and during the flight. Follow the
steps below to perform the range check.
1. Place the model at least 60cm (two feet) above non-metal contaminated ground (e.g. on a wooden bench).
2. The receiver antennas should be separated in the model, and do not touch the ground.
3. The module antenna should be in a vertical position.
4. Turn on the transmitter and the receiver, press the F/S button on the XJT module for 4 seconds to enter
range check mode, the RED LED will be off, GREEN LED will flash rapidly. The effective distance will be
decreased to 1/30 (at least 30m).
5. Walk away from the model while simultaneously operating the controls on the transmitter to confirm all
controls’ normal operation.
6. Press the F/S button on the XJT module for 1~2 seconds to exit range check mode, RED LED will be back
on, indicating normal operation is back.
Failsafe
Failsafe is a useful feature in which all controls move to a preset position whenever the control signal is lost for
a period of time. X8R supports failsafe function for all channels. Follow the steps below to set failsafe positions
for each channel:
1. Bind the receiver first and turn on both the transmitter and the receiver;
2. Move the controls to the desired failsafe position for all channels;
3. Press briefly the F/S button on the receiver (less than 1 second). The Green LED will flash twice, indicating
the failsafe position has been set in the receiver.
To disable the failsafe function, re-bind the receiver.
Failsafe is recommended to set when system is firstly used, or receiver has been re-bound. Follow steps below
to set failsafe.
Option-1.How to set failsafe to a user-determined state on lost signal:
1) Bind the receiver to the transmitter module first and turn on both the transmitter and the receiver;
2) Move the controls to desired failsafe position for all channels;
3) Press briefly the F/S button on the receiver and you are done.
Option-2. How to set failsafe for no pulses on lost signal:
1) Turn off the transmitter, power on the receiver, and then press briefly the F/S button on the receiver.
Note: If failsafe is not set, failsafe default will hold last position before signal is lost. In this case, there
exists risk that your model will fly away or cause injury.
For more details, please check the complete manual for X8R from www.frsky-rc.com — Download -Manual.
Should you have other questions, please send e-mails to FrSky technical support sales4tech@gmail.com.
FrSky Electronic Co., Ltd
Website:www.frsky-rc.com
E-mail: frsky@frsky-rc.com
www.frsky-rc.com
Receiver Mode select & Bind Operation
F/S Button
(signal pins)
connect the battery to any available
channel output (no need to hold the
CH7&CH8
F/S button on X8R)
CH3&CH4
connect the battery to any available
CH1&CH2
channel output while holding the F/S
button on X8R
No Jumper
Technical Support: sales4tech@gmail.com
Приёмник FrSky X8R с функциями телеметрии обладает 8-ю стандартными каналами PWM, их можно дополнить ещё 8-ю с помощью S.BUS порта (при этом может понадобиться S.BUS декодер, например FrSky S.BUS Decoder). Также возможно использование двух приёмников X8R, когда 1..8 каналы используются на первом, а 9..16 — на втором. Таким образом количество каналов этой системы может достигать 16-ти.
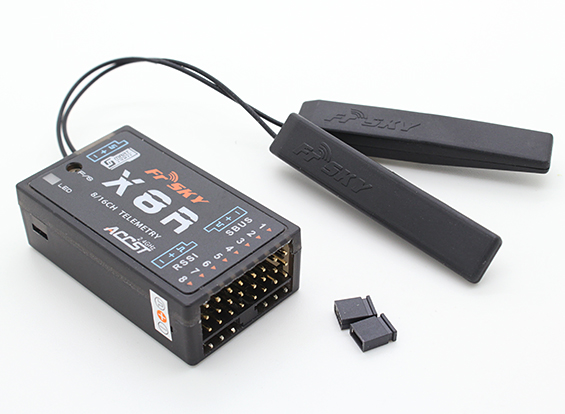
X8R гораздо меньше по размерам чем его предшественники, но в тоже время более богато оснащен, например помимо стандартного разъёма для подключения сенсоров, имеется Smart Port для подключения телеметрийных датчиков.
Равноценные приёмо-передающих антенны выполнены в формате «PCB» (типа таких). В режиме приёма они работают с использованием диверсити. Заявляется повышение чувствительности приёмника на 20% по сравнению с обычными антеннами. Для этого достаточно установить их под углом в 90° друг к другу.
Характеристики[править]
- Размеры: 46.5 x 27 x 14.4 мм
- Вес: 16.8 г
- Рабочее напряжение: 4..10 В
- Потребляемый ток: 100 мА при напряжении питания 5 В
- Выход RSSI: аналоговый с напряжением в пределах 0..3,3 В
Полезное[править]
- Чтобы забиндить приёмник, нужно перед включением спичкой нажать и держать кнопочку fs на приёмнике, а после включения приёмника и передатчика — отпустить её.
- В случае использования полётного контроллера лучше биндить в режиме D16 CH9-16. Тогда через S.bus будут идти все 16 каналов, а на приёмнике будут PWM-каналы с 9 по 16. Проще будет подключать дополнительное оборудование, чтобы не пересекаться с 1-8 каналами, которые по большей части заняты контроллером. Для этого нужно перед биндингом поставить перемычки на сигнальные контакты 1-2 и 3-4 канала. Если забиндить без перемычек — будет по s.bus все 16 каналов, но на самом приёмнике будут дублироваться каналы как и написаны с 1 по 8.
- Для подключения старых аналоговых телеметрийных датчиков можно использовать хаб.
Где купить FrSky X8R[править]
- Найти все предложения по продаже FrSky X8R на RCSearch.
- RCcopter.ru (Москва)
- R-X8R версия с защитой (redudancy) RCcopter.ru (Москва)
См. также[править]
- Другие приёмники FrSky
Описание
X8R находится в меньшем корпусе, чем предыдущие 8-канальные приемники, но обладает гораздо большими возможностями. Новый SmartPort поддерживает новые безконтактные датчики, а также более старые аналоговые датчики концентраторов. X8R поддерживает 8 стандартных серво выходов, и вы можете получить доступ ко всем 16 каналам, используя линию Sbus с сервоприводами, поддерживаемыми Sbus, или использовать FrSky S.BUS. Декодер на полные 16 каналов. Или вы можете использовать 2 приемника X8R в комбинации, и каналы будут синхронизироваться 1-8 на первом и 9-16 на втором. Протокол X8 также обратно совместим! В режиме D8 он работает с модулями передатчика DHT, DJT, DFT и DHT-U.
Спецификация
- Совместимость
— FrSky DFT / DJT / DHT / DHT-U в D_mode
— FrSky Taranis X9D / XJT в режиме D8
— FrSky Taranis X9D / XJT в режиме D16 - Обновление прошивки Y
- Вес 16,6 г
- Размеры 46,25 х 26,6 х 14,2 мм (Д х Ш х В)
- Рабочий диапазон полного диапазона (> 1,5 км)
- Диапазон рабочих напряжений 4,0 ~ 10 В
- Рабочий ток 100 мА при 5 В
- Количество каналов 16 каналов (1 ~ 8 каналов от обычных выходов канала, 1 ~ 16 каналов от порта SBUS или объедините два X8R, чтобы стать 16-канальным приемником)
Приёмник FrSky X8R 2.4G S.Port 8/16ch Reciever PCB-антенна устанавливается на коптер для соединения с вашей аппаратурой управления.
Характеристики:
- Тип антенны: PCB
- With RSSI output: analog voltage output (0~3.3V)
- Диапазатор рабочего напряжения: 4.0~10V
- Рабочий ток: 100mA@5V
- Дальность: full range (>1.5km)
- Firmware Upgradeable Compatibility:
- FrSky DFT/DJT/DHT/DHT-U in D_mode
- FrSky Taranis X9D/XJT in D8 mode
- FrSky Taranis X9D/XJT in D16 mod
- Количество каналов: 16 (1~8ch from conventional channel outputs, 1~16ch from SBUS port or combine two X8R to become a 16 channels receiver)
- Размеры: 46.25×26.6×14.2мм
- Вес: 12гр
Инструкция:
- FrSky X8R manual.pdf
В комплекте:
- Приёмник FrSky X8R 2.4G S.Port 8/16ch Reciever с PCB-антенной — 1шт
Многие уже наверное закупили классную и навороченную аппаратуру Taranis X8D Plus и вы хотите вывести на экран телеметрию но не знаете как.

Тогда вы попали не на бабки, а по адресу. Потому что тратиться вам особенно уже на надо будет. Единственное что вам понадобиться прикупить это:
Стоить это будет с пересылкой около 9$.
Надеюсь приёмник FrSky X8D уже шёл в комплекте с аппаратурой.

Тогда вы попали не на бабки, а по адресу. Потому что тратиться вам особенно уже на надо будет. Единственное что вам понадобиться прикупить это:
Стоить это будет с пересылкой около 9$.
Надеюсь приёмник FrSky X8D уже шёл в комплекте с аппаратурой.
Впринципе подойдёт и другой приёмник от FrSky главное наличие порта SMART Port.
Что обязательно надо сделать вначале.
1. Прошить свежие прошивки в полётный контроллер и аппаратуру.
2. Собрать схему. Подключив всё это дело к втрому порту телеметрии.
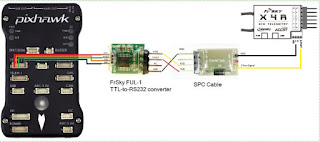
3. Произвести настройку порта в Mission Planner указав протокол порта.

3. Произвести настройку порта в Mission Planner указав протокол порта.
Далее следуйте инструкциям на видео
Вопросы, предложения и пожелания пришите в коменты. Подписывайтесь на мой канал YouTube.