
Garmin EDGE 530 Manual
Introduction
See the Important Safety and Product Information guide in the product box for product warnings and other important information.
Always consult your physician before you begin or modify any exercise program.
Device Overview
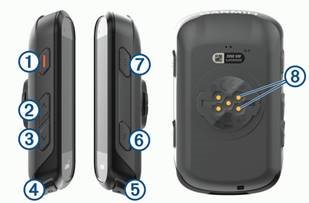
| 1 |  |
Select to enter sleep mode and wake the device. Hold to turn the device on and off. |
| 2 |  |
Select to scroll through the data screens, options, and settings. From the home screen, select to view the status page. |
| 3 |  |
Select to scroll through the data screens, options, and settings. From the home screen, select to view the device menu. |
| 4 |  |
Select to mark a new lap. |
| 5 |  |
Select to start and stop the activity timer. |
| 6 |  |
Select to return to the previous screen. Hold to return to the home screen. |
| 7 |  |
Select to choose an option or to acknowledge a message. During a ride, select to view menu options such as alerts and data fields. When  appears on the screen, hold to access additional features. appears on the screen, hold to access additional features. |
| 8 | Electrical contacts | Charge using an Edge external battery pack accessory. |
NOTE: Go to www.buy.garmin.com to purchase optional accessories.
Pairing Your Smartphone
To use the connected features of the Edge device, it must be paired directly through the Garmin Connect™ app, instead of from the Bluetooth® settings on your smartphone.
- From the app store on your smartphone, install and open the Garmin Connect app.
- Hold
 to turn on the device.
The first time you turn on the device, you will select the device language. The next screen prompts you to pair with your smartphone.
TIP: You can select Menu > Settings > Phone > Pair Smartphone to manually enter pairing mode. - Select an option to add your device to your Garmin Connect account:
 to turn on the device.
After you pair successfully, a message appears, and your device syncs automatically with your smartphone.
Viewing the Status Page
The status page displays the connection status of the GPS, wireless sensors, and your smartphone.
Select an option:
The status page appears. A flashing icon means the device is searching for a signal. A solid icon means the signal was found or the sensor is connected.
Charging the Device
NOTICE
To prevent corrosion, thoroughly dry the USB port, the weather cap, and the surrounding area before charging or connecting to a computer.
The device is powered by a built-in lithium-ion battery that you can charge using a standard wall outlet or a USB port on your computer.
NOTE: The device will not charge when outside the approved temperature range (Edge Specifications).
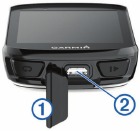
- Pull up the weather cap 1 from the USB port 2.

- Plug the small end of the USB cable into the USB port on the device.
- Plug the large end of the USB cable into an AC adapter or a computer USB port.
- Plug the AC adapter into a standard wall outlet.
When you connect the device to a power source, the device turns on. - Charge the device completely.
After you charge the device, close the weather cap.
About the Battery
This device contains a lithium-ion battery. See the Important Safety and Product Information guide in the product box for product warnings and other important information.
Installing the Standard Mount
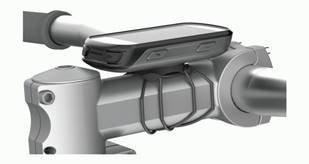
For the best GPS reception, position the bike mount so the front of the device is oriented toward the sky. You can install the bike mount on the stem or the handlebars.
- Select a secure location to mount the device where it does not interfere with the safe operation of your bike.
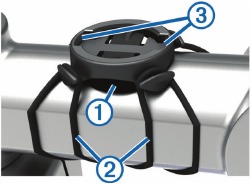
- Place the rubber disk 1 on the back of the bike mount.
The rubber tabs align with the back of the bike mount so it stays in place. - Place the bike mount on the bike stem.
- Attach the bike mount securely using the two bands 2.
- Align the tabs on the back of the device with the bike mount notches 3.
- Press down slightly and turn the device clockwise until it locks into place.
Installing the Out-Front Mount
NOTE: If you do not have this mount, you can skip this task.
- Select a secure location to mount the Edge device where it does not interfere with the safe operation of your bike.
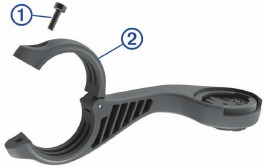
- Use the hex key to remove the screw 1 from the handlebar connector 2.
- Place the rubber pad around the handlebar:
- If the handlebar diameter is 25.4 mm, use the thicker pad.
- If the handlebar diameter is 31.8 mm, use the thinner pad.
- Place the handlebar connector around the rubber pad.
- Replace and tighten the screw.
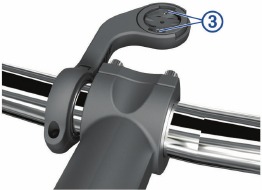
NOTE: Garmin® recommends tightening the screw so the mount is secure, with a maximum torque specification of 7 lbf-in. (0.8 N-m). You should check the tightness of the screw periodically. - Align the tabs on the back of the Edge device with the bike mount notches 3.
- Press down slightly and turn the Edge device clockwise until it locks into place.
Releasing the Edge
- Turn the Edge clockwise to unlock the device.
- Lift the Edge off the mount.
Installing the Mountain Bike Mount
NOTE: If you do not have this mount, you can skip this task.
- Select a secure location to mount the Edge device where it does not interfere with the safe operation of your bike.
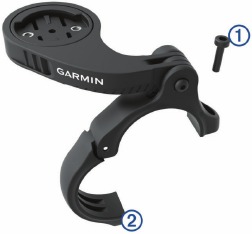
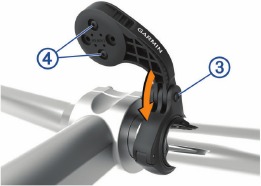
- Use the 3 mm hex key to remove the screw 1 from the handlebar connector 2.
- Select an option:
- If the handlebar diameter is 25.4 mm, place the thicker pad around the handlebar.
- If the handlebar diameter is 31.8 mm, place the thinner pad around the handlebar.
- If the handlebar diameter is 35 mm, do not use a rubber pad.
- Place the handlebar connector around the handlebar, so that the mount arm is above the bike stem.
- Use the 3 mm hex key to loosen the screw 3 on the mount arm, position the mount arm, and tighten the screw.
NOTE: Garmin recommends tightening the screw so the mount arm is secure, with a maximum torque specification of 20 lbf-in. (2.26 N-m). You should check the tightness of the screw periodically. - If necessary, use the 2 mm hex key to remove the two screws on the back side of the mount 4, remove and rotate the connector, and replace the screws to change the orientation of the mount.
- Replace and tighten the screw on the handlebar connector.
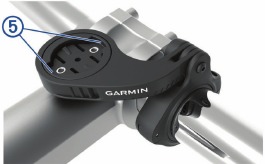
NOTE: Garmin recommends tightening the screw so the mount is secure, with a maximum torque specification of 7 lbf-in. (0.8 N-m). You should check the tightness of the screw periodically. - Align the tabs on the back of the Edge device with the bike mount notches 5.
- Press down slightly and turn the Edge device clockwise until it locks into place.
Acquiring Satellite Signals
The device may need a clear view of the sky to acquire satellite signals. The time and date are set automatically based on the GPS position.
- Go outdoors to an open area.
The front of the device should be oriented toward the sky. - Wait while the device locates satellites.
It may take 30–60 seconds to locate satellite signals.
Using the Backlight
You can select any key to turn on the backlight.
NOTE: You can adjust the backlight timeout (Display Settings).
- Select Menu > Settings > System > Display.
- Select an option:
Training
Going for a Ride
If your device was packaged with a wireless sensor, they are already paired and can be activated during initial setup.
- Hold to turn on the device.
- Go outside, and wait while the device locates satellites.
The satellite bars turn green when the device is ready. - From the home screen, select
 .
. - Select an activity profile.
- Select to start the activity timer.
NOTE: History is recorded only while the activity timer is running. - Select or for additional data screens.
- If necessary, select to view menu options such as alerts and data fields.
- Select to stop the activity timer.
TIP: Before you save this ride and share it on your Garmin Connect account, you can change the ride type. Accurate ride type data is important for creating bike friendly courses. - Select Save Ride.
 to turn on the device.
 to start the activity timer.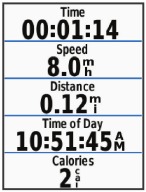
Shortcut menu options are available for data screens and accessory features. During a ride,  appears on the data screens.
Select  to view the shortcut menu options.
Using Virtual Partner®
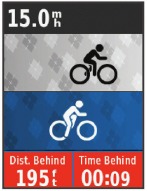
Your Virtual Partner is a training tool designed to help you meet your goals.
- If necessary, enable the Virtual Partner screen for the activity profile (Customizing the Data Screens).
- Go for a ride.
- Select to view the Virtual Partner screen to see who is leading.
- If necessary, select > Virtual Partner Speed to adjust the speed of the Virtual Partner during your ride.
Segments
Following a segment: You can send segments from your Garmin Connect account to your device. After a segment is saved to your device, you can follow the segment.
NOTE: When you download a course from your Garmin Connect account, all segments in the course are downloaded automatically.
Racing a segment: You can race a segment, trying to match or exceed your personal record or other cyclists who have ridden the segment.
Strava™ Segments
You can download Strava segments to your Edge 530 device. Follow Strava segments to compare your performance with your past rides, friends, and pros who have ridden the same segment.
To sign up for a Strava membership, go to the segments widget in your Garmin Connect account. For more information, go to www.strava.com.
The information in this manual applies to both Garmin Connect segments and Strava segments.
Following a Segment From Garmin Connect
Before you can download and follow a segment from Garmin Connect, you must have a Garmin Connect account (Garmin Connect).
- Connect the device to your computer using the USB cable.
NOTE: If you are using Strava segments, your favorite segments are transferred automatically to your device when it is connected to Garmin Connect Mobile or your computer. - Go to connect.garmin.com.
- Create a new segment, or select an existing segment.
- Select Send to Device.
- Disconnect the device, and turn it on.
- Select Menu > Training > Segments.
- Select the segment.
- Select Ride.
Enabling Segments
You can enable segment racing and prompts that alert you to approaching segments.
- Select Menu > Training > Segments.
- Select a segment.
- Select Enable.
NOTE: Prompts alerting you to approaching segments appear only for enabled segments.
Racing a Segment
Segments are virtual race courses. You can race a segment, and compare your performance to past activities, other riders’ performance, connections in your Garmin Connect account, or other members of the cycling community. You can upload your activity data to your Garmin Connect account to view your segment position.
NOTE: If your Garmin Connect account and Strava account are linked, your activity is automatically sent to your Strava account so you can review the segment position.
- Select to start the activity timer, and go for a ride.
When your path crosses an enabled segment, you can race the segment. - Start racing the segment.
The segment data screen appears automatically. - If necessary, select to change your goal during your race.
You can race against the segment leader, your past performance, or other riders (if applicable). The goal automatically adjusts based on your current performance.
 to start the activity timer, and go for a ride.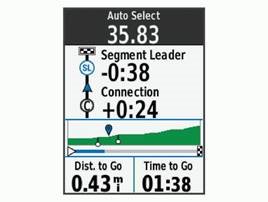
A message appears when the segment is complete.
Viewing Segment Details
- Select Menu > Training > Segments.
- Select a segment.
- Select an option:
- Select Map to view the segment on the map.
- Select Elevation to view an elevation plot of the segment.
- Select Leaderboard to view the ride times and average speeds for the segment leader, group leader or challenger, your personal best time and average speed, and other riders (if applicable).
TIP: You can select a leaderboard entry to change your segment race goal.
Segment Options
Select Menu > Training > Segments > Segment Options.
Turn Guidance: Enables or disables turn prompts.
Auto Select Effort: Enables or disables automatic goal adjustment based on your current performance.
Search: Allows you to search for saved segments by name.
Enable/Disable: Enables or disables the segments currently loaded on the device.
Delete: Allows you to delete all or multiple saved segments from the device.
Deleting a Segment
- Select Menu > Training > Segments.
- Select a segment.
- Select Delete > OK.
Workouts
You can create custom workouts that include goals for each workout step and for varied distances, times, and calories. You can create workouts using Garmin Connect or select a training plan that has built-in workouts from Garmin Connect, and transfer them to your device.
You can schedule workouts using Garmin Connect. You can plan workouts in advance and store them on your device.
Following a Workout From the Web
Before you can download a workout from Garmin Connect, you must have a Garmin Connect account (Garmin Connect).
- Connect the device to your computer.
- Go to www.garminconnect.com.
- Create and save a new workout.
- Select Send to Device, and follow the on-screen instructions.
- Disconnect the device.
Starting a Workout
Before you can start a workout, you must download a workout from your Garmin Connect account.
- Select Menu > Training > Workouts.
- Select a workout.
- Select Ride.
- Select to start the timer.
 to start the timer.
After you begin a workout, the device displays each step of the workout, the target (if any), and current workout data.
Stopping a Workout
TIP: When you save your ride, your workout ends automatically.
Deleting Workouts
- Select Menu > Training > Workouts > Workout Options > Delete Multiple.
- Select one or more workouts.
- Select Delete Workouts > OK.
About the Training Calendar
The training calendar on your device is an extension of the training calendar or schedule you set up in Garmin Connect. After you have added a few workouts to the Garmin Connect calendar, you can send them to your device. All scheduled workouts sent to the device appear in the training calendar list by date. When you select a day in the training calendar, you can view or do the workout. The scheduled workout stays on your device whether you complete it or skip it. When you send scheduled workouts from Garmin Connect, they overwrite the existing training calendar.
Using Garmin Connect Training Plans
Before you can download and use a training plan from Garmin Connect, you must have a Garmin Connect account (Garmin Connect).
You can browse Garmin Connect to find a training plan, schedule workouts and courses, and download the plan to your device.
- Connect the device to your computer.
- Go to www.garminconnect.com.
- Select and schedule a training plan.
- Review the training plan in your calendar.
- Select
 , and follow the on-screen instructions.
 , and follow the on-screen instructions.
Interval Workouts
You can create interval workouts based on distance or time. The device saves your custom interval workout until you create another interval workout. You can use open intervals when you are riding a known distance. When you select  , the device records an interval and moves to a rest interval.
Creating an Interval Workout
- Select Menu > Training > Intervals > Edit > Intervals > Type.
- Select Distance, Time, or Open.
TIP: You can create an open-ended interval by setting the type to Open. - Select Duration, enter a distance or time interval value for the workout, and select
 .
. - Select Rest > Type.
- Select Distance, Time, or Open.
- If necessary, enter a distance or time value for the rest interval, and select .
- Select one or more options:
- To set the number of repetitions, select Repeat.
- To add an open-ended warm up to your workout, select Warm Up > On.
- To add an open-ended cool down to your workout, select Cool Down > On.
 .
. .
.Starting an Interval Workout
- Select Menu > Training > Intervals > Ride.
- Select to start the timer.
- When your interval workout has a warm up, select
 to begin the first interval.
 - Follow the on-screen instructions.
 to start the timer.
 to begin the first interval.
When you complete all of the intervals, a message appears.
Training Indoors
The device includes an indoor activity profile where GPS is turned off. You can turn off GPS when you are training indoors or to save battery life.
NOTE: Any change to the GPS setting is saved to the active profile.
- Select Menu > Settings > Activity Profiles.
- Select a profile.
- Select GPS Mode > Off.
When GPS is turned off, speed and distance are not available unless you have a compatible sensor or indoor trainer that sends speed and distance data to the device.
Pairing Your ANT+® Indoor Trainer
- Bring the device within 3 m (10 ft.) of the ANT+ indoor trainer.
- Select Menu > Training > Indoor Trainer > Pair ANT+ Bike Trainer.
- Select the indoor trainer to pair with your device.
- Select Add Sensor.
When the indoor trainer is paired with your device, the indoor trainer appears as a connected sensor. You can customize your data fields to display sensor data.
Using an ANT+ Indoor Trainer
Before you can use a compatible ANT+ indoor trainer, you must mount your bike on the trainer and pair it with your device (Pairing Your ANT+® Indoor Trainer).
You can use your device with an indoor trainer to simulate resistance while following a course, activity, or workout. While using an indoor trainer, GPS is turned off automatically.
- Select Menu > Training > Indoor Trainer.
- Select an option:
- Select Follow a Course to follow a saved course (Courses).
- Select Follow an Activity to follow a saved ride (Going for a Ride).
- Select Follow a Workout to follow a power-based workout downloaded from your Garmin Connect account (Workouts).
- Select a course, activity, or workout.
- Select Ride.
- Select an activity profile.
- Select to start the timer.
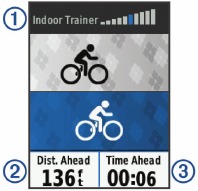
The trainer increases or decreases resistance based on the elevation information in the course or ride. - Select to view the trainer screen.
You can view the level of resistance 1, your distance ahead of or behind 2, and your time ahead of or behind 3 the distance and time originally recorded for the course or activity.
Setting Resistance
- Select Menu > Training > Indoor Trainer > Set Resistance.
- Select or to set the resistance force applied by the trainer.
- Select an activity profile.
- Start pedaling.
- If necessary, select > Set Resistance to adjust the resistance during your activity.
Setting Target Power
- Select Menu > Training > Indoor Trainer > Set Target Power.
- Set the target power value.
- Select an activity profile.
- Start pedaling.
The resistance force applied by the trainer is adjusted to maintain a constant power output based on your speed. - If necessary, select or to adjust the target power output during your activity.
 or
or  to adjust the target power output during your activity.
Setting a Training Target
The training target feature works with the Virtual Partner feature so you can train toward a set distance, distance and time, or distance and speed goal. During your training activity, the device gives you real-time feedback about how close you are to achieving your training target.
- Select Menu > Training > Set a Target.
- Select an option:
- Select Distance Only to select a preset distance or enter a custom distance.
- Select Distance and Time to select a distance and time target.
- Select Distance and Speed to select a distance and speed target.
The training target screen appears, indicating your estimated finish time. The estimated finish time is based on your current performance and the time remaining.
- Select .
- Select to start the activity timer.
- If necessary, scroll to view the Virtual Partner screen.
- After you complete your activity, select > Save Ride.
 to start the activity timer.
Cancelling a Training Target
Select > Cancel Target > OK.
Personal Records
When you complete a ride, the device displays any new personal records you achieved during that ride. Personal records include your fastest time over a standard distance, longest ride, and most ascent gained during a ride. When paired with a compatible power meter, the device displays the maximum power reading recorded during a 20-minute period.
Viewing Your Personal Records
Select Menu > My Stats > Personal Records.
Reverting a Personal Record
You can set each personal record back to the one previously recorded.
- Select Menu > My Stats > Personal Records.
- Select a record to revert.
- Select Previous Record > OK.
NOTE: This does not delete any saved activities.
Deleting All Personal Records
Select Menu > My Stats > Personal Records > Delete All > OK.
NOTE: This does not delete any saved activities.
Training Zones
- Heart rate zones (Setting Your Heart Rate Zones)
- Power zones (Setting Your Power Zones)
Navigation
Navigation features and settings also apply to navigating courses (Courses) and segments (Segments).
- Locations (Locations)
- Map settings (Map Settings)
Locations
You can record and store locations in the device.
Marking Your Location
Before you can mark a location, you must locate satellites.
A location is a point that you record and store in the device. If you want to remember landmarks or return to a certain spot, you can mark a location.
- Go for a ride.
- Select > Mark Location > OK.
Navigating to a Saved Location
Before you can navigate to a saved location, you must locate satellites.
- Select Menu > Navigation > Saved Locations.
- Select a location.
- Select View Map.
- Select Ride.
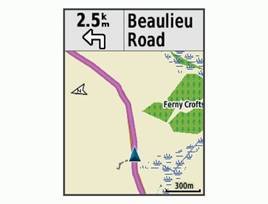
- Follow the on-screen instructions to your destination.
Editing Locations
- Select Menu > Navigation > Saved Locations.
- Select a location.
- Select Edit.
- Select a location detail.
For example, select Change Elevation to enter a known altitude for the location. - Edit the value, and select .
Deleting a Location
- Select Menu > Navigation > Saved Locations.
- Select a location.
- Select Delete Location > OK.
Setting Your Elevation
If you have accurate elevation data for your present location, you can manually calibrate the altimeter on your device.
- Go for a ride.
- Select > Set Elevation.
- Enter the elevation, and select .
Courses
Following a previously recorded activity: You can follow a saved course simply because it is a good route. For example, you can save and follow a bike friendly commute to work.
Racing against a previously recorded activity: You can also follow a saved course, trying to match or exceed previously set performance goals. For example, if the original course was completed in 30 minutes, you can race against a Virtual Partner trying to complete the course in under 30 minutes.
Following an existing ride from Garmin Connect: You can send a course from Garmin Connect to your device. Once it is saved to your device, you can follow the course or race against the course.
Creating a Course on Your Device
Before you can create a course, you must have an activity with GPS data saved to your device.
- Select Menu > Navigation > Courses > Course Options > Create New.
- Select an activity on which to base your course.
- Enter a name for the course, and select .
The course appears in the list. - Select the course, and review the course details.
- If necessary, select Settings to edit the course details.
For example, you can change the name or color of the course. - Select
 > Ride.
 > Ride.
Following a Course From Garmin Connect
Before you can download a course from Garmin Connect, you must have a Garmin Connect account (Garmin Connect).
- Select an option:
- Open the Garmin Connect app.
- Go to connect.garmin.com.
- Create a new course, or select an existing course.
- Select Send to Device.
- Follow the on-screen instructions.
- On the Edge device, select Menu > Navigation > Courses.
- Select the course.
- Select Ride.
Tips for Riding a Course
- Use turn guidance (Course Options).
- If you include a warmup, select to begin the course, and warm up as normal.
- Stay away from your course path as you warm up.
When you are ready to begin, head toward your course. When you are on any part of the course path, a message appears. - Scroll to the map to view the course map.
If you stray from the course, a message appears.
 to begin the course, and warm up as normal.
Viewing Course Details
- Select Menu > Navigation > Courses.
- Select a course.
- Select an option:
- Select Summary to view details about the course.
- Select Map to view the course on the map.
- Select Elevation to view an elevation plot of the course.
- Select Laps to select a lap and view additional information about each lap.
Displaying a Course on the Map
For each course saved to your device, you can customize how it appears on the map. For example, you can set your commute course to always display on the map in yellow. You can have an alternate course display in green. This allows you to see the courses while you are riding, but not follow or navigate a particular course.
- Select Menu > Navigation > Courses.
- Select the course.
- Select Settings.
- Select Always Display to make the course appear on the map.
- Select Color, and select a color.
- Select Course Points to include course points on the map.
The next time you ride near the course, it appears on the map.
Course Options
Select Menu > Navigation > Courses > Course Options.
Turn Guidance: Enables or disables turn prompts.
Off Crs. Warnings: Alerts you if you stray from the course.
Search: Allows you to search for saved courses by name.
Filter: Allows you to filter by course type, such as Strava courses.
Delete: Allows you to delete all or multiple saved courses from the device.
Stopping a Course
Select > Stop Course > OK.
Deleting a Course
- Select Menu > Navigation > Courses.
- Select a course.
- Select Delete > OK
Zooming the Map
- Go for a ride.
- Select to view the map.
- Select > Zoom Map In/Out.
- Select an option:
- Enable Auto Zoom to automatically set a zoom level for the map.
- Disable Auto Zoom to zoom in or out manually.
- If necessary, select Set Zoom Level.
- Select an option:
- Select to save the zoom level (optional).
Map Settings
Select Menu > Settings > Activity Profiles, select a profile, and select Navigation > Map.
Orientation: Sets how the map is shown on the page.
Auto Zoom: Automatically selects a zoom level for the map. When Off is selected, you must zoom in or out manually.
Guide Text: Sets when the turn-by-turn navigation prompts are shown (requires routable maps).
Map Visibility: Allows you to set advanced map features.
Map Information: Enables or disables the maps currently loaded on the device.
Changing the Map Orientation
- Select Menu > Settings > Activity Profiles.
- Select a profile.
- Select Navigation > Map > Orientation.
- Select an option:
- Select North Up to show north at the top of the page.
- Select Track Up to show your current direction of travel at the top of the page.
- Select 3D Mode to display the map in three dimensions.
Route Settings
Select Menu > Settings > Activity Profiles, select a profile, and select Navigation > Routing.
Popularity Routing: Calculates routes based on the most popular rides from Garmin Connect.
Routing Mode: Sets the transportation method to optimize your route.
Calculation Method: Sets the method used to calculate your route.
Lock on Road: Locks the position icon, which represents your position on the map, onto the nearest road.
Avoidance Setup: Sets the road types to avoid while navigating.
Recalculation: Automatically recalculates the route when you deviate from the route.
Selecting an Activity for Route Calculation
You can set the device to calculate the route based on activity type.
- Select Menu > Settings > Activity Profiles.
- Select a profile.
- Select Navigation > Routing > Routing Mode.
- Select an option to calculate your route.
For example, you can select Road Cycling for on-road navigation or Mountain Biking for off-road navigation.
Bluetooth Connected Features
The Edge device has several Bluetooth connected features for your compatible smartphone using the Garmin Connect and Connect IQ™ apps. Go to www.garmin.com/apps for more information.
Activity uploads to Garmin Connect: Automatically sends your activity to Garmin Connect as soon as you finish recording the activity.
Assistance: Allows you to send an automated text message with your name and GPS location to your emergency contacts using the Garmin Connect app.
Audio prompts: Allows the Garmin Connect app to play status announcements on your smartphone during a ride.
Bike alarm: Allows you to enable an alarm that sounds on the device and sends an alert to your smartphone when the device detects motion.
Connect IQ downloadable features: Allows you to download Connect IQ features from the Connect IQ app.
Course, segment, and workout downloads from Garmin Connect: Allows you to search for activities on Garmin Connect using your smartphone and send them to your device.
Device to device transfers: Allows you to wirelessly transfer files to another compatible Edge device.
Find my Edge: Locates your lost Edge device that is paired with your smartphone and currently within range.
GroupTrack: Allows you to keep track of other riders in your group using LiveTrack directly on screen and in real time. You can send preset messages to other riders in your GroupTrack session who have a compatible Edge device.
Incident detection: Allows the Garmin Connect app to send a message to your emergency contacts when the Edge device detects an incident.
LiveTrack: Allows friends and family to follow your races and training activities in real time. You can invite followers using email or social media, allowing them to view your live data on a Garmin Connect tracking page.
Messages: Allows you to reply to an incoming call or text message with a preset text message. This feature is available with compatible Android™ smartphones.
Notifications: Displays phone notifications and messages on your device.
Social media interactions: Allows you to post an update to your favorite social media website when you upload an activity to Garmin Connect.
Weather updates: Sends real-time weather conditions and alerts to your device.
Starting a GroupTrack Session
Before you can start a GroupTrack session, you must have a smartphone with the Garmin Connect Mobile app paired to your device (Pairing Your Smartphone).
During a ride, you can see the riders in your GroupTrack session on the map.
- On the Edge device, select Menu > Settings > GroupTrack to enable viewing connections on the map screen.
- In the Garmin Connect Mobile app, from the settings menu, select LiveTrack > GroupTrack.
- Select Visible to > All Connections.
NOTE: If you have more than one compatible device, you must select a device for the GroupTrack session. - Select Start LiveTrack.
- On the Edge device, select , and go for a ride.
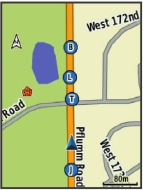
- Scroll to the map to view your connections.
You can tap an icon on the map to view location and heading information for other riders in the GroupTrack session. - Scroll to the GroupTrack list.
You can select a rider from the list, and that rider appears centered on the map.
Tips for GroupTrack Sessions
The GroupTrack feature allows you to keep track of other riders in your group using LiveTrack directly on the screen. All riders in the group must be your connections in your Garmin Connect account.
- Ride outside using GPS.
- Pair your Edge 530 device with your smartphone using Bluetooth technology.
- In the Garmin Connect Mobile app, from the settings menu, select Connections to update the list of riders for your GroupTrack session.
- Make sure all of your connections pair to their smartphones and start a LiveTrack session in the Garmin Connect Mobile app.
- Make sure all your connections are in range (40 km or 25 mi.).
- During a GroupTrack session, scroll to the map to view your connections.
- Stop riding before you attempt to view location and heading information for other riders in the GroupTrack session.
Transferring Files to Another Edge Device
You can transfer courses, segments, and workouts wirelessly from one compatible Edge device to another using Bluetooth technology.
- Turn on both Edge devices, and bring them within range (3 m) of each other.
- From the device that contains the files, select Menu > Settings > Device Transfers > Share Files.
- Select a file type to share.
- Select one or more files to transfer.
- From the device that receives the files, select Menu > Settings > Device Transfers.
- Select a nearby connection.
- Select one or more files to receive.
A message appears on both devices after the file transfer is complete.
Playing Audio Prompts on Your Smartphone
Before you can set up audio prompts, you must have a smartphone with the Garmin Connect Mobile app paired to your Edge device.
You can set the Garmin Connect Mobile app to play motivational status announcements on your smartphone during a ride or other activity. Audio prompts include the lap number and lap time, navigation, power, pace or speed, and heart-rate data. During an audio prompt, the Garmin Connect mobile app mutes the primary audio of the smartphone to play the announcement. You can customize the volume levels on the Garmin Connect Mobile app.
- From the settings in the Garmin Connect Mobile app, select Garmin Devices.
- Select your device.
- Select Device Settings > Audio Prompts.
Incident Detection and Assistance Features
Incident Detection
Incident detection is a supplemental feature primarily designed for road use. Incident detection should not be relied on as a primary method to obtain emergency assistance. The Garmin Connect Mobile app does not contact emergency services on your behalf.
When an incident is detected by your Edge device with GPS enabled, the Garmin Connect Mobile app can send an automated text message and email with your name and GPS location to your emergency contacts.
A message appears on your device and paired smartphone indicating your contacts will be informed after 30 seconds have elapsed. If assistance is not needed, you can cancel the automated emergency message.
Before you can enable incident detection on your device, you must set up emergency contact information in the Garmin Connect Mobile app. Your paired smartphone must be equipped with a data plan and be in an area of network coverage where data is available. Your emergency contacts must be able to receive text messages (standard text messaging rates may apply).
Assistance
Assistance is a supplemental feature and should not be relied on as a primary method to obtain emergency assistance. The Garmin Connect Mobile app does not contact emergency services on your behalf.
When your Edge device with GPS enabled is connected to the Garmin Connect Mobile app, you can send an automated text message with your name and GPS location to your emergency contacts.
Before you can enable the assistance feature on your device, you must set up emergency contact information in the Garmin Connect Mobile app. Your Bluetooth paired smartphone must be equipped with a data plan and be in an area of network coverage where data is available. Your emergency contacts must be able to receive text messages (standard text messaging rates may apply).
A message appears on your device indicating your contacts will be informed after a countdown has elapsed. If assistance is not needed, you can cancel the message.
Setting Up the Incident Detection and Assistance Features
- From the app store on your smartphone, install and open the Garmin Connect Mobile app.
- Pair your smartphone with your device (Pairing Your Smartphone).
- From the app settings in the Garmin Connect Mobile app, select Emergency Contacts, and enter your rider information and your emergency contacts.
Your selected contacts receive a message identifying them as emergency contacts.
NOTE: When you enter emergency contacts, incident detection is automatically enabled on your device. - Enable GPS on your Edge device (Changing the Satellite Setting).
Viewing Your Emergency Contacts
Before you can view your emergency contacts on your device, you must set up your rider information and emergency contacts in the Garmin Connect Mobile app.
Select Menu > Contacts.
Your emergency contacts’ names and phone numbers appear.
Requesting Assistance
Before you can request assistance, you must enable GPS on your Edge device.
- Hold for four seconds to activate the assistance feature.
The device beeps, and sends the message after the fivesecond countdown is complete.
TIP: You can select before the countdown is complete to cancel the message. - If necessary, select to send the message immediately.
 for four seconds to activate the assistance feature.
Turning Incident Detection On and Off
Select Menu > Settings > System > Incident Detection.
Cancelling an Automated Message
When an incident is detected by your device, you can cancel the automated emergency message on your device or your paired smartphone before it is sent to your emergency contacts.
Select Cancel > Yes before the end of the thirty-second countdown.
Sending a Status Update After an Incident
Before you can send a status update to your emergency contacts, your device must detect an incident and send an automated emergency message to your emergency contacts.
You can send a status update to your emergency contacts informing them you are not in need of assistance.
From the status page, select Incident Detected > I’m Okay.
A message is sent to all emergency contacts.
Wireless Sensors
Your device can be used with wireless ANT+ or Bluetooth sensors. For more information about compatibility and purchasing optional sensors, go to buy.garmin.com.
Putting On the Heart Rate Monitor
NOTE: If you do not have a heart rate monitor, you can skip this task.
You should wear the heart rate monitor directly on your skin, just below your sternum. It should be snug enough to stay in place during your activity.
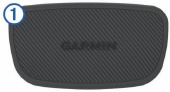
- Snap the heart rate monitor module 1 onto the strap.
The Garmin logos on the module and the strap should be right-side up. - Wet the electrodes 2 and the contact patches 3 on the back of the strap to create a strong connection between your chest and the transmitter.
- Wrap the strap around your chest, and connect the strap hook 4 to the loop 5.
NOTE: The care tag should not fold over.
The Garmin logos should be right-side up. - Bring the device within 3 m (10 ft.) of the heart rate monitor.

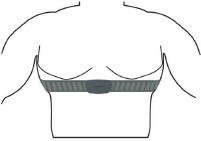
After you put on the heart rate monitor, it is active and sending data.
TIP: If the heart rate data is erratic or does not appear, see the troubleshooting tips (Tips for Erratic Heart Rate Data).
Recovery Time
You can use your Garmin device with wrist-based heart rate or a compatible chest heart rate monitor to display how much time remains before you are fully recovered and ready for the next hard workout.
NOTE: The recovery time recommendation uses your VO2 max. estimate and may seem inaccurate at first. The device requires you to complete a few activities to learn about your performance.
The recovery time appears immediately following an activity. The time counts down until it is optimal for you to attempt another hard workout.
Viewing Your Recovery Time
Before you can use the recovery time feature, you must put on the heart rate monitor, and pair it with your device (Pairing Your Wireless Sensors). If your device was packaged with a heart rate monitor, the device and sensor are already paired. For the most accurate estimate, complete the user profile setup (Setting Up Your User Profile), and set your maximum heart rate (Setting Your Heart Rate Zones).
- Select Menu > My Stats > Recovery Advisor > Enable.
- Go for a ride.
- After your ride, select Save Ride.
The recovery time appears. The maximum time is 4 days, and the minimum time is 6 hours.
About VO2 Max. Estimates
VO2 max. is the maximum volume of oxygen (in milliliters) you can consume per minute per kilogram of body weight at your maximum performance. In simple terms, VO2 max. is an indication of athletic performance and should increase as your level of fitness improves. VO2 max. estimates are provided and supported by Firstbeat. You can use your Garmin device paired with a compatible heart rate monitor and power meter to display your cycling VO2 max. estimate.
Getting Your VO2 Max. Estimate
Before you can view your VO2 max. estimate, you must put on the heart rate monitor, install the power meter, and pair them with your device (Pairing Your Wireless Sensors). If your device was packaged with a heart rate monitor, the device and sensor are already paired. For the most accurate estimate, complete the user profile setup (Setting Up Your User Profile), and set your maximum heart rate (Setting Your Heart Rate Zones).
NOTE: The estimate may seem inaccurate at first. The device requires a few rides to learn about your cycling performance.
- Ride at a steady, high intensity for at least 20 minutes outdoors.
- After your ride, select Save Ride.
- Select Menu > My Stats > Training Status > VO2 Max..
Your VO2 max. estimate appears as a number and position on the color gauge.
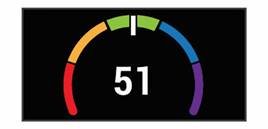
VO2 max. data and analysis is provided with permission from The Cooper Institute®. For more information, see the appendix (VO2 Max. Standard Ratings), and go to www.CooperInstitute.org.
Tips for Cycling VO2 Max. Estimates
The success and accuracy of the VO2 max. calculation improves when your ride is a sustained and moderately hard effort, and where heart rate and power are not highly variable.
- Before your ride, check that your device, heart rate monitor, and power meter are functioning properly, paired, and have good battery life.
- During your 20 minute ride, maintain your heart rate at greater than 70% of your maximum heart rate.
- During your 20 minute ride, maintain a fairly constant power output.
- Avoid rolling terrain.
- Avoid riding in groups where there is a lot of drafting.
Setting Your Heart Rate Zones
The device uses your user profile information from the initial setup to determine your heart rate zones. You can manually adjust the heart rate zones according to your fitness goals (Fitness Goals). For the most accurate calorie data during your activity, you should set your maximum heart rate, resting heart rate, and heart rate zones.
- Select Menu > My Stats > Training Zones > Heart Rate Zones.
- Enter your maximum, lactate threshold, and resting heart rate values.
You can use the auto detect feature to automatically detect your heart rate during an activity. The zone values update automatically, but you can also edit each value manually. - Select Based On:.
- Select an option:
- Select BPM to view and edit the zones in beats per minute.
- Select % Max. to view and edit the zones as a percentage of your maximum heart rate.
- Select % HRR to view and edit the zones as a percentage of your heart rate reserve (maximum heart rate minus resting heart rate).
- Select %LTHR to view and edit the zones as a percentage of your lactate threshold heart rate.
About Heart Rate Zones
Many athletes use heart rate zones to measure and increase their cardiovascular strength and improve their level of fitness. A heart rate zone is a set range of heartbeats per minute. The five commonly accepted heart rate zones are numbered from 1 to 5 according to increasing intensity. Generally, heart rate zones are calculated based on percentages of your maximum heart rate.
Fitness Goals
Knowing your heart rate zones can help you measure and improve your fitness by understanding and applying these principles.
- Your heart rate is a good measure of exercise intensity.
- Training in certain heart rate zones can help you improve cardiovascular capacity and strength.
If you know your maximum heart rate, you can use the table (Heart Rate Zone Calculations) to determine the best heart rate zone for your fitness objectives.
If you do not know your maximum heart rate, use one of the calculators available on the Internet. Some gyms and health centers can provide a test that measures maximum heart rate. The default maximum heart rate is 220 minus your age.
Tips for Erratic Heart Rate Data
If the heart rate data is erratic or does not appear, you can try these tips.
- Reapply water to the electrodes and contact patches (if applicable).
- Tighten the strap on your chest.
- Warm up for 5 to 10 minutes.
- Follow the care instructions (Caring for the Heart Rate Monitor).
- Wear a cotton shirt or thoroughly wet both sides of the strap.
- Synthetic fabrics that rub or flap against the heart rate monitor can create static electricity that interferes with heart rate signals.
- Move away from sources that can interfere with your heart rate monitor.
Sources of interference may include strong electromagnetic fields, some 2.4 GHz wireless sensors, high-voltage power lines, electric motors, ovens, microwave ovens, 2.4 GHz cordless phones, and wireless LAN access points.
Installing the Speed Sensor
NOTE: If you do not have this sensor, you can skip this task.
TIP: Garmin recommends you secure your bike on a stand while installing the sensor.
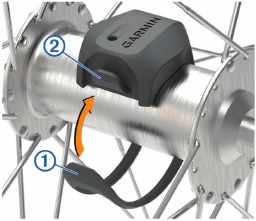
- Place and hold the speed sensor on top of the wheel hub.
- Pull the strap 1 around the wheel hub, and attach it to the hook 2 on the sensor.
The sensor may be tilted when installed on an asymmetrical hub. This does not affect operation. - Rotate the wheel to check for clearance.
The sensor should not contact other parts of your bike.
NOTE: The LED flashes green for five seconds to indicate activity after two revolutions.
Installing the Cadence Sensor
NOTE: If you do not have this sensor, you can skip this task.
TIP: Garmin recommends you secure your bike on a stand while installing the sensor.
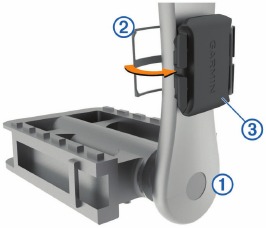
- Select the band size that fits your crank arm 1 securely.
The band you select should be the smallest one that stretches across the crank arm. - On the non-drive side, place and hold the flat side of the cadence sensor on the inside of the crank arm.
- Pull the bands 2 around the crank arm, and attach them to the hooks 3 on the sensor.
- Rotate the crank arm to check for clearance.
The sensor and bands should not contact any part of your bike or shoe.
NOTE: The LED flashes green for five seconds to indicate activity after two revolutions. - Take a 15 minute test ride and inspect the sensor and bands to ensure there is no evidence of damage.
About the Speed and Cadence Sensors
Cadence data from the cadence sensor is always recorded. If no speed and cadence sensors are paired with the device, GPS data is used to calculate the speed and distance.
Cadence is your rate of pedaling or «spinning» measured by the number of revolutions of the crank arm per minute (rpm).
Data Averaging for Cadence or Power
The non-zero data-averaging setting is available if you are training with an optional cadence sensor or power meter. The default setting excludes zero values that occur when you are not pedaling.
You can change the value of this setting (Data Recording Settings).
Pairing Your Wireless Sensors
Before you can pair, you must put on the heart rate monitor or install the sensor.
Pairing is the connecting of ANT+ or Bluetooth wireless sensors, for example, connecting a heart rate monitor with your Garmin device.
- Bring the device within 3 m (10 ft.) of the sensor.
NOTE: Stay 10 m (33 ft.) away from other riders’ sensors while pairing. - Select Menu > Settings > Sensors > Add Sensor.
- Select an option:
- Select a sensor type.
- Select Search All to search for all nearby sensors.
A list of available sensors appears.
- Select one or more sensors to pair with your device.
- Select Add Sensor.
When the sensor is paired with your device, the sensor status is Connected. You can customize a data field to display sensor data.
Training with Power Meters
- Go to www.garmin.com/intosports for a list of ANT+ sensors that are compatible with your device (such as Vector™).
- For more information, see the owner’s manual for your power meter.
- Adjust your power zones to match your goals and abilities (Setting Your Power Zones).
- Use range alerts to be notified when you reach a specified power zone (Setting Range Alerts).
- Customize the power data fields (Customizing the Data Screens).
Setting Your Power Zones
The values for the zones are default values and may not match your personal abilities. You can manually adjust your zones on the device or using Garmin Connect. If you know your functional threshold power (FTP) value, you can enter it and allow the software to calculate your power zones automatically.
- Select Menu > My Stats > Training Zones > Power Zones.
- Enter your FTP value.
- Select Based On:.
- Select an option:
- Select watts to view and edit the zones in watts.
- Select % FTP to view and edit the zones as a percentage of your functional threshold power.
Calibrating Your Power Meter
Before you can calibrate your power meter, you must install it, pair it with your device, and begin actively recording data with it.
For calibration instructions specific to your power meter, see the manufacturer’s instructions.
- Select Menu > Settings > Sensors.
- Select your power meter.
- Select Calibrate.
- Keep your power meter active by pedaling until the message appears.
- Follow the on-screen instructions.
Pedal-Based Power
Vector measures pedal-based power.
Vector measures the force you apply a few hundred times every second. Vector also measures your cadence or rotational pedaling speed. By measuring the force, the direction of force, the rotation of the crank arm, and time, Vector can determine power (watts). Because Vector independently measures left and right leg power, it reports your left-right power balance.
NOTE: The Vector S system does not provide left-right power balance.
Cycling Dynamics
Cycling dynamics metrics measure how you apply power throughout the pedal stroke, and where you apply power on the pedal, allowing you to understand your particular way of riding. Understanding how and where you produce power allows you to train more efficiently and evaluate your bike fit.
NOTE: You must have a dual sensing Edge system to use cycling dynamics metrics.
For more information, go to www.garmin.com/cyclingdynamics.
Using Cycling Dynamics
Before you can use cycling dynamics, you must pair the Vector power meter with your device (Pairing Your Wireless Sensors).
NOTE: Recording cycling dynamics uses additional device memory.
- Go for a ride.
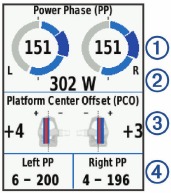
- Scroll to the cycling dynamics screen to view your power phase data 1, total power 2, and platform center offset 3.
- If necessary, select Data Fields to change a data field (Customizing the Data Screens).
NOTE: The two data fields at the bottom of the screen 4 can be customized.
You can send the ride to the Garmin Connect Mobile app to view additional cycling dynamics data (Sending Your Ride to Garmin Connect).
Power Phase Data
Power phase is the pedal stroke region (between the start crank angle and the end crank angle) where you produce positive power.
Platform Center Offset
Platform center offset is the location on the pedal platform where you apply force.
Updating the Vector Software Using the Edge Device
Before you can update the software, you must pair your Edge device with your Vector system.
- Send your ride data to your Garmin Connect account (Sending Your Ride to Garmin Connect).
Garmin Connect automatically looks for software updates and sends them to your Edge device. - Bring your Edge device within range (3 m) of the sensor.
- Rotate the crank arm a few times. The Edge device prompts you to install all pending software updates.
- Follow the on-screen instructions.
Getting Your FTP Estimate
The device uses your user profile information from the initial setup to estimate your functional threshold power (FTP). For a more accurate FTP value, you can conduct an FTP test using a paired power meter and heart rate monitor (Conducting an FTP Test).
Select Menu > My Stats > FTP.
Your FTP estimate appears as a value measured in watts per kilogram, your power output in watts, and a position on the color gauge.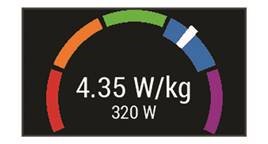
For more information, see FTP Ratings.
Conducting an FTP Test
Before you can conduct a test to determine your functional threshold power (FTP), you must have a paired power meter and heart rate monitor (Pairing Your Wireless Sensors).
- Select Menu > My Stats > FTP > FTP Test > Ride.
- Select to start the timer.
After you begin your ride, the device displays each step of the test, the target, and current power data. A message appears when the test is complete. - Select to stop the timer.
- Select Save Ride.
Your FTP appears as a value measured in watts per kilogram, your power output in watts, and a position on the color gauge.
 to start the timer.
Automatically Calculating FTP
Before the device can calculate your functional threshold power (FTP), you must have a paired power meter and heart rate monitor (Pairing Your Wireless Sensors).
- Select Menu > My Stats > FTP > Enable Auto Calculation.
- Ride at a steady, high intensity for at least 20 minutes outdoors.
- After your ride, select Save Ride.
- Select Menu > My Stats > FTP.
Your FTP appears as a value measured in watts per kilogram, your power output in watts, and a position on the color gauge.
Using Electronic Shifters
Before you can use compatible electronic shifters, such as Shimano® Di2™ shifters, you must pair them with your device (Pairing Your Wireless Sensors). You can customize the optional data fields (Customizing the Data Screens). The Edge 530 device displays current adjustment values when the sensor is in adjustment mode.
Situational Awareness
Your Edge device can be used with the Varia Vision™ device, Varia™ smart bike lights, and rearview radar to improve situational awareness. See the owner’s manual for your Varia device for more information.
NOTE: You may need to update the Edge software before pairing Varia devices (Updating the Software Using Garmin Express).
History
History includes time, distance, calories, speed, lap data, elevation, and optional ANT+ sensor information.
NOTE: History is not recorded while the timer is stopped or paused.
When the device memory is full, a message appears. The device does not automatically delete or overwrite your history. Upload your history to Garmin Connect periodically to keep track of all your ride data.
Viewing Your Ride
- Select Menu > History > Rides.
- Select a ride.
- Select an option.
Viewing Your Time in Each Training Zone
Before you can view your time in each training zone, you must pair your device with a compatible heart rate monitor or power meter, complete an activity, and save the activity.
Viewing your time in each heart rate and power zone can help you adjust your training intensity. You can adjust your power zones (Setting Your Power Zones) and your heart rate zones (Setting Your Heart Rate Zones) to match your goals and abilities. You can customize a data field to display your time in training zones during your ride (Customizing the Data Screens).
- Select Menu > History > Rides.
- Select a ride.
- Select an option:
- If your ride has data from one sensor, select Time in HR Zone or Time in Power Zone.
- If your ride has data from both sensors, select Time in Zone, and select Heart Rate Zones or Power Zones.
Deleting Rides
- Select Menu > History > Rides > Delete.
- Select one or more rides to delete.
- Select Delete Rides > OK.
Viewing Data Totals
You can view the accumulated data you have saved to the device, including the number of rides, time, distance, and calories.
- Select Menu > History > Totals.
- Select an option to view device or activity profile totals.
Deleting Data Totals
- Select Menu > History > Totals > Delete Totals.
- Select an option:
- Select Delete All Totals to delete all data totals from the history.
- Select an activity profile to delete accumulated data totals for a single profile.
NOTE: This does not delete any saved activities.
- Select OK.
Garmin Connect
You can connect with your friends on Garmin Connect. Garmin Connect gives you the tools to track, analyze, share, and encourage each other. Record the events of your active lifestyle including runs, walks, rides, swims, hikes, triathlons, and more.
You can create your free Garmin Connect account when you pair your device with your phone using the Garmin Connect Mobile app, or you can go to connect.garmin.com.
Store your activities: After you complete and save an activity with your device, you can upload that activity to Garmin Connect and keep it as long as you want.
Analyze your data: You can view more detailed information about your activity, including time, distance, elevation, heart rate, calories burned, cadence, an overhead map view, pace and speed charts, and customizable reports.
NOTE: Some data requires an optional accessory such as a heart rate monitor.
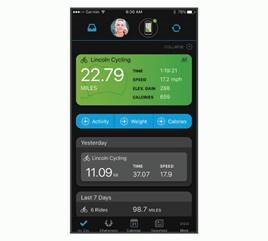
Plan your training: You can choose a fitness goal and load one of the day-by-day training plans.
Share your activities: You can connect with friends to follow each other’s activities or post links to your activities on your favorite social networking sites.
Sending Your Ride to Garmin Connect
- Sync your Edge device with the Garmin Connect Mobile app on your smartphone.
- Use the USB cable that came with your Edge device to send ride data to your Garmin Connect account on your computer.
Data Recording
The device uses smart recording. It records key points where you change direction, speed, or heart rate.
When a power meter is paired, the device records points every second. Recording points every second provides an extremely detailed track, and uses more of the available memory.
For information about data averaging for cadence and power, see Data Averaging for Cadence or Power.
Data Management
NOTE: The device is not compatible with Windows® 95, 98, Me, Windows NT®, and Mac® OS 10.3 and earlier.
Connecting the Device to Your Computer
NOTICE
To prevent corrosion, thoroughly dry the USB port, the weather cap, and the surrounding area before charging or connecting to a computer.
- Pull up the weather cap from the USB port.
- Plug the small end of the USB cable into the USB port.
- Plug the large end of the USB cable into a computer USB port.
Your device appears as a removable drive in My Computer on Windows computers and as a mounted volume on Mac computers.
Transferring Files to Your Device
- Connect the device to your computer.
On Windows computers, the device appears as a removable drive or a portable device. On Mac computers, the device appears as a mounted volume.
NOTE: Some computers with multiple network drives may not display device drives properly. See your operating system documentation to learn how to map the drive. - On your computer, open the file browser.
- Select a file.
- Select Edit > Copy.
- Open the portable device, drive, or volume for the device.
- Browse to a folder.
- Select Edit > Paste.
The file appears in the list of files in the device memory.
Deleting Files
NOTICE
If you do not know the purpose of a file, do not delete it. Your device memory contains important system files that should not be deleted.
- Open the Garmin drive or volume.
- If necessary, open a folder or volume.
- Select a file.
- Press the Delete key on your keyboard.
NOTE: If you are using an Apple® computer, you must empty the Trash folder to completely remove the files.
Disconnecting the USB Cable
If your device is connected to your computer as a removable drive or volume, you must safely disconnect your device from your computer to avoid data loss. If your device is connected to your Windows computer as a portable device, it is not necessary to safely disconnect the device.
- Complete an action:
- For Windows computers, select the Safely Remove Hardware icon in the system tray, and select your device.
- For Apple computers, select the device, and select File > Eject.
- Disconnect the cable from your computer.
Customizing Your Device
Connect IQ Downloadable Features
You can add Connect IQ features to your device from Garmin and other providers using the Connect IQ Mobile app.
Data Fields: Allow you to download new data fields that present sensor, activity, and history data in new ways. You can add Connect IQ data fields to built-in features and pages.
Widgets: Provide information at a glance, including sensor data and notifications.
Apps: Add interactive features to your device, such as new outdoor and fitness activity types.
Downloading Connect IQ Features Using Your Computer
- Connect the device to your computer using a USB cable.
- Go to apps.garmin.com, and sign in.
- Select a Connect IQ feature, and download it.
- Follow the on-screen instructions.
Profiles
The Edge has several ways for you to customize the device, including profiles. Profiles are a collection of settings that optimize your device based on how you are using it. For example, you can create different settings and views for training and mountain biking.
When you are using a profile and you change settings such as data fields or units of measurement, the changes are saved automatically as part of the profile.
Activity Profiles: You can create activity profiles for each type of biking. For example, you can create a separate activity profile for training, for racing, and for mountain biking. The activity profile includes customized data pages, activity totals, alerts, training zones (such as heart rate and speed), training settings (such as Auto Pause® and Auto Lap®), and navigation settings.
User Profile: You can update your gender, age, weight, and height settings. The device uses this information to calculate accurate ride data.
Setting Up Your User Profile
You can update your gender, age, weight, and height settings. The device uses this information to calculate accurate ride data.
- Select Menu > My Stats > User Profile.
- Select an option.
About Training Settings
The following options and settings allow you to customize your device based on your training needs. These settings are saved to an activity profile. For example, you can set time alerts for your racing profile and you can set an Auto Lap position trigger for your mountain biking profile.
Updating Your Activity Profile
You can customize ten activity profiles. You can customize your settings and data fields for a particular activity or trip.
- Select Menu > Settings > Activity Profiles.
- Select an option:
- Select a profile.
- Select Create New to add or copy a profile.
- If necessary, edit the name and color for the profile.
- Select an option:
- Select Data Screens to customize the data screens and data fields (Customizing the Data Screens).
- Select Default Ride Type to set the type of ride that is typical for this activity profile, such as commuting.
TIP: After a ride that is not typical, you can manually update the ride type. Accurate ride type data is important for creating bike friendly courses. - Select Segments to turn on your enabled segments (Enabling Segments).
- Select Alerts to customize your training alerts (Alerts).
- Select Auto Features > Auto Lap to set how laps are triggered (Marking Laps by Position).
- Select Auto Features > Auto Pause to change when the activity timer automatically pauses (Using Auto Pause).
- Select Auto Features > Auto Sleep to automatically enter sleep mode after five minutes of inactivity (Using Auto Sleep).
- Select Auto Features > Auto Scroll to customize the display of the training data screens when the activity timer is running (Using Auto Scroll).
- Select Timer Start Mode to customize how the device detects the start of a ride and automatically starts the activity timer (Starting the Timer Automatically).
- Select Nutrition/Hydration …
- Select Navigation > Map to customize the map settings (Map Settings).
- Select Navigation > Routing to customize the routing settings (Route Settings).
- Select Navigation > Navigation Prompts to customize the…
- Select Navigation > Sharp Bend Warnings …
- Select GPS Mode to turn off GPS (Training Indoors) or change the satellite setting (Changing the Satellite Setting).
All changes are saved to the activity profile.
Customizing the Data Screens
- Select Menu > Settings > Activity Profiles.
- Select a profile.
- Select Data Screens.
- Select a data screen.
- If necessary, enable the data screen.
- Select the number of data fields to appear on the screen.
- Select a data field to change it.
Changing the Satellite Setting
For increased performance in challenging environments and faster GPS position location, you can enable GPS+GLONASS or GPS+GALILEO. Using GPS and another satellite together reduces battery life more quickly than using only GPS.
- Select Menu > Settings > Activity Profiles.
- Select a profile.
- Select GPS Mode.
- Select an option.
Alerts
You can use alerts to train toward specific time, distance, calorie, heart rate, cadence, and power goals. Alert settings are saved with your activity profile.
Setting Range Alerts
If you have an optional heart rate monitor, cadence sensor, or power meter, you can set up range alerts. A range alert notifies you when the device measurement is above or below a specified range of values. For example, you can set the device to alert you when your cadence is below 40 RPM and over 90 RPM. You can also use a training zone for the range alert (Training Zones).
- Select Menu > Settings > Activity Profiles.
- Select a profile.
- Select Alerts.
- Select Heart Rate Alert, Cadence Alert, or Power Alert.
- Select the minimum and maximum values, or select zones.
- If necessary, select .
Each time you exceed or drop below the specified range, a message appears. The device also beeps if audible tones are turned on (Turning the Device Tones On and Off).
Setting a Recurring Alert
A recurring alert notifies you each time the device records a specified value or interval. For example, you can set the device to alert you every 30 minutes.
- Select Menu > Settings > Activity Profiles.
- Select a profile.
- Select Alerts.
- Select an alert type.
- Turn on the alert.
- Enter a value.
- Select .
Each time you reach the alert value, a message appears. The device also beeps if audible tones are turned on (Turning the Device Tones On and Off).
Auto Lap
Marking Laps by Position
You can use the Auto Lap feature to mark the lap at a specific position automatically. This feature is helpful for comparing your performance over different parts of a ride (for example, a long climb or training sprints). During courses, you can use the By Position option to trigger laps at all of the lap positions saved in the course.
- Select Menu > Settings > Activity Profiles.
- Select a profile.
- Select Auto Features > Auto Lap > Auto Lap Trigger > By Position > Lap At.
- Select an option:
- If necessary, customize the lap data fields (Customizing the Data Screens).
Marking Laps by Distance
You can use the Auto Lap feature to mark the lap at a specific distance automatically. This feature is helpful for comparing your performance over different parts of a ride (for example, every 10 miles or 40 kilometers).
- Select Menu > Settings > Activity Profiles.
- Select a profile.
- Select Auto Features > Auto Lap > Auto Lap Trigger > By Distance > Lap At.
- Enter a value.
- If necessary, customize the lap data fields (Customizing the Data Screens).
Using Auto Pause
You can use the Auto Pause feature to pause the timer automatically when you stop moving or when your speed drops below a specified value. This feature is helpful if your ride includes stop lights or other places where you need to slow down or stop.
NOTE: History is not recorded while the timer is stopped or paused.
- Select Menu > Settings > Activity Profiles.
- Select a profile.
- Select Auto Features > Auto Pause.
- Select an option:
- Select When Stopped to pause the timer automatically when you stop moving.
- Select Custom Speed to pause the timer automatically when your speed drops below a specified value.
- If necessary, customize optional time data fields (Customizing the Data Screens).
Using Auto Sleep
You can use the Auto Sleep feature to automatically enter sleep mode after 5 minutes of inactivity. During sleep mode, the screen is turned off and the ANT+ sensors, Bluetooth, and GPS are disconnected.
Wi‑Fi® continues to run while the device is asleep.
- Select Menu > Settings > Activity Profiles.
- Select a profile.
- Select Auto Features > Auto Sleep.
Using Auto Scroll
You can use the Auto Scroll feature to automatically cycle through all of the training data screens while the timer is running.
- Select Menu > Settings > Activity Profiles.
- Select a profile.
- Select Auto Features > Auto Scroll.
- Select a display speed.
Starting the Timer Automatically
This feature automatically detects when your device has acquired satellites and is moving. It starts the activity timer or reminds you to start the activity timer so you can record your ride data.
- Select Menu > Settings > Activity Profiles.
- Select a profile.
- Select Timer Start Mode.
- Select an option:
- Select Manual, and select to start the activity timer.
- Select Prompted to display a visual reminder when you reach the start notice speed.
- Select Auto to start the activity timer automatically when you reach the start speed.
- Select Manual, and select
 to start the activity timer.
Phone Settings
Select Menu > Settings > Connected Features > Phone.
Enable: Enables Bluetooth wireless technology.
NOTE: Other Bluetooth settings appear only when Bluetooth wireless technology is enabled.
Friendly Name: Allows you to enter a friendly name that identifies your devices with Bluetooth wireless technology.
Pair Smartphone: Connects your device with a compatible Bluetooth enabled smartphone. This setting allows you to use Bluetooth connected features, including LiveTrack and activity uploads to Garmin Connect.
Call and Text Alerts: Allows you to enable phone notifications from your compatible smartphone.
Missed Calls and Texts: Displays missed phone notifications from your compatible smartphone.
Text Reply Signature: Enables signatures in your text message replies.
System Settings
Select Menu > Settings > System.
- Display Settings (Display Settings)
- Data Recording Settings (Data Recording Settings)
- Unit Settings (Changing the Units of Measure)
- Tone Settings (Turning the Device Tones On and Off)
- Language Settings (Changing the Device Language)
Display Settings
Select Menu > Settings > System > Display.
Auto Brightness: Automatically adjusts the backlight brightness based on the ambient light.
Brightness: Sets the backlight brightness.
Backlight Timeout: Sets the length of time before the backlight turns off.
Color Mode: Sets the device to display day or night colors. You can select the Auto option to allow the device to set day or night colors automatically based on the time of day.
Screen Capture: Allows you to save the image of the device screen.
Data Recording Settings
Select Menu > Settings > System > Data Recording.
Recording Interval: Controls how the device records activity data. The Smart option records key points where you change direction, speed, or heart rate. The 1 Sec option records points every second. It creates a very detailed record of your activity and increases the size of the stored activity file.
Cadence Averaging: Controls whether the device includes zero values for cadence data that occur when you are not pedaling (Data Averaging for Cadence or Power).
Power Averaging: Controls whether the device includes zero values for power data that occur when you are not pedaling (Data Averaging for Cadence or Power).
Log HRV: Sets the device to record your heart rate variability during an activity.
Changing the Units of Measure
You can customize units of measure for distance and speed, elevation, temperature, weight, position format, and time format.
- Select Menu > Settings > System > Units.
- Select a measurement type.
- Select a unit of measure for the setting.
Turning the Device Tones On and Off
Select Menu > Settings > System > Tones.
Changing the Device Language
Select Menu > Settings > System > Language.
Time Zones
Each time you turn on the device and acquire satellites or sync with your smartphone, the device automatically detects your time zone and the current time of day.
Setting Up Extended Display Mode
You can use your Edge 530 device as an extended display to view data screens from a compatible Garmin multisport watch.
For example, you can pair a compatible Forerunner® device to display its data screens on your Edge device during a triathlon.
- From your Edge device, select Menu > Settings > Extended Display Mode > Connect Watch.
- From your compatible Garmin watch, select Settings > Sensors & Accessories > Add New > Extended Display.
- Follow the on-screen instructions on your Edge device and Garmin watch to complete the pairing process.
The data screens from your paired watch appear on the Edge device when the devices are paired.
NOTE: Normal Edge device functions are disabled while using Extended Display mode.
After pairing your compatible Garmin watch with your Edge device, they connect automatically the next time you use Extended Display mode.
Exiting Extended Display Mode
While the device is in Extended Display mode, select > Exit Extended Display Mode > OK.
Device Information
Specifications
Edge Specifications
| Battery type | Rechargeable, built-in lithium-ion battery |
| Battery life | Up to 15 hr. |
| Operating temperature range | From -20º to 60ºC (from -4º to 140ºF) |
| Charging temperature range | From 0º to 45ºC (from 32º to 113ºF) |
| Wireless frequency/protocol | 2.4 GHz @ 13.7 dBm nominal |
| Water rating | IEC 60529 IPX7* |
*The device withstands incidental exposure to water of up to 1 m for up to 30 min. For more information, go to www.garmin.com/waterrating.
Heart Rate Monitor Specifications
| Battery type | User-replaceable CR2032, 3 volts |
| Battery life | Up to 4.5 yr. at 1 hr./day |
| Water resistance | 3 ATM* NOTE: This product does not transmit heart rate data while swimming. |
| Operating temperature range | From -5° to 50°C (from 23° to 122°F) |
| Radio frequency/protocol | 2.4 GHz ANT+ wireless communications protocol |
*The device withstands pressure equivalent to a depth of 30 m. For more information, go to www.garmin.com/waterrating.
Speed Sensor and Cadence Sensor Specifications
| Battery type | User-replaceable CR2032, 3 V |
| Battery life | Approximately 12 mo. at 1 hr./day |
| Operating temperature range | From -20º to 60ºC (from -4º to 140ºF) |
| Wireless frequency/protocol | 2.4 GHz @ 4 dBm nominal |
| Water rating | IEC 60529 IPX7* |
*The device withstands incidental exposure to water of up to 1 m for up to 30 min. For more information, go to www.garmin.com/waterrating.
Device Care
NOTICE
Do not store the device where prolonged exposure to extreme temperatures can occur, because it can cause permanent damage.
Avoid chemical cleaners, solvents, and insect repellents that can damage plastic components and finishes.
Secure the weather cap tightly to prevent damage to the USB port.
Cleaning the Device
- Wipe the device using a cloth dampened with a mild detergent solution.
- Wipe it dry.
After cleaning, allow the device to dry completely.
Caring for the Heart Rate Monitor
NOTICE
You must unsnap and remove the module before washing the strap.
A build up of sweat and salt on the strap can decrease the ability of the heart rate monitor to report accurate data.
- Go to www.garmin.com/HRMcare for detailed washing instructions.
- Rinse the strap after every use.
- Machine wash the strap after every seven uses.
- Do not put the strap in a dryer.
- When drying the strap, hang it up or lay it flat.
- To prolong the life of your heart rate monitor, unsnap the module when not in use.
User Replaceable Batteries
See the Important Safety and Product Information guide in the product box for product warnings and other important information.
Replacing the Heart Rate Monitor Battery
- Use a small Phillips screwdriver to remove the four screws on the back of the module.
- Remove the cover and battery.
- Wait 30 seconds.
- Insert the new battery with the positive side facing up.
NOTE: Do not damage or lose the O-ring gasket. - Replace the back cover and the four screws.
NOTE: Do not overtighten.
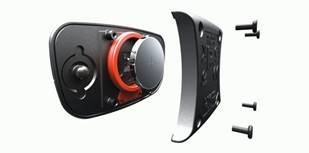
After you replace the heart rate monitor battery, you may need to pair it with the device again.
Replacing the Speed Sensor Battery
The device uses one CR2032 battery. The LED flashes red to indicate a low battery level after two revolutions.
- Locate the circular battery cover 1 on the front of the sensor.
- Twist the cover counter-clockwise until the cover is loose enough to remove.
- Remove the cover and the battery 2.
- Wait 30 seconds.
- Insert the new battery into the cover, observing polarity.
NOTE: Do not damage or lose the O-ring gasket. - Twist the cover clockwise so that the marker on the cover aligns with the marker on the case.
NOTE: The LED flashes red and green for a few seconds after battery replacement. When the LED flashes green and then stops flashing, the device is active and ready to send data.
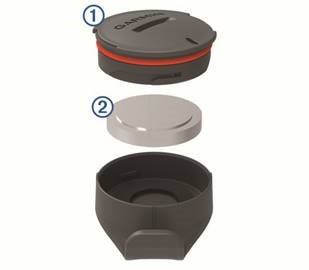
Replacing the Cadence Sensor Battery
The device uses one CR2032 battery. The LED flashes red to indicate a low battery level after two revolutions.
- Locate the circular battery cover on the back of the sensor.
- Twist the cover counter-clockwise until the marker points to unlocked and the cover is loose enough to remove.
- Remove the cover and the battery 2.
- Wait 30 seconds.
- Insert the new battery into the cover, observing polarity.
NOTE: Do not damage or lose the O-ring gasket. - Twist the cover clockwise until the marker points to locked.
NOTE: The LED flashes red and green for a few seconds after battery replacement. When the LED flashes green and then stops flashing, the device is active and ready to send data.
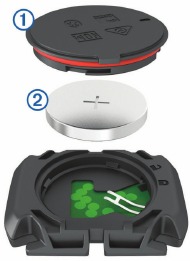
Troubleshooting
Resetting the Device
If the device stops responding, you may need to reset it. This does not erase any of your data or settings.
Hold  for 10 seconds.
The device resets and turns on.
Restoring the Default Settings
You can restore the default configuration settings and activity profiles. This will not remove your history or activity data, such as rides, workouts, and courses.
Select Menu > Settings > System > Device Reset > Reset Default Settings > OK.
Clearing User Data and Settings
You can clear all user data and restore the device to its initial setup. This removes your history and data, such as rides, workouts, and courses, and resets the device settings and activity profiles. This will not remove any files you added to the device from your computer.
Select Menu > Settings > System > Device Reset > Delete Data and Reset Settings > OK.
Maximizing Battery Life
- Turn on Battery Save Mode (Turning On Battery Save Mode).
- Decrease the backlight brightness (Using the Backlight) or shorten the backlight timeout (Display Settings).
- Select the Smart recording interval (Data Recording Settings).
- Turn on the Auto Sleep feature (Using Auto Sleep).
- Turn off the Bluetooth wireless feature (Phone Settings).
- Select the GPS setting (Changing the Satellite Setting).
- Remove wireless sensors that you no longer use.
Turning On Battery Save Mode
Battery save mode adjusts the settings automatically to extend the battery life for longer rides. During an activity, the screen turns off. You can enable automatic alerts and tap the screen to wake it up. Battery save mode records GPS track points and sensor data less frequently. Speed, distance, and track data accuracy are reduced.
NOTE: History is recorded in battery save mode when the timer is running.
- Select Menu > Settings > Battery Save Mode > Enable.
- Select the alerts that wake up the screen during an activity.
My phone will not connect to the device
If your phone will not connect to the device, you can try these tips.
Improving GPS Satellite Reception
- Frequently sync the device to your Garmin Connect account:
- Connect your device to a computer using the USB cable and the Garmin Express™ application.
- Sync your device to the Garmin Connect Mobile app using your Bluetooth enabled smartphone.
- Connect your device to your Garmin Connect account using a Wi‑Fi wireless network.
While connected to your Garmin Connect account, the device downloads several days of satellite data, allowing it to quickly locate satellite signals.
- Take your device outside to an open area away from tall buildings and trees.
- Remain stationary for a few minutes.
My device is in the wrong language
- From the home screen, select .
- Scroll down to the last item in the list, and select .
- Scroll down to the last item in the list, and select .
- Scroll down to the seventh item in the list, and select .
- Scroll down to your language, and select .
 .
.Temperature Readings
The device may display temperature readings that are higher than the actual air temperature if the device is placed in direct sunlight, held in your hand, or is charging with an external battery pack. Also, the device will take some time to adjust to significant changes in temperature.
Replacement O-rings
Replacement bands (O-rings) are available for the mounts.
NOTE: Use Ethylene Propylene Diene Monomer (EPDM) replacement bands only. Go to http://buy.garmin.com, or contact your Garmin dealer.
Viewing Device Information
You can view the unit ID, software version, regulatory information, and license agreement.
Select Setup > About
Updating the Software Using Garmin Connect Mobile
Before you can update your device software using the Garmin Connect Mobile app, you must have a Garmin Connect account, and you must pair the device with a compatible smartphone (Pairing Your Smartphone).
- Synchronize your device with the Garmin Connect Mobile app.
When new software is available, your device alerts you to update the software. - Follow the on-screen instructions.
Select Setup > About.
Updating the Software Using Garmin Express
Before you can update your device software, you must have a Garmin Connect account, and you must download the Garmin Express application.
- Connect the device to your computer using the USB cable.
When new software is available, Garmin Express sends it to your device. - Follow the on-screen instructions.
- Do not disconnect your device from the computer during the update process.
NOTE: If you have already set up your device with Wi‑Fi connectivity, Garmin Connect can automatically download available software updates to your device when it connects using Wi‑Fi.
Product Updates
On your computer, install Garmin Express (www.garmin.com/express). On your smartphone, install the Garmin Connect app.
This provides easy access to these services for Garmin devices:
- Software updates
- Map updates
- Data uploads to Garmin Connect
- Product registration
Getting More Information
- Go to support.garmin.com for additional manuals, articles, and software updates.
- Go to www.garmin.com/intosports.
- Go to www.garmin.com/learningcenter.
- Go to buy.garmin.com, or contact your Garmin dealer for information about optional accessories and replacement parts.
Data Fields
Some data fields require ANT+ accessories to display data.
Balance: The current left/right power balance.
Balance — 10s Avg.: The 10-second moving average of the left/ right power balance.
Balance — 30s Avg.: The 30-second moving average of the left/ right power balance.
Balance — 3s Avg.: The three-second moving average of the left/right power balance.
Balance — Avg.: The average left/right power balance for the current activity.
Balance — Lap: The average left/right power balance for the current lap.
Battery Level: The remaining battery power.
Battery Status: The remaining battery power of a bike light accessory.
Beam Angle Status: The headlight beam mode.
Cadence: Cycling. The number of revolutions of the crank arm. Your device must be connected to a cadence accessory for this data to appear.
Cadence — Avg.: Cycling. The average cadence for the current activity.
Cadence — Lap: Cycling. The average cadence for the current lap.
Calories: The amount of total calories burned.
Calories to Go: During a workout, the remaining calories when you are using a calorie target.
Course Pt. Dist.: The remaining distance to the next point on the course.
Di2 Battery Level: The remaining battery power of a Di2 sensor.
Di2 Shift Mode: The current shift mode of a Di2 sensor.
Dist. — Lap: The distance traveled for the current lap.
Dist. — Last Lap: The distance traveled for the last completed lap.
Dist. to Dest.: The remaining distance to the final destination. You must be navigating for this data to appear.
Dist. to Go: During a workout or course, the remaining distance when you are using a distance target.
Dist. to Next: The remaining distance to the next waypoint on the route. You must be navigating for this data to appear.
Distance: The distance traveled for the current track or activity.
Distance Ahead: The distance ahead or behind the Virtual Partner.
Elevation: The altitude of your current location above or below sea level.
ETA at Destination: The estimated time of day when you will reach the final destination (adjusted to the local time of the destination). You must be navigating for this data to appear.
ETA at Next: The estimated time of day when you will reach the next waypoint on the route (adjusted to the local time of the waypoint). You must be navigating for this data to appear.
Front Gear: The front bike gear from a gear position sensor.
Gear Battery: The battery status of a gear position sensor.
Gear Combo: The current gear combination from a gear position sensor.
Gear Ratio: The number of teeth on the front and rear bike gears, as detected by a gear position sensor.
Gears: The front and rear bike gears from a gear position sensor.
GPS Accuracy: The margin of error for your exact location. For example, your GPS location is accurate to within +/- 3.65 m (12 ft.).
GPS Signal Strength: The strength of the GPS satellite signal.
Grade: The calculation of rise (elevation) over run (distance). For example, if for every 3 m (10 ft.) you climb you travel 60 m (200 ft.), the grade is 5%.
Heading: The direction you are moving.
Heart Rate: Your heart rate in beats per minute (bpm). Your device must be connected to a compatible heart rate monitor.
HR — %HRR: The percentage of heart rate reserve (maximum heart rate minus resting heart rate).
HR — %Max.: The percentage of maximum heart rate.
HR — Avg.: The average heart rate for the current activity.
HR — Avg. %HRR: The average percentage of heart rate reserve (maximum heart rate minus resting heart rate) for the current activity.
HR — Avg. %Max.: The average percentage of maximum heart rate for the current activity.
HR Graph: A line graph showing your current heart rate zone (1 to 5).
HR — Lap: The average heart rate for the current lap.
HR — Lap %HRR: The average percentage of heart rate reserve (maximum heart rate minus resting heart rate) for the current lap.
HR — Lap %Max.: The average percentage of maximum heart rate for the current lap.
HR — Last Lap: The average heart rate for the last completed lap.
HR to Go: During a workout, the amount you are above or below the heart rate target.
HR Zone: The current range of your heart rate (1 to 5). The default zones are based on your user profile and maximum heart rate (220 minus your age).
Laps: The number of laps completed for the current activity.
Light Mode: The light network configuration mode.
Lights Connected: The number of connected lights.
Location at Dest.: The last point on the route or course.
Location at Next: The next point on the route or course.
Odometer: A running tally of distance traveled for all trips. This total does not clear when resetting the trip data.
PCO: The platform center offset. Platform center offset is the location on the pedal platform where force is applied.
PCO — Avg.: The average platform center offset for the current activity.
PCO — Lap: The average platform center offset for the current lap.
Pedal Smoothness: The measurement of how evenly a rider is applying force to the pedals throughout each pedal stroke.
Performance Condition: The performance condition score is a real-time assessment of your ability to perform.
Power: The current power output in watts. Your device must be connected to a compatible power meter.
Power — %FTP: The current power output as a percentage of functional threshold power.
Power — 10s Avg.: The 10-second moving average of power output.
Power — 30s Avg.: The 30-second moving average of power output.
Power — 3s Avg.: The 3-second moving average of power output.
Power — Avg.: The average power output for the current activity.
Power — IF: The Intensity Factor™ for the current activity.
Power — kJ: The accumulated work performed (power output) in kilojoules.
Power — Lap: The average power output for the current lap.
Power — Lap Max.: The top power output for the current lap.
Power — Last Lap: The average power output for the last completed lap.
Power — Max.: The top power output for the current activity.
Power — NP: The Normalized Power™ for the current activity.
Power — NP Lap: The average Normalized Power for the current lap.
Power — NP Last Lap: The average Normalized Power for the last completed lap.
Power Phase — L.: The current power phase angle for the left leg. Power phase is the pedal stroke region where positive power is produced.
Power Phase — L. Avg.: The average power phase angle for the left leg for the current activity.
Power Phase — L. Lap: The average power phase angle for the left leg for the current lap.
Power Phase — L. Peak: The current power phase peak angle for the left leg. Power phase peak is the angle range over which the rider produces the peak portion of the driving force.
Power Phase — L. Peak Avg.: The average power phase peak angle for the left leg for the current activity.
Power Phase — L. Peak Lap: The average power phase peak angle for the left leg for the current lap.
Power Phase — R.: The current power phase angle for the right leg. Power phase is the pedal stroke region where positive power is produced.
Power Phase — R. Avg.: The average power phase angle for the right leg for the current activity.
Power Phase — R. Lap: The average power phase angle for the right leg for the current lap.
Power Phase — R. Peak: The current power phase peak angle for the right leg. Power phase peak is the angle range over which the rider produces the peak portion of the driving force.
Power Phase — R. Peak Avg.: The average power phase peak angle for the right leg for the current activity.
Power Phase — R. Peak Lap: The average power phase peak angle for the right leg for the current lap.
Power — TSS: The Training Stress Score™ for the current activity.
Power — watts/kg: The amount of power output in watts per kilogram.
Power Zone: The current range of power output (1 to 7) based on your FTP or custom settings.
Rear Gear: The rear bike gear from a gear position sensor.
Reps to Go: During a workout, the remaining repetitions.
Speed: The current rate of travel.
Speed — Avg.: The average speed for the current activity.
Speed — Lap: The average speed for the current lap.
Speed — Last Lap: The average speed for the last completed lap.
Speed — Max.: The top speed for the current activity.
Sunrise: The time of sunrise based on your GPS position.
Sunset: The time of sunset based on your GPS position.
Target Power: The target power output during an activity.
Temperature: The temperature of the air. Your body temperature affects the temperature sensor.
Time: The stopwatch time for the current activity.
Time Ahead: The time ahead or behind the Virtual Partner.
Time — Avg. Lap: The average lap time for the current activity.
Time — Elapsed: The total time recorded. For example, if you start the timer and run for 10 minutes, then stop the timer for 5 minutes, then start the timer and run for 20 minutes, your elapsed time is 35 minutes.
Time in Zone: The time elapsed in each heart rate or power zone.
Time — Lap: The stopwatch time for the current lap.
Time — Last Lap: The stopwatch time for the last completed lap.
Time of Day: The time of day based on your current location and time settings (format, time zone, daylight saving time).
Time Seated: The time spent seated while pedaling for the current activity.
Time Seated Lap: The time spent seated while pedaling for the current lap.
Time Standing: The time spent standing while pedaling for the current activity.
Time Standing Lap: The time spent standing while pedaling for the current lap.
Time to Dest.: The estimated time remaining before you reach the destination. You must be navigating for this data to appear.
Time to Go: During a workout, the remaining time when you are using a time target.
Time to Next: The estimated time remaining before you reach the next waypoint in the route. You must be navigating for this data to appear.
Torque Effectiveness: The measurement of how efficiently a rider is pedaling.
Total Ascent: The total elevation distance ascended since the last reset.
Total Descent: The total elevation distance descended since the last reset.
Trainer Resistance: The resistance force applied by an indoor trainer.
Vertical Speed: The rate of ascent or descent over time.
VS — 30s Avg.: The 30-second moving average of vertical speed.
Workout Step: During a workout, the current step out of the total number of steps.
VO2 Max. Standard Ratings
These tables include standardized classifications for VO2 max. estimates by age and gender.
| Males | Percentile | 20–29 | 30–39 | 40–49 | 50–59 | 60–69 | 70–79 |
| Superior | 95 | 55.4 | 54 | 52.5 | 48.9 | 45.7 | 42.1 |
| Excellent | 80 | 51.1 | 48.3 | 46.4 | 43.4 | 39.5 | 36.7 |
| Good | 60 | 45.4 | 44 | 42.4 | 39.2 | 35.5 | 32.3 |
| Fair | 40 | 41.7 | 40.5 | 38.5 | 35.6 | 32.3 | 29.4 |
| Poor | 0–40 | <41.7 | <40.5 | <38.5 | <35.6 | <32.3 | <29.4 |
| Females | Percentile | 20–29 | 30–39 | 40–49 | 50–59 | 60–69 | 70–79 |
| Superior | 95 | 49.6 | 47.4 | 45.3 | 41.1 | 37.8 | 36.7 |
| Excellent | 80 | 43.9 | 42.4 | 39.7 | 36.7 | 33 | 30.9 |
| Good | 60 | 39.5 | 37.8 | 36.3 | 33 | 30 | 28.1 |
| Fair | 40 | 36.1 | 34.4 | 33 | 30.1 | 27.5 | 25.9 |
| Poor | 0–40 | <36.1 | <34.4 | <33 | <30.1 | <27.5 | <25.9 |
Data reprinted with permission from The Cooper Institute. For more information, go to www.CooperInstitute.org.
FTP Ratings
These tables include classifications for functional threshold power (FTP) estimates by gender.
| Males | Watts per Kilogram (W/kg) |
| Superior | 5.05 and greater |
| Excellent | From 3.93 to 5.04 |
| Good | From 2.79 to 3.92 |
| Fair | From 2.23 to 2.78 |
| Untrained | Less than 2.23 |
| Females | Watts per Kilogram (W/kg) |
| Superior | 4.30 and greater |
| Excellent | From 3.33 to 4.29 |
| Good | From 2.36 to 3.32 |
| Fair | From 1.90 to 2.35 |
| Untrained | Less than 1.90 |
FTP ratings are based on research by Hunter Allen and Andrew Coggan, PhD, Training and Racing with a Power Meter (Boulder, CO: VeloPress, 2010).
Heart Rate Zone Calculations
| Zone | % of Maximum Heart Rate | Perceived Exertion | Benefits |
| 1 | 50–60% | Relaxed, easy pace, rhythmic breathing | Beginning-level aerobic training, reduces stress |
| 2 | 60–70% | Comfortable pace, slightly deeper breathing, conversation possible | Basic cardiovascular training, good recovery pace |
| 3 | 70–80% | Moderate pace, more difficult to hold conversation | Improved aerobic capacity, optimal cardiovascular training |
| 4 | 80–90% | Fast pace and a bit uncomfortable, breathing forceful | Improved anaerobic capacity and threshold, improved speed |
| 5 | 90–100% | Sprinting pace, unsustainable for long period of time, labored breathing | Anaerobic and muscular endurance, increased power |
Wheel Size and Circumference
Your speed sensor automatically detects your wheel size. If necessary, you can manually enter your wheel circumference in the speed sensor settings.
The tire size is marked on both sides of the tire. This is not a comprehensive list. You can also measure the circumference of your wheel or use one of the calculators available on the internet.
| Tire Size | Wheel Circumference (mm) |
| 20 × 1.75 | 1515 |
| 20 × 1-3/8 | 1615 |
| 22 × 1-3/8 | 1770 |
| 22 × 1-1/2 | 1785 |
| 24 × 1 | 1753 |
| 24 × 3/4 Tubular | 1785 |
| 24 × 1-1/8 | 1795 |
| 24 × 1.75 | 1890 |
| 24 × 1-1/4 | 1905 |
| 24 × 2.00 | 1925 |
| 24 × 2.125 | 1965 |
| 26 × 7/8 | 1920 |
| 26 × 1-1.0 | 1913 |
| 26 × 1 | 1952 |
| 26 × 1.25 | 1953 |
| 26 × 1-1/8 | 1970 |
| 26 × 1.40 | 2005 |
| 26 × 1.50 | 2010 |
| 26 × 1.75 | 2023 |
| 26 × 1.95 | 2050 |
| 26 × 2.00 | 2055 |
| 26 × 1-3/8 | 2068 |
| 26 × 2.10 | 2068 |
| 26 × 2.125 | 2070 |
| 26 × 2.35 | 2083 |
| 26 × 1-1/2 | 2100 |
| 26 × 3.00 | 2170 |
| 27 × 1 | 2145 |
| 27 × 1-1/8 | 2155 |
| 27 × 1-1/4 | 2161 |
| 27 × 1-3/8 | 2169 |
| 29 x 2.1 | 2288 |
| 29 x 2.2 | 2298 |
| 29 x 2.3 | 2326 |
| 650 x 20C | 1938 |
| 650 x 23C | 1944 |
| 650 × 35A | 2090 |
| 650 × 38B | 2105 |
| 650 × 38A | 2125 |
| 700 × 18C | 2070 |
| 700 × 19C | 2080 |
| 700 × 20C | 2086 |
| 700 × 23C | 2096 |
| 700 × 25C | 2105 |
| 700C Tubular | 2130 |
| 700 × 28C | 2136 |
| 700 × 30C | 2146 |
| 700 × 32C | 2155 |
| 700 × 35C | 2168 |
| 700 × 38C | 2180 |
| 700 × 40C | 2200 |
| 700 × 44C | 2235 |
| 700 × 45C | 2242 |
| 700 × 47C | 2268 |
support.garmin.com
All rights reserved. Under the copyright laws, this manual may not be copied, in whole or in part, without the written consent of Garmin. Garmin reserves the right to change or improve its products and to make changes in the content of this manual without obligation to notify any person or organization of such changes or improvements. Go to www.garmin.com for current updates and supplemental information concerning the use of this product.
Garmin®, the Garmin logo, ANT+®, Auto Lap®, Auto Pause®, Edge®, Forerunner®, and Virtual Partner® are trademarks of Garmin Ltd. or its subsidiaries, registered in the USA and other countries. Connect IQ™, Garmin Connect™, Garmin Express™, Garmin Index™, Varia™, Varia Vision™, and Vector™ are trademarks of Garmin Ltd. or its subsidiaries. These trademarks may not be used without the express permission of Garmin.
Android™ is a trademark of Google Inc. Apple® and Mac®are trademarks of Apple, Inc., registered in the U.S. and other countries. The Bluetooth® word mark and logos are owned by the Bluetooth SIG, Inc. and any use of such marks by Garmin is under license. The Cooper Institute®, as well as any related trademarks, are the property of The Cooper Institute. Advanced heartbeat analytics by Firstbeat. Di2™ is a trademark of Shimano, Inc. Shimano® is a registered trademark of Shimano, Inc. Training Stress Score™ (TSS), Intensity Factor™ (IF), and Normalized Power™ (NP) are trademarks of Peaksware, LLC. STRAVA and Strava™ are trademarks of Strava, Inc. Windows® is a registered trademark of Microsoft Corporation in the United States and other countries. Other trademarks and trade names are those of their respective owners.
This product is ANT+®certified. Visit www.thisisant.com/directory for a list of compatible products and apps. M/N: A03485
© 2019 Garmin Ltd. or its subsidiaries

Documents / Resources
References
Download manual
Here you can download full pdf version of manual, it may contain additional safety instructions, warranty information, FCC rules, etc.
Download Garmin EDGE 530 Manual
Introduction
See the Important Safety and Product Information guide in the product box for product warnings and other important information.
Always consult your physician before you begin or modify any exercise program.
Device Overview
| 1 | |
Select to enter sleep mode and wake the device. Hold to turn the device on and off. |
| 2 | |
Select to scroll through the data screens, options, and settings. From the home screen, select to view the status page. |
| 3 | |
Select to scroll through the data screens, options, and settings. From the home screen, select to view the device menu. |
| 4 | |
Select to mark a new lap. |
| 5 | |
Select to start and stop the activity timer. |
| 6 | |
Select to return to the previous screen. Hold to return to the home screen. |
| 7 | |
Select to choose an option or to acknowledge a message. During a ride, select to view menu options such as alerts and data fields. When appears on the screen, hold to access additional features. |
| 8 | Electrical contacts | Charge using an Edge external battery pack accessory. |
NOTE: Go to www.buy.garmin.com to purchase optional accessories.
Pairing Your Smartphone
To use the connected features of the Edge device, it must be paired directly through the Garmin Connect™ app, instead of from the Bluetooth® settings on your smartphone.
- From the app store on your smartphone, install and open the Garmin Connect app.
- Hold to turn on the device.
The first time you turn on the device, you will select the device language. The next screen prompts you to pair with your smartphone.
TIP: You can select Menu > Settings > Phone > Pair Smartphone to manually enter pairing mode. - Select an option to add your device to your Garmin Connect account:
After you pair successfully, a message appears, and your device syncs automatically with your smartphone.
Viewing the Status Page
The status page displays the connection status of the GPS, wireless sensors, and your smartphone.
Select an option:
The status page appears. A flashing icon means the device is searching for a signal. A solid icon means the signal was found or the sensor is connected.
Charging the Device
NOTICE
To prevent corrosion, thoroughly dry the USB port, the weather cap, and the surrounding area before charging or connecting to a computer.
The device is powered by a built-in lithium-ion battery that you can charge using a standard wall outlet or a USB port on your computer.
NOTE: The device will not charge when outside the approved temperature range (Edge Specifications).
- Pull up the weather cap 1 from the USB port 2.
- Plug the small end of the USB cable into the USB port on the device.
- Plug the large end of the USB cable into an AC adapter or a computer USB port.
- Plug the AC adapter into a standard wall outlet.
When you connect the device to a power source, the device turns on. - Charge the device completely.
After you charge the device, close the weather cap.
About the Battery
This device contains a lithium-ion battery. See the Important Safety and Product Information guide in the product box for product warnings and other important information.
Installing the Standard Mount
For the best GPS reception, position the bike mount so the front of the device is oriented toward the sky. You can install the bike mount on the stem or the handlebars.
- Select a secure location to mount the device where it does not interfere with the safe operation of your bike.
- Place the rubber disk 1 on the back of the bike mount.
The rubber tabs align with the back of the bike mount so it stays in place. - Place the bike mount on the bike stem.
- Attach the bike mount securely using the two bands 2.
- Align the tabs on the back of the device with the bike mount notches 3.
- Press down slightly and turn the device clockwise until it locks into place.
Installing the Out-Front Mount
NOTE: If you do not have this mount, you can skip this task.
- Select a secure location to mount the Edge device where it does not interfere with the safe operation of your bike.
- Use the hex key to remove the screw 1 from the handlebar connector 2.
- Place the rubber pad around the handlebar:
- If the handlebar diameter is 25.4 mm, use the thicker pad.
- If the handlebar diameter is 31.8 mm, use the thinner pad.
- Place the handlebar connector around the rubber pad.
- Replace and tighten the screw.
NOTE: Garmin® recommends tightening the screw so the mount is secure, with a maximum torque specification of 7 lbf-in. (0.8 N-m). You should check the tightness of the screw periodically. - Align the tabs on the back of the Edge device with the bike mount notches 3.
- Press down slightly and turn the Edge device clockwise until it locks into place.
Releasing the Edge
- Turn the Edge clockwise to unlock the device.
- Lift the Edge off the mount.
Installing the Mountain Bike Mount
NOTE: If you do not have this mount, you can skip this task.
- Select a secure location to mount the Edge device where it does not interfere with the safe operation of your bike.
- Use the 3 mm hex key to remove the screw 1 from the handlebar connector 2.
- Select an option:
- If the handlebar diameter is 25.4 mm, place the thicker pad around the handlebar.
- If the handlebar diameter is 31.8 mm, place the thinner pad around the handlebar.
- If the handlebar diameter is 35 mm, do not use a rubber pad.
- Place the handlebar connector around the handlebar, so that the mount arm is above the bike stem.
- Use the 3 mm hex key to loosen the screw 3 on the mount arm, position the mount arm, and tighten the screw.
NOTE: Garmin recommends tightening the screw so the mount arm is secure, with a maximum torque specification of 20 lbf-in. (2.26 N-m). You should check the tightness of the screw periodically. - If necessary, use the 2 mm hex key to remove the two screws on the back side of the mount 4, remove and rotate the connector, and replace the screws to change the orientation of the mount.
- Replace and tighten the screw on the handlebar connector.
NOTE: Garmin recommends tightening the screw so the mount is secure, with a maximum torque specification of 7 lbf-in. (0.8 N-m). You should check the tightness of the screw periodically. - Align the tabs on the back of the Edge device with the bike mount notches 5.
- Press down slightly and turn the Edge device clockwise until it locks into place.
Acquiring Satellite Signals
The device may need a clear view of the sky to acquire satellite signals. The time and date are set automatically based on the GPS position.
- Go outdoors to an open area.
The front of the device should be oriented toward the sky. - Wait while the device locates satellites.
It may take 30–60 seconds to locate satellite signals.
Using the Backlight
You can select any key to turn on the backlight.
NOTE: You can adjust the backlight timeout (Display Settings).
- Select Menu > Settings > System > Display.
- Select an option:
Training
Going for a Ride
If your device was packaged with a wireless sensor, they are already paired and can be activated during initial setup.
- Hold to turn on the device.
- Go outside, and wait while the device locates satellites.
The satellite bars turn green when the device is ready. - From the home screen, select .
- Select an activity profile.
- Select to start the activity timer.
NOTE: History is recorded only while the activity timer is running. - Select or for additional data screens.
- If necessary, select to view menu options such as alerts and data fields.
- Select to stop the activity timer.
TIP: Before you save this ride and share it on your Garmin Connect account, you can change the ride type. Accurate ride type data is important for creating bike friendly courses. - Select Save Ride.
Shortcut menu options are available for data screens and accessory features. During a ride, appears on the data screens.
Select to view the shortcut menu options.
Using Virtual Partner®
Your Virtual Partner is a training tool designed to help you meet your goals.
- If necessary, enable the Virtual Partner screen for the activity profile (Customizing the Data Screens).
- Go for a ride.
- Select to view the Virtual Partner screen to see who is leading.
- If necessary, select > Virtual Partner Speed to adjust the speed of the Virtual Partner during your ride.
Segments
Following a segment: You can send segments from your Garmin Connect account to your device. After a segment is saved to your device, you can follow the segment.
NOTE: When you download a course from your Garmin Connect account, all segments in the course are downloaded automatically.
Racing a segment: You can race a segment, trying to match or exceed your personal record or other cyclists who have ridden the segment.
Strava™ Segments
You can download Strava segments to your Edge 530 device. Follow Strava segments to compare your performance with your past rides, friends, and pros who have ridden the same segment.
To sign up for a Strava membership, go to the segments widget in your Garmin Connect account. For more information, go to www.strava.com.
The information in this manual applies to both Garmin Connect segments and Strava segments.
Following a Segment From Garmin Connect
Before you can download and follow a segment from Garmin Connect, you must have a Garmin Connect account (Garmin Connect).
- Connect the device to your computer using the USB cable.
NOTE: If you are using Strava segments, your favorite segments are transferred automatically to your device when it is connected to Garmin Connect Mobile or your computer. - Go to connect.garmin.com.
- Create a new segment, or select an existing segment.
- Select Send to Device.
- Disconnect the device, and turn it on.
- Select Menu > Training > Segments.
- Select the segment.
- Select Ride.
Enabling Segments
You can enable segment racing and prompts that alert you to approaching segments.
- Select Menu > Training > Segments.
- Select a segment.
- Select Enable.
NOTE: Prompts alerting you to approaching segments appear only for enabled segments.
Racing a Segment
Segments are virtual race courses. You can race a segment, and compare your performance to past activities, other riders’ performance, connections in your Garmin Connect account, or other members of the cycling community. You can upload your activity data to your Garmin Connect account to view your segment position.
NOTE: If your Garmin Connect account and Strava account are linked, your activity is automatically sent to your Strava account so you can review the segment position.
- Select to start the activity timer, and go for a ride.
When your path crosses an enabled segment, you can race the segment. - Start racing the segment.
The segment data screen appears automatically. - If necessary, select to change your goal during your race.
You can race against the segment leader, your past performance, or other riders (if applicable). The goal automatically adjusts based on your current performance.
A message appears when the segment is complete.
Viewing Segment Details
- Select Menu > Training > Segments.
- Select a segment.
- Select an option:
- Select Map to view the segment on the map.
- Select Elevation to view an elevation plot of the segment.
- Select Leaderboard to view the ride times and average speeds for the segment leader, group leader or challenger, your personal best time and average speed, and other riders (if applicable).
TIP: You can select a leaderboard entry to change your segment race goal.
Segment Options
Select Menu > Training > Segments > Segment Options.
Turn Guidance: Enables or disables turn prompts.
Auto Select Effort: Enables or disables automatic goal adjustment based on your current performance.
Search: Allows you to search for saved segments by name.
Enable/Disable: Enables or disables the segments currently loaded on the device.
Delete: Allows you to delete all or multiple saved segments from the device.
Deleting a Segment
- Select Menu > Training > Segments.
- Select a segment.
- Select Delete > OK.
Workouts
You can create custom workouts that include goals for each workout step and for varied distances, times, and calories. You can create workouts using Garmin Connect or select a training plan that has built-in workouts from Garmin Connect, and transfer them to your device.
You can schedule workouts using Garmin Connect. You can plan workouts in advance and store them on your device.
Following a Workout From the Web
Before you can download a workout from Garmin Connect, you must have a Garmin Connect account (Garmin Connect).
- Connect the device to your computer.
- Go to www.garminconnect.com.
- Create and save a new workout.
- Select Send to Device, and follow the on-screen instructions.
- Disconnect the device.
Starting a Workout
Before you can start a workout, you must download a workout from your Garmin Connect account.
- Select Menu > Training > Workouts.
- Select a workout.
- Select Ride.
- Select to start the timer.
After you begin a workout, the device displays each step of the workout, the target (if any), and current workout data.
Stopping a Workout
TIP: When you save your ride, your workout ends automatically.
Deleting Workouts
- Select Menu > Training > Workouts > Workout Options > Delete Multiple.
- Select one or more workouts.
- Select Delete Workouts > OK.
About the Training Calendar
The training calendar on your device is an extension of the training calendar or schedule you set up in Garmin Connect. After you have added a few workouts to the Garmin Connect calendar, you can send them to your device. All scheduled workouts sent to the device appear in the training calendar list by date. When you select a day in the training calendar, you can view or do the workout. The scheduled workout stays on your device whether you complete it or skip it. When you send scheduled workouts from Garmin Connect, they overwrite the existing training calendar.
Using Garmin Connect Training Plans
Before you can download and use a training plan from Garmin Connect, you must have a Garmin Connect account (Garmin Connect).
You can browse Garmin Connect to find a training plan, schedule workouts and courses, and download the plan to your device.
- Connect the device to your computer.
- Go to www.garminconnect.com.
- Select and schedule a training plan.
- Review the training plan in your calendar.
- Select , and follow the on-screen instructions.
Interval Workouts
You can create interval workouts based on distance or time. The device saves your custom interval workout until you create another interval workout. You can use open intervals when you are riding a known distance. When you select , the device records an interval and moves to a rest interval.
Creating an Interval Workout
- Select Menu > Training > Intervals > Edit > Intervals > Type.
- Select Distance, Time, or Open.
TIP: You can create an open-ended interval by setting the type to Open. - Select Duration, enter a distance or time interval value for the workout, and select .
- Select Rest > Type.
- Select Distance, Time, or Open.
- If necessary, enter a distance or time value for the rest interval, and select .
- Select one or more options:
- To set the number of repetitions, select Repeat.
- To add an open-ended warm up to your workout, select Warm Up > On.
- To add an open-ended cool down to your workout, select Cool Down > On.
Starting an Interval Workout
- Select Menu > Training > Intervals > Ride.
- Select to start the timer.
- When your interval workout has a warm up, select to begin the first interval.
- Follow the on-screen instructions.
When you complete all of the intervals, a message appears.
Training Indoors
The device includes an indoor activity profile where GPS is turned off. You can turn off GPS when you are training indoors or to save battery life.
NOTE: Any change to the GPS setting is saved to the active profile.
- Select Menu > Settings > Activity Profiles.
- Select a profile.
- Select GPS Mode > Off.
When GPS is turned off, speed and distance are not available unless you have a compatible sensor or indoor trainer that sends speed and distance data to the device.
Pairing Your ANT+® Indoor Trainer
- Bring the device within 3 m (10 ft.) of the ANT+ indoor trainer.
- Select Menu > Training > Indoor Trainer > Pair ANT+ Bike Trainer.
- Select the indoor trainer to pair with your device.
- Select Add Sensor.
When the indoor trainer is paired with your device, the indoor trainer appears as a connected sensor. You can customize your data fields to display sensor data.
Using an ANT+ Indoor Trainer
Before you can use a compatible ANT+ indoor trainer, you must mount your bike on the trainer and pair it with your device (Pairing Your ANT+® Indoor Trainer).
You can use your device with an indoor trainer to simulate resistance while following a course, activity, or workout. While using an indoor trainer, GPS is turned off automatically.
- Select Menu > Training > Indoor Trainer.
- Select an option:
- Select Follow a Course to follow a saved course (Courses).
- Select Follow an Activity to follow a saved ride (Going for a Ride).
- Select Follow a Workout to follow a power-based workout downloaded from your Garmin Connect account (Workouts).
- Select a course, activity, or workout.
- Select Ride.
- Select an activity profile.
- Select to start the timer.
The trainer increases or decreases resistance based on the elevation information in the course or ride. - Select to view the trainer screen.
You can view the level of resistance 1, your distance ahead of or behind 2, and your time ahead of or behind 3 the distance and time originally recorded for the course or activity.
Setting Resistance
- Select Menu > Training > Indoor Trainer > Set Resistance.
- Select or to set the resistance force applied by the trainer.
- Select an activity profile.
- Start pedaling.
- If necessary, select > Set Resistance to adjust the resistance during your activity.
Setting Target Power
- Select Menu > Training > Indoor Trainer > Set Target Power.
- Set the target power value.
- Select an activity profile.
- Start pedaling.
The resistance force applied by the trainer is adjusted to maintain a constant power output based on your speed. - If necessary, select or to adjust the target power output during your activity.
Setting a Training Target
The training target feature works with the Virtual Partner feature so you can train toward a set distance, distance and time, or distance and speed goal. During your training activity, the device gives you real-time feedback about how close you are to achieving your training target.
- Select Menu > Training > Set a Target.
- Select an option:
- Select Distance Only to select a preset distance or enter a custom distance.
- Select Distance and Time to select a distance and time target.
- Select Distance and Speed to select a distance and speed target.
The training target screen appears, indicating your estimated finish time. The estimated finish time is based on your current performance and the time remaining.
- Select .
- Select to start the activity timer.
- If necessary, scroll to view the Virtual Partner screen.
- After you complete your activity, select > Save Ride.
Cancelling a Training Target
Select > Cancel Target > OK.
Personal Records
When you complete a ride, the device displays any new personal records you achieved during that ride. Personal records include your fastest time over a standard distance, longest ride, and most ascent gained during a ride. When paired with a compatible power meter, the device displays the maximum power reading recorded during a 20-minute period.
Viewing Your Personal Records
Select Menu > My Stats > Personal Records.
Reverting a Personal Record
You can set each personal record back to the one previously recorded.
- Select Menu > My Stats > Personal Records.
- Select a record to revert.
- Select Previous Record > OK.
NOTE: This does not delete any saved activities.
Deleting All Personal Records
Select Menu > My Stats > Personal Records > Delete All > OK.
NOTE: This does not delete any saved activities.
Training Zones
- Heart rate zones (Setting Your Heart Rate Zones)
- Power zones (Setting Your Power Zones)
Navigation
Navigation features and settings also apply to navigating courses (Courses) and segments (Segments).
- Locations (Locations)
- Map settings (Map Settings)
Locations
You can record and store locations in the device.
Marking Your Location
Before you can mark a location, you must locate satellites.
A location is a point that you record and store in the device. If you want to remember landmarks or return to a certain spot, you can mark a location.
- Go for a ride.
- Select > Mark Location > OK.
Navigating to a Saved Location
Before you can navigate to a saved location, you must locate satellites.
- Select Menu > Navigation > Saved Locations.
- Select a location.
- Select View Map.
- Select Ride.
- Follow the on-screen instructions to your destination.
Editing Locations
- Select Menu > Navigation > Saved Locations.
- Select a location.
- Select Edit.
- Select a location detail.
For example, select Change Elevation to enter a known altitude for the location. - Edit the value, and select .
Deleting a Location
- Select Menu > Navigation > Saved Locations.
- Select a location.
- Select Delete Location > OK.
Setting Your Elevation
If you have accurate elevation data for your present location, you can manually calibrate the altimeter on your device.
- Go for a ride.
- Select > Set Elevation.
- Enter the elevation, and select .
Courses
Following a previously recorded activity: You can follow a saved course simply because it is a good route. For example, you can save and follow a bike friendly commute to work.
Racing against a previously recorded activity: You can also follow a saved course, trying to match or exceed previously set performance goals. For example, if the original course was completed in 30 minutes, you can race against a Virtual Partner trying to complete the course in under 30 minutes.
Following an existing ride from Garmin Connect: You can send a course from Garmin Connect to your device. Once it is saved to your device, you can follow the course or race against the course.
Creating a Course on Your Device
Before you can create a course, you must have an activity with GPS data saved to your device.
- Select Menu > Navigation > Courses > Course Options > Create New.
- Select an activity on which to base your course.
- Enter a name for the course, and select .
The course appears in the list. - Select the course, and review the course details.
- If necessary, select Settings to edit the course details.
For example, you can change the name or color of the course. - Select > Ride.
Following a Course From Garmin Connect
Before you can download a course from Garmin Connect, you must have a Garmin Connect account (Garmin Connect).
- Select an option:
- Open the Garmin Connect app.
- Go to connect.garmin.com.
- Create a new course, or select an existing course.
- Select Send to Device.
- Follow the on-screen instructions.
- On the Edge device, select Menu > Navigation > Courses.
- Select the course.
- Select Ride.
Tips for Riding a Course
- Use turn guidance (Course Options).
- If you include a warmup, select to begin the course, and warm up as normal.
- Stay away from your course path as you warm up.
When you are ready to begin, head toward your course. When you are on any part of the course path, a message appears. - Scroll to the map to view the course map.
If you stray from the course, a message appears.
Viewing Course Details
- Select Menu > Navigation > Courses.
- Select a course.
- Select an option:
- Select Summary to view details about the course.
- Select Map to view the course on the map.
- Select Elevation to view an elevation plot of the course.
- Select Laps to select a lap and view additional information about each lap.
Displaying a Course on the Map
For each course saved to your device, you can customize how it appears on the map. For example, you can set your commute course to always display on the map in yellow. You can have an alternate course display in green. This allows you to see the courses while you are riding, but not follow or navigate a particular course.
- Select Menu > Navigation > Courses.
- Select the course.
- Select Settings.
- Select Always Display to make the course appear on the map.
- Select Color, and select a color.
- Select Course Points to include course points on the map.
The next time you ride near the course, it appears on the map.
Course Options
Select Menu > Navigation > Courses > Course Options.
Turn Guidance: Enables or disables turn prompts.
Off Crs. Warnings: Alerts you if you stray from the course.
Search: Allows you to search for saved courses by name.
Filter: Allows you to filter by course type, such as Strava courses.
Delete: Allows you to delete all or multiple saved courses from the device.
Stopping a Course
Select > Stop Course > OK.
Deleting a Course
- Select Menu > Navigation > Courses.
- Select a course.
- Select Delete > OK
Zooming the Map
- Go for a ride.
- Select to view the map.
- Select > Zoom Map In/Out.
- Select an option:
- Enable Auto Zoom to automatically set a zoom level for the map.
- Disable Auto Zoom to zoom in or out manually.
- If necessary, select Set Zoom Level.
- Select an option:
- Select to save the zoom level (optional).
Map Settings
Select Menu > Settings > Activity Profiles, select a profile, and select Navigation > Map.
Orientation: Sets how the map is shown on the page.
Auto Zoom: Automatically selects a zoom level for the map. When Off is selected, you must zoom in or out manually.
Guide Text: Sets when the turn-by-turn navigation prompts are shown (requires routable maps).
Map Visibility: Allows you to set advanced map features.
Map Information: Enables or disables the maps currently loaded on the device.
Changing the Map Orientation
- Select Menu > Settings > Activity Profiles.
- Select a profile.
- Select Navigation > Map > Orientation.
- Select an option:
- Select North Up to show north at the top of the page.
- Select Track Up to show your current direction of travel at the top of the page.
- Select 3D Mode to display the map in three dimensions.
Route Settings
Select Menu > Settings > Activity Profiles, select a profile, and select Navigation > Routing.
Popularity Routing: Calculates routes based on the most popular rides from Garmin Connect.
Routing Mode: Sets the transportation method to optimize your route.
Calculation Method: Sets the method used to calculate your route.
Lock on Road: Locks the position icon, which represents your position on the map, onto the nearest road.
Avoidance Setup: Sets the road types to avoid while navigating.
Recalculation: Automatically recalculates the route when you deviate from the route.
Selecting an Activity for Route Calculation
You can set the device to calculate the route based on activity type.
- Select Menu > Settings > Activity Profiles.
- Select a profile.
- Select Navigation > Routing > Routing Mode.
- Select an option to calculate your route.
For example, you can select Road Cycling for on-road navigation or Mountain Biking for off-road navigation.
Bluetooth Connected Features
The Edge device has several Bluetooth connected features for your compatible smartphone using the Garmin Connect and Connect IQ™ apps. Go to www.garmin.com/apps for more information.
Activity uploads to Garmin Connect: Automatically sends your activity to Garmin Connect as soon as you finish recording the activity.
Assistance: Allows you to send an automated text message with your name and GPS location to your emergency contacts using the Garmin Connect app.
Audio prompts: Allows the Garmin Connect app to play status announcements on your smartphone during a ride.
Bike alarm: Allows you to enable an alarm that sounds on the device and sends an alert to your smartphone when the device detects motion.
Connect IQ downloadable features: Allows you to download Connect IQ features from the Connect IQ app.
Course, segment, and workout downloads from Garmin Connect: Allows you to search for activities on Garmin Connect using your smartphone and send them to your device.
Device to device transfers: Allows you to wirelessly transfer files to another compatible Edge device.
Find my Edge: Locates your lost Edge device that is paired with your smartphone and currently within range.
GroupTrack: Allows you to keep track of other riders in your group using LiveTrack directly on screen and in real time. You can send preset messages to other riders in your GroupTrack session who have a compatible Edge device.
Incident detection: Allows the Garmin Connect app to send a message to your emergency contacts when the Edge device detects an incident.
LiveTrack: Allows friends and family to follow your races and training activities in real time. You can invite followers using email or social media, allowing them to view your live data on a Garmin Connect tracking page.
Messages: Allows you to reply to an incoming call or text message with a preset text message. This feature is available with compatible Android™ smartphones.
Notifications: Displays phone notifications and messages on your device.
Social media interactions: Allows you to post an update to your favorite social media website when you upload an activity to Garmin Connect.
Weather updates: Sends real-time weather conditions and alerts to your device.
Starting a GroupTrack Session
Before you can start a GroupTrack session, you must have a smartphone with the Garmin Connect Mobile app paired to your device (Pairing Your Smartphone).
During a ride, you can see the riders in your GroupTrack session on the map.
- On the Edge device, select Menu > Settings > GroupTrack to enable viewing connections on the map screen.
- In the Garmin Connect Mobile app, from the settings menu, select LiveTrack > GroupTrack.
- Select Visible to > All Connections.
NOTE: If you have more than one compatible device, you must select a device for the GroupTrack session. - Select Start LiveTrack.
- On the Edge device, select , and go for a ride.
- Scroll to the map to view your connections.
You can tap an icon on the map to view location and heading information for other riders in the GroupTrack session. - Scroll to the GroupTrack list.
You can select a rider from the list, and that rider appears centered on the map.
Tips for GroupTrack Sessions
The GroupTrack feature allows you to keep track of other riders in your group using LiveTrack directly on the screen. All riders in the group must be your connections in your Garmin Connect account.
- Ride outside using GPS.
- Pair your Edge 530 device with your smartphone using Bluetooth technology.
- In the Garmin Connect Mobile app, from the settings menu, select Connections to update the list of riders for your GroupTrack session.
- Make sure all of your connections pair to their smartphones and start a LiveTrack session in the Garmin Connect Mobile app.
- Make sure all your connections are in range (40 km or 25 mi.).
- During a GroupTrack session, scroll to the map to view your connections.
- Stop riding before you attempt to view location and heading information for other riders in the GroupTrack session.
Transferring Files to Another Edge Device
You can transfer courses, segments, and workouts wirelessly from one compatible Edge device to another using Bluetooth technology.
- Turn on both Edge devices, and bring them within range (3 m) of each other.
- From the device that contains the files, select Menu > Settings > Device Transfers > Share Files.
- Select a file type to share.
- Select one or more files to transfer.
- From the device that receives the files, select Menu > Settings > Device Transfers.
- Select a nearby connection.
- Select one or more files to receive.
A message appears on both devices after the file transfer is complete.
Playing Audio Prompts on Your Smartphone
Before you can set up audio prompts, you must have a smartphone with the Garmin Connect Mobile app paired to your Edge device.
You can set the Garmin Connect Mobile app to play motivational status announcements on your smartphone during a ride or other activity. Audio prompts include the lap number and lap time, navigation, power, pace or speed, and heart-rate data. During an audio prompt, the Garmin Connect mobile app mutes the primary audio of the smartphone to play the announcement. You can customize the volume levels on the Garmin Connect Mobile app.
- From the settings in the Garmin Connect Mobile app, select Garmin Devices.
- Select your device.
- Select Device Settings > Audio Prompts.
Incident Detection and Assistance Features
Incident Detection
Incident detection is a supplemental feature primarily designed for road use. Incident detection should not be relied on as a primary method to obtain emergency assistance. The Garmin Connect Mobile app does not contact emergency services on your behalf.
When an incident is detected by your Edge device with GPS enabled, the Garmin Connect Mobile app can send an automated text message and email with your name and GPS location to your emergency contacts.
A message appears on your device and paired smartphone indicating your contacts will be informed after 30 seconds have elapsed. If assistance is not needed, you can cancel the automated emergency message.
Before you can enable incident detection on your device, you must set up emergency contact information in the Garmin Connect Mobile app. Your paired smartphone must be equipped with a data plan and be in an area of network coverage where data is available. Your emergency contacts must be able to receive text messages (standard text messaging rates may apply).
Assistance
Assistance is a supplemental feature and should not be relied on as a primary method to obtain emergency assistance. The Garmin Connect Mobile app does not contact emergency services on your behalf.
When your Edge device with GPS enabled is connected to the Garmin Connect Mobile app, you can send an automated text message with your name and GPS location to your emergency contacts.
Before you can enable the assistance feature on your device, you must set up emergency contact information in the Garmin Connect Mobile app. Your Bluetooth paired smartphone must be equipped with a data plan and be in an area of network coverage where data is available. Your emergency contacts must be able to receive text messages (standard text messaging rates may apply).
A message appears on your device indicating your contacts will be informed after a countdown has elapsed. If assistance is not needed, you can cancel the message.
Setting Up the Incident Detection and Assistance Features
- From the app store on your smartphone, install and open the Garmin Connect Mobile app.
- Pair your smartphone with your device (Pairing Your Smartphone).
- From the app settings in the Garmin Connect Mobile app, select Emergency Contacts, and enter your rider information and your emergency contacts.
Your selected contacts receive a message identifying them as emergency contacts.
NOTE: When you enter emergency contacts, incident detection is automatically enabled on your device. - Enable GPS on your Edge device (Changing the Satellite Setting).
Viewing Your Emergency Contacts
Before you can view your emergency contacts on your device, you must set up your rider information and emergency contacts in the Garmin Connect Mobile app.
Select Menu > Contacts.
Your emergency contacts’ names and phone numbers appear.
Requesting Assistance
Before you can request assistance, you must enable GPS on your Edge device.
- Hold for four seconds to activate the assistance feature.
The device beeps, and sends the message after the fivesecond countdown is complete.
TIP: You can select before the countdown is complete to cancel the message. - If necessary, select to send the message immediately.
Turning Incident Detection On and Off
Select Menu > Settings > System > Incident Detection.
Cancelling an Automated Message
When an incident is detected by your device, you can cancel the automated emergency message on your device or your paired smartphone before it is sent to your emergency contacts.
Select Cancel > Yes before the end of the thirty-second countdown.
Sending a Status Update After an Incident
Before you can send a status update to your emergency contacts, your device must detect an incident and send an automated emergency message to your emergency contacts.
You can send a status update to your emergency contacts informing them you are not in need of assistance.
From the status page, select Incident Detected > I’m Okay.
A message is sent to all emergency contacts.
Wireless Sensors
Your device can be used with wireless ANT+ or Bluetooth sensors. For more information about compatibility and purchasing optional sensors, go to buy.garmin.com.
Putting On the Heart Rate Monitor
NOTE: If you do not have a heart rate monitor, you can skip this task.
You should wear the heart rate monitor directly on your skin, just below your sternum. It should be snug enough to stay in place during your activity.
- Snap the heart rate monitor module 1 onto the strap.
The Garmin logos on the module and the strap should be right-side up. - Wet the electrodes 2 and the contact patches 3 on the back of the strap to create a strong connection between your chest and the transmitter.
- Wrap the strap around your chest, and connect the strap hook 4 to the loop 5.
NOTE: The care tag should not fold over.
The Garmin logos should be right-side up. - Bring the device within 3 m (10 ft.) of the heart rate monitor.
After you put on the heart rate monitor, it is active and sending data.
TIP: If the heart rate data is erratic or does not appear, see the troubleshooting tips (Tips for Erratic Heart Rate Data).
Recovery Time
You can use your Garmin device with wrist-based heart rate or a compatible chest heart rate monitor to display how much time remains before you are fully recovered and ready for the next hard workout.
NOTE: The recovery time recommendation uses your VO2 max. estimate and may seem inaccurate at first. The device requires you to complete a few activities to learn about your performance.
The recovery time appears immediately following an activity. The time counts down until it is optimal for you to attempt another hard workout.
Viewing Your Recovery Time
Before you can use the recovery time feature, you must put on the heart rate monitor, and pair it with your device (Pairing Your Wireless Sensors). If your device was packaged with a heart rate monitor, the device and sensor are already paired. For the most accurate estimate, complete the user profile setup (Setting Up Your User Profile), and set your maximum heart rate (Setting Your Heart Rate Zones).
- Select Menu > My Stats > Recovery Advisor > Enable.
- Go for a ride.
- After your ride, select Save Ride.
The recovery time appears. The maximum time is 4 days, and the minimum time is 6 hours.
About VO2 Max. Estimates
VO2 max. is the maximum volume of oxygen (in milliliters) you can consume per minute per kilogram of body weight at your maximum performance. In simple terms, VO2 max. is an indication of athletic performance and should increase as your level of fitness improves. VO2 max. estimates are provided and supported by Firstbeat. You can use your Garmin device paired with a compatible heart rate monitor and power meter to display your cycling VO2 max. estimate.
Getting Your VO2 Max. Estimate
Before you can view your VO2 max. estimate, you must put on the heart rate monitor, install the power meter, and pair them with your device (Pairing Your Wireless Sensors). If your device was packaged with a heart rate monitor, the device and sensor are already paired. For the most accurate estimate, complete the user profile setup (Setting Up Your User Profile), and set your maximum heart rate (Setting Your Heart Rate Zones).
NOTE: The estimate may seem inaccurate at first. The device requires a few rides to learn about your cycling performance.
- Ride at a steady, high intensity for at least 20 minutes outdoors.
- After your ride, select Save Ride.
- Select Menu > My Stats > Training Status > VO2 Max..
Your VO2 max. estimate appears as a number and position on the color gauge.
VO2 max. data and analysis is provided with permission from The Cooper Institute®. For more information, see the appendix (VO2 Max. Standard Ratings), and go to www.CooperInstitute.org.
Tips for Cycling VO2 Max. Estimates
The success and accuracy of the VO2 max. calculation improves when your ride is a sustained and moderately hard effort, and where heart rate and power are not highly variable.
- Before your ride, check that your device, heart rate monitor, and power meter are functioning properly, paired, and have good battery life.
- During your 20 minute ride, maintain your heart rate at greater than 70% of your maximum heart rate.
- During your 20 minute ride, maintain a fairly constant power output.
- Avoid rolling terrain.
- Avoid riding in groups where there is a lot of drafting.
Setting Your Heart Rate Zones
The device uses your user profile information from the initial setup to determine your heart rate zones. You can manually adjust the heart rate zones according to your fitness goals (Fitness Goals). For the most accurate calorie data during your activity, you should set your maximum heart rate, resting heart rate, and heart rate zones.
- Select Menu > My Stats > Training Zones > Heart Rate Zones.
- Enter your maximum, lactate threshold, and resting heart rate values.
You can use the auto detect feature to automatically detect your heart rate during an activity. The zone values update automatically, but you can also edit each value manually. - Select Based On:.
- Select an option:
- Select BPM to view and edit the zones in beats per minute.
- Select % Max. to view and edit the zones as a percentage of your maximum heart rate.
- Select % HRR to view and edit the zones as a percentage of your heart rate reserve (maximum heart rate minus resting heart rate).
- Select %LTHR to view and edit the zones as a percentage of your lactate threshold heart rate.
About Heart Rate Zones
Many athletes use heart rate zones to measure and increase their cardiovascular strength and improve their level of fitness. A heart rate zone is a set range of heartbeats per minute. The five commonly accepted heart rate zones are numbered from 1 to 5 according to increasing intensity. Generally, heart rate zones are calculated based on percentages of your maximum heart rate.
Fitness Goals
Knowing your heart rate zones can help you measure and improve your fitness by understanding and applying these principles.
- Your heart rate is a good measure of exercise intensity.
- Training in certain heart rate zones can help you improve cardiovascular capacity and strength.
If you know your maximum heart rate, you can use the table (Heart Rate Zone Calculations) to determine the best heart rate zone for your fitness objectives.
If you do not know your maximum heart rate, use one of the calculators available on the Internet. Some gyms and health centers can provide a test that measures maximum heart rate. The default maximum heart rate is 220 minus your age.
Tips for Erratic Heart Rate Data
If the heart rate data is erratic or does not appear, you can try these tips.
- Reapply water to the electrodes and contact patches (if applicable).
- Tighten the strap on your chest.
- Warm up for 5 to 10 minutes.
- Follow the care instructions (Caring for the Heart Rate Monitor).
- Wear a cotton shirt or thoroughly wet both sides of the strap.
- Synthetic fabrics that rub or flap against the heart rate monitor can create static electricity that interferes with heart rate signals.
- Move away from sources that can interfere with your heart rate monitor.
Sources of interference may include strong electromagnetic fields, some 2.4 GHz wireless sensors, high-voltage power lines, electric motors, ovens, microwave ovens, 2.4 GHz cordless phones, and wireless LAN access points.
Installing the Speed Sensor
NOTE: If you do not have this sensor, you can skip this task.
TIP: Garmin recommends you secure your bike on a stand while installing the sensor.
- Place and hold the speed sensor on top of the wheel hub.
- Pull the strap 1 around the wheel hub, and attach it to the hook 2 on the sensor.
The sensor may be tilted when installed on an asymmetrical hub. This does not affect operation. - Rotate the wheel to check for clearance.
The sensor should not contact other parts of your bike.
NOTE: The LED flashes green for five seconds to indicate activity after two revolutions.
Installing the Cadence Sensor
NOTE: If you do not have this sensor, you can skip this task.
TIP: Garmin recommends you secure your bike on a stand while installing the sensor.
- Select the band size that fits your crank arm 1 securely.
The band you select should be the smallest one that stretches across the crank arm. - On the non-drive side, place and hold the flat side of the cadence sensor on the inside of the crank arm.
- Pull the bands 2 around the crank arm, and attach them to the hooks 3 on the sensor.
- Rotate the crank arm to check for clearance.
The sensor and bands should not contact any part of your bike or shoe.
NOTE: The LED flashes green for five seconds to indicate activity after two revolutions. - Take a 15 minute test ride and inspect the sensor and bands to ensure there is no evidence of damage.
About the Speed and Cadence Sensors
Cadence data from the cadence sensor is always recorded. If no speed and cadence sensors are paired with the device, GPS data is used to calculate the speed and distance.
Cadence is your rate of pedaling or «spinning» measured by the number of revolutions of the crank arm per minute (rpm).
Data Averaging for Cadence or Power
The non-zero data-averaging setting is available if you are training with an optional cadence sensor or power meter. The default setting excludes zero values that occur when you are not pedaling.
You can change the value of this setting (Data Recording Settings).
Pairing Your Wireless Sensors
Before you can pair, you must put on the heart rate monitor or install the sensor.
Pairing is the connecting of ANT+ or Bluetooth wireless sensors, for example, connecting a heart rate monitor with your Garmin device.
- Bring the device within 3 m (10 ft.) of the sensor.
NOTE: Stay 10 m (33 ft.) away from other riders’ sensors while pairing. - Select Menu > Settings > Sensors > Add Sensor.
- Select an option:
- Select a sensor type.
- Select Search All to search for all nearby sensors.
A list of available sensors appears.
- Select one or more sensors to pair with your device.
- Select Add Sensor.
When the sensor is paired with your device, the sensor status is Connected. You can customize a data field to display sensor data.
Training with Power Meters
- Go to www.garmin.com/intosports for a list of ANT+ sensors that are compatible with your device (such as Vector™).
- For more information, see the owner’s manual for your power meter.
- Adjust your power zones to match your goals and abilities (Setting Your Power Zones).
- Use range alerts to be notified when you reach a specified power zone (Setting Range Alerts).
- Customize the power data fields (Customizing the Data Screens).
Setting Your Power Zones
The values for the zones are default values and may not match your personal abilities. You can manually adjust your zones on the device or using Garmin Connect. If you know your functional threshold power (FTP) value, you can enter it and allow the software to calculate your power zones automatically.
- Select Menu > My Stats > Training Zones > Power Zones.
- Enter your FTP value.
- Select Based On:.
- Select an option:
- Select watts to view and edit the zones in watts.
- Select % FTP to view and edit the zones as a percentage of your functional threshold power.
Calibrating Your Power Meter
Before you can calibrate your power meter, you must install it, pair it with your device, and begin actively recording data with it.
For calibration instructions specific to your power meter, see the manufacturer’s instructions.
- Select Menu > Settings > Sensors.
- Select your power meter.
- Select Calibrate.
- Keep your power meter active by pedaling until the message appears.
- Follow the on-screen instructions.
Pedal-Based Power
Vector measures pedal-based power.
Vector measures the force you apply a few hundred times every second. Vector also measures your cadence or rotational pedaling speed. By measuring the force, the direction of force, the rotation of the crank arm, and time, Vector can determine power (watts). Because Vector independently measures left and right leg power, it reports your left-right power balance.
NOTE: The Vector S system does not provide left-right power balance.
Cycling Dynamics
Cycling dynamics metrics measure how you apply power throughout the pedal stroke, and where you apply power on the pedal, allowing you to understand your particular way of riding. Understanding how and where you produce power allows you to train more efficiently and evaluate your bike fit.
NOTE: You must have a dual sensing Edge system to use cycling dynamics metrics.
For more information, go to www.garmin.com/cyclingdynamics.
Using Cycling Dynamics
Before you can use cycling dynamics, you must pair the Vector power meter with your device (Pairing Your Wireless Sensors).
NOTE: Recording cycling dynamics uses additional device memory.
- Go for a ride.
- Scroll to the cycling dynamics screen to view your power phase data 1, total power 2, and platform center offset 3.
- If necessary, select Data Fields to change a data field (Customizing the Data Screens).
NOTE: The two data fields at the bottom of the screen 4 can be customized.
You can send the ride to the Garmin Connect Mobile app to view additional cycling dynamics data (Sending Your Ride to Garmin Connect).
Power Phase Data
Power phase is the pedal stroke region (between the start crank angle and the end crank angle) where you produce positive power.
Platform Center Offset
Platform center offset is the location on the pedal platform where you apply force.
Updating the Vector Software Using the Edge Device
Before you can update the software, you must pair your Edge device with your Vector system.
- Send your ride data to your Garmin Connect account (Sending Your Ride to Garmin Connect).
Garmin Connect automatically looks for software updates and sends them to your Edge device. - Bring your Edge device within range (3 m) of the sensor.
- Rotate the crank arm a few times. The Edge device prompts you to install all pending software updates.
- Follow the on-screen instructions.
Getting Your FTP Estimate
The device uses your user profile information from the initial setup to estimate your functional threshold power (FTP). For a more accurate FTP value, you can conduct an FTP test using a paired power meter and heart rate monitor (Conducting an FTP Test).
Select Menu > My Stats > FTP.
Your FTP estimate appears as a value measured in watts per kilogram, your power output in watts, and a position on the color gauge.
For more information, see FTP Ratings.
Conducting an FTP Test
Before you can conduct a test to determine your functional threshold power (FTP), you must have a paired power meter and heart rate monitor (Pairing Your Wireless Sensors).
- Select Menu > My Stats > FTP > FTP Test > Ride.
- Select to start the timer.
After you begin your ride, the device displays each step of the test, the target, and current power data. A message appears when the test is complete. - Select to stop the timer.
- Select Save Ride.
Your FTP appears as a value measured in watts per kilogram, your power output in watts, and a position on the color gauge.
Automatically Calculating FTP
Before the device can calculate your functional threshold power (FTP), you must have a paired power meter and heart rate monitor (Pairing Your Wireless Sensors).
- Select Menu > My Stats > FTP > Enable Auto Calculation.
- Ride at a steady, high intensity for at least 20 minutes outdoors.
- After your ride, select Save Ride.
- Select Menu > My Stats > FTP.
Your FTP appears as a value measured in watts per kilogram, your power output in watts, and a position on the color gauge.
Using Electronic Shifters
Before you can use compatible electronic shifters, such as Shimano® Di2™ shifters, you must pair them with your device (Pairing Your Wireless Sensors). You can customize the optional data fields (Customizing the Data Screens). The Edge 530 device displays current adjustment values when the sensor is in adjustment mode.
Situational Awareness
Your Edge device can be used with the Varia Vision™ device, Varia™ smart bike lights, and rearview radar to improve situational awareness. See the owner’s manual for your Varia device for more information.
NOTE: You may need to update the Edge software before pairing Varia devices (Updating the Software Using Garmin Express).
History
History includes time, distance, calories, speed, lap data, elevation, and optional ANT+ sensor information.
NOTE: History is not recorded while the timer is stopped or paused.
When the device memory is full, a message appears. The device does not automatically delete or overwrite your history. Upload your history to Garmin Connect periodically to keep track of all your ride data.
Viewing Your Ride
- Select Menu > History > Rides.
- Select a ride.
- Select an option.
Viewing Your Time in Each Training Zone
Before you can view your time in each training zone, you must pair your device with a compatible heart rate monitor or power meter, complete an activity, and save the activity.
Viewing your time in each heart rate and power zone can help you adjust your training intensity. You can adjust your power zones (Setting Your Power Zones) and your heart rate zones (Setting Your Heart Rate Zones) to match your goals and abilities. You can customize a data field to display your time in training zones during your ride (Customizing the Data Screens).
- Select Menu > History > Rides.
- Select a ride.
- Select an option:
- If your ride has data from one sensor, select Time in HR Zone or Time in Power Zone.
- If your ride has data from both sensors, select Time in Zone, and select Heart Rate Zones or Power Zones.
Deleting Rides
- Select Menu > History > Rides > Delete.
- Select one or more rides to delete.
- Select Delete Rides > OK.
Viewing Data Totals
You can view the accumulated data you have saved to the device, including the number of rides, time, distance, and calories.
- Select Menu > History > Totals.
- Select an option to view device or activity profile totals.
Deleting Data Totals
- Select Menu > History > Totals > Delete Totals.
- Select an option:
- Select Delete All Totals to delete all data totals from the history.
- Select an activity profile to delete accumulated data totals for a single profile.
NOTE: This does not delete any saved activities.
- Select OK.
Garmin Connect
You can connect with your friends on Garmin Connect. Garmin Connect gives you the tools to track, analyze, share, and encourage each other. Record the events of your active lifestyle including runs, walks, rides, swims, hikes, triathlons, and more.
You can create your free Garmin Connect account when you pair your device with your phone using the Garmin Connect Mobile app, or you can go to connect.garmin.com.
Store your activities: After you complete and save an activity with your device, you can upload that activity to Garmin Connect and keep it as long as you want.
Analyze your data: You can view more detailed information about your activity, including time, distance, elevation, heart rate, calories burned, cadence, an overhead map view, pace and speed charts, and customizable reports.
NOTE: Some data requires an optional accessory such as a heart rate monitor.
Plan your training: You can choose a fitness goal and load one of the day-by-day training plans.
Share your activities: You can connect with friends to follow each other’s activities or post links to your activities on your favorite social networking sites.
Sending Your Ride to Garmin Connect
- Sync your Edge device with the Garmin Connect Mobile app on your smartphone.
- Use the USB cable that came with your Edge device to send ride data to your Garmin Connect account on your computer.
Data Recording
The device uses smart recording. It records key points where you change direction, speed, or heart rate.
When a power meter is paired, the device records points every second. Recording points every second provides an extremely detailed track, and uses more of the available memory.
For information about data averaging for cadence and power, see Data Averaging for Cadence or Power.
Data Management
NOTE: The device is not compatible with Windows® 95, 98, Me, Windows NT®, and Mac® OS 10.3 and earlier.
Connecting the Device to Your Computer
NOTICE
To prevent corrosion, thoroughly dry the USB port, the weather cap, and the surrounding area before charging or connecting to a computer.
- Pull up the weather cap from the USB port.
- Plug the small end of the USB cable into the USB port.
- Plug the large end of the USB cable into a computer USB port.
Your device appears as a removable drive in My Computer on Windows computers and as a mounted volume on Mac computers.
Transferring Files to Your Device
- Connect the device to your computer.
On Windows computers, the device appears as a removable drive or a portable device. On Mac computers, the device appears as a mounted volume.
NOTE: Some computers with multiple network drives may not display device drives properly. See your operating system documentation to learn how to map the drive. - On your computer, open the file browser.
- Select a file.
- Select Edit > Copy.
- Open the portable device, drive, or volume for the device.
- Browse to a folder.
- Select Edit > Paste.
The file appears in the list of files in the device memory.
Deleting Files
NOTICE
If you do not know the purpose of a file, do not delete it. Your device memory contains important system files that should not be deleted.
- Open the Garmin drive or volume.
- If necessary, open a folder or volume.
- Select a file.
- Press the Delete key on your keyboard.
NOTE: If you are using an Apple® computer, you must empty the Trash folder to completely remove the files.
Disconnecting the USB Cable
If your device is connected to your computer as a removable drive or volume, you must safely disconnect your device from your computer to avoid data loss. If your device is connected to your Windows computer as a portable device, it is not necessary to safely disconnect the device.
- Complete an action:
- For Windows computers, select the Safely Remove Hardware icon in the system tray, and select your device.
- For Apple computers, select the device, and select File > Eject.
- Disconnect the cable from your computer.
Customizing Your Device
Connect IQ Downloadable Features
You can add Connect IQ features to your device from Garmin and other providers using the Connect IQ Mobile app.
Data Fields: Allow you to download new data fields that present sensor, activity, and history data in new ways. You can add Connect IQ data fields to built-in features and pages.
Widgets: Provide information at a glance, including sensor data and notifications.
Apps: Add interactive features to your device, such as new outdoor and fitness activity types.
Downloading Connect IQ Features Using Your Computer
- Connect the device to your computer using a USB cable.
- Go to apps.garmin.com, and sign in.
- Select a Connect IQ feature, and download it.
- Follow the on-screen instructions.
Profiles
The Edge has several ways for you to customize the device, including profiles. Profiles are a collection of settings that optimize your device based on how you are using it. For example, you can create different settings and views for training and mountain biking.
When you are using a profile and you change settings such as data fields or units of measurement, the changes are saved automatically as part of the profile.
Activity Profiles: You can create activity profiles for each type of biking. For example, you can create a separate activity profile for training, for racing, and for mountain biking. The activity profile includes customized data pages, activity totals, alerts, training zones (such as heart rate and speed), training settings (such as Auto Pause® and Auto Lap®), and navigation settings.
User Profile: You can update your gender, age, weight, and height settings. The device uses this information to calculate accurate ride data.
Setting Up Your User Profile
You can update your gender, age, weight, and height settings. The device uses this information to calculate accurate ride data.
- Select Menu > My Stats > User Profile.
- Select an option.
About Training Settings
The following options and settings allow you to customize your device based on your training needs. These settings are saved to an activity profile. For example, you can set time alerts for your racing profile and you can set an Auto Lap position trigger for your mountain biking profile.
Updating Your Activity Profile
You can customize ten activity profiles. You can customize your settings and data fields for a particular activity or trip.
- Select Menu > Settings > Activity Profiles.
- Select an option:
- Select a profile.
- Select Create New to add or copy a profile.
- If necessary, edit the name and color for the profile.
- Select an option:
- Select Data Screens to customize the data screens and data fields (Customizing the Data Screens).
- Select Default Ride Type to set the type of ride that is typical for this activity profile, such as commuting.
TIP: After a ride that is not typical, you can manually update the ride type. Accurate ride type data is important for creating bike friendly courses. - Select Segments to turn on your enabled segments (Enabling Segments).
- Select Alerts to customize your training alerts (Alerts).
- Select Auto Features > Auto Lap to set how laps are triggered (Marking Laps by Position).
- Select Auto Features > Auto Pause to change when the activity timer automatically pauses (Using Auto Pause).
- Select Auto Features > Auto Sleep to automatically enter sleep mode after five minutes of inactivity (Using Auto Sleep).
- Select Auto Features > Auto Scroll to customize the display of the training data screens when the activity timer is running (Using Auto Scroll).
- Select Timer Start Mode to customize how the device detects the start of a ride and automatically starts the activity timer (Starting the Timer Automatically).
- Select Nutrition/Hydration …
- Select Navigation > Map to customize the map settings (Map Settings).
- Select Navigation > Routing to customize the routing settings (Route Settings).
- Select Navigation > Navigation Prompts to customize the…
- Select Navigation > Sharp Bend Warnings …
- Select GPS Mode to turn off GPS (Training Indoors) or change the satellite setting (Changing the Satellite Setting).
All changes are saved to the activity profile.
Customizing the Data Screens
- Select Menu > Settings > Activity Profiles.
- Select a profile.
- Select Data Screens.
- Select a data screen.
- If necessary, enable the data screen.
- Select the number of data fields to appear on the screen.
- Select a data field to change it.
Changing the Satellite Setting
For increased performance in challenging environments and faster GPS position location, you can enable GPS+GLONASS or GPS+GALILEO. Using GPS and another satellite together reduces battery life more quickly than using only GPS.
- Select Menu > Settings > Activity Profiles.
- Select a profile.
- Select GPS Mode.
- Select an option.
Alerts
You can use alerts to train toward specific time, distance, calorie, heart rate, cadence, and power goals. Alert settings are saved with your activity profile.
Setting Range Alerts
If you have an optional heart rate monitor, cadence sensor, or power meter, you can set up range alerts. A range alert notifies you when the device measurement is above or below a specified range of values. For example, you can set the device to alert you when your cadence is below 40 RPM and over 90 RPM. You can also use a training zone for the range alert (Training Zones).
- Select Menu > Settings > Activity Profiles.
- Select a profile.
- Select Alerts.
- Select Heart Rate Alert, Cadence Alert, or Power Alert.
- Select the minimum and maximum values, or select zones.
- If necessary, select .
Each time you exceed or drop below the specified range, a message appears. The device also beeps if audible tones are turned on (Turning the Device Tones On and Off).
Setting a Recurring Alert
A recurring alert notifies you each time the device records a specified value or interval. For example, you can set the device to alert you every 30 minutes.
- Select Menu > Settings > Activity Profiles.
- Select a profile.
- Select Alerts.
- Select an alert type.
- Turn on the alert.
- Enter a value.
- Select .
Each time you reach the alert value, a message appears. The device also beeps if audible tones are turned on (Turning the Device Tones On and Off).
Auto Lap
Marking Laps by Position
You can use the Auto Lap feature to mark the lap at a specific position automatically. This feature is helpful for comparing your performance over different parts of a ride (for example, a long climb or training sprints). During courses, you can use the By Position option to trigger laps at all of the lap positions saved in the course.
- Select Menu > Settings > Activity Profiles.
- Select a profile.
- Select Auto Features > Auto Lap > Auto Lap Trigger > By Position > Lap At.
- Select an option:
- If necessary, customize the lap data fields (Customizing the Data Screens).
Marking Laps by Distance
You can use the Auto Lap feature to mark the lap at a specific distance automatically. This feature is helpful for comparing your performance over different parts of a ride (for example, every 10 miles or 40 kilometers).
- Select Menu > Settings > Activity Profiles.
- Select a profile.
- Select Auto Features > Auto Lap > Auto Lap Trigger > By Distance > Lap At.
- Enter a value.
- If necessary, customize the lap data fields (Customizing the Data Screens).
Using Auto Pause
You can use the Auto Pause feature to pause the timer automatically when you stop moving or when your speed drops below a specified value. This feature is helpful if your ride includes stop lights or other places where you need to slow down or stop.
NOTE: History is not recorded while the timer is stopped or paused.
- Select Menu > Settings > Activity Profiles.
- Select a profile.
- Select Auto Features > Auto Pause.
- Select an option:
- Select When Stopped to pause the timer automatically when you stop moving.
- Select Custom Speed to pause the timer automatically when your speed drops below a specified value.
- If necessary, customize optional time data fields (Customizing the Data Screens).
Using Auto Sleep
You can use the Auto Sleep feature to automatically enter sleep mode after 5 minutes of inactivity. During sleep mode, the screen is turned off and the ANT+ sensors, Bluetooth, and GPS are disconnected.
Wi‑Fi® continues to run while the device is asleep.
- Select Menu > Settings > Activity Profiles.
- Select a profile.
- Select Auto Features > Auto Sleep.
Using Auto Scroll
You can use the Auto Scroll feature to automatically cycle through all of the training data screens while the timer is running.
- Select Menu > Settings > Activity Profiles.
- Select a profile.
- Select Auto Features > Auto Scroll.
- Select a display speed.
Starting the Timer Automatically
This feature automatically detects when your device has acquired satellites and is moving. It starts the activity timer or reminds you to start the activity timer so you can record your ride data.
- Select Menu > Settings > Activity Profiles.
- Select a profile.
- Select Timer Start Mode.
- Select an option:
- Select Manual, and select to start the activity timer.
- Select Prompted to display a visual reminder when you reach the start notice speed.
- Select Auto to start the activity timer automatically when you reach the start speed.
- Select Manual, and select
Phone Settings
Select Menu > Settings > Connected Features > Phone.
Enable: Enables Bluetooth wireless technology.
NOTE: Other Bluetooth settings appear only when Bluetooth wireless technology is enabled.
Friendly Name: Allows you to enter a friendly name that identifies your devices with Bluetooth wireless technology.
Pair Smartphone: Connects your device with a compatible Bluetooth enabled smartphone. This setting allows you to use Bluetooth connected features, including LiveTrack and activity uploads to Garmin Connect.
Call and Text Alerts: Allows you to enable phone notifications from your compatible smartphone.
Missed Calls and Texts: Displays missed phone notifications from your compatible smartphone.
Text Reply Signature: Enables signatures in your text message replies.
System Settings
Select Menu > Settings > System.
- Display Settings (Display Settings)
- Data Recording Settings (Data Recording Settings)
- Unit Settings (Changing the Units of Measure)
- Tone Settings (Turning the Device Tones On and Off)
- Language Settings (Changing the Device Language)
Display Settings
Select Menu > Settings > System > Display.
Auto Brightness: Automatically adjusts the backlight brightness based on the ambient light.
Brightness: Sets the backlight brightness.
Backlight Timeout: Sets the length of time before the backlight turns off.
Color Mode: Sets the device to display day or night colors. You can select the Auto option to allow the device to set day or night colors automatically based on the time of day.
Screen Capture: Allows you to save the image of the device screen.
Data Recording Settings
Select Menu > Settings > System > Data Recording.
Recording Interval: Controls how the device records activity data. The Smart option records key points where you change direction, speed, or heart rate. The 1 Sec option records points every second. It creates a very detailed record of your activity and increases the size of the stored activity file.
Cadence Averaging: Controls whether the device includes zero values for cadence data that occur when you are not pedaling (Data Averaging for Cadence or Power).
Power Averaging: Controls whether the device includes zero values for power data that occur when you are not pedaling (Data Averaging for Cadence or Power).
Log HRV: Sets the device to record your heart rate variability during an activity.
Changing the Units of Measure
You can customize units of measure for distance and speed, elevation, temperature, weight, position format, and time format.
- Select Menu > Settings > System > Units.
- Select a measurement type.
- Select a unit of measure for the setting.
Turning the Device Tones On and Off
Select Menu > Settings > System > Tones.
Changing the Device Language
Select Menu > Settings > System > Language.
Time Zones
Each time you turn on the device and acquire satellites or sync with your smartphone, the device automatically detects your time zone and the current time of day.
Setting Up Extended Display Mode
You can use your Edge 530 device as an extended display to view data screens from a compatible Garmin multisport watch.
For example, you can pair a compatible Forerunner® device to display its data screens on your Edge device during a triathlon.
- From your Edge device, select Menu > Settings > Extended Display Mode > Connect Watch.
- From your compatible Garmin watch, select Settings > Sensors & Accessories > Add New > Extended Display.
- Follow the on-screen instructions on your Edge device and Garmin watch to complete the pairing process.
The data screens from your paired watch appear on the Edge device when the devices are paired.
NOTE: Normal Edge device functions are disabled while using Extended Display mode.
After pairing your compatible Garmin watch with your Edge device, they connect automatically the next time you use Extended Display mode.
Exiting Extended Display Mode
While the device is in Extended Display mode, select > Exit Extended Display Mode > OK.
Device Information
Specifications
Edge Specifications
| Battery type | Rechargeable, built-in lithium-ion battery |
| Battery life | Up to 15 hr. |
| Operating temperature range | From -20º to 60ºC (from -4º to 140ºF) |
| Charging temperature range | From 0º to 45ºC (from 32º to 113ºF) |
| Wireless frequency/protocol | 2.4 GHz @ 13.7 dBm nominal |
| Water rating | IEC 60529 IPX7* |
*The device withstands incidental exposure to water of up to 1 m for up to 30 min. For more information, go to www.garmin.com/waterrating.
Heart Rate Monitor Specifications
| Battery type | User-replaceable CR2032, 3 volts |
| Battery life | Up to 4.5 yr. at 1 hr./day |
| Water resistance | 3 ATM* NOTE: This product does not transmit heart rate data while swimming. |
| Operating temperature range | From -5° to 50°C (from 23° to 122°F) |
| Radio frequency/protocol | 2.4 GHz ANT+ wireless communications protocol |
*The device withstands pressure equivalent to a depth of 30 m. For more information, go to www.garmin.com/waterrating.
Speed Sensor and Cadence Sensor Specifications
| Battery type | User-replaceable CR2032, 3 V |
| Battery life | Approximately 12 mo. at 1 hr./day |
| Operating temperature range | From -20º to 60ºC (from -4º to 140ºF) |
| Wireless frequency/protocol | 2.4 GHz @ 4 dBm nominal |
| Water rating | IEC 60529 IPX7* |
*The device withstands incidental exposure to water of up to 1 m for up to 30 min. For more information, go to www.garmin.com/waterrating.
Device Care
NOTICE
Do not store the device where prolonged exposure to extreme temperatures can occur, because it can cause permanent damage.
Avoid chemical cleaners, solvents, and insect repellents that can damage plastic components and finishes.
Secure the weather cap tightly to prevent damage to the USB port.
Cleaning the Device
- Wipe the device using a cloth dampened with a mild detergent solution.
- Wipe it dry.
After cleaning, allow the device to dry completely.
Caring for the Heart Rate Monitor
NOTICE
You must unsnap and remove the module before washing the strap.
A build up of sweat and salt on the strap can decrease the ability of the heart rate monitor to report accurate data.
- Go to www.garmin.com/HRMcare for detailed washing instructions.
- Rinse the strap after every use.
- Machine wash the strap after every seven uses.
- Do not put the strap in a dryer.
- When drying the strap, hang it up or lay it flat.
- To prolong the life of your heart rate monitor, unsnap the module when not in use.
User Replaceable Batteries
See the Important Safety and Product Information guide in the product box for product warnings and other important information.
Replacing the Heart Rate Monitor Battery
- Use a small Phillips screwdriver to remove the four screws on the back of the module.
- Remove the cover and battery.
- Wait 30 seconds.
- Insert the new battery with the positive side facing up.
NOTE: Do not damage or lose the O-ring gasket. - Replace the back cover and the four screws.
NOTE: Do not overtighten.
After you replace the heart rate monitor battery, you may need to pair it with the device again.
Replacing the Speed Sensor Battery
The device uses one CR2032 battery. The LED flashes red to indicate a low battery level after two revolutions.
- Locate the circular battery cover 1 on the front of the sensor.
- Twist the cover counter-clockwise until the cover is loose enough to remove.
- Remove the cover and the battery 2.
- Wait 30 seconds.
- Insert the new battery into the cover, observing polarity.
NOTE: Do not damage or lose the O-ring gasket. - Twist the cover clockwise so that the marker on the cover aligns with the marker on the case.
NOTE: The LED flashes red and green for a few seconds after battery replacement. When the LED flashes green and then stops flashing, the device is active and ready to send data.
Replacing the Cadence Sensor Battery
The device uses one CR2032 battery. The LED flashes red to indicate a low battery level after two revolutions.
- Locate the circular battery cover on the back of the sensor.
- Twist the cover counter-clockwise until the marker points to unlocked and the cover is loose enough to remove.
- Remove the cover and the battery 2.
- Wait 30 seconds.
- Insert the new battery into the cover, observing polarity.
NOTE: Do not damage or lose the O-ring gasket. - Twist the cover clockwise until the marker points to locked.
NOTE: The LED flashes red and green for a few seconds after battery replacement. When the LED flashes green and then stops flashing, the device is active and ready to send data.
Troubleshooting
Resetting the Device
If the device stops responding, you may need to reset it. This does not erase any of your data or settings.
Hold for 10 seconds.
The device resets and turns on.
Restoring the Default Settings
You can restore the default configuration settings and activity profiles. This will not remove your history or activity data, such as rides, workouts, and courses.
Select Menu > Settings > System > Device Reset > Reset Default Settings > OK.
Clearing User Data and Settings
You can clear all user data and restore the device to its initial setup. This removes your history and data, such as rides, workouts, and courses, and resets the device settings and activity profiles. This will not remove any files you added to the device from your computer.
Select Menu > Settings > System > Device Reset > Delete Data and Reset Settings > OK.
Maximizing Battery Life
- Turn on Battery Save Mode (Turning On Battery Save Mode).
- Decrease the backlight brightness (Using the Backlight) or shorten the backlight timeout (Display Settings).
- Select the Smart recording interval (Data Recording Settings).
- Turn on the Auto Sleep feature (Using Auto Sleep).
- Turn off the Bluetooth wireless feature (Phone Settings).
- Select the GPS setting (Changing the Satellite Setting).
- Remove wireless sensors that you no longer use.
Turning On Battery Save Mode
Battery save mode adjusts the settings automatically to extend the battery life for longer rides. During an activity, the screen turns off. You can enable automatic alerts and tap the screen to wake it up. Battery save mode records GPS track points and sensor data less frequently. Speed, distance, and track data accuracy are reduced.
NOTE: History is recorded in battery save mode when the timer is running.
- Select Menu > Settings > Battery Save Mode > Enable.
- Select the alerts that wake up the screen during an activity.
My phone will not connect to the device
If your phone will not connect to the device, you can try these tips.
Improving GPS Satellite Reception
- Frequently sync the device to your Garmin Connect account:
- Connect your device to a computer using the USB cable and the Garmin Express™ application.
- Sync your device to the Garmin Connect Mobile app using your Bluetooth enabled smartphone.
- Connect your device to your Garmin Connect account using a Wi‑Fi wireless network.
While connected to your Garmin Connect account, the device downloads several days of satellite data, allowing it to quickly locate satellite signals.
- Take your device outside to an open area away from tall buildings and trees.
- Remain stationary for a few minutes.
My device is in the wrong language
- From the home screen, select .
- Scroll down to the last item in the list, and select .
- Scroll down to the last item in the list, and select .
- Scroll down to the seventh item in the list, and select .
- Scroll down to your language, and select .
Temperature Readings
The device may display temperature readings that are higher than the actual air temperature if the device is placed in direct sunlight, held in your hand, or is charging with an external battery pack. Also, the device will take some time to adjust to significant changes in temperature.
Replacement O-rings
Replacement bands (O-rings) are available for the mounts.
NOTE: Use Ethylene Propylene Diene Monomer (EPDM) replacement bands only. Go to http://buy.garmin.com, or contact your Garmin dealer.
Viewing Device Information
You can view the unit ID, software version, regulatory information, and license agreement.
Select Setup > About
Updating the Software Using Garmin Connect Mobile
Before you can update your device software using the Garmin Connect Mobile app, you must have a Garmin Connect account, and you must pair the device with a compatible smartphone (Pairing Your Smartphone).
- Synchronize your device with the Garmin Connect Mobile app.
When new software is available, your device alerts you to update the software. - Follow the on-screen instructions.
Select Setup > About.
Updating the Software Using Garmin Express
Before you can update your device software, you must have a Garmin Connect account, and you must download the Garmin Express application.
- Connect the device to your computer using the USB cable.
When new software is available, Garmin Express sends it to your device. - Follow the on-screen instructions.
- Do not disconnect your device from the computer during the update process.
NOTE: If you have already set up your device with Wi‑Fi connectivity, Garmin Connect can automatically download available software updates to your device when it connects using Wi‑Fi.
Product Updates
On your computer, install Garmin Express (www.garmin.com/express). On your smartphone, install the Garmin Connect app.
This provides easy access to these services for Garmin devices:
- Software updates
- Map updates
- Data uploads to Garmin Connect
- Product registration
Getting More Information
- Go to support.garmin.com for additional manuals, articles, and software updates.
- Go to www.garmin.com/intosports.
- Go to www.garmin.com/learningcenter.
- Go to buy.garmin.com, or contact your Garmin dealer for information about optional accessories and replacement parts.
Data Fields
Some data fields require ANT+ accessories to display data.
Balance: The current left/right power balance.
Balance — 10s Avg.: The 10-second moving average of the left/ right power balance.
Balance — 30s Avg.: The 30-second moving average of the left/ right power balance.
Balance — 3s Avg.: The three-second moving average of the left/right power balance.
Balance — Avg.: The average left/right power balance for the current activity.
Balance — Lap: The average left/right power balance for the current lap.
Battery Level: The remaining battery power.
Battery Status: The remaining battery power of a bike light accessory.
Beam Angle Status: The headlight beam mode.
Cadence: Cycling. The number of revolutions of the crank arm. Your device must be connected to a cadence accessory for this data to appear.
Cadence — Avg.: Cycling. The average cadence for the current activity.
Cadence — Lap: Cycling. The average cadence for the current lap.
Calories: The amount of total calories burned.
Calories to Go: During a workout, the remaining calories when you are using a calorie target.
Course Pt. Dist.: The remaining distance to the next point on the course.
Di2 Battery Level: The remaining battery power of a Di2 sensor.
Di2 Shift Mode: The current shift mode of a Di2 sensor.
Dist. — Lap: The distance traveled for the current lap.
Dist. — Last Lap: The distance traveled for the last completed lap.
Dist. to Dest.: The remaining distance to the final destination. You must be navigating for this data to appear.
Dist. to Go: During a workout or course, the remaining distance when you are using a distance target.
Dist. to Next: The remaining distance to the next waypoint on the route. You must be navigating for this data to appear.
Distance: The distance traveled for the current track or activity.
Distance Ahead: The distance ahead or behind the Virtual Partner.
Elevation: The altitude of your current location above or below sea level.
ETA at Destination: The estimated time of day when you will reach the final destination (adjusted to the local time of the destination). You must be navigating for this data to appear.
ETA at Next: The estimated time of day when you will reach the next waypoint on the route (adjusted to the local time of the waypoint). You must be navigating for this data to appear.
Front Gear: The front bike gear from a gear position sensor.
Gear Battery: The battery status of a gear position sensor.
Gear Combo: The current gear combination from a gear position sensor.
Gear Ratio: The number of teeth on the front and rear bike gears, as detected by a gear position sensor.
Gears: The front and rear bike gears from a gear position sensor.
GPS Accuracy: The margin of error for your exact location. For example, your GPS location is accurate to within +/- 3.65 m (12 ft.).
GPS Signal Strength: The strength of the GPS satellite signal.
Grade: The calculation of rise (elevation) over run (distance). For example, if for every 3 m (10 ft.) you climb you travel 60 m (200 ft.), the grade is 5%.
Heading: The direction you are moving.
Heart Rate: Your heart rate in beats per minute (bpm). Your device must be connected to a compatible heart rate monitor.
HR — %HRR: The percentage of heart rate reserve (maximum heart rate minus resting heart rate).
HR — %Max.: The percentage of maximum heart rate.
HR — Avg.: The average heart rate for the current activity.
HR — Avg. %HRR: The average percentage of heart rate reserve (maximum heart rate minus resting heart rate) for the current activity.
HR — Avg. %Max.: The average percentage of maximum heart rate for the current activity.
HR Graph: A line graph showing your current heart rate zone (1 to 5).
HR — Lap: The average heart rate for the current lap.
HR — Lap %HRR: The average percentage of heart rate reserve (maximum heart rate minus resting heart rate) for the current lap.
HR — Lap %Max.: The average percentage of maximum heart rate for the current lap.
HR — Last Lap: The average heart rate for the last completed lap.
HR to Go: During a workout, the amount you are above or below the heart rate target.
HR Zone: The current range of your heart rate (1 to 5). The default zones are based on your user profile and maximum heart rate (220 minus your age).
Laps: The number of laps completed for the current activity.
Light Mode: The light network configuration mode.
Lights Connected: The number of connected lights.
Location at Dest.: The last point on the route or course.
Location at Next: The next point on the route or course.
Odometer: A running tally of distance traveled for all trips. This total does not clear when resetting the trip data.
PCO: The platform center offset. Platform center offset is the location on the pedal platform where force is applied.
PCO — Avg.: The average platform center offset for the current activity.
PCO — Lap: The average platform center offset for the current lap.
Pedal Smoothness: The measurement of how evenly a rider is applying force to the pedals throughout each pedal stroke.
Performance Condition: The performance condition score is a real-time assessment of your ability to perform.
Power: The current power output in watts. Your device must be connected to a compatible power meter.
Power — %FTP: The current power output as a percentage of functional threshold power.
Power — 10s Avg.: The 10-second moving average of power output.
Power — 30s Avg.: The 30-second moving average of power output.
Power — 3s Avg.: The 3-second moving average of power output.
Power — Avg.: The average power output for the current activity.
Power — IF: The Intensity Factor™ for the current activity.
Power — kJ: The accumulated work performed (power output) in kilojoules.
Power — Lap: The average power output for the current lap.
Power — Lap Max.: The top power output for the current lap.
Power — Last Lap: The average power output for the last completed lap.
Power — Max.: The top power output for the current activity.
Power — NP: The Normalized Power™ for the current activity.
Power — NP Lap: The average Normalized Power for the current lap.
Power — NP Last Lap: The average Normalized Power for the last completed lap.
Power Phase — L.: The current power phase angle for the left leg. Power phase is the pedal stroke region where positive power is produced.
Power Phase — L. Avg.: The average power phase angle for the left leg for the current activity.
Power Phase — L. Lap: The average power phase angle for the left leg for the current lap.
Power Phase — L. Peak: The current power phase peak angle for the left leg. Power phase peak is the angle range over which the rider produces the peak portion of the driving force.
Power Phase — L. Peak Avg.: The average power phase peak angle for the left leg for the current activity.
Power Phase — L. Peak Lap: The average power phase peak angle for the left leg for the current lap.
Power Phase — R.: The current power phase angle for the right leg. Power phase is the pedal stroke region where positive power is produced.
Power Phase — R. Avg.: The average power phase angle for the right leg for the current activity.
Power Phase — R. Lap: The average power phase angle for the right leg for the current lap.
Power Phase — R. Peak: The current power phase peak angle for the right leg. Power phase peak is the angle range over which the rider produces the peak portion of the driving force.
Power Phase — R. Peak Avg.: The average power phase peak angle for the right leg for the current activity.
Power Phase — R. Peak Lap: The average power phase peak angle for the right leg for the current lap.
Power — TSS: The Training Stress Score™ for the current activity.
Power — watts/kg: The amount of power output in watts per kilogram.
Power Zone: The current range of power output (1 to 7) based on your FTP or custom settings.
Rear Gear: The rear bike gear from a gear position sensor.
Reps to Go: During a workout, the remaining repetitions.
Speed: The current rate of travel.
Speed — Avg.: The average speed for the current activity.
Speed — Lap: The average speed for the current lap.
Speed — Last Lap: The average speed for the last completed lap.
Speed — Max.: The top speed for the current activity.
Sunrise: The time of sunrise based on your GPS position.
Sunset: The time of sunset based on your GPS position.
Target Power: The target power output during an activity.
Temperature: The temperature of the air. Your body temperature affects the temperature sensor.
Time: The stopwatch time for the current activity.
Time Ahead: The time ahead or behind the Virtual Partner.
Time — Avg. Lap: The average lap time for the current activity.
Time — Elapsed: The total time recorded. For example, if you start the timer and run for 10 minutes, then stop the timer for 5 minutes, then start the timer and run for 20 minutes, your elapsed time is 35 minutes.
Time in Zone: The time elapsed in each heart rate or power zone.
Time — Lap: The stopwatch time for the current lap.
Time — Last Lap: The stopwatch time for the last completed lap.
Time of Day: The time of day based on your current location and time settings (format, time zone, daylight saving time).
Time Seated: The time spent seated while pedaling for the current activity.
Time Seated Lap: The time spent seated while pedaling for the current lap.
Time Standing: The time spent standing while pedaling for the current activity.
Time Standing Lap: The time spent standing while pedaling for the current lap.
Time to Dest.: The estimated time remaining before you reach the destination. You must be navigating for this data to appear.
Time to Go: During a workout, the remaining time when you are using a time target.
Time to Next: The estimated time remaining before you reach the next waypoint in the route. You must be navigating for this data to appear.
Torque Effectiveness: The measurement of how efficiently a rider is pedaling.
Total Ascent: The total elevation distance ascended since the last reset.
Total Descent: The total elevation distance descended since the last reset.
Trainer Resistance: The resistance force applied by an indoor trainer.
Vertical Speed: The rate of ascent or descent over time.
VS — 30s Avg.: The 30-second moving average of vertical speed.
Workout Step: During a workout, the current step out of the total number of steps.
VO2 Max. Standard Ratings
These tables include standardized classifications for VO2 max. estimates by age and gender.
| Males | Percentile | 20–29 | 30–39 | 40–49 | 50–59 | 60–69 | 70–79 |
| Superior | 95 | 55.4 | 54 | 52.5 | 48.9 | 45.7 | 42.1 |
| Excellent | 80 | 51.1 | 48.3 | 46.4 | 43.4 | 39.5 | 36.7 |
| Good | 60 | 45.4 | 44 | 42.4 | 39.2 | 35.5 | 32.3 |
| Fair | 40 | 41.7 | 40.5 | 38.5 | 35.6 | 32.3 | 29.4 |
| Poor | 0–40 | <41.7 | <40.5 | <38.5 | <35.6 | <32.3 | <29.4 |
| Females | Percentile | 20–29 | 30–39 | 40–49 | 50–59 | 60–69 | 70–79 |
| Superior | 95 | 49.6 | 47.4 | 45.3 | 41.1 | 37.8 | 36.7 |
| Excellent | 80 | 43.9 | 42.4 | 39.7 | 36.7 | 33 | 30.9 |
| Good | 60 | 39.5 | 37.8 | 36.3 | 33 | 30 | 28.1 |
| Fair | 40 | 36.1 | 34.4 | 33 | 30.1 | 27.5 | 25.9 |
| Poor | 0–40 | <36.1 | <34.4 | <33 | <30.1 | <27.5 | <25.9 |
Data reprinted with permission from The Cooper Institute. For more information, go to www.CooperInstitute.org.
FTP Ratings
These tables include classifications for functional threshold power (FTP) estimates by gender.
| Males | Watts per Kilogram (W/kg) |
| Superior | 5.05 and greater |
| Excellent | From 3.93 to 5.04 |
| Good | From 2.79 to 3.92 |
| Fair | From 2.23 to 2.78 |
| Untrained | Less than 2.23 |
| Females | Watts per Kilogram (W/kg) |
| Superior | 4.30 and greater |
| Excellent | From 3.33 to 4.29 |
| Good | From 2.36 to 3.32 |
| Fair | From 1.90 to 2.35 |
| Untrained | Less than 1.90 |
FTP ratings are based on research by Hunter Allen and Andrew Coggan, PhD, Training and Racing with a Power Meter (Boulder, CO: VeloPress, 2010).
Heart Rate Zone Calculations
| Zone | % of Maximum Heart Rate | Perceived Exertion | Benefits |
| 1 | 50–60% | Relaxed, easy pace, rhythmic breathing | Beginning-level aerobic training, reduces stress |
| 2 | 60–70% | Comfortable pace, slightly deeper breathing, conversation possible | Basic cardiovascular training, good recovery pace |
| 3 | 70–80% | Moderate pace, more difficult to hold conversation | Improved aerobic capacity, optimal cardiovascular training |
| 4 | 80–90% | Fast pace and a bit uncomfortable, breathing forceful | Improved anaerobic capacity and threshold, improved speed |
| 5 | 90–100% | Sprinting pace, unsustainable for long period of time, labored breathing | Anaerobic and muscular endurance, increased power |
Wheel Size and Circumference
Your speed sensor automatically detects your wheel size. If necessary, you can manually enter your wheel circumference in the speed sensor settings.
The tire size is marked on both sides of the tire. This is not a comprehensive list. You can also measure the circumference of your wheel or use one of the calculators available on the internet.
| Tire Size | Wheel Circumference (mm) |
| 20 × 1.75 | 1515 |
| 20 × 1-3/8 | 1615 |
| 22 × 1-3/8 | 1770 |
| 22 × 1-1/2 | 1785 |
| 24 × 1 | 1753 |
| 24 × 3/4 Tubular | 1785 |
| 24 × 1-1/8 | 1795 |
| 24 × 1.75 | 1890 |
| 24 × 1-1/4 | 1905 |
| 24 × 2.00 | 1925 |
| 24 × 2.125 | 1965 |
| 26 × 7/8 | 1920 |
| 26 × 1-1.0 | 1913 |
| 26 × 1 | 1952 |
| 26 × 1.25 | 1953 |
| 26 × 1-1/8 | 1970 |
| 26 × 1.40 | 2005 |
| 26 × 1.50 | 2010 |
| 26 × 1.75 | 2023 |
| 26 × 1.95 | 2050 |
| 26 × 2.00 | 2055 |
| 26 × 1-3/8 | 2068 |
| 26 × 2.10 | 2068 |
| 26 × 2.125 | 2070 |
| 26 × 2.35 | 2083 |
| 26 × 1-1/2 | 2100 |
| 26 × 3.00 | 2170 |
| 27 × 1 | 2145 |
| 27 × 1-1/8 | 2155 |
| 27 × 1-1/4 | 2161 |
| 27 × 1-3/8 | 2169 |
| 29 x 2.1 | 2288 |
| 29 x 2.2 | 2298 |
| 29 x 2.3 | 2326 |
| 650 x 20C | 1938 |
| 650 x 23C | 1944 |
| 650 × 35A | 2090 |
| 650 × 38B | 2105 |
| 650 × 38A | 2125 |
| 700 × 18C | 2070 |
| 700 × 19C | 2080 |
| 700 × 20C | 2086 |
| 700 × 23C | 2096 |
| 700 × 25C | 2105 |
| 700C Tubular | 2130 |
| 700 × 28C | 2136 |
| 700 × 30C | 2146 |
| 700 × 32C | 2155 |
| 700 × 35C | 2168 |
| 700 × 38C | 2180 |
| 700 × 40C | 2200 |
| 700 × 44C | 2235 |
| 700 × 45C | 2242 |
| 700 × 47C | 2268 |
support.garmin.com
All rights reserved. Under the copyright laws, this manual may not be copied, in whole or in part, without the written consent of Garmin. Garmin reserves the right to change or improve its products and to make changes in the content of this manual without obligation to notify any person or organization of such changes or improvements. Go to www.garmin.com for current updates and supplemental information concerning the use of this product.
Garmin®, the Garmin logo, ANT+®, Auto Lap®, Auto Pause®, Edge®, Forerunner®, and Virtual Partner® are trademarks of Garmin Ltd. or its subsidiaries, registered in the USA and other countries. Connect IQ™, Garmin Connect™, Garmin Express™, Garmin Index™, Varia™, Varia Vision™, and Vector™ are trademarks of Garmin Ltd. or its subsidiaries. These trademarks may not be used without the express permission of Garmin.
Android™ is a trademark of Google Inc. Apple® and Mac®are trademarks of Apple, Inc., registered in the U.S. and other countries. The Bluetooth® word mark and logos are owned by the Bluetooth SIG, Inc. and any use of such marks by Garmin is under license. The Cooper Institute®, as well as any related trademarks, are the property of The Cooper Institute. Advanced heartbeat analytics by Firstbeat. Di2™ is a trademark of Shimano, Inc. Shimano® is a registered trademark of Shimano, Inc. Training Stress Score™ (TSS), Intensity Factor™ (IF), and Normalized Power™ (NP) are trademarks of Peaksware, LLC. STRAVA and Strava™ are trademarks of Strava, Inc. Windows® is a registered trademark of Microsoft Corporation in the United States and other countries. Other trademarks and trade names are those of their respective owners.
This product is ANT+®certified. Visit www.thisisant.com/directory for a list of compatible products and apps. M/N: A03485
© 2019 Garmin Ltd. or its subsidiaries
Documents / Resources
References
Download manual
Here you can download full pdf version of manual, it may contain additional safety instructions, warranty information, FCC rules, etc.
Download Garmin EDGE 530 Manual
16
17
(автоматическое начало круга) для настройки кри-
терия начала нового круга (
см. п. «Отметка начала
круга по местоположению», стр. 16)
.
• Выберите Auto Features (авто функции) > Auto
Pause (авто пауза) для изменения критерия автома-
тической остановки таймера (
см. п. «Использование
функции автоматической паузы», стр. 17
).
• Выберите Auto Features (авто функции) > Auto
Sleep (авто сон) для автоматического переключения
прибора в режим сна после отсутствия действий в
течение пяти минут (
см. п. «Использование функции
автоматического сна», стр. 17
).
• Выберите Auto Features (авто функции) > Auto
Scroll (автоматическая прокрутка) для настройки
индикации данных тренировки при работающем
таймере (
см. п. «Использование автоматической
прокрутки», стр. 17)
.
• Выберите Start Notice (напоминание о старте)
для настройки режима уведомления о старте (
см. п.
«Изменение напоминания о старте», стр. 17
).
Все внесенные вами изменения будут сохранены в профи-
ле занятия.
Настройка экранов данных
Вы можете настроить экраны данных для каждого профи-
ля занятия.
1 Выберите Menu (меню) > Settings (настройки) > Activity
Profiles (профили занятий).
2 Выберите профиль.
3 Выберите Data Screens (экраны данных).
4 Выберите экран данных.
5 При необходимости включите экран данных.
6 Выберите количество полей данных, которые вы хотите
видеть на этом экране.
7 Выберите поле данных, которое вы хотите изменить.
Изменение спутниковой настройки
Для повышения эффективности работы в сложных усло-
виях и более быстрого расчета местоположения вы може-
те одновременно использовать системы GPS и ГЛОНАСС.
При одновременном использовании обеих систем заряд
батареи расходуется быстрее, чем при работе одной
системы GPS.
1 Выберите Menu (меню) > Settings (настройки) > Activity
Profiles (профили занятий).
2 Выберите профиль.
3 Выберите GPS Mode (режим GPS).
4 Выберите нужную опцию.
Настройки карты
Выберите Menu (меню) > Settings (настройки) > Activity
Profiles (профили занятий). Затем выберите нужный про-
филь и опцию Map (карта)/
Orientation (ориентация): Определяет, каким образом карта
показана на экране.
Auto Zoom (авто масштаб): Автоматический выбор уровня
масштаба для карты. При использовании опции Off (выкл.)
вы должны увеличивать или уменьшать масштаб автома-
тически.
Guide Text (текстовые подсказки): Определяет, когда на
экране появляются подсказки перед поворотами.
Изменение ориентации карты
1 Выберите Menu (меню) > Settings (настройки) > Activity
Profiles (профили занятий).
2 Выберите профиль.
3 Выберите Map (карта) > Orientation (ориентация).
4 Выберите одну из следующих опций:
• North Up (север вверху), чтобы совместить верхнюю
часть страницы с севером.
• Track Up (курс вверху), чтобы совместить верхнюю
часть страницы с текущим направлением движения.
• 3D Mode (3D режим), чтобы просматривать 3-мерное
изображение карты.
Предупреждения
Вы можете использовать функцию предупреждений, чтобы
использовать в тренировках целевые параметры времени,
расстояния, калорий, частоты пульса, частоты вращения пе-
далей и мощности. Настройки предупреждений сохраняются в
профиле занятия.
Настройка диапазонных предупреждений
Если вы используете дополнительный пульсометр, датчик
частоты вращения педалей или измеритель мощности, то вы
можете задавать диапазонные предупреждения. Устройство
выдаст сигнал, если определенный параметр станет выше или
ниже выбранного диапазона значений. Например, вы можете
настроить прибор таким образом, чтобы он выдавал преду-
преждение, когда частота вращения педалей станет ниже 40
об./мин. и выше 90 об./мин. Также вы можете использовать в
качестве диапазона предупреждения зону тренировки (
см. п.
«Зоны тренировки», стр. 8
).
1 Выберите Menu (меню) > Settings (настройки) > Activity
Profiles (профили занятий).
2 Выберите профиль.
3 Выберите Alerts (предупреждения).
4 Выберите Heart Rate Alert (предупреждение по частоте
пульса), Cadence Alert (предупреждение по частоте враще-
ния) или Power Alert (предупреждение по мощности).
5 При необходимости включите предупреждение.
6 Введите минимальное и максимальное значение или выбе-
рите зоны.
7 При необходимости выберите .
Каждый раз, когда значение становится ниже или выше ука-
занного диапазона, на экране прибора появляется сообщение.
Если звуковые сигналы включены, то устройство также выдает
звуковой сигнал (
см. п. «Включение и выключение звуковых
сигналов устройства», стр. 15
).
Настройка повторяющегося предупреждения
Повторяющееся предупреждение выдается каждый раз, когда
устройство записывает определенное значение или интервал.
Например, вы можете настроить прибор на выдачу предупреж-
дений каждые 30 минут.
1 Выберите Menu (меню) > Settings (настройки) > Activity
Profiles (профили занятий).
2 Выберите профиль.
3 Выберите Alerts (предупреждения).
4 Выберите Time Alert (предупреждение по времени), Distance
Alert (предупреждение по расстоянию) или Calories Alert
(предупреждение по калориям).
5 Включите предупреждение.
6 Введите значение.
7 Выберите .
Каждый раз при достижении параметра предупреждения на
экране прибора появляется сообщение. Если звуковые сигна-
лы включены, то устройство также выдает звуковой сигнал (
см.
п. «Включение и выключение звуковых сигналов устройства»,
стр. 15
).
Функция Auto Lap
®
(автоматическая отметка начала
круга)
Отметка начала круга по местоположению
Вы можете использовать функцию Auto Lap
®
для автомати-
ческой отметки начала круга в определенном местоположе-
нии. Эта функция может быть полезна для сравнения ваших
результатов, показанных на различных отрезках заезда
(например, длинный подъем или спринт). При прохождении
дистанций используйте опцию By position (по местоположению)
для начала новых кругов во всех начальных точках кругов,
сохраненных в дистанции.
1 Выберите
Menu (меню) > Settings (настройки) > Activity
Profiles (профили занятий).
2 Выберите профиль.
3 Выберите
Auto Features (авто функции) > Auto Lap (ав-
томатическое начало круга) > Auto Lap Trigger (включение
нового круга) > By Position (по местоположению) > Lap
At (круг на).
4 Выполните одно из следующих действий:
• Выберите
Lap Press Only (только нажатие
кнопки Lap), чтобы устройство отмечало новый
круг каждый раз при нажатии на кнопку
, а также
каждый раз при повторном прохождении этих ме-
стоположений.
• Выберите
Start And Lap (кнопки Start и Lap),
чтобы устройство отмечало новый круг в место-
положении GPS, где вы нажали кнопку …, а также
в любых точках маршрута, в которых вы нажали
кнопку
.
• Выберите
Mark And Lap (отметка и Lap), чтобы
устройство отмечало новый круг в определенном
местоположении GPS, отмеченном до поездки,
а также в любых точках маршрута, в которых вы
нажали кнопку
.
5 При необходимости проведите настройку полей с ин-
формацией о круге (
см. п. «Настройка экранов данных»,
стр. 16
).
Отметка начала круга после прохождения опре-
деленного расстояния
Вы можете использовать функцию Auto Lap
®
для авто-
матического начала нового круга после прохождения
определенного расстояния. Эта функция может быть по-
лезна для сравнения результатов на различных отрезках
заезда (например, каждые 10 миль или 40 км).
1 Выберите
Menu (меню) > Settings (настройки) >
Activity Profiles (профили занятий).
2 Выберите профиль.
3 Выберите
Auto Features (авто функции) > Auto Lap
(автоматическое начало круга) > Auto Lap Trigger
(включение нового круга) > By Distance (по расстоя-
нию) > Lap At (круг на).
4 Введите значение.
6 При необходимости проведите настройку полей с ин-
формацией о круге (
см. п. «Настройка экранов данных»,
стр. 16
).
Использование функции автоматической паузы
Вы можете использовать функцию автоматической пау-
зы (Auto Pause
®
) для автоматической остановки таймера
в том случае, если вы прекращаете движение, или ваша
скорость падает ниже заданного значения. Эта функция
может быть полезна в ситуациях, когда ваш маршрут
включает светофоры или другие места, где вам прихо-
дится останавливаться или замедлять движение.
ПРИМЕЧАНИЕ: Когда таймер остановлен или отключен,
данные архива не записываются.
1 Выберите Menu (меню) > Settings (настройки) >
Activity Profiles (профили занятий).
2 Выберите профиль.
3 Выберите Auto Features (авто функции) > Auto
Pause (автоматическая пауза).
4 При необходимости выберите Auto Pause Mode (ре-
жим автоматической паузы).
5 Выберите одну из следующих опций:
• Выберите When Stopped (при остановке), чтобы
таймер автоматически останавливался, когда вы
прекращаете движение.
• Выберите Custom Speed (настраиваемая ско-
рость), чтобы таймер автоматически останавли-
вался, когда ваша скорость падает ниже заданно-
го значения.
6 При необходимости настройте дополнительные поля
данных времени (
см. п. «Настройка экранов данных»,
стр. 16
).
В поле Time – Elapsed (время – истекшее) показано об-
щее время, включая время с остановленным таймером.
Использование функции автоматического переключе-
ния в режим сна
Вы можете использовать функцию Auto Sleep (авто сон) для
автоматического переключения устройства в режим сна после 5
минут без активности. В режиме сна экран отключается; датчики
ANT
+®
, Bluetooth
®
и GPS отсоединяются.
1 Выберите Menu (меню) > Settings (настройки) > Activity
Profiles (профили занятий).
2 Выберите профиль.
3 Выберите Auto Features (авто функции) > Auto Sleep (авто
сон).
Использование автоматической прокрутки
Используйте эту функцию для автоматической прокрутки всех
страниц с данными тренировки во время работы таймера.
1 Выберите
Menu (меню) > Settings (настройки) > Activity
Profiles (профили занятий).
2 Выберите профиль.
3 Выберите
Auto Features (авто функции) > Auto Scroll (авто-
матическая прокрутка).
4 Выберите скорость прокрутки.
Изменение напоминания о старте
Эта функция автоматически определяет, когда ваш прибор Edge
принял спутниковые сигналы и находится в состоянии движения.
Устройство напоминает вам включить таймер, чтобы вы могли
записать информацию о тренировке.
1 Выберите Menu (меню) > Settings (настройки) > Activity
Profiles (профили занятий).
2 Выберите профиль.
3 Выберите Start Notice (напоминание о старте).
4 При необходимости выберите Start Notice Mode (режим напо-
минания о старте).
5 Выберите одну из следующих опций:
◦ Once (однократно)
◦ Repeat > Repeat Delay (повтор > задержка повтора) –
изменение времени задержки напоминания.
Настройки Bluetooth
®
Выберите
Menu (меню) > Settings (настройки) > Bluetooth.
Enable (включить): Включение беспроводной технологии
Bluetooth.
ПРИМЕЧАНИЕ: Остальные настройки Bluetooth будут показаны
только в том случае, если выбрана опция Enable (включить).
Friendly Name (псевдоним): Позволяет ввести псевдоним,
используемый для идентификации ваших устройств в среде
Bluetooth.
Pair Smartphone (сопряжение со смартфоном): Подключение
устройства к совместимому смартфону Bluetooth. Эта настройка
позволяет вам использовать подключаемые функции Bluetooth,
например, LiveTrack (живое слежение) и загрузку занятий в при-
ложение Garmin Connect
TM
.
Pair Bluetooth Smart Device (сопряжение с устройством
по Bluetooth Smart): Подключение устройства к совместимо-
му смартфону с использованием беспроводной технологии
Bluetooth Smart. Эта настройка позволяет использовать функции
для работы с вызовами и текстовыми сообщениями.
ПРИМЕЧАНИЕ: Эта настройка появляется только после сопря-
жения устройства с совместимым смартфоном, оборудованным
беспроводной технологией Bluetooth Smart.
Call and Text Alerts (предупреждения о вызовах и текстовых
сообщениях): Позволяет принимать оповещения от совмести-
мого смартфона.
Missed Calls and Texts (пропущенные вызовы и текстовые
сообщения): Индикация оповещений о пропущенных вызовах и
сообщениях с совместимого смартфона.
Системные настройки
Выберите
Menu (меню) > Settings (настройки) > System (си-
стема).
• Настройки дисплея (
см. п. «Настройки дисплея», стр. 14
).
• Настройки записи данных
(см. п. «Настройки записи
Велокомпьютер Garmin Edge 530 оснащен цветным дисплеем, навигационным датчиком и встроенными картами. Это позволяет использовать устройство для полноценных поездок на большие расстояния. Дополнительные возможности для любителей горного велосипеда гарантируют сбор детальной информации.
Достоинства
- Разрешение дисплея – 246 х 322 пикселей.
- GPS/ГЛОНАСС.
- Навигационные подсказки.
- Расширенная статистика по тренировкам.
- Совместимость с дополнительными датчиками.
- ClimbPro.
- Предупреждение о приближающихся машинах.
- Регистратор аварии Incident Detection.
- Водонепроницаемость IPX7.
- Батарея на 20 ч работы.
Навигация Garmin Edge 530
В памяти устройства сохранены карты Garmin, которые помогут сориентироваться в любой точке мира. На экране отображается не только текущее местоположение, но и подсказки о поворотах, разворотах и других участках дороги, что гарантирует безопасную езду. При необходимости вы можете выстроить маршрут, и велокомпьютер подскажет, как лучше добраться до конечной точки.
Тренировки
Прибор способен анализировать скорость, частоту вращения педалей, ваш пульс, количество затраченных усилий и т.д. Для этого достаточно подключить к устройству дополнительные датчики ANT+ и отслеживать их показатели в меню. На основе полученных велосипедным компьютером Garmin Edge 530 результатов можно менять интенсивность и продолжительность тренировок, определять время отдыха, отслеживать прогресс и т.д.
Функция Strava служит дополнительной мотивацией для тренировок. Программа вычисляет показатели скорости, пройденного пути и времени на определенном участке, и при повторном прохождении отрезка вы сможете улучшить свои показатели, соревнуясь с собой или друзьями.
Режим ClimbPro анализирует карту высот местности и подсказывает, когда стоит приложить дополнительные усилия, а когда можно отдохнуть. Дополнительные датчики определяет количество и дальность прыжков, плавность спуска и сложность поездки. Полученные показатели дадут исчерпывающую картину тренировки.
Безопасность и удобство
При подключении радара заднего обзора и интеллектуальных фар, Garmin Edge 530 будет получать данные о приближающихся машинах и информировать вас изображениями на дисплее. Водители также будут уведомлены, что вы едете на велосипеде – фонари начинают мигать интенсивнее, предупреждая автовладельцев.
Если в поездке вы столкнулись с проблемами, например, потребовался срочный ремонт, можно воспользоваться функцией Incident Detection. Приложение отправит сведения о вашем местоположении заранее введенным контактам.
Дополнительные особенности
Корпус выполнен по стандарту IPX7 – можно не бояться проливного дождя или мытья велосипеда с закрепленным на руле компьютером, т.к. внутренние платы устройства не повредятся.
Питание идет от встроенного Li-Ion аккумулятора, заряда которого хватит на 20 ч бесперебойной работы. При необходимости можно подключить дополнительный блок Garmin Charge и увеличить время работы до 40 ч.
Производитель

Garmin Ltd. — производитель GPS-навигационной техники. Навигаторы Garmin предназначены для различных сфер применения, включая автомобильное, авиационное, морское, туристическое и спортивное оборудование, а также оборудование для беспроводных приложений
Германия — родина бренда
Китай — страна производства
Подробнее о бренде
Подробнее
Нашли ошибку в описании или в характеристиках?
Выделите текст и нажмите Ctrl+Enter
Устройство:
Garmin Edge® 530 Mountain Bike Bundle
Размер: 6,21 MB
Добавлено: 2023-05-15 13:47:27
Количество страниц: 34
Печатать инструкцию
Скачать
Как пользоваться?
Наша цель — обеспечить Вам самый быстрый доступ к руководству по эксплуатации устройства Garmin Edge® 530 Mountain Bike Bundle. Пользуясь просмотром онлайн Вы можете быстро просмотреть содержание и перейти на страницу, на которой найдете решение своей проблемы с Garmin Edge® 530 Mountain Bike Bundle.
Для Вашего удобства
Если просмотр руководства Garmin Edge® 530 Mountain Bike Bundle непосредственно на этой странице для Вас неудобен, Вы можете воспользоваться двумя возможными решениями:
- Полноэкранный просмотр -, Чтобы удобно просматривать инструкцию (без скачивания на компьютер) Вы можете использовать режим полноэкранного просмотра. Чтобы запустить просмотр инструкции Garmin Edge® 530 Mountain Bike Bundle на полном экране, используйте кнопку Полный экран.
- Скачивание на компьютер — Вы можете также скачать инструкцию Garmin Edge® 530 Mountain Bike Bundle на свой компьютер и сохранить ее в своем архиве. Если ты все же не хотите занимать место на своем устройстве, Вы всегда можете скачать ее из ManualsBase.
Garmin Edge® 530 Mountain Bike Bundle Руководство пользователя
Печатная версия
Многие предпочитают читать документы не на экране, а в печатной версии. Опция распечатки инструкции также предусмотрена и Вы можете воспользоваться ею нажав на ссылку, находящуюся выше — Печатать инструкцию. Вам не обязательно печатать всю инструкцию Garmin Edge® 530 Mountain Bike Bundle а только некоторые страницы. Берегите бумагу.
Резюме
Ниже Вы найдете заявки которые находятся на очередных страницах инструкции для Garmin Edge® 530 Mountain Bike Bundle. Если Вы хотите быстро просмотреть содержимое страниц, которые находятся на очередных страницах инструкции, Вы воспользоваться ими.
Посмотреть инструкция для Garmin Edge 530 бесплатно. Руководство относится к категории велокомпьютеры, 26 человек(а) дали ему среднюю оценку 8.4. Руководство доступно на следующих языках: английский. У вас есть вопрос о Garmin Edge 530 или вам нужна помощь? Задайте свой вопрос здесь
Не можете найти ответ на свой вопрос в руководстве? Вы можете найти ответ на свой вопрос ниже, в разделе часто задаваемых вопросов о Garmin Edge 530.
Какой вес Garmin Edge 530?
Аккумулятор в моем устройстве велокомпьютер начал ржаветь. Безопасно ли пользоваться устройством?
Что означает аббревиатура GPS?
Необходим ли интернет для GPS?
Какой размер экрана Garmin Edge 530?
Какая высота Garmin Edge 530?
Какое разрешение экрана дисплея Garmin Edge 530?
Какая ширина Garmin Edge 530?
Какая толщина Garmin Edge 530?
Инструкция Garmin Edge 530 доступно в русский?
Не нашли свой вопрос? Задайте свой вопрос здесь