Настройка IP-телефона Linksys SPA942 (с обновлением прошивки и руссификацией)
Следует обратить внимание на то, что все настройки будут производиться под расширенными полномочиями администратора — активируются из режима непривилегированного пользователя по ссылкам: Admin Login → advanced.
Режим непривилегированного пользователя:

Режим привелигированного пользователя с расширенными полномочиями (обратите внимание как изменяются ссылки переключения режимов):

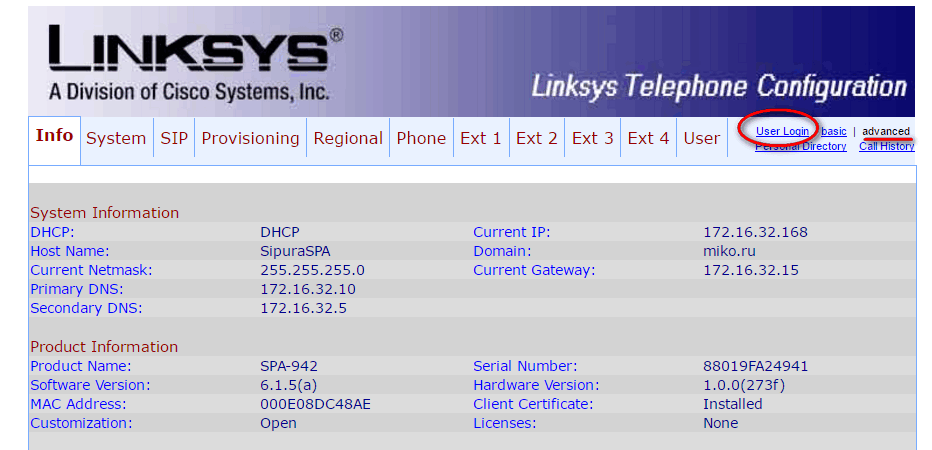
При загрузке открывается страница Info с общей сводкой о состоянии телефонного аппарата, в первую очередь следует обратить внимание на следующие параметры:
- Версию прошивки;
- Настройки времени;
- Состоянии аккаунтов.

Для прошивки и русификации необходим настроенный tftp-сервер, на который предварительно следует залить файлы прошивки и словари.
Прошивать аппарат следует, если версия прошивки ниже 6.1.5(а). Файлы прошивки следует загрузить на tftp-сервер и активировать процесс прошивки через веб интерфейс телефона командой в адресной строке:
http://<PHONE_IP>/upgrade?tftp://<TFTP_SERVER_IP>/spa942-6-1-5a.bin
Следует учесть что если прошивка ниже 5.2.5, сначала следует прошить на эту версию.
Второй способ: непосредственно в веб-интерфейсе во вкладке Provisioning указать параметр Upgrade Rule (serv=tftp://<TFTP_SERVER_IP>/spa942-6-1-5a.bin)

Далее можно переходить к шагу русификации. На странице Regional необходимо указать параметры:
- Dictionary Server Script — serv=tftp://172.16.1.201/;d0=English;x0=enS_US_v615.xml;d1=Russian;x1=ruS_v615.xml
- Language Selection — Russian
- Default Character Ecoding — UTF-8
Также на этой вкладке можно можно выставить необходимый часовой пояс в параметре Time Zone.

Настройка поведения кнопок линий производится на вкладке Phone.
В данной настройке можно указать чтобы все кнопки линий использовали один и тот же экстеншен — на всех линиях необходимо параметр Extension указать равным номеру настроенного Ext, например 1, а также параметр Share Call Appearance = private.

Также на кнопку линии можно подвязать функционал BLF — мониторинг состояния внутреннего номера, также находящегося на АТС. Работает только с прошивкой версии 6-1-5a. Для активации BLF необходимо в соответсвующем Line Key следует параметры привести к следующему виду:
- Extension — Disabled
- Share Call Appearance — shared
- Extended Function — fnc=blf+sd;sub=<ext>@<asterisk_ip>;nme=<ext>
Обязательно необходимо в поле Line Key Extended Function параметр Server Type указать Asterisk.

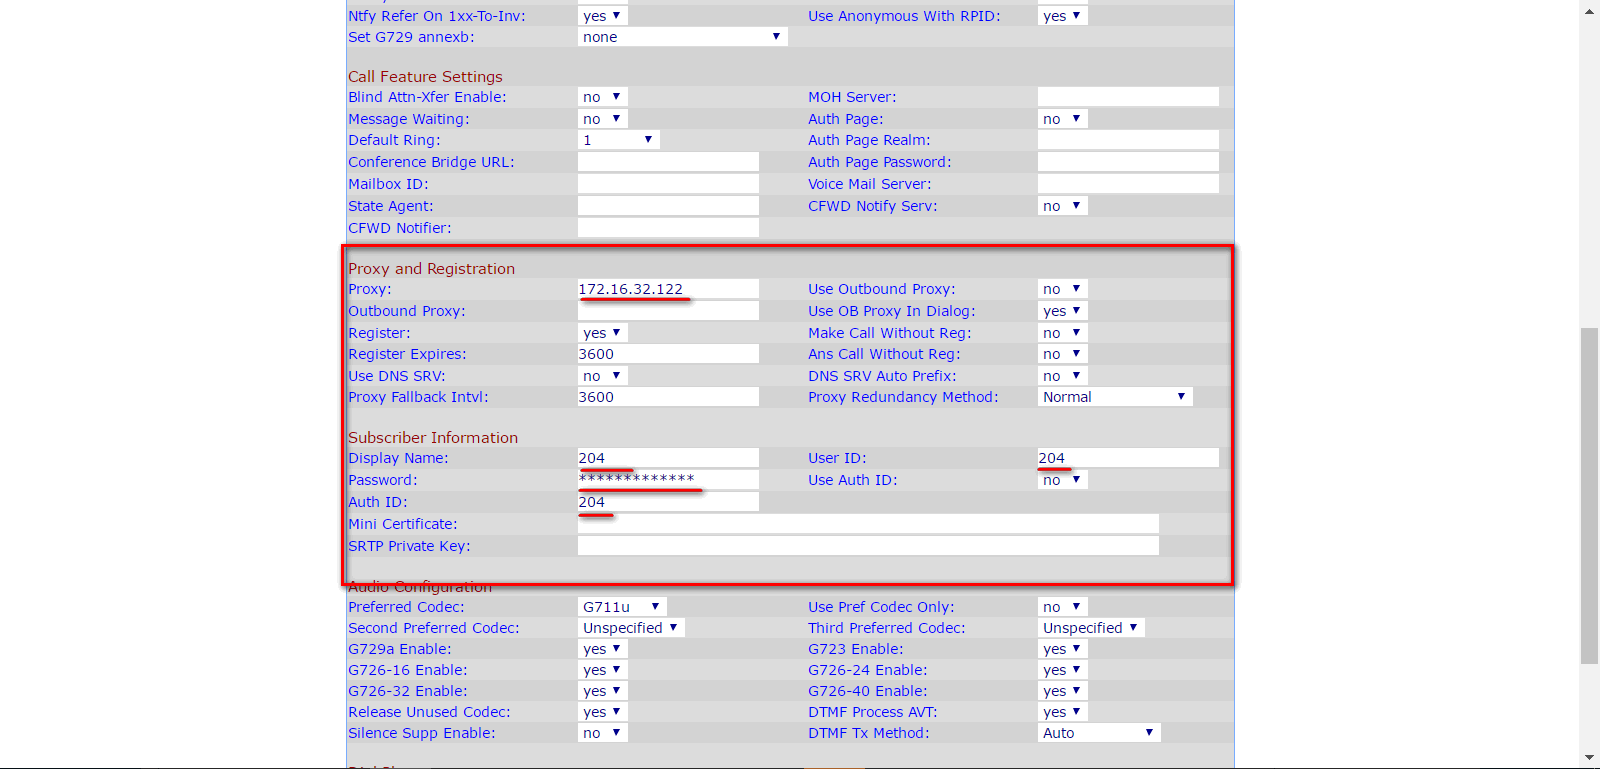
Следующим этапом настраивается непосредственно SIP-аккаунт на вкладке Ext1 необходимо выставить параметры:
- Line Enable: yes — активация аккаунта
- Proxy: <asterisk ip> — ip-адрес Asterisk`а
- Display Name: <ext> — отображаемое имя (может быть любое)
- User ID: <ext> — внутренний номер
- Password: <some secret> — пароль внутреннего номера
- DTMF Tx Method: AVT (rfc-2833)
- Dial Plan: подбирается по необходимости


Если нет необходимости заводить еще номера на телефон, то в остальных аккаунтах необходимо указать Line Enable: no

- Manuals
- Brands
- Linksys Manuals
- IP Phone
- SPA942 — Cisco — IP Phone
- User manual
-
Contents
-
Table of Contents
-
Bookmarks
Quick Links
Linksys SPA- — — — 942
Linksys SPA
Linksys SPA
Linksys SPA
942 User’s Guide
942
942
User’s Guide
User’s Guide
User’s Guide
V1.0
Related Manuals for Linksys SPA-942
Summary of Contents for Linksys SPA-942
-
Page 1
Linksys SPA Linksys SPA Linksys SPA Linksys SPA- — — — 942 942 User’s Guide User’s Guide User’s Guide User’s Guide V1.0… -
Page 2: Table Of Contents
Warm Transferring Placing a Call on Hold Placing a Conference Call Call Forwarding Do Not Disturb Using the Voice Mail Features of the Linksys SPA-942 …………………………………… 6-7 Accessing Voice Mail Recording Your Message Fast-Forwarding or Rewinding Messages Voice Mail Prompt Menu Accessing Voice Mail from Another Location Using Additional Features of the Linksys SPA-942 …………………………………………..
-
Page 3: Linksys Spa-942 Overview
Linksys SPA-942 Overview The following list highlights some of the features that are available with your Linksys SPA-942 VoIP phone. 1. Handset 2. LCD screen which displays time, date, your phone number, caller ID, call status, and soft key tabs.
-
Page 4: Using The Call Features Of The Linksys Spa-942
Using the Call Features of the Linksys SPA-942 Placing a Call There are 2 options available to place a call: Lift the handset and dial the number. • Dial the number and press the “dial” soft key. • Answering a Call There are 2 options available to answer a call.
-
Page 5: Placing A Conference Call
Placing a Conference Call To establish a conference call for an existing call: Press the “Conf” soft key (this will automatically select a new line and place the other • party on hold). Dial the 4 digit extension or the local or long distance number of the second party. •…
-
Page 6: Using The Voice Mail Features Of The Linksys Spa-942
Using the Voice Mail Features of the Linksys SPA-942 Accessing Voice Mail Press • Enter your mailbox number which is your extension number. • Enter your temporary password which is your extension number. • At this time you may reset your password. Press 0 for Mailbox Options, then 4 and •…
-
Page 7: Accessing Voice Mail From Another Location
Press 0 for mailbox options. Your options include: 1 to record your unavailable greeting • 2 to record your busy greeting. • 3 to record your name. • 4 to change your password. • * to return to the main menu. •…
-
Page 8: Using Additional Features Of The Linksys Spa-942
Using the Additional Features of the Linksys SPA-942 Using Call History To access your Call History press Select option 3 or “Call History” and press the “select” soft key You will have the option to view the following call histories: Missed Calls •…
Настройка телефона Linksys SPA942
Обратно к перечню инструкций
Настройка телефона производится через его web-интерфейс.
Узнать адрес телефона можно нажав на кнопку «Меню» 
Выбираем «Сетевые настройки» (клавиша 9). Под цифрой «2» — «Текущий IP» указан полученный телефоном автоматический IP-адрес от роутера. Вводим его в адресную строку браузера. Должно появиться окно web-интерфейса аппарата с просьбой ввести Логин и Пароль для входа в меню. По умолчанию логин admin и пароль admin.
Переключаемся в режим администратора, для этого нажимаем Admin Login, вместо него появится User Login, как показано на рисунке. После этого нажимаем на «advanced», надпись должна стать неактивной.
Для настройки сетевых параметров WAN интерфейса телефона (параметры подключения к роутеру/интернет-провайдеру) перейдите в меню «System»
Для настройки SIP-аккаунта перейдите на вкладку «Ext1» и вводим следующие данные:
Proxy — адрес сервера
User ID, Auth ID, Display Name — номер линии / SIP ID
Password — пароль устройства
В нашем примере мы настраиваем телефон Linksys SPA942 для АТС Askozia. В АТС Askozia в разделе «Учетные записи» → «Устройства» была добавлена новая учетная запись VoIP/SIP Телефона для телефона Linksys SPA942 как показано на рисунке
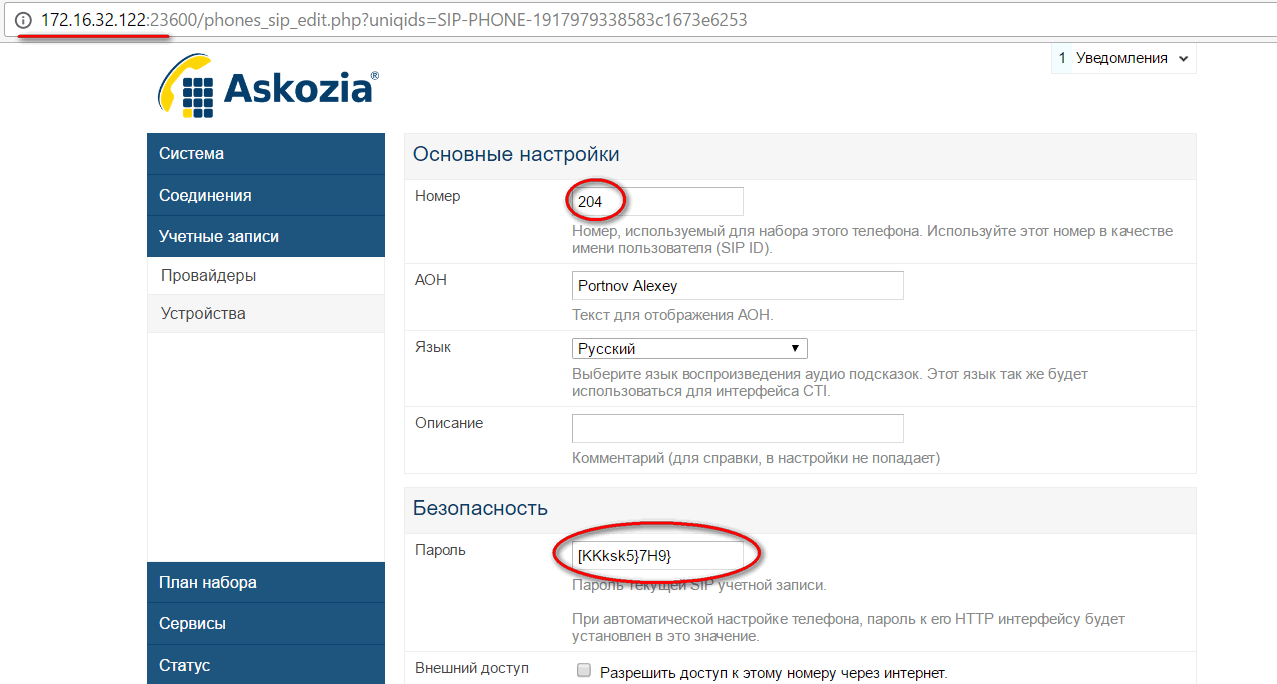
Подробнее об учетных записях телефона читайте здесь
Краткое содержание страницы № 1
620-05600390 — Release 5.6.2
LINKSYS SPA-941 OR SPA-942
TELEPHONE USER GUIDE
WWW
www.tekelec.com
Краткое содержание страницы № 2
Tekelec, Inc. 3605 E. Plano Parkway, Suite 100 Plano, TX 75074 © 2005 Tekelec, Inc. All rights reserved. T100, T300, T6000, T7000, T8000, and T9000 are trademarks of Tekelec, Inc. Trademarks of Tekelec, Inc. include: • Tekelec, Inc. • Tekelec • dryISE • ISE • OpenManager All products, names and services are trademarks and registered trademarks of their respective companies. Music: [BG_EASY.WAV, BG_LIGHT.WAV, BG_JAZZ.WAV, IRELAND.WAV, JAPAN.WAV, LITLLITE.WAV, TRANCE.WAV] © and (P) Copyright
Краткое содержание страницы № 3
Table of Contents • • • • • • 1 Your Linksys SPA-941 or SPA-942 Telephone Introduction …………………………………………………………………………………….1 Accessing Phone Features ……………………………………………………………………….. 1 In This Manual…………………………………………………………………………………………. 1 Telephone Description …………………………………………………….
Краткое содержание страницы № 4
3 System Telephone Features Feature Activation Digit …………………………………………………………………13 Abbreviated Dial ……………………………………………………………………………13 Creating an Abbreviated Dial Code…………………………………………………………… 13 Using an Abbreviated Dial Code ………………………………………………………………. 14 Modifying an Abbreviated Dial Code ………….
Краткое содержание страницы № 5
Call Waiting …………………………………………………………………………………..27 Answering the Second Call ……………………………………………………………………… 28 Switching Between Held Calls………………………………………………………………….. 28 Suspending Call Waiting …………………………………………………………………………. 28 Call Waiting with Caller ID ……………………….
Краткое содержание страницы № 6
Picking Up a Parked Call ……………………………………………………………….41 Retrieveing the Parked Call……………………………………………………………………… 41 Priority Call …………………………………………………………………………………..42 Enabling/Disabling Priority Call ………………………………………………………………… 42 Adding Members to the Priority Call List ………………….
Краткое содержание страницы № 7
Deleting Forwarded Phone Numbers ………………………………………………………… 56 Speed Dial …………………………………………………………………………………….57 Programming a Speed Dial Key ……………………………………………………………….. 57 Using a Speed Dial Button ………………………………………………………………………. 58 Identifying the Number Assigned to a Speed Dial key ……………
Краткое содержание страницы № 8
Sending a Message Directly to an Extension ………………………………….73 Personal Greetings ………………………………………………………………………..73 Recording Personalized Mailbox Greetings ……………………………………………….. 74 Listening to Your Greetings……………………………………………………………………… 74 Receiving Pager Notification ………………………………………………………….
Краткое содержание страницы № 9
Returning to the Auto Attendant or Operator ………………………………….91 Zeroing Out to a Custom Operator …………………………………………………91 Replaying a Message …………………………………………………………………….92 Saving a Message ………………………………………………………………………….92 Skipping to the Next Message ………………………………………………………..92 Deleting a Messa
Краткое содержание страницы № 10
Using Controls While Playing Messages ………………………………………107 Rewind/Fast Forward ……………………………………………………………………………. 107 Rewind to the Beginning of a Message……………………………………………………. 107 Fast Forward to the End of a Message ……………………………………………………. 107 Pause Play of a Message………………………………………………………………
Краткое содержание страницы № 11
7 Set Up Outlook for TAPI Using TAPI to Call from Outlook …………………………………………………..121 Installing the TAPI Support Software ……………………………………………123 Configuring Windows for TAPI …………………………………………………….128 Configuring Outlook to Use TAPI …………………………………………………136 Index 1 Table of Contents ix
Краткое содержание страницы № 12
x Table of Contents
Краткое содержание страницы № 13
Your Linksys SPA-941 or SPA-942 1 Telephone Introduction This guide describes how to use all of the features that are provided by the Tekelec 6000 telephone system on your Linksys SPA-941 or Linksys SPA-942 telephone. Accessing Phone Features Some features require you to dial an activating digit followed by a numeric code. The default value for this activating digit is 5 and it is used throughout this guide. However, your system administrator may choose to use another digit for this functio
Краткое содержание страницы № 14
Linksys SPA-941/942 Features Table Ringer Four Display Indicator Softkeys Four Line Buttons Scroll Key and “More” key Voice Mail Hold Settings Mute Volume Headset Numeric Speakerphone Keypad Figure 1: Linksys SPA-941/942 IP Telephone Linksys SPA-941/942 Features Table Features Descriptions Display The LCD display shows call status, dialing and directory information as well as menu items. Ringer Indicator This indicator flashes red when there is an incoming call. Four Softkeys The funct
Краткое содержание страницы № 15
In This Manual Features Descriptions Scroll Key and “More” Key The buttons allow the user to scroll up and down menu items on the display. Pressing the right side of the button provides “More” information/additional choices for the menu options shown on the display Voice Mail Acts as a speed dial to the user’s voice mail. Hold Places the call on Hold. The Line button for the call that is on hold will be flashing red while the call is on hold. To resume the held call, press the blinking Lin
Краткое содержание страницы № 16
Moving Your Telephone 4 Your Linksys SPA-941 or SPA-942 Telephone Linksys SPA-941/942 Telephone User Guide 620-05600390
Краткое содержание страницы № 17
Basic Phone Features 2 Adjusting the Volume 1. Activate the handset, headset, or speakerphone. 2. Press the Volume key once. A horizontal scale displays on the phone to indicate the volume level. 3. Press the Scroll key (up or down) to adjust the volume as desired. The setting is automatically saved. Adjusting the Ringer Volume 1. While the phone is ringing, press the Volume key once. A horizontal scale displays on the phone to indicate the volume level. 2. Press the Scroll key (up or down)
Краткое содержание страницы № 18
Hanging Up Hanging Up To hang-up the phone, use one of these options: • Replace the handset in its cradle. • Press the line key and replace the handset. • Press the Headset ( ) key (if using a headset). • Press the Speaker ( ) key (if using the speakerphone). Line Indicators The numbers assigned to each of the line keys on the Linksys phone appear on the LCD display. Each line key has a light indicator that indicates the state of the call on the line: • Solid green – the line is free with no a
Краткое содержание страницы № 19
Using the Main Display softkeys Managing Missed Calls The Linksys phone will display the number of missed calls. You can view the caller ID and return the call, if desired. Using the Main Display softkeys When you have missed calls, the softkeys on the main display will show “lcr” (last call redial) on the left, and “miss” on the right. • If you press the lcr softkey, the phone will redial the first missed call. • If you press the miss softkey, you can view the missed calls, and choose whic
Краткое содержание страницы № 20
Preferences Preferences There are many Preference settings that can be configured on your Linksys telephone. The possible configuration items are: • Block Caller ID • Block Anonymous Call • Do Not Disturb (unsupported) • Secure Call • Dial Assistance • Preferred Audio Device • Auto Answer Page • Send Audio to Speaker • Time Format • Date Format To configure your phone preferences: 1. Press the Settings ( ) key and press 5 or use the scroll down key to select Preferences from the list. 2. Press
инструкцияLinksys SPA942

Cisco Small Business
IP Phone Model SPA92X, SPA94X, and SPA962
USER GUIDE
Посмотреть инструкция для Linksys SPA942 бесплатно. Руководство относится к категории телефоны, 1 человек(а) дали ему среднюю оценку 5.9. Руководство доступно на следующих языках: английский. У вас есть вопрос о Linksys SPA942 или вам нужна помощь? Задайте свой вопрос здесь
- Getting Started
- Installing Your Phone
- Using Basic Phone Functions
- Using Advanced Phone Features
- Using the Web Interface
- Using the SPA932 Attendant Console
- Additional Information
- Where to Go From Here
Нужна помощь?
У вас есть вопрос о Linksys а ответа нет в руководстве? Задайте свой вопрос здесь Дай исчерпывающее описание проблемы и четко задайте свой вопрос. Чем детальнее описание проблемы или вопроса, тем легче будет другим пользователям Linksys предоставить вам исчерпывающий ответ.
Количество вопросов: 0

Главная
| Linksys | |
| SPA942 | |
| телефон | |
| английский | |
| Руководство пользователя (PDF) |
Не можете найти ответ на свой вопрос в руководстве? Вы можете найти ответ на свой вопрос ниже, в разделе часто задаваемых вопросов о Linksys SPA942.
Инструкция Linksys SPA942 доступно в русский?
Не нашли свой вопрос? Задайте свой вопрос здесь
Нет результатов

Cisco SPA901
инструкция87 страниц(ы)

Gigaset A220 Trio
инструкция17 страниц(ы)

Gigaset A510A Trio
инструкция72 страниц(ы)

Fysic FX-5720
инструкция60 страниц(ы)

Panasonic KX-TG8622
инструкция76 страниц(ы)

Topcom Butler Outdoor 2010
инструкция152 страниц(ы)

Gigaset A510 Duo
инструкция77 страниц(ы)

Swissvoice ePure
инструкция36 страниц(ы)

Tiptel 290 ISDN
инструкция84 страниц(ы)

Doro PhoneEasy 110
инструкция26 страниц(ы)
Посмотреть все Linksys руководства Посмотреть все Linksys телефон руководства