
-
Contents
-
Table of Contents
-
Bookmarks
Quick Links
Technical Manual
Autoclave
Vacuklav
Vacuklav
as of software version 4.06
Please read the accompanying User Manual before you start operation of the
autoclave. The instructions contain important safety precautions. Make sure to keep
the Technical Manual together with the User Manual near the autoclave. The
instructions are part of the product.
®
23 B+
®
31 B+
For users and Service personnel
Related Manuals for MELAG Vacuklav 23 B+
Summary of Contents for MELAG Vacuklav 23 B+
4.11.2
Interruption of a drying phase ………………………………………………………………………………………. 20
4.13 Operational shutdowns………………………………………………………………………………………………………. 21
5
INTO SERVICE……………………………………………………………………………………………………………………………… 21
6
SPECIAL FUNCTIONS ……………………………………………………………………………………………………………. 22
6.1
6.2
Selection for additional drying …………………………………………………………………………………………….. 22
6.3
6.3.1
Output of logs…………………………………………………………………………………………………………….. 22
6.3.1.1
External printer…………………………………………………………………………………………………….. 22
6.3.1.2
Connection to an external PC………………………………………………………………………………… 24
6.3.1.2.1 Installation……………………………………………………………………………………………………….. 24
6.3.1.3
No printer ……………………………………………………………………………………………………………. 24
6.3.2
6.3.3
6.3.4
Printing out all stored cycles ………………………………………………………………………………………… 26
6.3.5
6.3.6
6.3.7
Test printout ………………………………………………………………………………………………………………. 29
6.4
Setting the date and time of day …………………………………………………………………………………………. 30
6.5
Automatic pre-heating ……………………………………………………………………………………………………….. 31
6.6
Total-cycle counter ……………………………………………………………………………………………………………. 32
6.7
6.8
Program modifications……………………………………………………………………………………………………….. 33
7
FAULTY OPERATION / MALFUNCTIONS ………………………………………………………………………………… 34
7.1
What to do in case of malfunctions ……………………………………………………………………………………… 34
7.2
7.2.1
An empty display window…………………………………………………………………………………………….. 34
7.2.2
7.2.3
Poor drying………………………………………………………………………………………………………………… 34
7.3
Warning messages……………………………………………………………………………………………………………. 35
7.4
Error messages ………………………………………………………………………………………………………………… 37
8
8.1
Preparation of instruments …………………………………………………………………………………………………. 39
8.2
8.3
8.3.1
Cleaning ……………………………………………………………………………………………………………………. 41
8.3.2
8.4
8.4.1
8.4.2
8.4.3
9
ANNEX ………………………………………………………………………………………………………………………………….. 43
9.1
Instructions on drying ………………………………………………………………………………………………………… 43
9.1.1
9.1.2
Textiles……………………………………………………………………………………………………………………… 44
9.1.3
Instruments ……………………………………………………………………………………………………………….. 45
9.1.4
Loading the autoclave …………………………………………………………………………………………………. 45
9.1.5
9.1.6
9.1.7
Removing sterilized items ……………………………………………………………………………………………. 46
9.1.8
10 INDEX……………………………………………………………………………………………………………………………………. 47
®
23-B……………………………………………………………………………………… 41
User Manual for the Vacuklav
®
42 ………………………………………………… 22
®
23-B
3
Similar to MELAG Vacuklav 23-B Manuals, User Guides and Instructions:
-
Biohit Proline Plus 728010
1CONTENTS 1. Intended Use …………………………………………………………………………….. 2 2. Product description ………………………………………………………………….. 2 3. Biohit tips ………………………………………………………………………. …
Proline Plus 728010 Laboratory Equipment, 14
-
Antec DECADE Elite
T +31 71 5813333 | F +31 71 5813334 | [email protected] | www.myantec.com Antec Industrieweg 12 2382 NV Zoeterwoude T he Netherlands DECADE Elite User Manual 175.0010, Edition 2, 2015 …
DECADE Elite Security Sensors, 122
-
Emerson Branson Sonifier
Sonifier® Quickstart GuideSonifier®Front Panel Controls and LCDContinuous or pulsed ultrasonicsTime, energy, and temperature control modes. Program a Pulse Temp and a Max Temp to enable True Temperature ControlFully programmable pulsing, in time or energy (joules)Experiment progress indicatorProcess monitoringTest …
Branson Sonifier Laboratory Equipment, 2
-
Woson DOLPHINN
DOLPHINN Steam Sterilizer Operation Manual Technical Publications DOLPHINN Steam Sterilizer Operation Manual ASS090 REV-B Operation Documentation © 2015 By Woson Medical Instrument Co., Ltd. …
DOLPHINN Laboratory Equipment, 19
User manual
Vacuklav®23 B+
Vacuklav®31 B+
Steam sterilizer
From software version 5.15
Dear Dr
We should like to extend our thanks for the expression of trust in our company which you have displayed through the
purchase of this MELAG device.
As an owner-run and operated family concern founded in 1951, we have a long history of successful specialization in
hygiene products for practice-based use. Our focus on quality, highest standards of operational reliability and innovation
has established MELAG as the world’s leading manufacturer in the area instrument treatment and hygiene.
You, our customer are justified in your demand for the best products, quality and reliability. Providing «competence in
hygiene» and «quality — made in Germany», we guarantee that these demands will be met. Our certified quality
management systems is subject to close monitoring: one instrument to this end is our annual multi-day audit conducted
in accordance with ISO 13485 and ISO 9001. This guarantees that all MELAG products are manufactured and tested in
accordance with strict quality criteria.
The MELAG management and team.
General notes
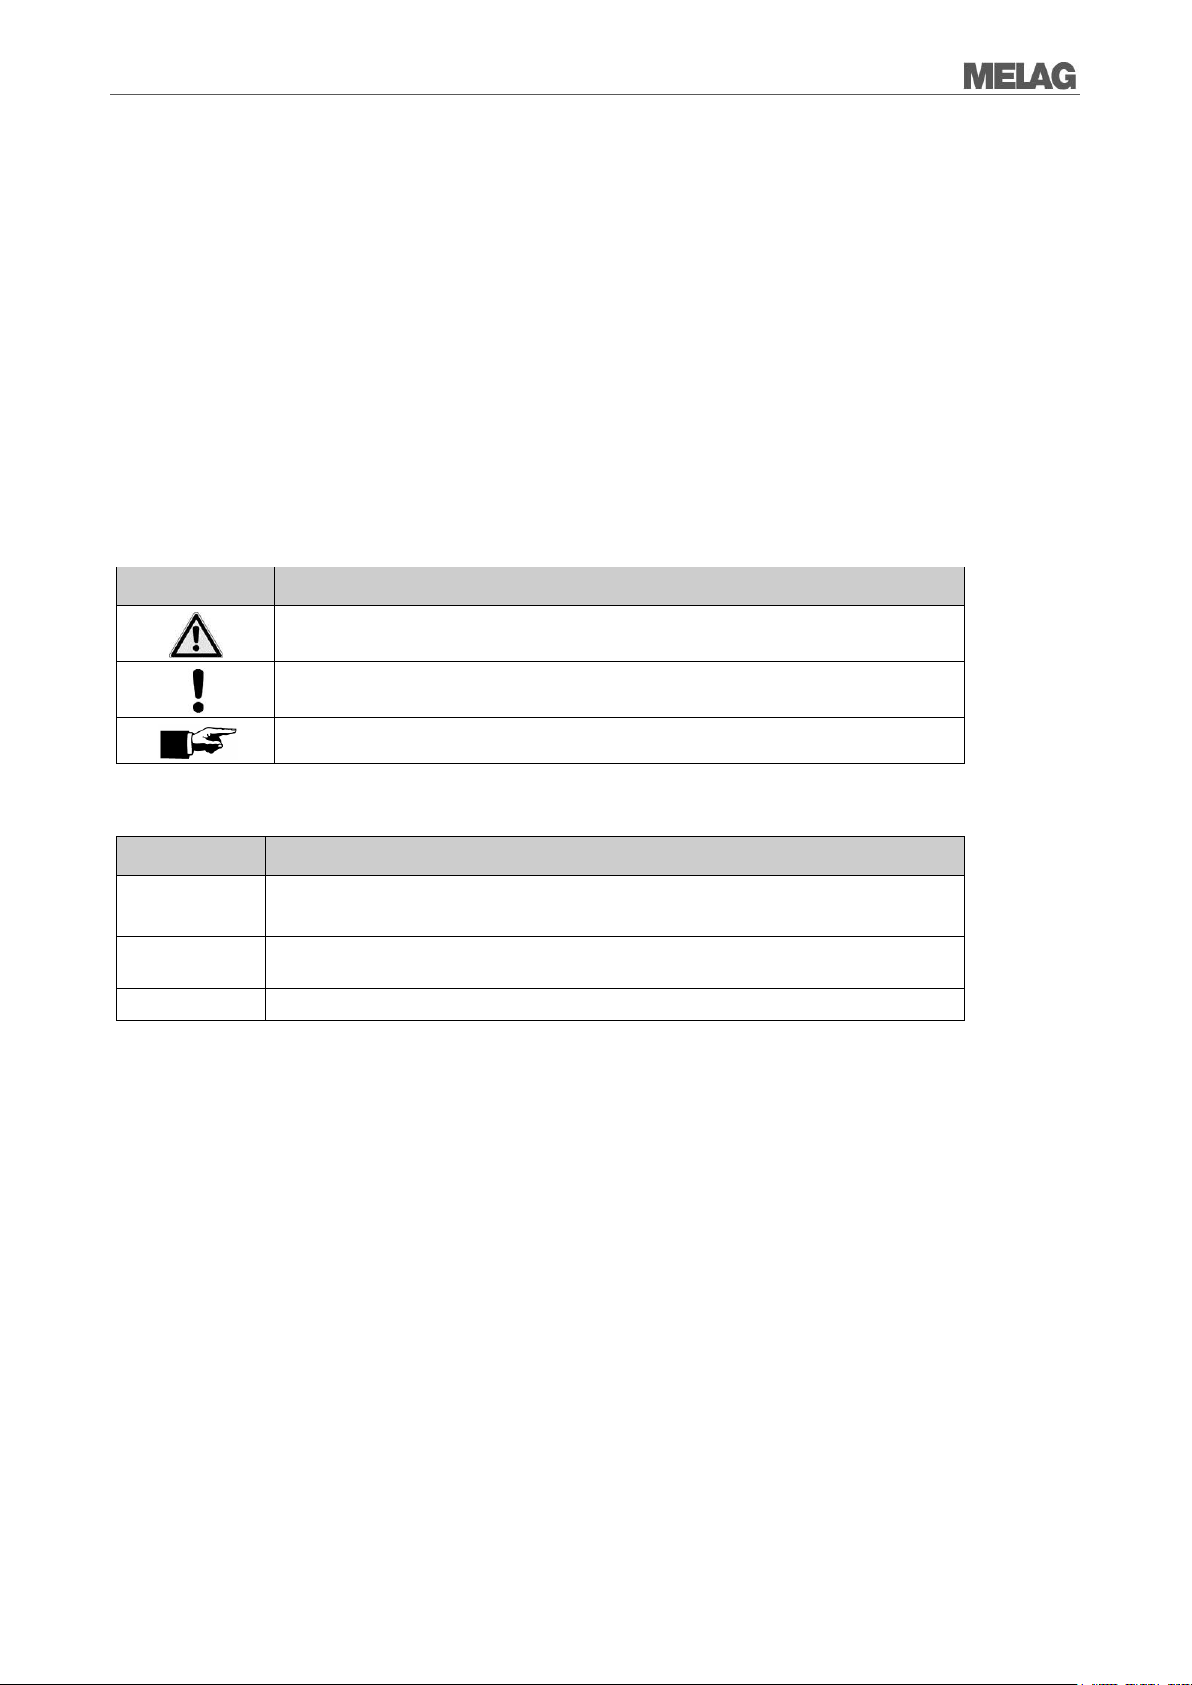
Indicates a dangerous situation, which if not avoided, could entail slight to lifethreatening injuries.
Draws your attention to a situation, which if not avoided, could result in damage to
the instruments, the practice fittings or the device.
Draws your attention to important information.
Words or phrases appearing on the display of the sterilizer are marked as software
citations.
Reference to another text section within these instructions.
Reference to a detail in a figure – in the example, to part no. 5 in Figure 1.
General notes
Please read this user manual carefully before commissioning the device. The manual includes important safety
information. The functionality and value-retention of this sterilizer depends on the care accorded to it.
Please store this user manual carefully and in close proximity to your sterilizer. It represents a component of the product.
User group
This manual is addressed to doctors, their assistants and service departments.
Validity
This manual is valid for the steam sterilizer Vacuklav 23 B+ und Vacuklav 31 B+.
About this manual
Symbols used
Formatting rules
Symbols on the device
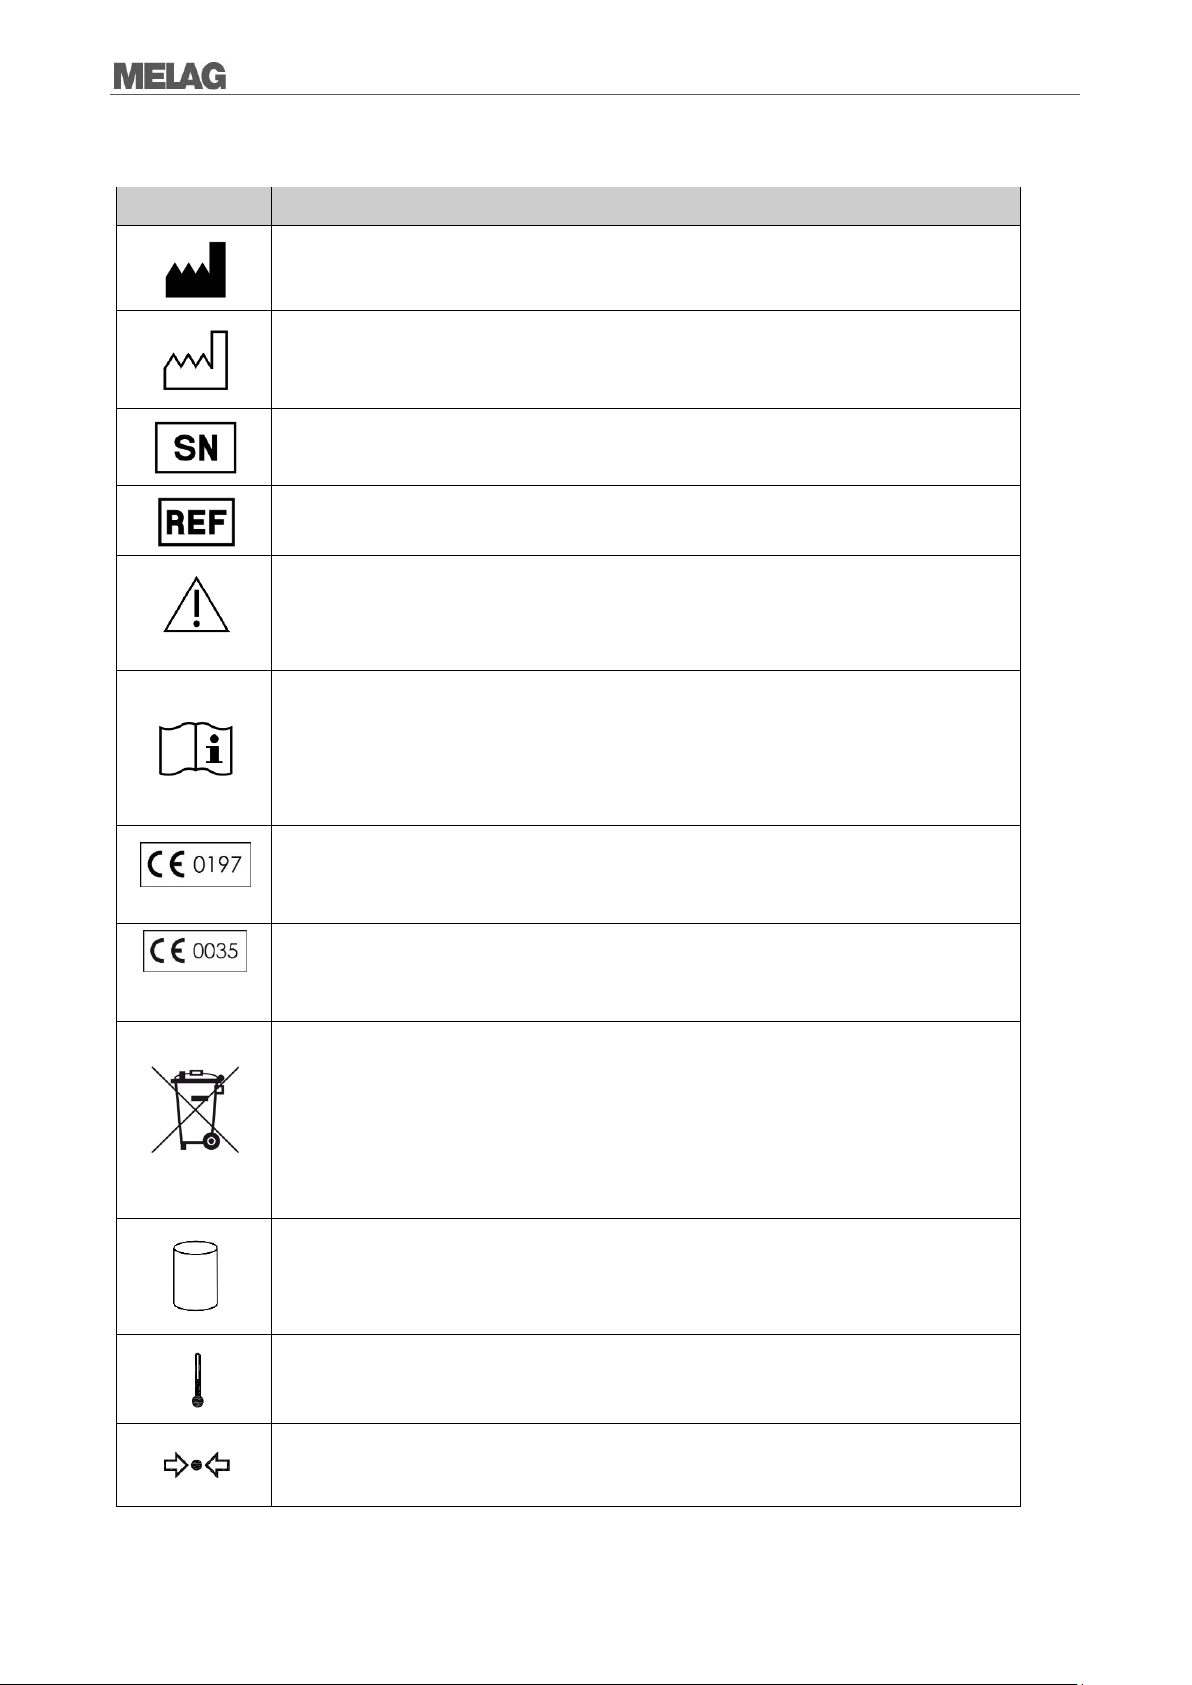
Manufacturer of the medical device
Date of manufacture of the medical device
Serial number of the medical device by the manufacturer
Article number of the medical device
This User Manual contains important safety information.
Failure to comply of the safety instructions could result in human and material damage.
Please read this user manual carefully before commissioning the device. The manual
includes important safety information. The functionality and value-retention of this sterilizer
depends on the care accorded to it. Please store this user manual carefully and in close
proximity to your sterilizer. It represents a component of the product.
In affixing this CE mark, the manufacturer declares that this medical product fulfils the basic
requirements of the medical device directive. The four-digit number confirms that this is
monitored by an approved certification agency.
In affixing this CE mark, the manufacturer declares that this medical product fulfils the basic
requirements of the pressure device directive. The four-digit number confirms that this is
monitored by an approved certification agency.
The symbol of the struck out waste bin identifies a device that may not be disposed in the
domestic waste. The vendor is responsible for appropriate disposal of the device — it must be
delivered to the vendor to be disposed of. With the designation of an apparatus with this
symbol, the manufacturer furthermore declares that he satisfies all requirements of the law
concerning the release, redemption and environmentally sound disposal of electric and
electronic appliances.
MELAG devices are synonymous for long-term quality. When you eventually need to
decommission your MELAG device, we offer a special disposal service. Simply contact your
stockist.
Indication of the scale of the chamber volume
Operating temperature of the device
Operating pressure of the device
General notes

General notes
Scope of delivery
Standard scope of delivery
Vacuklav 23 B+ or Vacuklav 31 B+
User manual
Technical manual
Guarantee
Manufacturer’s inspection report
Declaration of conformity medical products directive
Declaration of conformity pressure device directive
Installation / set-up protocol
Mounts for trays and cassettes
Tray jack
Hose for emptying the interior water storage tank
TORX key for removing the carrying strap
Lever for emergency opening of the door
Key for the filter inside the chamber
2 Replacement device fuses on the door interior of the sterilizer
Optionally
Trays
Standard tray cassettes and jack
Additional mounts

Table of contents
Chapter 1 – Device description ………………….. 8
Intended Use ……………………………………………………… 8
Views of the device ……………………………………………… 9
Operating panel ………………………………………………….10
Mountings for the load …………………………………………10
Chapter 2 – Installation …………………………… 11
Electrical connection ……………………………………………11
Feed water supply ………………………………………………11
Waste water connection ………………………………………11
Record of installation and set-up …………………………..11
Chapter 3 – Initial start-up ……………………….. 12
Switching on the sterilizer …………………………………….12
Opening and closing the door ……………………………….12
Providing feed water ……………………………………………12
Setting the date and time ……………………………………..13
Chapter 4 — Sterilizing …………………………….. 14
Preparing the sterilization material ………………………..14
Loading the sterilizer……………………………………………15
Selecting the program………………………………………….18
Selecting automatic pre-heating ……………………………19
Starting the program ……………………………………………19
Selecting additional drying ……………………………………20
Program run ……………………………………………………….20
Sterilization phase is ended ………………………………….20
Drying phase ……………………………………………………..21
Program end ………………………………………………………21
Manual program abort …………………………………………21
Displaying the daily batch counter …………………………23
Displaying the total batch counter ………………………….23
Removing the sterilized equipment ………………………..24
Storing sterile equipment ……………………………………..24
Chapter 5 — Logging ……………………………….. 25
Batch documentation …………………………………………..25
Output media ……………………………………………………..25
Outputting logs immediately and automatically ………..28
Subsequent log output …………………………………………29
Displaying the log memory …………………………………..30
Deleting logs in the internal log memory …………………30
Reading logs correctly …………………………………………31
Table of contents
Batch-related checks ………………………………………….. 33
Vacuum test ……………………………………………………… 33
Bowie & Dick test ………………………………………………. 34
Checking the quality of the feed water ………………….. 35
Check pre-heating temperature of the chamber ……… 35
Chapter 7 — Maintenance ………………………… 36
Checks and cleaning ………………………………………….. 36
Avoiding staining ……………………………………………….. 37
Replacing the door seal ……………………………………… 37
Aligning the door seal sealing lip ………………………….. 38
Replacing or sterilzing the sterile filter ………………….. 39
Cleaning the filter in the chamber…………………………. 40
Maintenance …………………………………………………….. 41
Chapter 8 – Operating Pauses ………………… 41
Sterilization times ………………………………………………. 41
Operating pauses ………………………………………………. 41
Decommissioning ………………………………………………. 41
Recommissioning after relocation ………………………… 41
Chapter 9 – Description of function …………… 42
The sterilization procedure ………………………………….. 42
Type of the feed water supply ……………………………… 42
Internal process monitoring …………………………………. 42
Program …………………………………………………………… 42
Chapter 10 – Malfunctions ………………………. 46
Before you call customer service …………………………. 46
Opening the Emergency door during a power failure . 53
Changing the device fuses ………………………………….. 54
Glossary ………………………………………………. 55
Technical Data ……………………………………… 57
Accessories ………………………………………….. 58
Chapter 6 – Functional Checks ………………… 33
Automatic functional checks …………………………………33
Manual functional checks …………………………………….33

Safety Instructions
When operating the sterilizer, please observe the following safety instructions as well as those contained
in subsequent chapters.
Use the device only for the purpose named in the user manual.
Power cable and mains socket
Set-up installation and commissioning
Safety Instructions
Never use this sterilizer to sterilize any fluids.
Never damage or alter the plug or power cable.
Never operate the sterilizer if the plug or power cable are damaged.
Never unplug by pulling on the power cable. Always take a grip on the plug.
The sterilizer should only be set-up, installed and commissioned by MELAG authorized persons.
The connections for electrical provision and water supply and discharge must be set-up by trained
personnel.
In accordance with current VDE specifications, the sterilizer is unsuitable for operation in areas
exposed to the danger of explosion.
The sterilizer is conceived for use outside the patient area. The device should be located a
minimum of 1.5 m radius away from the treatment area.
Observe all the information contained in the technical manual during commissioning.
Documentation media (computer, CF card reader, etc.) must be placed in such a way that they
cannot come into contact with liquids.
Failure to comply with the set-up conditions can result in malfunctions or damage to the sterilizer
and/or human injury.
Preparation and sterilization
Follow the manufacturer instructions of your textile articles and instruments regarding their
treatment and sterilization.
Observe the relevant standards and directives applicable to the treatment and sterilization of
textiles and instruments e.g. from the RKI, and DGSV.
Only ever use packaging material and systems which have been cleared by their manufacturer for
steam sterilization (consult the manufacturer’s instructions).
Only ever operate the steam sterilizer with a sterile filter inserted.
Program abort
Please observe that depending on the time of the program abort, opening the door following a
program abort can lead to hot steam leaving the chamber.
Depending on the time of the program abort, it is possible that the load is unsterile. Observe the
clear instructions on the sterilizer display. It may be necessary to re-pack and re-sterilize the
sterilization material.
Removing the sterilized equipment
Never use force to open the door.
Use a tray jack to remove the tray. Never touch the sterilized equipment, the chamber or the door
with bare hands. The components are hot.
Check the packaging on the sterilized equipment for damage when removing it from the sterilizer.
Should the packaging be damaged, re-pack the sterilization material and re-sterilize it.
6

Maintenance
Maintenance should only be performed by authorized personnel.
Carrying the sterilizer
The sterilizer should always be carried by two people.
Use the correct carrying strap to carry the sterilizer.
Malfunctions
Upon the incidence of repeated malfunction messages in the sterilizer, turn off the sterilizer and if
necessary, inform your stockist.
The sterilizer may only be serviced by authorized personnel.
The sterile filter must be sterilized or replaced following a power outage suffered in over-pressure
or following the incidence of the malfunction message Malfunction 32.
Safety Instructions
7

Chapter 1 – Device description
Chapter 1 – Device description
Intended Use
The sterilizer is designed for application in a medical context, e.g. clinics and medical and dental practices.
According to DIN EN 13060, this sterilizer is a Class-B-sterilizer. As a universal sterilizer, it is suited to
highly-demanding sterilization tasks. It can be used to sterilize instruments with a low inner diameter and
transfer instruments — both wrapped or unwrapped — and large quantities of textiles.
DANGER
The sterilization of fluids can result in a delay in boiling, which could result in damage to
the sterilizer and burns.
Never use this sterilizer to sterilize any fluids. It is not licensed for the sterilization of fluids.
WARNING
Failure to observe these provisions can result in damage or can compromise safety.
Only ever use the sterilizer for the applications as foreseen in the technical documentation
and only in connection with the devices and components as recommended by MELAG.
As with the preceding instrument treatment and in accordance with §2 MPBetreibV, the
sterilization of instruments and textiles using this sterilizer may only be carried out by
competent personnel.
When conducting sterilization procedures, only use instruments, packaging and textiles which
the manufacturer has cleared for steam sterilization.
8
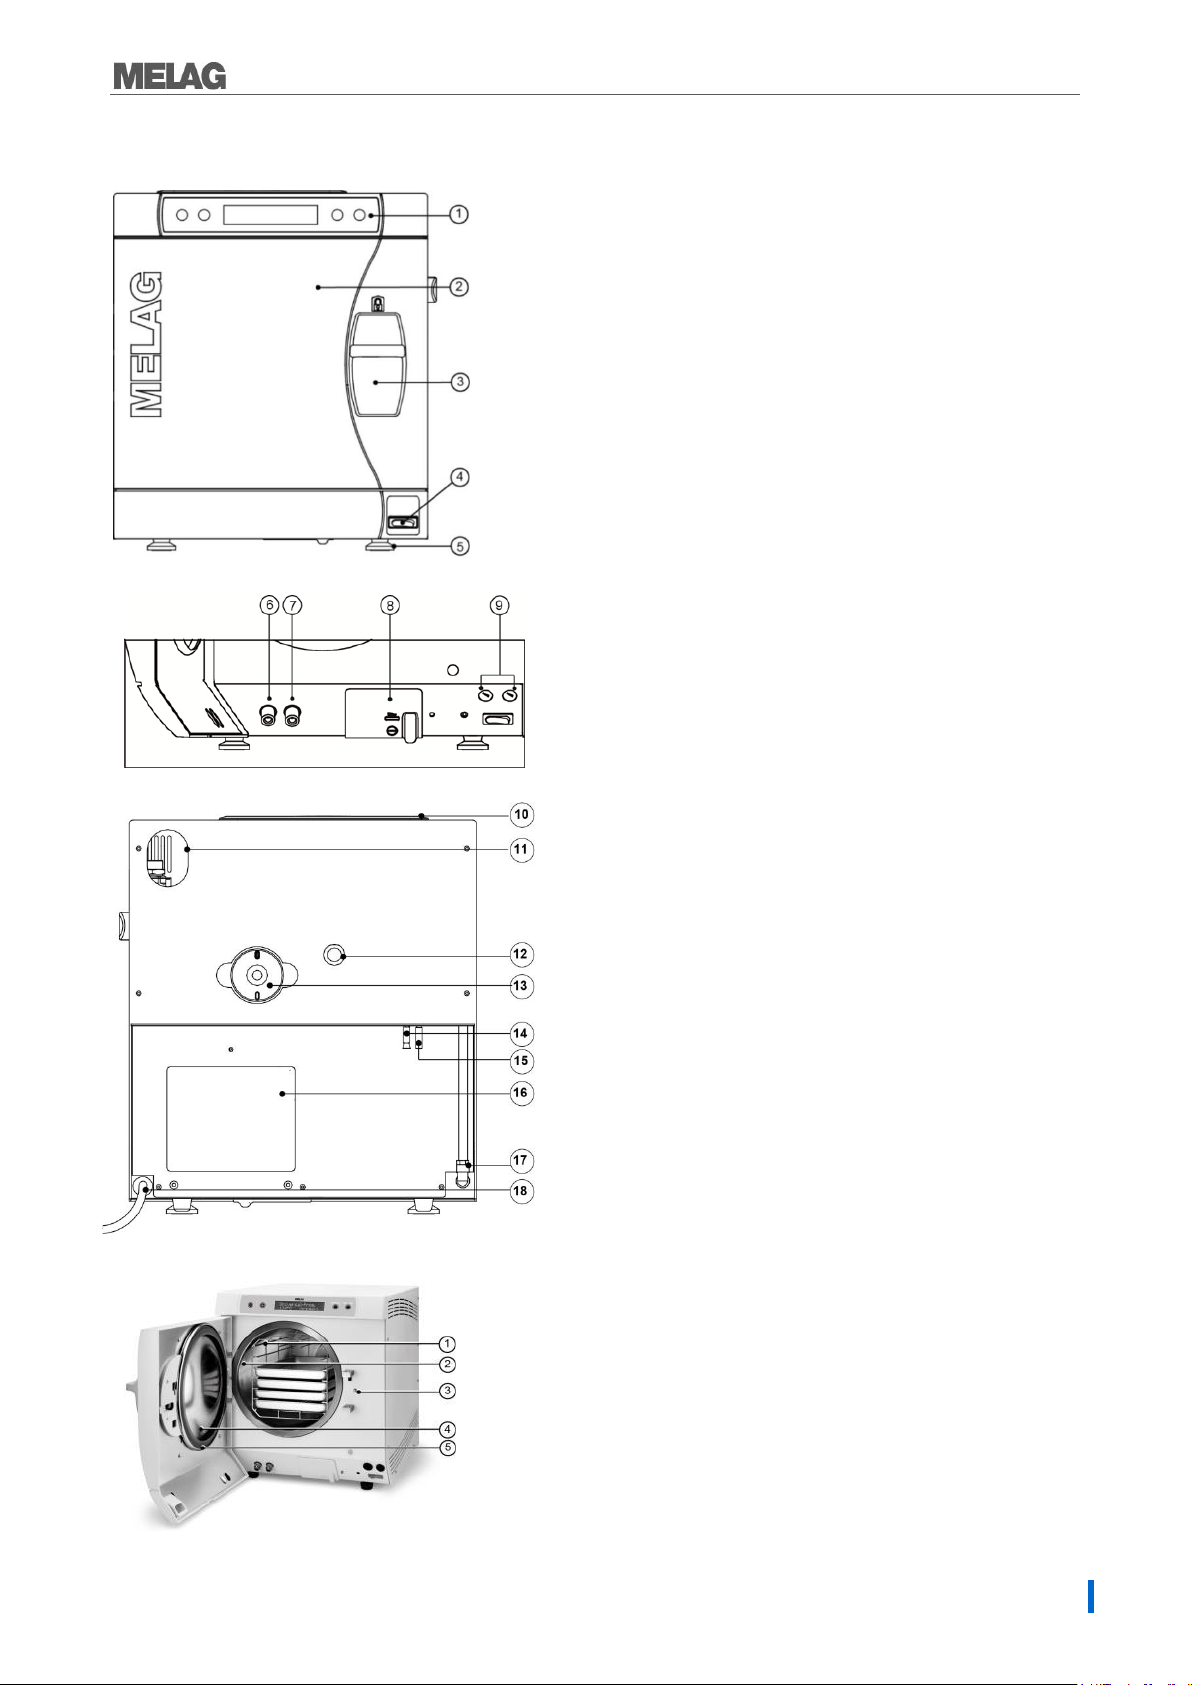
1. Operating and display panel
2. Door, pivots to the left
3. Sliding closure grip
4. Power switch
5. Front device foot (adjustable)
6. Connection for emptying the
storage tank waste water
7. Connection for emptying the
storage tank feed water
8. Serial data and printer connection (RS232)*
9. Fuses – 2x 16A/gRL
*hidden behind the white cover
10. Tank lid
11. Slot for optional upgrade with the
safety combination EN 1717
12. Spring safety valve
13. Sterile filter
14. One-way discharge (optional)
15. Emergency overflow hose
16. Cooler
17. Purified feed water inlet for
water treatment unit
18. Power supply cord
Fig. 2: Device view rear panel
1. Mounting to hold trays/cassettes
2. Chamber
3. Door locking pin
4. Round blank
5. Door seal
Views of the device
Chapter 1 – Device description
Fig. 1: Device view front side
Fig. 3: View of the interior
9
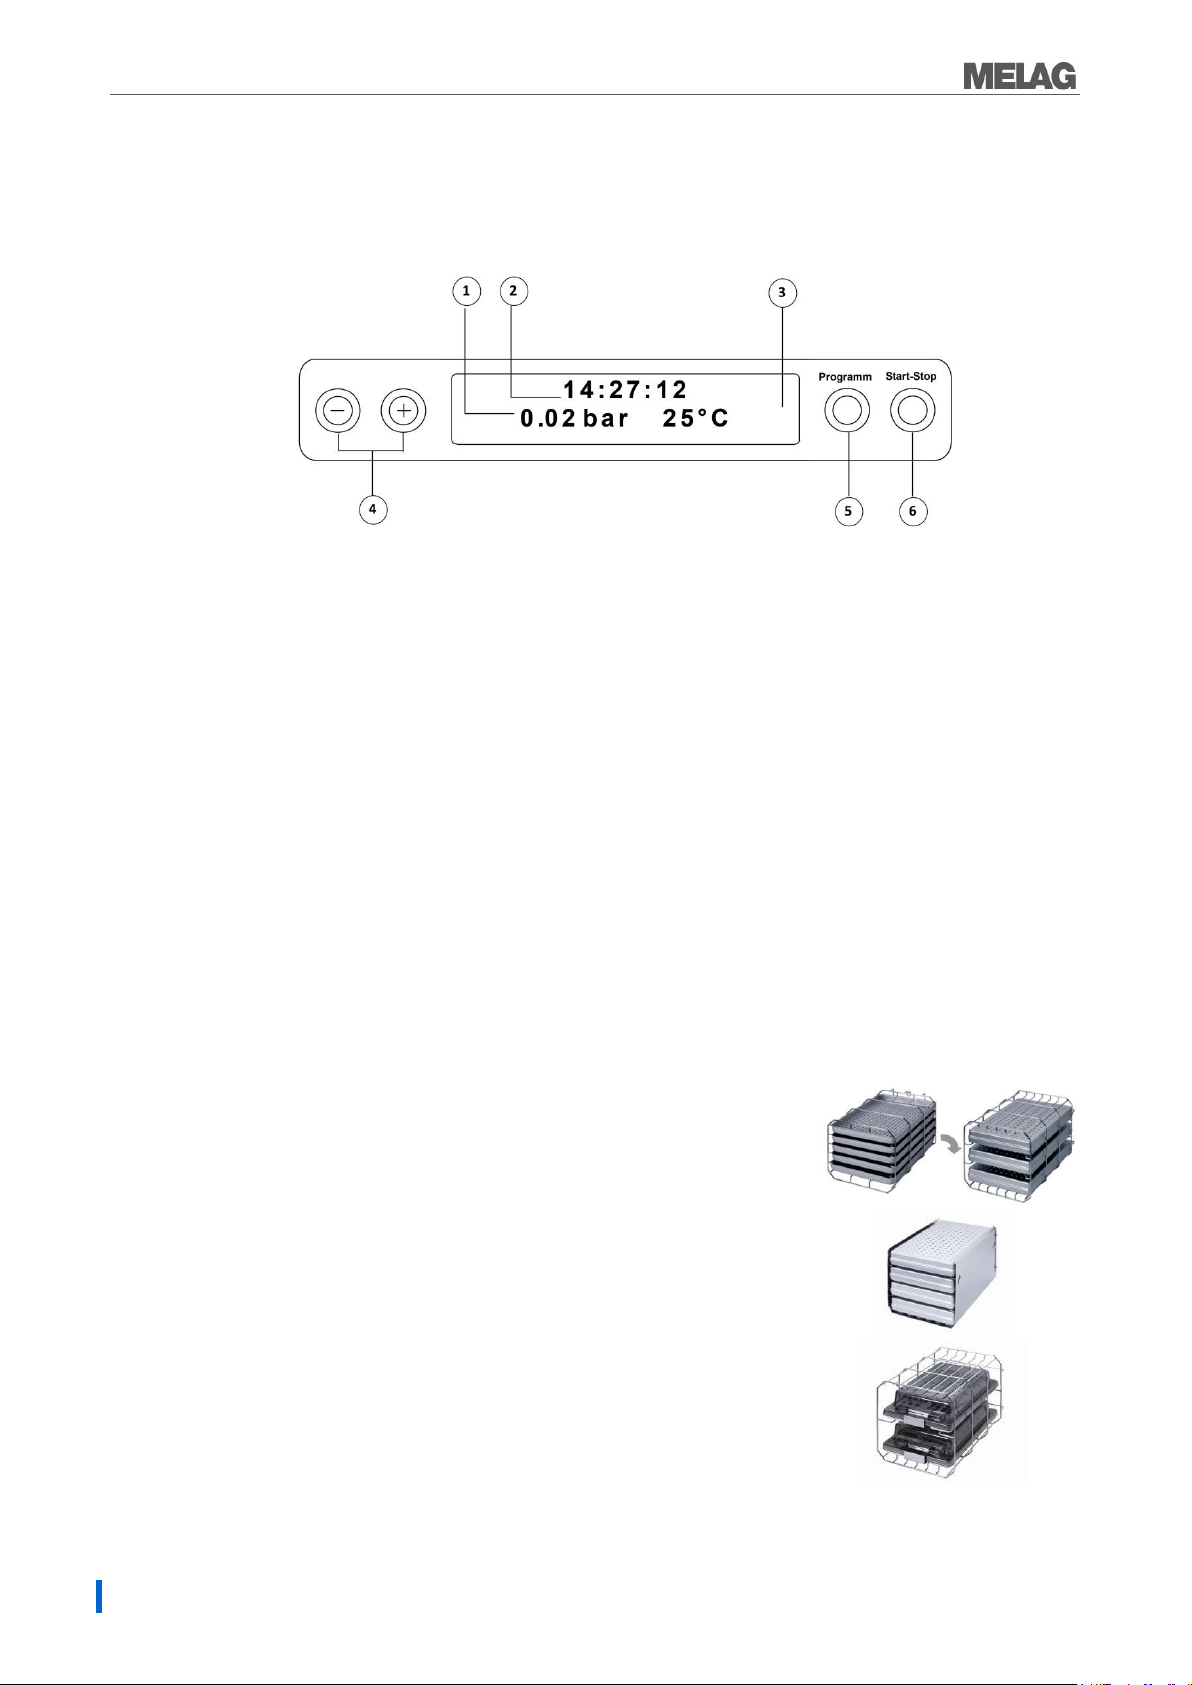
Chapter 1 – Device description
1. 2-line LC display
for program status display and parameter display.
3. Chamber pressure (bar) and (steam)- temperature (°C)
4. Function key (-) and (+)
to select, set and display special functions:
print, date/time, preheating, total batches, conductivity, acknowledge error, key (+) for unlocking the door.
5. Program selection key (P)
to select the sterilization programs/test programs and select or set options (submenus) of the
special functions.
6. Start – Stop key (S)
to start programs, terminate programs/drying as well as control of the special functions.
Mount A
The sterilizer is always delivered with a mount for holding trays or
cartridges.
The mounting (A) is standard and can hold either five trays or three
standard tray cassettes rotated by 90°.
Mount B
The mounting (B) can hold four standard tray cassettes or four trays.
Mount D
The mounting (D) can hold two high cassettes
(e.g. for implant cassettes) or four trays rotated by 90°.
Operating panel
The operating panel consists of a two-row alphanumerical LED display and four membrane keys.
Initial state
The display switches to the initial state after every activation of the device. This displays the current time
and chamber pressure in bar and the (steam) temperature in °C.
Mountings for the load
10

Chapter 2 – Installation
Chapter 2 – Installation
PLEASE NOTE
The autoclave should only be set-up, installed and commissioned by MELAG authorized persons.
Please observe the technical manual regarding installation. This contains all building-side
requirements.
Electrical connection
DANGER
Incorrectly performed electrical connections can result in a short-circuit, fire, water damage and/or
an electric shock.
This could result in serious injury.
The connections for electrical provision and water supply and discharge must be set-up by
trained personnel.
Observe the information regarding the installation and commissioning provided in the
technical manual.
Observe the following safety measures when dealing with the mains cable and plug:
Never splice or change the power cable.
Never bend or twist the power cable.
Never pull on the mains cable to take the power plug out of the socket.
Never place any heavy objects on the power cable.
Ensure that the power cable does not become jammed (e.g. between the doors or windows)
Never lead the cable along a source of heat.
Never use any nails, paper fasteners or similar objects to fix the cable.
Should the cable or plug become damaged, switch off the sterilizer. The power cable and plug should
only be replaced by authorized personnel.
Failure to observe these provisions can result in damage to the cable or plug and/or a fire or an
electric shock. This could result in serious injury.
Feed water supply
Steam sterilization requires distilled or demineralized/de-ionized water. Use only demineralized or distilled
water according to DIN EN 13060, Appendix C. The feed water supply is provided either by an external
water storage tank or with a water treatment unit see Chapter 3 – Initial start-up. Detailed information
regarding the connection to a water treatment unit is provided in the technical manual.
Waste water connection
The waste water can either be collected in an internal storage tank (left side) and manually emptied or
automatically drained via the one-way drain. An upgrade set for the tank drain is available for connecting
the sterilizer to the effluent. Detailed information regarding the connection to the effluent is provided in the
technical manual.
Record of installation and set-up
The record of installation and set-up is to be completed by the responsible person and a copy be sent to
both MELAG and the stockist as proof of correct set-up, installation and commissioning. This is a
constituent part of any guarantee claim.
11
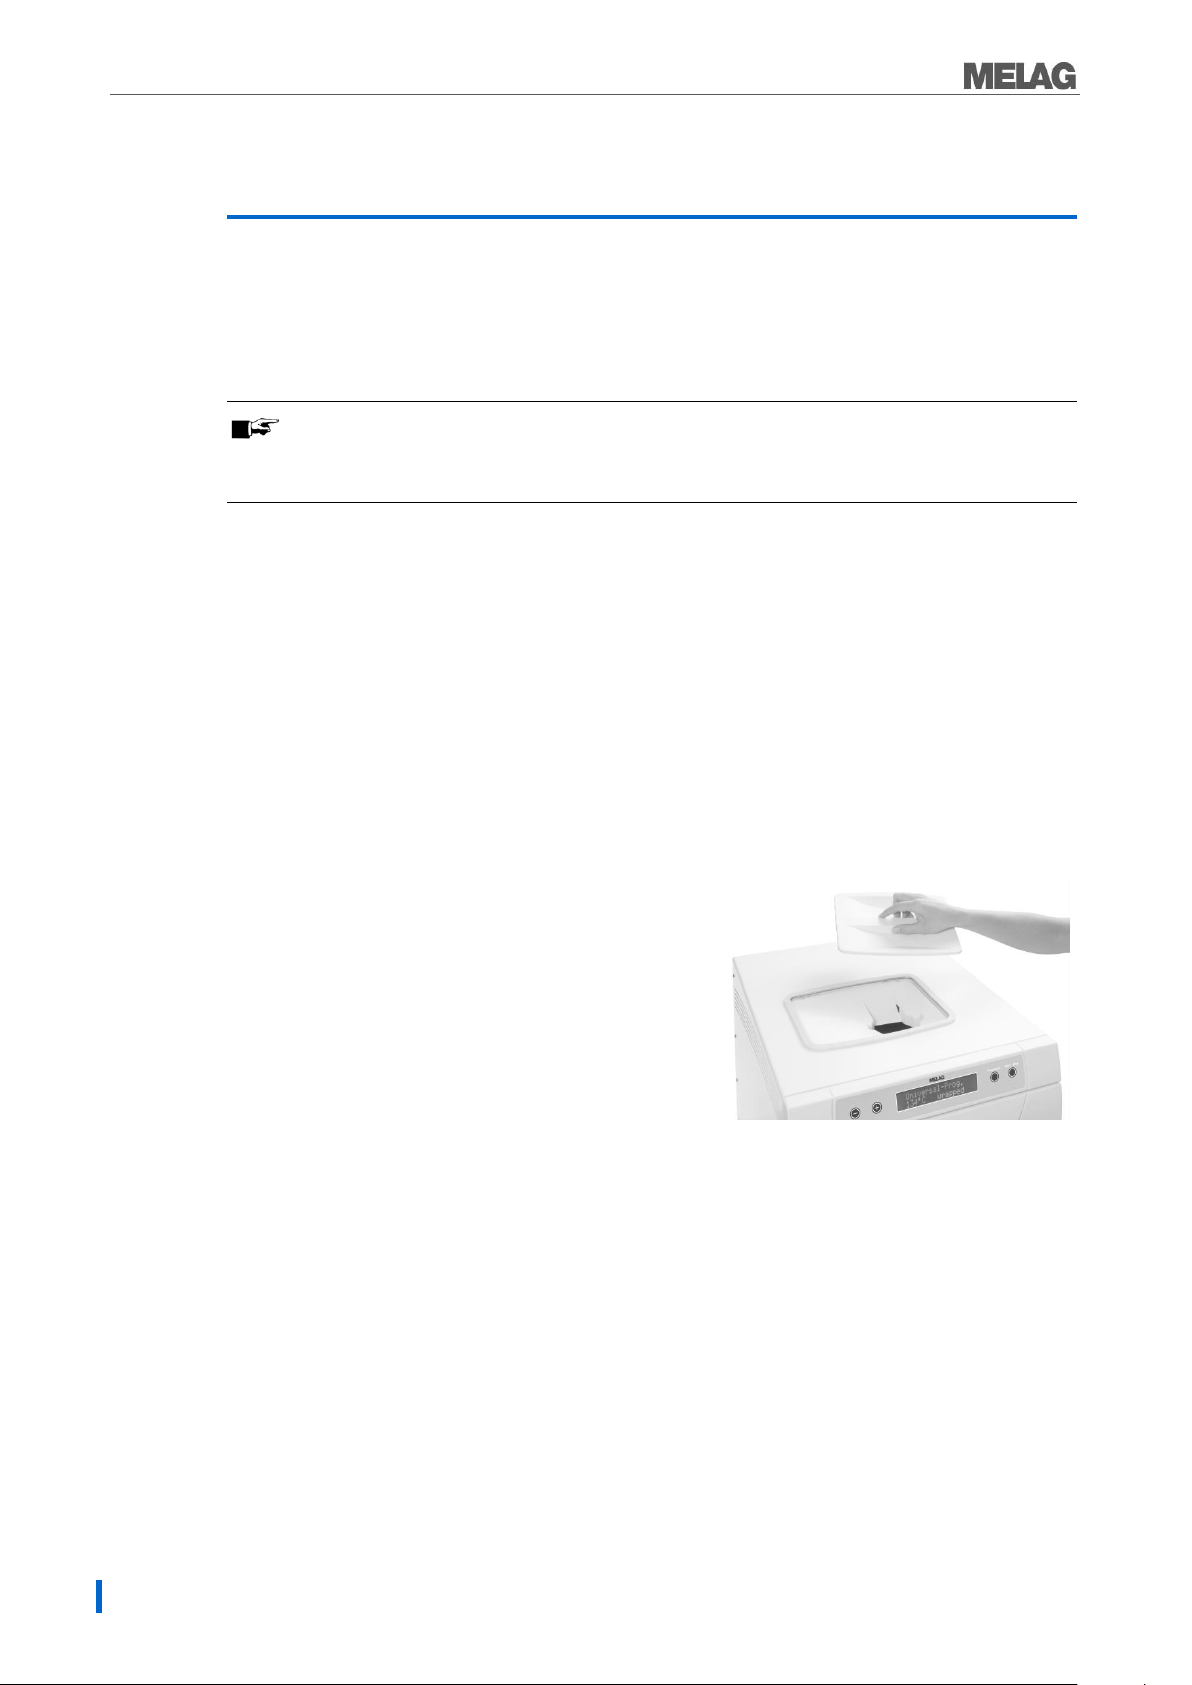
Chapter 3 – Initial start-up
When feed water is supplied via the internal storage tank,
this needs to be filled manually from time to time. The
sterilizer will issue a maintenance message at the relevant
time.
The internal storage tank holds max. 5 liters. This volume
of feed water in the circulation system is sufficient for up to
7 sterilization runs.
To fill the storage tank with fresh feed water, remove the
lid and fill the right-hand chamber of the storage tank with
fresh feed water up to the MAX mark.
Chapter 3 – Initial start-up
Switching on the sterilizer
Turn the power switch on to power the sterilizer (page 9(4).
After switching on the sterilizer with the power switch, the display shows in alternation to the initial state
the message: Unlocking door with key (+), if the door is closed.
PLEASE NOTE
The trays and all accessories must be removed from the chamber directly after the sterilizer
having been switched on for the first time and before commissioning.
Opening and closing the door
The door can only be opened when the display shows: Acknowledge with ‘+’/ Unlock door
with ‘+’ key.
1. Press the (+) key. You can open the door after hearing an audible click.
2. Close the door with light pressure against the chamber flange and simultaneously press down the
sliding-closure grip.
Providing feed water
Using the internal storage tank
Setting the feed water supply on the sterilizer
The INTERN function must be set in order to enable feed water supply via the internal storage tank. The
EXTERN function must be set in order to enable feed water supply via a water treatment unit.
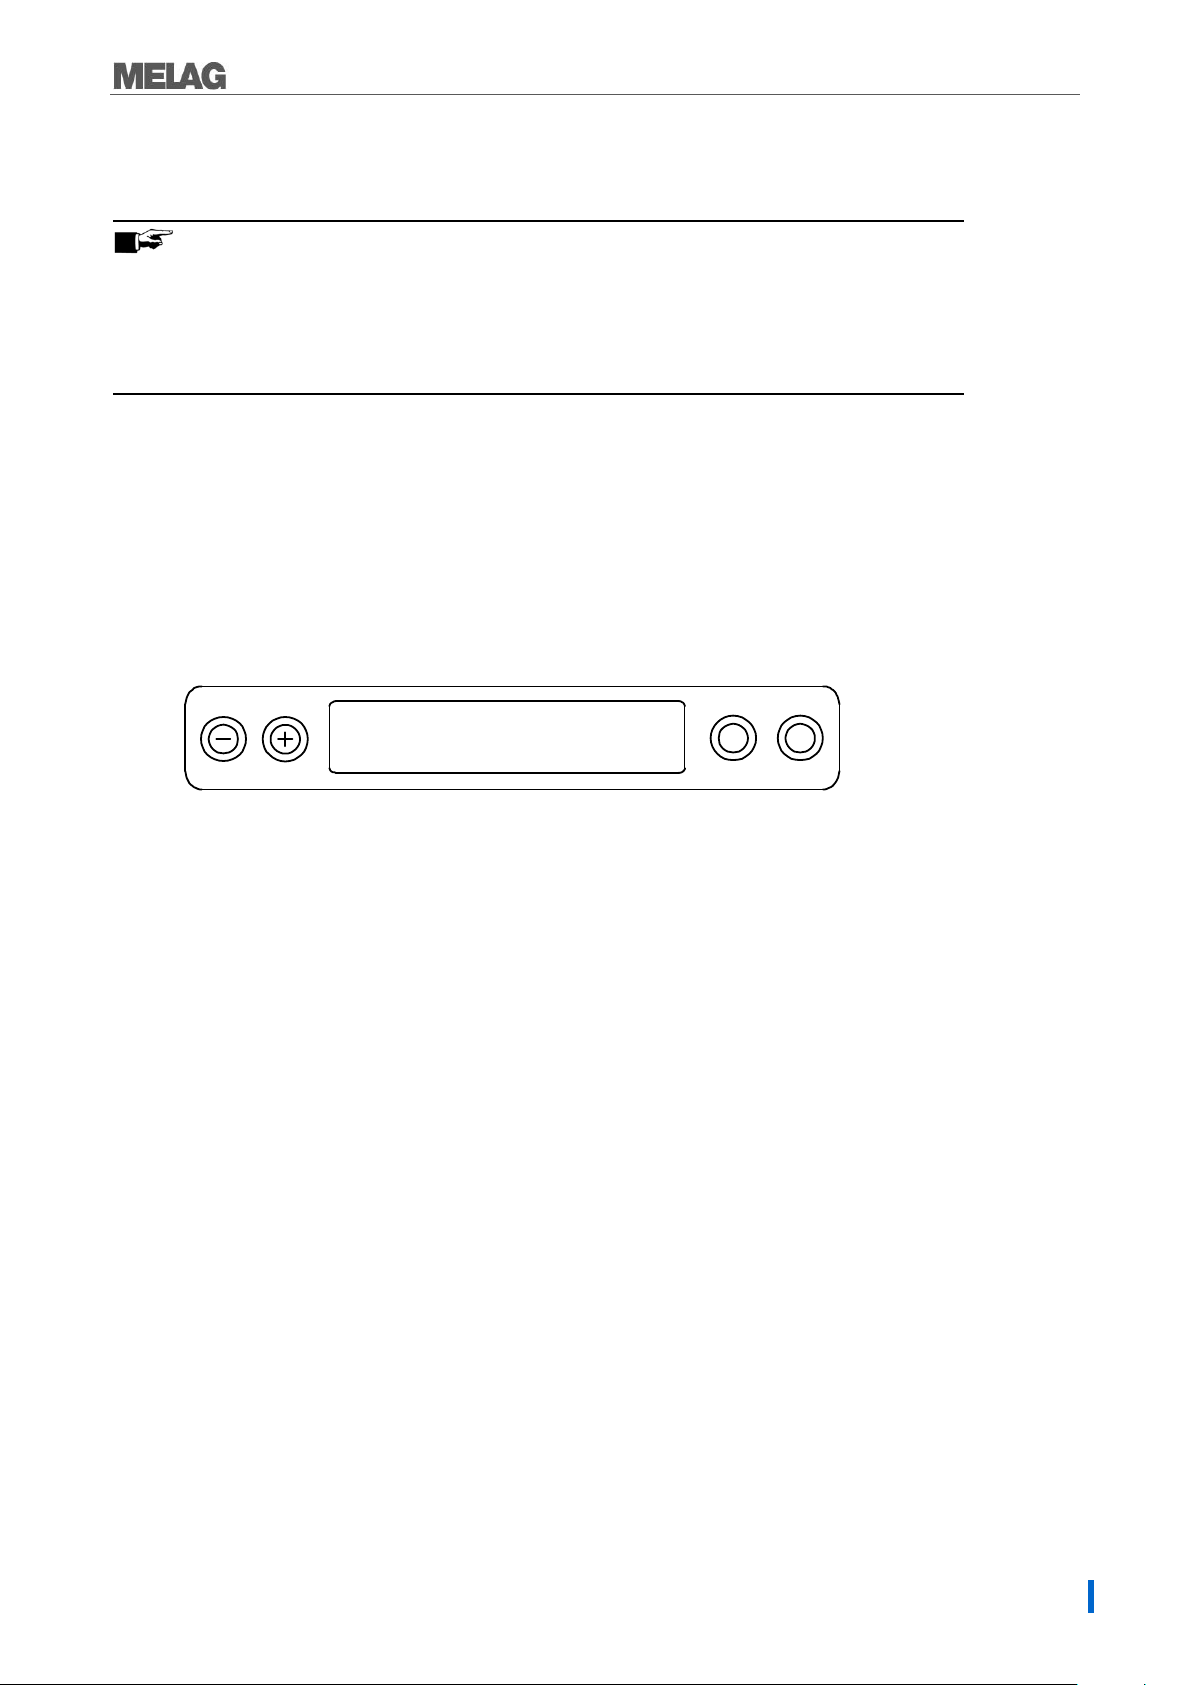
1. Press the (+) and (-) keys simultaneously to select the set-up menu Function.
The display shows the menu Function: Last batch no.
2. Navigate using the (+) or (-) keys until the display shows: Function: Feed water test:
3. Press the (P) key. The display shows the option currently set, e.g. pre-heating yes.
4. Press the (P) key again to change to the desired setting (INTERN/EXTERN).
12
5. Press the (S) key to save the setting and to leave the menu.
Repeated pressing of the (S) key enables you to leave the menu entirely and return to the display basic
state.
Chapter 3 – Initial start-up
Using a water treatment unit
Observe the specifications in the technical manual when using a water treatment unit.
PLEASE NOTE
Should you wish to use a water treatment unit from another manufacturer, please consult
MELAG.
Failure to comply with these provisions can result in damage to the sterilizer and/or human
injury.
Setting the date and time
Correct batch documentation requires the correct date and time setting on the sterilizer. Ensure that you
take into account the clock change in autumn and summer, as this is not adjusted automatically. Set the
date and time as follows:
1. Press the (+) and (-) keys simultaneously to select the set-up menu Function.
The display shows the menu Function: Last batch no.
2. Navigate in the Function menu using the (+) or (-) keys until the display shows:
3. Press the (P) key to confirm. The current hour is displayed.
4. Choose one of the following setting possibilities using the (+) or (-) keys: Hours, minute, second,
day, month, year.
5. To adjust the Hours parameter, press the (P) key to confirm.
The current value flashes on the display.
6. You can increase or reduce the value using the (+) and (-) keys.
7. To save the value, confirm with the (P) key.
The current value set no longer flashes on the display.
To alter the other parameters, proceed in a similar fashion.
8. After ending the settings, press the (S) key to leave the menu.
The display shows the menu Function: Date / time.
9. Repeated pressing of the (S) key enables you to leave the menu and the display returns to its
basic state.
13
Chapter 4 — Sterilizing
Chapter 4 — Sterilizing
Preparing the sterilization material
A significant prerequisite for safe disinfection and sterilization of sterilizing materials is the appropriate
preparation, i.e. cleaning and maintenance of the sterilizing materials according to the manufacturer’s
instructions. Furthermore the materials, cleaning agents and processing procedure employed are of
significance.
Only ever operate the steam sterilizer with a sterile filter inserted.
PLEASE NOTE
Wherever possible, please ensure the separate sterilization of textiles and instruments in
separate sterilization containers or sterilization packaging. This leads to better drying results.
WARNING
Treating instruments
Please ensure the following when treating used and brand-new instruments:
Follow both the instrument manufacturer’s instructions regarding treatment and sterilization and
comply with the relevant standards and directives e.g. from the BGV A1, RKI and DGSV.
Clean the instruments exceptionally thoroughly e.g. using a washer-disinfector.
Rinse the instruments after washing and disinfecting, where possible with de-mineralized or distilled
water and then dry the instruments thoroughly with a clean, non-fuzzing cloth.
Use only those care agents suitable for steam sterilization. Consult the manufacturer of the care
agents.
DANGER
The incorrect treatment of instruments could result in any dirt residue being loosened during
sterilization. The presence of residual disinfection and cleaning fluids results in corrosion.
The use of unsuitable care agents e.g. water repellent agents or oils impermeable to steam
could result in unsterile instruments. This represents a danger to the health of both
patients and yourself.
This could result in increased maintenance requirements and a restriction of the sterilizer
function.
Comply with the treatment instructions contained in these instructions.
When using ultra-sound devices, care equipment for hand pieces and washing and disinfection devices,
please observe the manufacturer’s treatment instructions.
14
Chapter 4 — Sterilizing
Treating textiles
Please observe the following points when treating textiles and putting the textiles in sterilization containers:
Observe and comply with both the manufacturer’s instructions of the textiles regarding treatment and
sterilization as well as the relevant standards and directives e.g. from the RKI, and DGSV.
Arrange the folds in the textiles parallel to each other.
Stack textiles vertically wherever possible and not too closely together in the sterilization chamber.
This enables the development of flow channels.
Retain the vertical stacking system when packing textiles in the sterilization container.
If textile packages do not remain together, wrap the textiles in sterilization paper.
Only ever sterilize dry textiles.
The textiles must not be permitted to come into direct contact with the floor or walls of the sterilization
chamber; otherwise they will become saturated with condensate.
DANGER
Steam penetration of the textile package can be restricted and/or will produce poor drying results.
The textiles could not be sterilized.
This could endanger the health of patient and practice team.
Comply with the treatment instructions contained in these instructions.
Loading the sterilizer
Only when correctly loaded is effective sterilization and good drying possible.
Ensure the following during loading:
Insert trays or cassettes in the chamber only with their appropriate mount.
Use perforated trays such as those from MELAG. Only in this way can the condensate drain off. The
use of a non-perforated base or half-shell to accept the sterilization material can result in poor drying
results.
The use of paper tray inserts can result in poor drying results.
Packaging
Only ever use packaging materials and systems (sterilization barrier systems) corresponding to the
standard DIN EN IS0 11607-1.
The correct use of suitable packaging is important in achieving successful sterilization results.
You can use re-usable rigid packaging systems such as e.g. standard tray cassettes or soft packaging
such as transparent sterilization packaging, paper bags, sterilization paper, textiles or fleece.
Closed sterilization containers
Please observe the following when using closed sterilization containers for sterilization material:
Use aluminium sterilization containers. Aluminium retains and conducts heat and thus improves
drying.
Closed sterilization containers must be either perforated or have a valve on at least one side —
optimally the bottom.
Wherever possible, please ensure that sterilization containers are stacked on top of those of identical
size, so that the condensate can run down their sides.
Our TIP: MELAG sterilization containers fulfil the requirements of DIN EN 868-8 for
successful sterilization and drying. They have a perforated lid and are fitted with
single-use paper filters.
15
Chapter 4 — Sterilizing
WARNING
The use of unsuitable sterilization containers results in insufficient steam penetration and even
failure of the sterilization. This can also prevent condensate drain-off.
This produces poor drying results. This can result in unsterile instruments and thus
endanger the health of patient and practice team.
Closed sterilization containers must be either perforated on at least one location — optimally
the bottom — or be equipped with a valve.
WARNING
Incorrect stacking of the sterilization containers can result in the dripping condensate being
unable to drain off to the chamber floor. This would then saturate the sterilization material directly
underneath it.
This produces poor drying results. This can result in unsterile instruments and thus
endanger the health of patient and practice team.
Do not cover the perforations when stacking the sterilization containers.
Soft sterilization packaging
Soft sterilization packaging can be used in both sterilization containers and on trays. Please observe the
following when using soft sterilization packaging e.g. MELAfol:
Arrange soft sterilization packaging in a perpendicular position and at narrow intervals.
Do not place multiple soft sterilization packages flat on top of each other on a tray or in a container.
If the seam seal tears during sterilization, this could be caused by the choice of undersized packaging.
Should this not be the case, re-pack the instruments and sterilize them again.
Should the seam seal rip during sterilization, extend the sealing pulse on the sealing device or make a
double seam.
Multiple wrapping
The sterilizer functions on the fractionated pre-vacuum method. This permits the use of multiple wrapping.
16
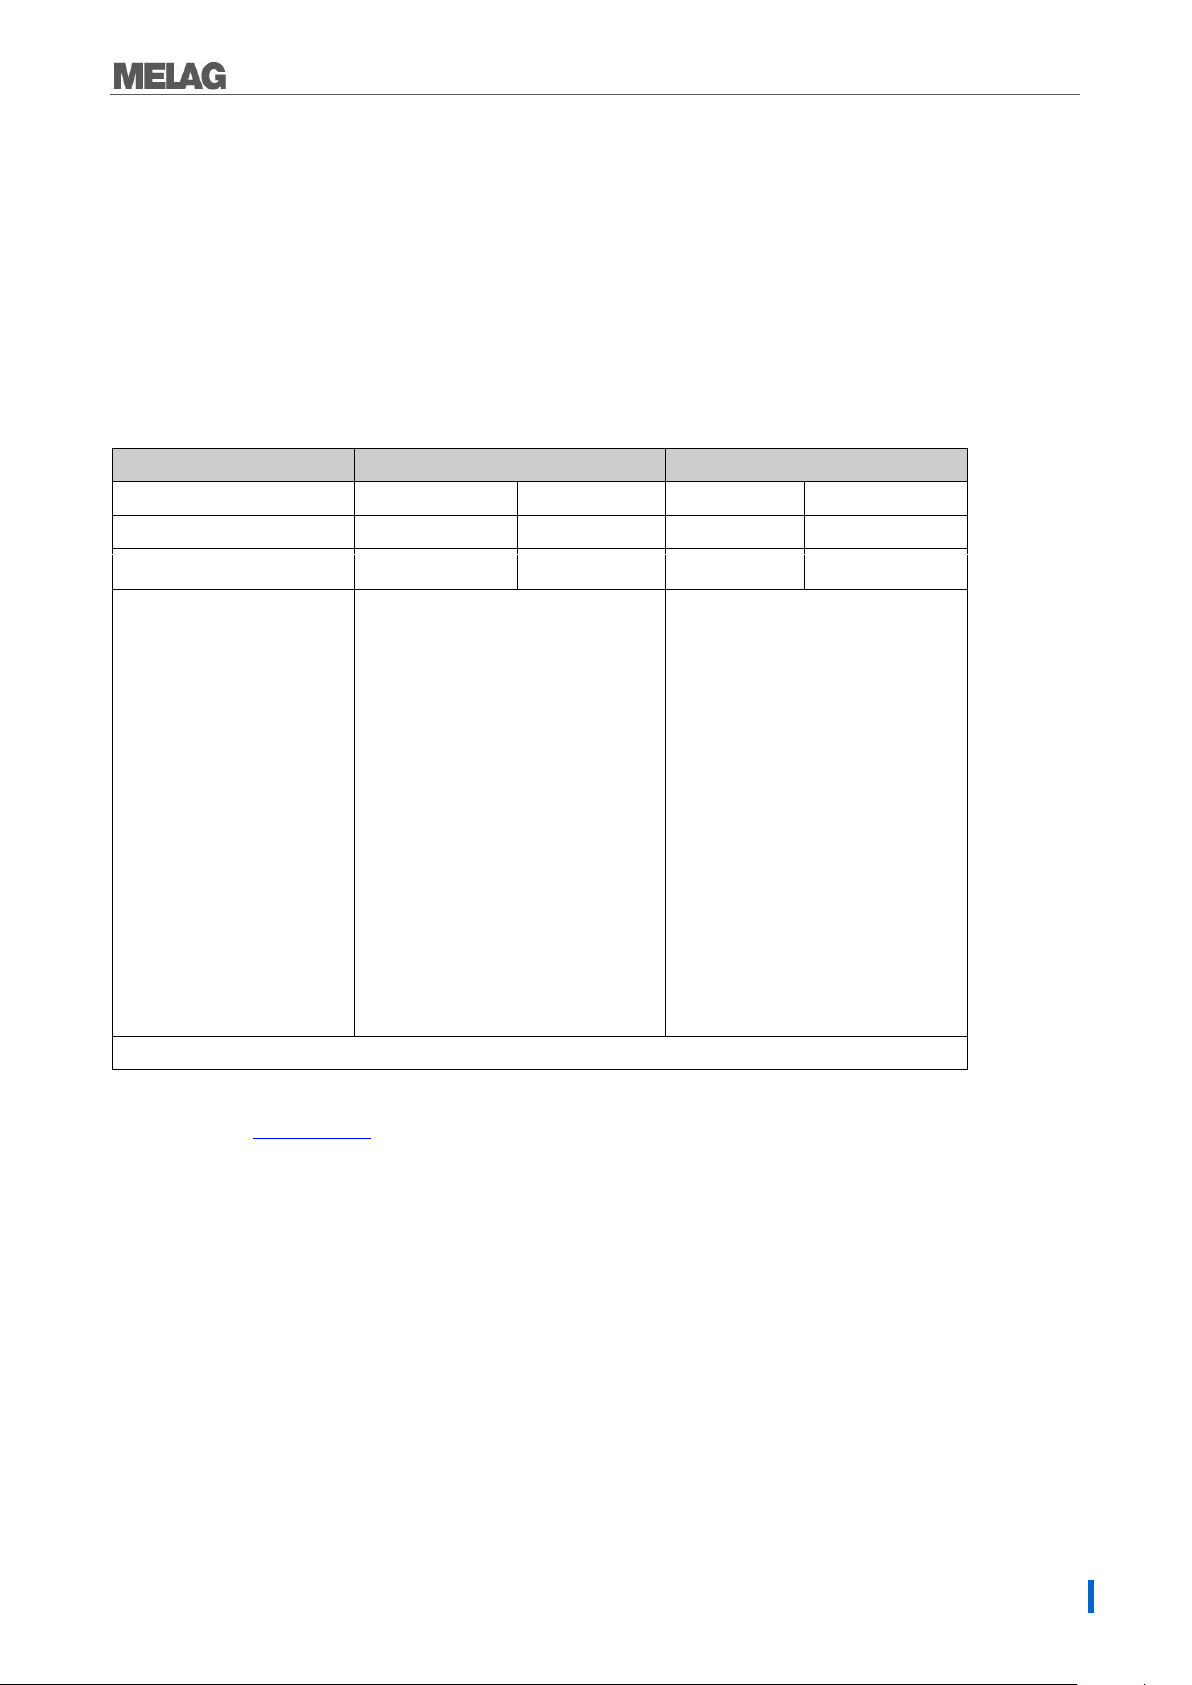
Chapter 4 — Sterilizing
Loading variant
mounting A
max. 5 trays, depth 420 mm max. 6
sterilization containers 15 K
max. 3 sterilization containers 15M
max. 2 sterilization containers 15G
max. 6 sterilization containers 17K
max. 3 sterilization containers 17M
max. 1 sterilization containers 17G
max. 3 swab drums 17R
max. 1 sterilization containers 23G
max. 2 sterilization containers 23M
max. 2 swab drums 23R
max. 2 sterilization containers 28M
max. 1 sterilization containers 28G
max. 3 standard tray cassettes
max. 5 trays, depth 290 mm
max. 3 sterilization containers 15 K
max. 3 sterilization containers 17K
max. 3 swab drums 17R
max. 2 swab drums 23R
max. 2 sterilization containers 28M
max. 1 sterilization containers 28G
max. 3 standard tray cassettes
*MELAG mount, trays and sterilization containers. See appendix A – accessories
Mixed loads
Please observe the following when using mixed loads:
Always place textiles at the top.
Place the sterilization containers at the bottom.
Place unwrapped instruments at the bottom.
Place transparent sterilization packaging and paper bags at the top — except in combination with
textiles. In this case, place them at the bottom.
Place heavy loads at the bottom.
Transparent sterilization packaging should be loaded on their edges so that the paper side and film
side are alternating in contact. If this is not possible, the paper side should face downwards.
Load patterns designed especially for the dental sector are available from the download area of the
MELAG website: www.melag.de.
17
Chapter 4 — Sterilizing
Sterilization
temperature
Single and multiple wrapped mixed loads;
hollow-bodied articles, long articles with a low
diameter; instruments with narrow lumen
(hollow body A) andsimple hollow items
(hollow body B)
5 kg instruments
1.8 kg textiles
single wrapped and unwrapped (no textiles)
Transfer instruments, long, instruments with narrow
lumen (hollow body A) andsimple hollow items
(hollow body B)
single wrapped
1.5 kg or
unwrapped 5 kg
Only unwrapped (no textiles)
Simple solid instruments,simple hollow items(hollow
body B)
5 kg unwrapped
instruments
single and multiple wrapping Larger quantities of
textiles, thermo-instable goods (e.g. plastic, rubber
articles); Mixed loads; instruments with narrow lumen
(hollow body A) andsimple hollow items(hollow body
B)
textiles 1.8 kg or
Thermo-unstable
items 5 kg
Single and multiple wrapped instruments under
suspicion of carrying the danger of infection through
abnormally altered proteins (e.g. Creutzfeld-Jacob,
BSE); instruments with narrow lumen (hollow body A)
andsimple hollow items(hollow body B)
5 kg instruments
1.8 kg textiles
Selecting the program
You can switch between the initial state and the desired program using the program selection switch.Now
select the sterilization program according to how and whether the sterilization material is packed. It is also
necessary to take into account the temperature resistance of the sterilization material. The following tables
show which program is to be selected for which sterilization material.
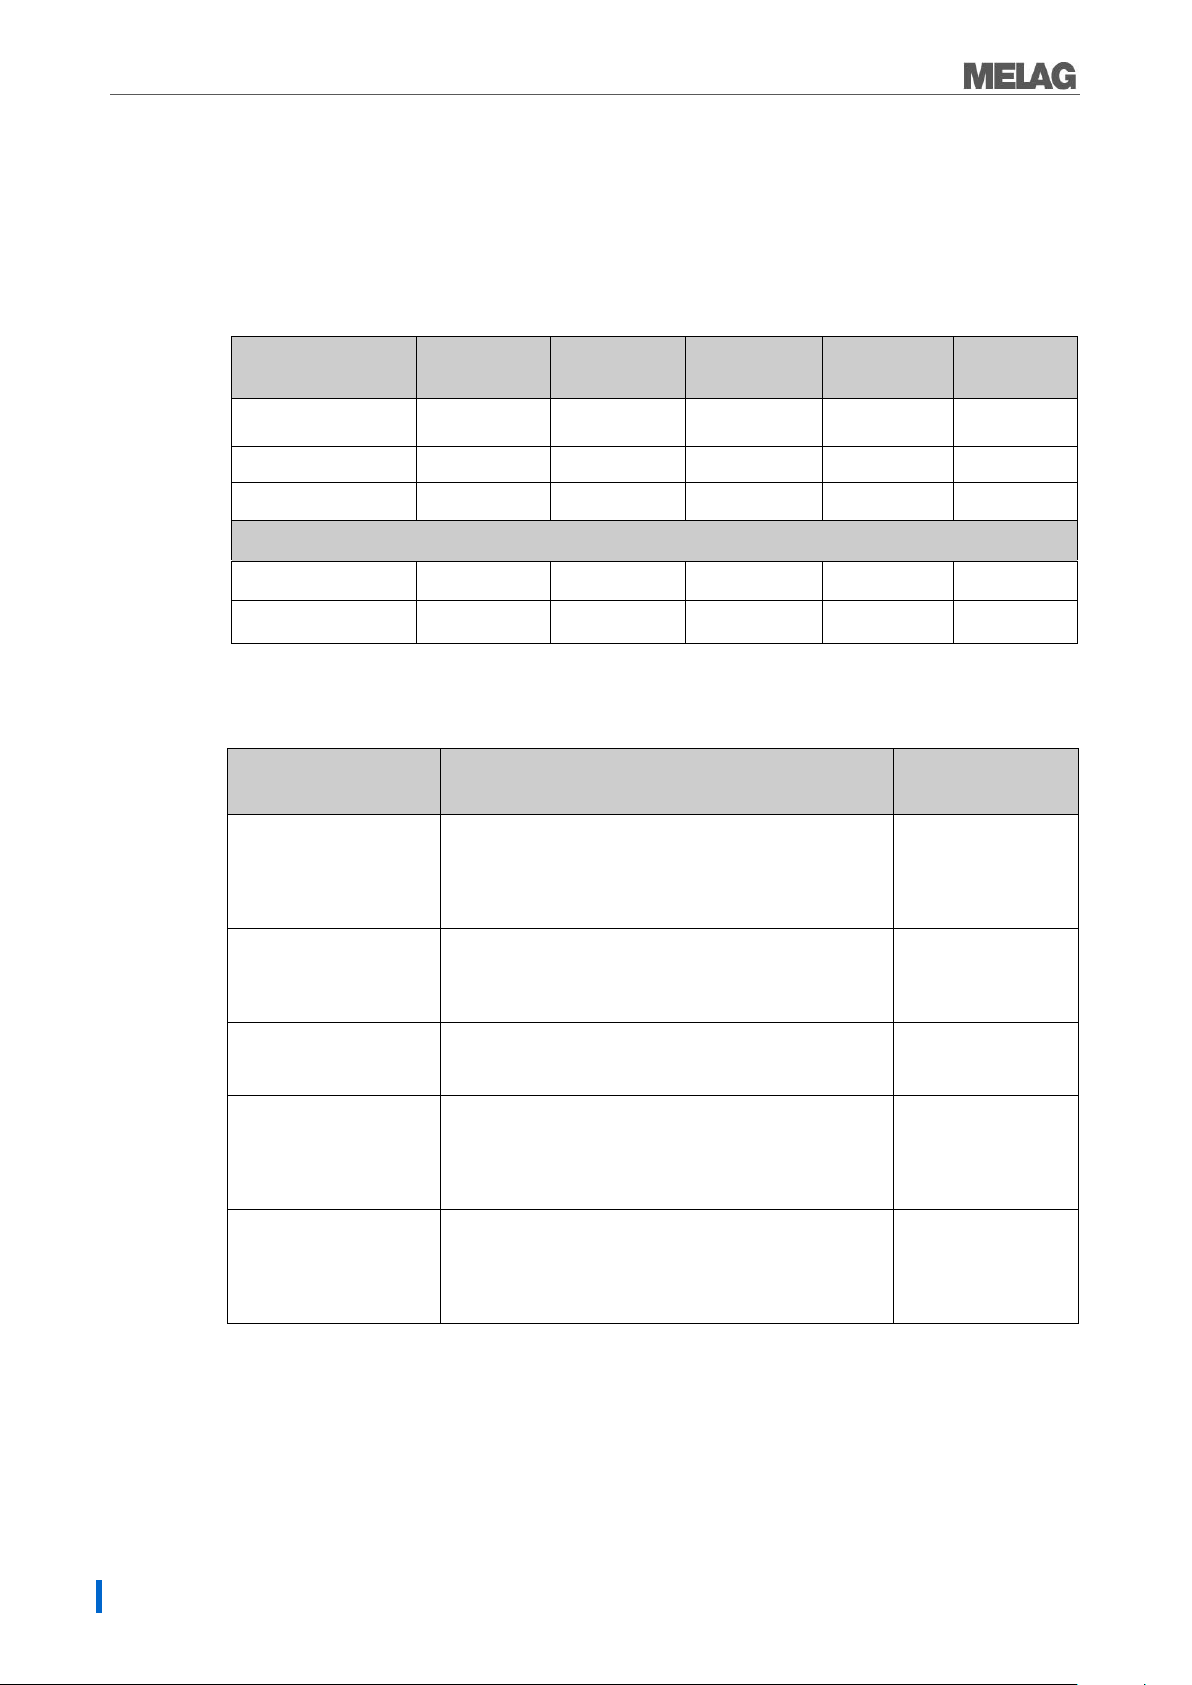
Table 1: Overview of the Sterilization programs
*without drying (full load for Vacuclav 23 B+ and Vacuklav 31 B+: 5 kg) and depending on loading and
installation conditions, eg. mains voltage.
Table 2: Overview of the use of the respective sterilization programs
*valid for Vacuklav 23 B+ and Vacuklav 31 B+
18
 Loading…
Technical Description for the
Autoclave
Vacuklav
®
23 B
Dear Doctor:
Thank you very much for the trust which you have shown by purchasing this autoclave.
For 50 years now, MELAG — a medium-sized family-owned and -operated business — has specialised in the production of sterilization equipment for medical practice. During this period, MELAG has succeeded in becoming a leading manufacturer of sterilization equipment. More than 335,000 MELAG units sold throughout the world testify to the exceptional quality of our products — which are manufactured exclusively in Germany.
As all other MELAG products, this autoclave was manufactured and tested according to strict quality criteria. Before placing this unit into operation, please carefully read this
Technical Description. The long-term functional effectiveness and the preservation of the value of your autoclave will primarily depend on careful preparation of instruments before sterilization, and on proper care of the unit.
The staff and management of MELAG
Page 1
The functional effectiveness and the preservation of value of this unit depend on:
1. Proper preparation of the instruments to be sterilized
2. Proper care of the autoclave
3. The use of sufficiently pure demineralized / distilled water
1 DESCRIPTION OF THE UNIT ……………………………………………………………………………………………………..4
1.1
Views of the unit …………………………………………………………………………………………………………………..4
1.2
Technical data ……………………………………………………………………………………………………………………..5
1.2.1
Primary technical data…………………………………………………………………………………………………….5
1.2.2
Capacity / weights ………………………………………………………………………………………………………….5
1.2.3
Operating media…………………………………………………………………………………………………………….5
1.2.4
Operational parameter ……………………………………………………………………………………………………5
1.2.4.1
Programs / operating times……………………………………………………………………………………….5
1.2.4.2
Consumption of energy / water………………………………………………………………………………….5
1.3
Installation examples…………………………………………………………………………………………………………….6
1.4
Control panel ……………………………………………………………………………………………………………………….7
1.5
Performance features of this autoclave……………………………………………………………………………………7
1.5.1
Preliminary air removal by sub-atmospheric pulsing …………………………………………………………..7
1.5.2
Sterilization categories ……………………………………………………………………………………………………7
1.5.3
Separate steam generation……………………………………………………………………………………………..7
1.5.4
One-way system / conductivity measurement / automatic re-supply of water…………………………7
1.5.5
Electronic parameter control ……………………………………………………………………………………………7
1.5.6
Vacuum drying ………………………………………………………………………………………………………………7
1.5.7
Pre-heating……………………………………………………………………………………………………………………8
1.5.8
Documentation of results ………………………………………………………………………………………………..8
2 INSTALLATION …………………………………………………………………………………………………………………………8
2.1
Requirements for installation………………………………………………………………………………………………….8
2.2
Transport ribbons …………………………………………………………………………………………………………………8
2.3
Levelling ……………………………………………………………………………………………………………………………..8
2.4
Mains power supply………………………………………………………………………………………………………………8
2.5
Outlet connection for one-way water……………………………………………………………………………………….9
2.6
Internal water supply with demineralized / distilled water …………………………………………………………..9
2.7
Connection of a water treatment system………………………………………………………………………………….9
2.8
Emptying the water storage tank…………………………………………………………………………………………….9
3 PLACING THE AUTOCLAVE INTO OPERATION………………………………………………………………………….9
3.1
Printer connection and initialisation (optional) ………………………………………………………………………….9
3.1.1
Connection of the MELAprint
®
42 ……………………………………………………………………………………..9
3.1.2
Initialisation of the printer / setting for immediate printout ……………………………………………………9
3.2
Vacuum test …………………………………………………………………………………………………………………….. 10
3.3
Trial run …………………………………………………………………………………………………………………………… 11
3.4
Installation log – sent to MELAG…………………………………………………………………………………………. 11
3.5
Safety instructions …………………………………………………………………………………………………………….. 12
4 FOR EACH STERILIZATION CYCLE ……………………………………………………………………………………….. 13
4.1
Water and power ………………………………………………………………………………………………………………. 13
4.1.1
Demineralized / distilled water ……………………………………………………………………………………… 13
4.1.2
Power supply……………………………………………………………………………………………………………… 13
4.2
Preparation of instruments …………………………………………………………………………………………………. 13
4.3
Loading the autoclave ……………………………………………………………………………………………………….. 14
4.4
Closing the door ……………………………………………………………………………………………………………….. 15
4.5
Selection of the program ……………………………………………………………………………………………………. 15
4.6
Start of program ……………………………………………………………………………………………………………….. 16
4.7
Program sequence ……………………………………………………………………………………………………………. 16
Printout of cycle log…………………………………………………………………………………………………………………….. 18
4.8
Removing the sterilized items …………………………………………………………………………………………….. 18
4.9
Sterile storage ………………………………………………………………………………………………………………….. 18
4.10
Sterilization frequency / interval periods ………………………………………………………………………………. 19
4.11
Manual abort of the program ………………………………………………………………………………………………. 19
4.11.1
Aborting during the sterilization phases …………………………………………………………………………. 19
Page 2
Technical Description for the Vacuklav
®
23-B
4.11.2
Interruption of a drying phase ………………………………………………………………………………………. 20
4.12
Response in case of warnings and error messages ………………………………………………………………. 21
4.13
Operational shutdowns………………………………………………………………………………………………………. 21
5 PLACING THE AUTOCLAVE OUT OF OPERATION / TRANSPORT / PUTTING THE AUTOCLAVE BACK
INTO SERVICE……………………………………………………………………………………………………………………………… 21
6 SPECIAL FUNCTIONS ……………………………………………………………………………………………………………. 22
6.1
Display of water quality (conductivity) / pre-heat temperature of the sterilization chamber…………. 22
6.2
Selection for additional drying …………………………………………………………………………………………….. 22
6.3
Logging / documentation of sterilization cycles……………………………………………………………………… 22
6.3.1
Output of logs…………………………………………………………………………………………………………….. 22
6.3.1.1
External printer…………………………………………………………………………………………………….. 22
6.3.1.1.1
Connection of the external printer Melaprint
®
42 ………………………………………………… 22
6.3.1.1.2
Initialization of the printer…………………………………………………………………………………. 23
6.3.1.2
Connection to an external PC………………………………………………………………………………… 24
6.3.1.2.1
Installation……………………………………………………………………………………………………….. 24
6.3.1.2.2
Initializing the output on your PC ……………………………………………………………………… 24
6.3.1.3
No printer ……………………………………………………………………………………………………………. 24
6.3.2
Immediate printout option: YES or NO…………………………………………………………………………… 24
6.3.3
Printing out stored cycles at a later time ………………………………………………………………………… 25
6.3.4
Printing out all stored cycles ………………………………………………………………………………………… 26
6.3.5
Displaying the contents of the printer memory ……………………………………………………………….. 27
6.3.6
Deleting stored cycles from the memory………………………………………………………………………… 28
6.3.7
Test printout ………………………………………………………………………………………………………………. 29
6.4
Setting the date and time of day …………………………………………………………………………………………. 30
6.5
Automatic pre-heating ……………………………………………………………………………………………………….. 31
6.6
Total-cycle counter ……………………………………………………………………………………………………………. 32
6.7
Changing the setting for supply of demineralized / distilled water ……………………………………………. 33
6.8
Program modifications……………………………………………………………………………………………………….. 33
7 FAULTY OPERATION / MALFUNCTIONS ………………………………………………………………………………… 34
7.1
What to do in case of malfunctions ……………………………………………………………………………………… 34
7.2
Malfunctions without an error message ……………………………………………………………………………….. 34
7.2.1
An empty display window…………………………………………………………………………………………….. 34
7.2.2
The autoclave uses too much demineralized / distilled water …………………………………………… 34
7.2.3
Poor drying………………………………………………………………………………………………………………… 34
7.3
Warning messages……………………………………………………………………………………………………………. 35
7.4
Error messages ………………………………………………………………………………………………………………… 37
8 PRESERVING THE VALUE OF THIS DEVICE…………………………………………………………………………… 40
8.1
Preparation of instruments …………………………………………………………………………………………………. 40
8.2
Drag-in rust (rust brought into the autoclave)………………………………………………………………………… 40
8.3
Regular care of the Vacuklav
®
23-B……………………………………………………………………………………… 41
8.3.1
Cleaning ……………………………………………………………………………………………………………………. 41
8.3.2
Use of demineralized / distilled water ……………………………………………………………………………. 41
8.4
Monitoring the functions of the autoclave……………………………………………………………………………… 42
8.4.1
Continuous monitoring of sterilization progress………………………………………………………………. 42
8.4.2
Periodical bacteriological monitoring (every 6 months) ……………………………………………………. 42
8.4.3
Periodic maintenance recommendation…………………………………………………………………………. 42
9 ANNEX ………………………………………………………………………………………………………………………………….. 43
9.1
Instructions on drying ………………………………………………………………………………………………………… 43
9.1.1
The drying process in sterilization containers …………………………………………………………………. 43
9.1.2
Textiles ……………………………………………………………………………………………………………………… 44
9.1.3
Instruments ……………………………………………………………………………………………………………….. 45
9.1.4
Loading the autoclave …………………………………………………………………………………………………. 45
9.1.5
Loading of containers with soft sterilization packages……………………………………………………… 45
9.1.6
Stacking of sterilization containers………………………………………………………………………………… 46
9.1.7
Removing sterilized items ……………………………………………………………………………………………. 46
9.1.8
Further improvement of the drying process ……………………………………………………………………. 46
10 INDEX……………………………………………………………………………………………………………………………………. 47
Page 3
1 Description of the unit
1.1
Views of the unit __________________________________________________________
19
18
17
Vacuklav
®
23-B
16
1
2
3
4
5
6
7
8
9
Back view
Front view
15
14
13
12
10
11
20 21
720
150 300 250
Side view
500
80
590
Fig. 1 Views of the Vacuklav
®
23-B
1 Water storage tank
4 Spring-operated safety valve
5 Connection for demineralized / distilled
11 Power cable
12 Front adjustable feet of the unit
13 Serial data and printer interface (RS 232)
14 Fuses for the unit: 2
× 16 A / FF water (OUT)
6 Sterile filter
7 Connection for pressure release for water storage tank (IN)
16 Sliding-lock handle
17 Hinged door (opens to the left)
8 Cooler
9 Connection for demineralized / distilled
18 Operator’s control and monitoring panel
19 Cover to water tank water (IN) (quick-fitted threaded connection for 6
× 1 hose)
20 Drain hose for water tank, drain side (OUT)
21 Drain hose for water tank, demineralized-water side (OUT)
10 Connection for pressure release (OUT)
Page 4
Technical Description for the Vacuklav
®
23-B
1.2.1 Primary technical data _____________________________________________________________
Sterilization chamber (
× depth)
25 cm
× 45 cm
Power ratings
2400 W / 230V AC / 10.4 A / 50 … 60 Hz
Sterilization pressure / temp.
Disinfection pressure / temp.
Maximum load
Outside dimensions
2 bar / 134°C; 1 bar / 121°C
0.3 bar / 105°C
5 kg of instruments or 1.8 kg of textiles
48.5 cm high
× 42.5 cm wide × 72 cm deep
Weight of unit (without load)
Volume of chamber
48 kg
22.6 litre
Maximum loading
Water storage tank (demineralized / distilled water)
5 kg of instruments or 1.8 kg of textiles
Fresh-water side: 5 litres (approx. 7 cycles); drain side: 3 litres
Loading variations Mount “B” for max. 4 norm tray cassettes or 4 MELAG trays
Mount “C” for max. 3 norm tray cassettes or 6 MELAG trays
MELAG sterilization containers: 28M,G, 23R,M,G 15K,M,G,
17R,K,M,G
MELAG Package Holders
Power ratings:
Electricity ratings
Power ratings
aqua dem / aqua dest
230 V AC / 10.4 A / 50 … 60 Hz
2400 W; fuse = 16 A; RCCB (residual current circuit breaker); 30 mA
Demineralized / steam-distilled water in accordance with VDE 0510
1.2.4.1 Programs / operating times _________________________________________________________
Program
«Quick program» (134°C, 2 bar)
«Universal program» (134°C, 2 bar)
«Gentle program» (121°C, 1 bar)
» Prion Program» (134°C, 2bar )
«Bowie & Dick» (134°C, 2 bar)
«Vacuum Test»
Operating time (not including drying period)
Hot start; load = 0.5 kg
17 min
30 min
41 min
47 min
33 min
—
Hot start; load = 5 kg
23 min
43 min
58 min (1,8 kg textiles)
60 min
40 min
18 min (empty)
Drying
10 min
15 min
20 min
15 min
5 min
—
1.2.4.2 Consumption of energy / water _____________________________________________________
Power consumption
«Pre-heating»
One-time heating up to pre-heating approx. 0.12 kWh ( = 0.03 DEM
1
) temperature (134°C)
«Stand by» operation per hour approx. 0.2 kWh ( = 0.05 DEM)
«Program cycle» (including drying) 0.3 kWh (= 0.075 DEM) for “Quick program” / hot start / light load, up to …
1.1 kWh ( = 0.275 DEM) for “Gentle program” / cold start / full load
Consumption of demineralized /
350 ml ( = 0.06 DEM
2.
) for “Quick program”
distilled water 500 ml ( = 0.10 DEM) for “Universal program”
600 ml ( = 0.12 DEM) for “Gentle program”
1
2
Based on following price for one kWh: = 0.25 DEM
Based on following price for one litre of distilled water from the MELAdest
®
65: 0.20 DEM
Page 5
Example 1
A
A
Example 2
A
B
A
Example 4
Example 3
B
B
Fig. 2. Installation examples for Vacuklav
®
(A)
with double-chamber trap
(B)
*1
*1 Alternative: a separate drain with stench trap, instead of the double-chamber trap.
Example 1
Vacuklav
®
23-B rear view
Standard version = version as supplied
(with internal supply of water)
Example 3
Vacuklav
®
MELAdem
23-B rear view
®
37 (optional), external water supply, with manual draining of the waste-water tank
MELAjet
®
(optional)
Leak detector with shutoff valve and sensor
(optional)
Example 2
Vacuklav
®
MELAdem
23-B rear view
®
37 (optional), external water supply, with manual draining of the waste-water tank
Leak detector with shutoffvalve and sensor
(optional)
Example 4
Vacuklav
®
MELAdem
23-B rear view
®
47 (optional), with drain of waste water automatically into a double-chamber trap
Leak detector with shutoff valve and sensor
(optional)
Page 6
Technical Description for the Vacuklav
®
23-B
Function buttons
For selections, settings, and display of special functions: printing, date and time of day, pre-heating, total sterilised loads, water conductivity, error-report acknowledgement
Fig. 3: Vacuklav
®
23-B control panel
2 x 20-character alphanumeric LED
display For display of program status and parameters, and for operator for basic and special functions
Program Start / Stop
Program selection button
For selection of the sterilisation programs and test programs, and for selection/settings of options (sub-menus) for the special functions
Start / stop button
For starting and stopping of programs, drying, and for control fo special functions
1.5
Performance features of this autoclave______________________________________
1.5.1 Preliminary air removal by sub-atmospheric pulsing ________________________________________
Preliminary air removal by sub-atmospheric pulsing repeatedly evacuates the air from the autoclave and alternately introduces steam between evacuations: providing the required penetration of the sterilized objects with saturated steam. This ensures fast and effective execution of difficult sterilization tasks: e.g., instruments with narrow bores and large amounts of textiles. This autoclave also features a special program for the Bowie & Dick Test (a recognised procedure used in large-scale sterilization to confirm steam penetration.
The Vacuklav
®
23-B features three sterilization programs for temperatures at 134°C: the “Universal Program” (for wrapped objects), the “Prion Program” (a special Universal Program), the “Fast Program” for unwrapped items, and the “Gentle Program” (a sterilization program for textiles and rubber articles at 121°C). The user can at any time perform additional functional checks of the autoclave by running the Bowie & Dick Test for steam penetration, and the Vacuum Test for leak testing. The additional program «MELAsteam
®
» is available as an option, and functions at a temperature of 136°C.
1.5.3 Separate steam generation______________________________________________________________
The powerful steam generator outside the actual sterilization chamber makes it possible to sterilize large loads of instruments or textiles in a short time. No waiting periods are necessary between the sterilization cycles, and excess temperatures within the sterilization chamber cannot occur.
1.5.4 One-way system / conductivity measurement / automatic re-supply of water ____________________
The Vacuklav
®
23-B operates with the tried-and-proven one-way system: this means that all evaporated water and all impurities contained in this water are removed from the autoclave upon pressure release. For the following program cycle, new demineralized / distilled water is therefore used. An integrated conductivity measurement system monitors the quality of the demineralized / distilled water used in steam generation. For heavy use of the autoclave, we recommend supply of the demineralized / distilled water by connection of a water-treatment system such as the MELAdem
®
47 or MELAdem
®
37. If the instruments are carefully prepared, this arrangement prevents spots on the items sterilized, and avoids fouling of the autoclave.
1.5.5 Electronic parameter control ____________________________________________________________
The microprocessor installed in the Vacuklav
®
23-B implements electronic parameter control, which continuously monitors pressure, temperature, and time in the programs. The process evaluation and monitoring system contained in the program control system compares momentary process parameters with standard process data and monitors the process with respect to limit temperatures, limit times, and limit pressures. This function detects malfunctions in the program cycle and guarantees the security of the sterilization / disinfection results.
The vacuum drying feature ensures good drying results, even for wrapped items.
Page 7
1.5.7 Pre-heating___________________________________________________________________________
Activating the pre-heating function warms up the cold autoclave chamber before sterilization, or maintains the temperature between sterilization cycles. This shortens the duration of cycles and considerably reduces the formation of condensation, thus optimising drying results.
1.5.8 Documentation of results _______________________________________________________________
The memory of the electronic control system stores records of the previous 40 programs. For effective hard-copy documentation and for checking purposes a MELAprint
®
42 printer can be connected to print out a record immediately after completion of a program, or to print out records from the memory. By connection of a PC, the program MELAwin
®
can also transfer the records to the PC, for permanent archiving of all results, and for printing out these results as needed.
2 Installation
For the steps required to prepare for and carry out the setting up and installation of this autoclave, see the separate instructions contained in “Setting up the Vacuklav
®
23-B”.
The autoclave should be set up in a dry place which is protected against dust. The base should be stable and capable of supporting the weight of the appliance (unloaded weight = 43 kg). The space required by the autoclave can be seen from the external dimensions (see Section 1.2.1 here). A minimum additional space of 10 cm should be allowed on both sides and above the autoclave in order to ensure that heat can escape.
The electrical power supply should be a separate 230V AC circuit with a 16 A fuse.
This autoclave operates with a blower for the cooling system, on the rear side of the unit. If there is a restriction of the escape of heat above the unit, this can impair the functioning and shorten the service life of the autoclave.
IMPORTANT: We therefore urgently advise our users not to install the autoclave in an area where there is
not sufficient circulation of air.
If the user decides to install an automatic one-way water system, it is necessary to have a connection to the wastewater plumbing near the autoclave, preferably a wall outlet (NW 40) or a sink drain (standard length of outflow pipe = 2 m, with 16 mm diameter). The work surface on which the autoclave stands must be higher than the outlet, and the outlet pipe must be without bends and twists which could prevent water flowing out freely. At the same time, the work surface must provide convenient access to the autoclave, and the display must be clearly visible.
The autoclave can be supplied with demineralized / distilled water from the integrated dual-chamber storage tank, with freshwater and wastewater chambers. Alternatively, the Vacuklav
®
23-B can also be connected to an external water purifier – the MELAdem
®
47 or MELAdem
®
37 (or an equivalent water purification system). However, please note that this will require additional space.
Lift the autoclave out of the packaging by using the transport straps. The straps themselves are each removed by unscrewing the two retaining screws, which must then be screwed firmly back in place without washers.
In order to operate properly, and to allow unimpeded return flow of condensate into the steam generator, the autoclave must be installed so that it definitely slopes toward the rear. First install the autoclave in a horizontal (level) position, and check that this position is in fact horizontal with a spirit level at the chamber flange. Then extend the front feet to lift up the front side of the autoclave, by screwing the feet out by at least five (5) turns.
2.4 Mains power supply _____________________________________________________
The electric cable of the appliance must be plugged into a mains socket rated at 230 V / 50 Hz. The power rating of the autoclave is 2400 W. In order to avoid overloading the building electricity supply, we recommend using a separate electrical circuit fitted with a 16 A fuse and optionally protected with a type RCCB (residual current circuit breaker) with a tripping current of 30 mA.
Page 8
Technical Description for the Vacuklav
®
23-B
2.5
Outlet connection for one-way water _______________________________________
The connection for the one-way water outlet at the back of the unit (3) must be hooked up to the drainage system of the building by means of the outlet pipe supplied (transparent pipe). It is important that the pipe should have a
steady downward gradient, without twists and kinks. The outlet must be connected to an existing sink drain, or to a separate NW40 drain pipe with use of the wall-mounted drain (MELAG article no. 37410).
If the user decides for internal supply of the autoclave with demineralized / distilled water, this water is taken from the right chamber of the built-in water storage tank. To install the internal system for supply of demineralized / distilled water, connect the hose at the demineralized / distilled water connection of the supply tank to the swivell threaded connection at the supply point for demineralized / distilled water on the rear side of the autoclave. For this variation of water supply, the autoclave is delivered ready for installation. To fill the feed water tank, remove the cover of the tank and fill the right chamber with demineralized / distilled water up to the maximum mark.
2.7
Connection of a water treatment system ____________________________________
The autoclave can be directly connected to a water treatment system for direct supply with demineralized / distilled water. Instead of being connected to the water storage tank (as in Section 2.6), the demineralized / distilled water connection is hooked up directly to the water treatment system. The reverse-osmosis system MELAdem
®
47 and the ion-exchanger MELAdem
®
37 are designed to optimally satisfy the requirements of the Vacuklav
®
23-B. Please consult the operating manuals of these reverse-osmosis systems for detailed instructions on installation and placing into operation. If you decide to use water treatment systems made by other manufacturers, be sure that they deliver water with sufficient quality and quantity. Please get in touch with the company MELAG before connecting such systems made by other manufacturers. In addition, a water stop valve (MELAG article no. 01056) should be installed upstream of such water treatment systems, in order to satisfy insurance requirements.
2.8 Emptying the water storage tank __________________________________________
It is easy to completely empty the water storage tank of this autoclave. This is required, for example, to clean or repair the autoclave, or to place it out of operation. To drain the tank, pull the drain hoses out of the front panel at the plug (see Fig. 1: drain side [21], and tank side, with demineralized water [22]). Pull out the plugs, and allow the water to drain into a separate container.
3 Placing the autoclave into operation
3.1
Printer connection and initialisation (optional) _______________________________
3.1.1 Connection of the MELAprint
®
42 _________________________________________________________
The accessory printer MELAprint
®
42 is designed for connection to the autoclave Vacuklav
®
23-B. This is an optional item which is not supplied with the normal scope of delivery for the autoclave. Follow the instructions in Section
6.3.1.1.1 of this manual to connect the printer to the autoclave.
3.1.2 Initialisation of the printer / setting for immediate printout____________________________________
Follow the instructions in Section 6.3.1.1.2 of this manual to initialise the external printer after it has been
connected. This initialisation will log the printer on to the computer control system in the autoclave. Follow the instructions in Section 6.3.2 of this manual to set the immediate-printout option to «Yes». This means that the system will automatically print out a report when the system program has come to an end.
Page 9
A vacuum test (leak test) should be conducted under the following conditions to assure proper functioning of the autoclave:
− Once when a new autoclave is set up for the first time
− When the autoclave is being put back into service after a long period of inactivity
− When the autoclave is moved to a new location
− Periodically as part of routine operations.
The vacuum test should be performed on the cold autoclave as follows:
Operator action: Shown on the display:
1. Switch on the autoclave at the power switch: After the following message …
… the display will show the initial state:
P l e a s e w a i t
D o o r u n l o c k i n g
1 4 : 2 7 : 1 2
0 . 0 2 b a r 2 5 ° C
Program Start-Stop
Program Start-Stop
2. Press the “Program” button several times until the program “Vacuum test” appears.
V a c u u m t e s t
Program Start-Stop
3. Close the door
Program Start-Stop
D o o r c l o s e d
4. Press the “Start – Stop” button
Program Start-Stop
V a c u u m t e s t : S t a r t
P r e s s . = 9 8 0 m b a r
5. The vacuum pressure has been reached. The equilibration time begins to run (waiting time until beginning of measurement).
6. After the waiting time has run out (5 min), the measuring time will begin (here:
7 min 52 s).
V a c u u m t e s t 0 0 : 0 0
P r e s s . = 8 0 m b a r
V a c u u m t e s t 0 7 : 5 2
P r e s s u r e = 8 2 m b a r
Program Start-Stop
Program Start-Stop
Page 10
Technical Description for the Vacuklav
®
23-B
Operator action:
7.
After the measuring time has run out (10 min), the chamber is vented, and …
… then the leak rate is given
(with connected printer and setting for immediate printout = “Yes”, a record will now be printed out. After the message “Please wait – door unlocking”, the following request will appear:
Shown on the display:
V e n t i l a t e
– 0 . 5 6 b a r 2 5 ° C
L e a k r a t e = 0 . 2 m b a r
O p e n d o o r p l e a s e
Program Start-Stop
Program Start-Stop
Program Start-Stop
8. Open the door.
Program Start-Stop
Vacuum test
If the leak rate determined is greater than the maximum permissible value, the following will appear in the display and on the printed log: “Test not successful”. In such a case, follow the instructions given in this manual under
Section 7.3.
To continue the functional check of the autoclave, carry out the trial run by loading the autoclave with a typical load for your daily work, and then run the program “Universal program, 134°C, wrapped”. Load the autoclave and use the “Program” button to select this program. Then press the button “Start – Stop”. If the program runs correctly
(also see Section 4.7 here), the following message will appear at the end of the program:
Program Start-Stop
Universal program run successfully
This display will also show the maximum values achieved for pressure and temperature. If a printer is connected, and with setting for immediate printout = “Yes”, a record will now be printed out.
3.4
Installation log – sent to MELAG ___________________________________________
As documentation that the autoclave has been set up properly, an installation record should be produced by an authorised person and a copy sent to MELAG. This is important in the event that you wish to make claims under warranty provisions.
Page 11
*
Danger: Be careful when opening the door of the autoclave, especially if you are interrupting a drying cycle. Small amounts of residual steam can escape through the door and can burn operating personnel.
*
Warning: After opening the autoclave door, do not touch exposed hot metal parts.
Warning: These parts can burn operating personnel. Be sure to use a MELAG or standard tray handle to remove still-hot trays from the autoclave. Be sure to use suitable hand
*
protection (for example, potholders or gloves) when removing other sterilizing containers.
We recommend the installation of a leak monitor in the water supply line (see Section 2,
Installation, for instructions).
*
If you wish to connect to this autoclave water-treatment systems which are made by other equipment manufacturers, get in touch with the MELAG company before you install this equipment.
*
This device is not suitable for the sterilization of liquids.
*
According to presently valid regulations published by the Society of German Electrical
Engineers (VDE), this device is not suitable for operation in hazardous areas which are
*
endangered by the possibility of explosion (for example, in hazardous atmospheres).
Important: Empty the water supply tank before moving the autoclave. If the autoclave has water inside, do not tip it.
*
This device may be repaired only by the company MELAG or by persons authorised by
MELAG (specialist personnel or customer-care staff). These persons must use original spare parts and must observe the instructions for service published by MELAG.
*
Danger: Do not open the enclosure to this device before disconnecting the electrical power plug from its outlet.
*
This autoclave will properly sterilize only if the operating personnel observe the instructions in this Technical Description – especially the instructions for loading the autoclave in accordance with the program required.
Page 12
4 For each sterilization cycle
Technical Description for the Vacuklav
®
23-B
This autoclave automatically checks to make sure that there is enough demineralized / distilled water, and it checks that the quality of the demineralized / distilled water is sufficient for starting a program. In order to start a program without delay, to avoid error messages, and to prevent a program from stopping before it is finished (see Sections
7.3 and 7.4), please make sure to carry out the following:
1. Before starting the first sterilization cycle of a day, check to make sure that there is enough water in the right side of the dual-chamber water supply tank (this applies if you are using the system’s own internal supply: i.e., if you are not using a connected water-treatment system). If there is not enough water in the tank, fill with water of sufficient quality (see Section 8.3.2 of this manual).
2. If you use a direct water supply from the MELAdem
®
47 water-treatment system, make sure that the water feed to the autoclave is open in time. If the pressure tank is empty, this feed must be opened at least one hour before starting a program. This step is not necessary if the water supply remains open continuously .
Switch on the power switch at the bottom right of the front of the autoclave. The message “Please wait – Door unlocking” will appear in the display. After approx. 15 s, the device will then be in its initial state.
Time of day (h:min:s)
1 4 : 2 7 : 1 2
Program Start-Stop
Chamber pressure (bar)
Temperature (steam) (°C)
0 . 0 2 b a r 2 5 ° C
4.2
Preparation of instruments ________________________________________________
MELAG — use of non-rusting materials for parts which come into contact with steam
All parts of the Vacuklav
®
23-B which come into contact with steam are made of non-rusting materials. The sterilization chamber and the chamber door are of stainless steel, steam lines are Teflon
®
, and threaded connections and solenoid valves are brass.
Drag-in rust
The non-rusting parts used in the Vacuklav
®
23-B ensure that the autoclave itself cannot cause rust to form. In any cases in which rust has developed on the autoclave or on the sterilized items inside, investigations have consistently shown that this rust has been dragged into the autoclave from the outside by rusty instruments. We
must point out that rust can form on stainless-steel instruments made by even the best manufacturers.
One main cause of instrument rusting is improper treatment with chemical cleaning and disinfecting agents during preparation for sterilization.
Preparation of instruments for sterilization
The problem of drag-in rust shows how important it is to properly prepare items for sterilization. It is urgently
necessary to observe the following procedures:
1. Clean and prepare (for example, by oiling) handpieces and contra angles as described in the instructions provided by the manufacturers of these items.
2. Immediately after their medical use, all other instruments must be placed in a disinfection and/or cleaning solution in accordance with UVV/VBG 103 and properly cleaned and disinfected there.
3. Always be sure to use the correct dosage of disinfection and/or cleaning agents in these solutions.
4. Important: Be sure to carefully follow the instructions for the length of time that the instruments must soak in the solutions.
5. We also recommend the use of ultrasonic equipment, recommended cleaning and care equipment for handpieces and contra angles, as well as thermal disinfecting techniques.
6. The proper cleaning of instruments is also essentially important in preventing particles of soiled matter from separating from the instruments during sterilization and from clogging the filters, nozzles, and valves of the autoclave. It is extremely important to use a brush to very carefully clean the locks, joints, and hinges of the instruments before sterilization.
7. Important: Use a brush under running water to completely rinse all cleaning and disinfecting agents from instruments before placing them in the autoclave. Residue of chemical cleaning and disinfecting agents
must by no means be allowed to enter the autoclave, since they will cause corrosion there.
8. As a final step before placing the instruments into the autoclave, rinse them with demineralized water, and dry them well.
9. Be sure to use oil (as indicated in the manufacturers’ instructions) to prepare turbines and handpieces for sterilization, in order to ensure their long service life.
Page 13
Instruments new from the factory:
Be sure also to follow the above-described pre-cleaning procedure even for instruments new from the factory.
Often there are small amounts of oil, grease, and impurities still on new instruments, from their production.
Important: It is absolutely necessary to carefully follow the instructions for preparation and re-sterilization
procedures which are provided by manufacturers of instruments.
4.3 Loading the autoclave ____________________________________________________
The correct loading of the autoclave is essentially important in guaranteeing the sterilization effectiveness and the proper drying of the items being sterilized. Be sure to observe the following basic instructions in loading the autoclave:
Tray mounts:
There are 2 different tray mounts for the Vacuklav
®
23-B:
1. Tray mount “B” (MELAG art.-no. 40224) for loading of either a maximum of 4 trays, or 4 standard tray cassettes
2. Tray mount “C” (MELAG art.-no. 40242) for loading of either a maximum of 6 trays, or 3 standard tray cassettes.
Both of these tray mounts are also designed to support the following MELAG sterilization containers:
Types 15K,M,G; Type 17K,M,G,R; Type 23M,G,R, Type 28M,G.
In normal cases the autoclave should always be operated with a tray mount, since this ensures optimal steam penetration and drying. In exceptional cases, it may be possible to remove the tray mount and place the suitable containers directly into the sterilization chamber (for example, with use of sterilization containers of other manufacturers). But please check with your specialist dealer or with MELAG before attempting this solution.
For sterilization of instruments sealed in see-through sterilization packaging, we recommend the use of the MELAG
Package Stand (MELAG article no. 22420). The Package Support considerably improves the results of the drying process for instruments wrapped in this way.
Trays:
Trays used for the loading of sterilized items must be perforated, in order to allow the condensate to run out.
MELAG trays fulfil this requirement. We cannot advise the use of non-perforated trays or bowls (e.g., unperforated standard-tray supports), since they do not allow proper trying.
Closed sterilization containers:
Closed sterilization containers must be perforated on at least one side (preferably the bottom), or they must have valves, in order to allow the steam to properly penetrate and the condensate to flow out. All MELAG sterilization containers satisfy this requirement, with perforations on two sides and with a sterile filter cloth insert. We cannot recommend sterilization with sterilization containers with holes only on the top, since they do not allow proper drying.
See-through sterilization packaging:
If you use see-through sterilization packaging (for example, MELAfol
®
), these should be placed vertically on the tray for sterilization. We recommend the use of MELAG Foil Holders (MELAG article no. 22420).
Important: Do not stack the see-through sterilization packages horizontally on top of each other. If the sealing seam of the package breaks during sterilization, please use a longer sealing pulse on the MELAG MELASEAL
Package Sealing Device, or seal with a double seam.
If standard tray cassettes are sealed in MELAfol
®
(250 mm wide), clamps or tape must be used to reinforce the side seam and to prevent it from breaking open. In addition, be sure to press excess air out of the package before sealing it.
Multiple packaging:
Air removal by sub-atmospheric pulsing allows multiple-wrapping.
Loading limits:
Be careful not to exceed the prescribed maximum loading amounts: 5kg of instruments or 1.8kg of textiles.
Mixed loads of textiles and instruments:
If you are sterilizing textiles and instruments at the same time, place the textiles above the instruments and do not allow the textiles to come into direct contact with the instruments. Do not sterilize textiles and instruments in the same sterilization container. Important: Do not by any means allow the textiles to come into direct contact with the wall of the sterilization chamber. Please observe the following instructions for different types of packaging in one sterilization cycle:
Place the see-through sterilization packaging and paper packing on the top (but if you are using a combination with textiles: then arrange these packages on the bottom)
Sterilization of liquids:
Danger: The Vacuklav
®
23-B is not suitable for the sterilization of liquids.
Page 14
Technical Description for the Vacuklav
®
23-B
4.4
Closing the door ________________________________________________________
Close the door by slightly pressing it shut in the direction of the sterilization chamber flange, and at the same time press down the sliding handle until it will go no farther. The following message will appear on the display:
D o o r
Program Start-Stop c l o s e d
4.5
Selection of the program__________________________________________________
Select the required program on the basis of the following criteria:
− The physical properties of the items to be sterilized (especially their ability to resist high temperatures)
− The type of packaging (you must use the “Universal program”, or the “Gentle program” if part or all of the load is wrapped).
Press the button “Program selection” repeatedly to run through the following programs (and the initial position), and to make your selection:
Program name / Display message
U n i v e r s a l — p r o g r a m
1 3 4 ° C w r a p p e d
Program
Parameters / applications
Universal program at 134°C, 2 bar, and a sterilization time of 3.5 min, for:
Sterilization of all kinds of wrapped items, especially instruments, or mixed loads (wrapped and unwrapped)
Q u i c k — p r o g r a m
1 3 4 ° C u n w r a p p e d
G e n t l e — p r o g r a m
1 2 1 ° C w r a p p e d
P r i o n — P r o g r a m
1 3 4 ° C w r a p p e d 2 0 ‘
M E L A s t e a m C l e a n i n g
2 . 3 b a r 6 0 ‘
B o w i e & D i c k t e s t
1 3 4 ° C 2 . 2 b a r 3 ‘
Program
Program
Programm
Programm
Program
Quick program at 134°C, 2 bar, and a sterilization time of
3.5 min, for:
Sterilization of only unwrapped instruments (and no textiles), for fast re-use of the sterilized items (you must interrupt the drying cycle manually)
Gentle program at 121°C, 1 bar, and a sterilization time of
15 min, for: Sterilization of all kinds of wrapped items, especially larger amounts of textiles, and of items sensitive to heat (plastic and rubber articles), and for mixed loads
(wrapped and unwrapped)
Prion Program (a special Universal Program) at 134°C,
2 bar, and with sterilization time extended to
20 min, for sterilization of wrapped items, especially instruments and/or mixed loads (i.e., packed and unpacked). This program is recommended for sterilization of instruments used in situations in which the danger of infection by pathologically modified proteins is suspected: for example,
Creutzfeld-Jacob and BSE).
MELAsteam Cleaning at 136°C, 2.3 bar, and a maximum cleaning time of 60 min., for the steam cleaning of instruments that have already been disinfected.
CAUTION: Use only together with a permanently installed MELAsteam
®
Pistol (otherwise the system is disabled.
See the Operator’s Manual for MELAsteam
®
.
Bowie & Dick Test Program at 134°C, 2 bar, and a sterilization time of 3.5 min, for:
Functional testing of the autoclave (verification of steam penetration by using special indicators)
V a c u u m t e s t
1 5 : 3 1 : 3 3
0 . 0 2 b a r 2 2 ° C
Program
Programm
Vacuum test program for:
Functional testing of the autoclave (verification of the vacuum seal of the autoclave by determining the leak rate).
Start this program when the autoclave is cold.
Initial position of the autoclave (no program selected)
Page 15
4.6
Start of program _________________________________________________________
Start the selected program by pressing the button “Start – Stop”. When you press this button, the autoclave will automatically begin to check the quality and quantity of the available demineralized / distilled water, and will run a conductivity test.
Program Start-Stop
S t a r t
When you start the “Quick program”, the display will also show the warning message: “Warning: only unwrapped instruments”. When you start the disinfection program, the display will show the warning: “Warning: Not sterilization”. When you see these messages, you must acknowledge them by pressing the button “Start” again.
After you start the program, its sequence will begin to run fully automatically. The display will continuously show the status of the running program as follows:
Program status:
1. 1. Pulsing, consisting of evacuation (air removal), until a programmed evacuation pressure, and with steam injection until a slight overpressure are reached. The display shows the chamber pressure and the steam temperature.
Shown on the display:
1 . s u b — a t m . p u l s i n g
– 0 . 0 8 5 b a r 2 2 ° C
Program Start-Stop
2. 2. … and additional pulsing steps
Additional pulsing (as described above) will take place, depending on the program selected.
This continues until the required vacuum is achieved and the required penetration of the items with saturated steam have taken place.
2 . s u b — a t m . p u l s i n g
– 0 . 8 5 b a r 7 0 ° C
Program Start-Stop
3. Heating-up phase
The heating-up phase follows pulsing. Continued injection of steam into the chamber increases the pressure and temperature, in accordance with the saturated-steam curve, until the programmed parameters are achieved.
4.
Sterilization phase
When pressure and temperature are in accordance with the saturated-steam curve, and when the programmed required values are reached, the actual sterilization time begins to run. The display flashes between showing the pressure / temperature, and showing the time remaining in the sterilization phase.
H e a t u p
1 . 8 0 b a r 1 1 7 ° C
S t e r i l i z a t i o n
2 . 1 8 b a r 1 3 5 ° C
S t e r i l i z a t i o n s t i l l : 2 m i n , 1 2 s
Program Start-Stop
Program Start-Stop
Program Start-Stop
5. Pressure release
After the sterilization phase has come to an end, pressure release will follow, with simultaneous emptying of the steam generator. Pressure and temperature fall.
P r e s s u r e r e l e a s e
0 . 8 5 b a r 9 6 ° C
Program Start-Stop
Page 16
Technical Description for the Vacuklav
®
23-B
Program status:
6.
Drying phase
After the pressure has been released, the drying phase begins. After the drying phase begins, it is possible to interrupt the program without causing an error message. This is because the actual sterilization phase is complete. You should wait until the drying has come to an end, however (unless you are using the “Fast program”).
Shown on the display:
V a c u u m — d r y i n g s i n . 1 ‘ – 0 . 9 b a r i m m e d i a t e r e m o v a l : p r e s s » S T O P »
Program Start-Stop
Program Start-Stop
7.
Ventilation
At the end of the drying period, the sterilization chamber is vented in a pressure-compensation process, until the pressure returns to normal atmospheric level.
8.
End of program
When the venting of the sterilization chamber is complete, the program cycle is finished.
If a printer is connected to the autoclave, and if the immediate-printout option is set to “Yes”, a record of the sterilization cycle will be printed out.
When the autoclave has automatically unlocked the door, you can open the door to remove the sterilized items.
V e n t i l a t e
– 0 . 1 2 b a r 6 0 ° C
Q u i c k — p r o g r a m r u n s u c c e s s f u l l y
P l e a s e w a i t d o o r u n l o c k i n g
O p e n d o o r p l e a s e
Program Start-Stop
Program Start-Stop
Program Start-Stop
Program Start-Stop
Page 17
Printout of cycle log ___________________________________________________________
The printout of the cycle log contains the following information:
——————————————
MELAG Vacuklav 23-B
——————————————
Program which has started
Programm : Universal-Programm
Current date
134°C wrapped
Date : 07.07.2005
Time : 11:33:35 (Start)
Time of day when the program started
Batch Nor.: 5
——————————————
The daily cycle number
Preheating 116,5 °C
Conductivity 7
µS/cm
Pre-heat temperature
Step of program Press. Temperat. Time
Conductivity of the demineralised / distilled water
bar °C min
Start 0.03 70.1 00:00
1.Fractionation
Evacuation -0.90 67.2 05:00
Steam entry 0.10 98.8 14:02
2. Fractionation
Evacuation -0.80 66.9 19:01
Steam entry 0.10 100.9 25:43
3. Fractionation
Program-sequence phases with the respective values for steam pressure, steam tempera-
Evacuation -0.80 78.8 30:43
Steam entry 0.10 101.1 39:02 ture, and time (relative to the start of the program).
Heat up 2.05 134.2 44:45
Steril. begin 2.05 134.2 44:45
Steril. end 2.19 136.0 48:15
Press. release 0.10 106.5 49:53
Vacuum drying
Drying begin -0,25 100.4 50:17
Drying press. -0,90 70,1 54:47
Drying end -0,35 60,5 59:44
Ventilation -0,18 57,1 64:44
End -0,05 57,1 64:44
Message showing results
——————————————
Mean sterilisation temperature / deviations
PROGRAMM RUN SUCCESFULLY!
Mean sterilisation pressure / deviations
Temperature : 135.4 +0.1 /-0.1 °C
Sterilisation time actually run
Oressure : 2.16 +0.01/-0.01 bar
Time of steril.: 3 min 30 s
Time of day at end of program
Time : 12:38:54 (End)
==========================================
Information line with totalled cycle meter, fac-
276 2001001567 3.31 1.16 tory number, and software version no.
4.8
Removing the sterilized items _____________________________________________
You can remove the sterilized items after opening the door. Danger of burning! Do not touch the hot sterilization chamber or the door of the autoclave unless you are wearing sufficient protection for your hands (gloves, etc.). Be sure to use the proper tools (MELAG Tray Lifter or standard tray lifter) or hand protection (pot holders or gloves) to remove the hot sterilized items from the autoclave.
After removing sterilized items which are wrapped, check the package to determine whether it is damaged. If it is damaged (broken package seals, for example), you must sterilize the contents once again. Important: If you must sterilize the contents again, they must be wrapped in a new package.
The sterilized items must be sufficiently dry before proper sterile storage is possible. The Vacuklav
®
23-B provides excellent drying if the complete program is allowed to run (i.e., without interrupting the drying process), and if the loading instructions given in this manual are properly observed (see Section 4.3 above). Immediately after
Page 18
Technical Description for the Vacuklav
®
23-B
sterilization it can occur that condensation residue remains on the sterilized items or on their package. The heat from the still-hot sterilized items will evaporate this condensate after completion of sterilization. DIN 58953, Part 7,
Section 7, contains the following on moisture residue on paper wraps or see-through sterilization paper after sterilization: “Small amounts of water on the outside of the packages are harmless if they have dried away within
30 minutes after taking them out of a steam sterilizer.”
After they have cooled down, provide sterile storage for wrapped sterilized items where they are not subjected to
dust (for example, in an instrument cabinet). Under conditions of dust-protected storage, DIN 58953, Part 7, provides a rule of thumb for the maximum shelf life of sterilized items: six (6) weeks for sterilized items in single wrapping (e.g., see-through sterilization packages), and six (6) months for sterilized items in double sterilization packages.
4.10 Sterilization frequency / interval periods_____________________________________
After the drying phase has run out, or after it is interrupted by the user, the autoclave can be immediately loaded with new items and started again at once. It is not necessary to wait before starting the next cycle.
4.11 Manual abort of the program ______________________________________________
4.11.1 Aborting during the sterilization phases___________________________________________________
It is possible to terminate any started program prematurely by pressing the «Start-Stop» button. Caution: If you abort a program before it reaches the “Drying” step, then the items inside the autoclave must be considered not
sterile.
Warning! When you open the autoclave door, it is possible that dangerous steam can escape from the sterilization chamber (depending on the operating status just before the door is opened). If you abort a program before it reaches the “Sterilization” program phase, we recommend that you run the next program without any items in the sterilization chamber.
Operator action Shown on the display:
1. Press the «Start-Stop» button.
A safety question will then appear for 5 seconds on the display so that you can confirm that you really want to abort the program. If you take no further action, the program will continue as usual after this 5 s has run out.
S t o p p r o g r a m ? b u t t o n » S t o p »
Program Start-Stop
2. If you press the «Start-«Stop» button again before the above-stated confirmation question disappears from the screen (within 5 seconds), then the program will prematurely stop.
If the autoclave is operating in a state in overpressure (greater than normal atmospheric pressure) when you abort a program, a pressure-release step will follow. If the autoclave is in a vacuum status, a venting step will take place
3. After pressure compensation has been achieved, the following two messages will alternate on the display: “Termination end” and
“Confirmation with ‘–’ key”. If you press the “–”, this will confirm that you wish to terminate the program.
P r o g r a m s t o p p e d
P r e s s u r e r e l e a s e
1 . 5 2 b a r 1 1 2 ° C
S t o p / e n d
0 . 0 2 b a r 8 8 ° C
Program Start-Stop
Program Start-Stop
Program Start-Stop
Program Start-Stop
A c k n o w l e d g e w i t h b u t t o n » – »
4. Press the “–” button to confirm that you really want to abort the program. You will then see the message “Please wait – Door unlocking.” The display will then show the program which you have selected.
G e n t l e p r o g r a m
1 2 1 ° C w r a p p e d
Program Start-Stop
Page 19
4.11.2 Interruption of a drying phase ___________________________________________________________
It is possible to interrupt the program after the “Drying” step has started. Since the actual sterilization / disinfection phase has been completed by this time, the items in the autoclave are considered sterile or disinfected.
Depending on the point in time of interruption of the drying phase, however, the user must realise that the sterilized items have not yet sufficiently dried. This is especially true for wrapped sterilized items. This also means that the items are not sufficiently dry for sterile storage. For these reasons, we do not recommend that you interrupt the drying phase for the “Universal program” and the “Gentle program”.
With the “Fast program”, it is possible to interrupt the drying phase in order that the items can be immediately used.
Once the interrupted program comes to a stop, take the unpacked instruments out of the autoclave. The intrinsic heat of the instruments will dry the moisture on them as they cool down. Warning! When you open the autoclave door, it is possible that dangerous steam can escape from the sterilization chamber (depending on the operating status just before the door is opened).
Operator action
1
.
The autoclave is in the drying phase. The display alternates between the two following messages:
“Vacuum drying”, followed by the length of drying time which has already run.
Shown on the display:
V a c u u m d r y i n g s i n . 3 ‘ – 0 . 9 b a r 6 8 ° C
… and …
The message showing how you can interrupt the drying phase.
I m m e d i a t e r e m o v a l p r e s s » S t o p »
Programm Start-Stop
Programm Start-Stop
2. Press the «Start-Stop» button.
A safety question will then appear for 5 seconds on the display so that you can confirm that you really want to abort the program. If you take no further action, the program will continue as usual after this 5 s has run out.
3. If you press the «Start-«Stop» button again before the above-stated confirmation question disappears from the screen (within 5 seconds), then the program will prematurely stop.
4
.
The system will then vent the sterilization chamber.
When the sterilization chamber has been vented, the program sequence is finished. The following status message will appear on the display:
It will alternate with the following message:
And with the following message:
If a printer is connected to the autoclave, and if you have selected “Yes” for the option for immediate logging, the printer will immediately log the message that the drying phase has been interrupted.
S t o p p r o g r a m ? p r e s s » S t o p »
D r y i n g s t o p p e d
V e n t i l a t e
– 0 . 5 2 b a r 1 1 2 ° C
Q u i c k p r o g r a m r u n s u c c e s s f u l l y
O p e n d o o r p l e a s e
D r y i n g s t o p p e d
Program Start-Stop
Program Start-Stop
Program Start-Stop
Program Start-Stop
Program Start-Stop
Program Start-Stop
Page 20
Technical Description for the Vacuklav
®
23-B
4.12 Response in case of warnings and error messages ________________________
The Vacuklav
®
23-B has safety features as well as an extensive checking and monitoring system which is integrated into the computer control. These functions guarantee a maximum of possible reliability for the sterilization process, and eliminate risks arising from the autoclave for the patient and the autoclave operator.
For example, the system continuously tests a number of autoclave functions (for example, the sensor systems for pressure and temperature) after the power switch is turned on. The autoclave system also checks to make sure that further conditions are met for successful program start: For example, that power and water are present in sufficient quantity and quality. Start of the program is not possible if these conditions are not fulfilled.
After the initial test, and after the program starts, the system will monitor all parameters relevant for sterilization, as well as additional limit values for the individual program phases. If these limit values are exceeded, the system will display the respective error messages and will automatically interrupt the program.
In addition to instructions, warnings, and error messages on the display, the printer (if connected) will log out the type of errors and faults, and the time of their occurrence.
If any of the above-stated messages appear, please read Section 7 of this manual for appropriate reactions. This section also contains instructions concerning possible operator faults.
If the autoclave is not being used for a certain period of time (for example, overnight), leave its door slightly open rather than closing it. This will spare the door gasket and will lengthen its service life (e.g., by preventing it from sticking shut).
In case of longer inactive periods – such as vacations – shut off the supply of water from the water treatment system.
5 Placing the autoclave out of operation / transport / putting the autoclave back into service
If you wish to take the autoclave out of operation, or if you wish to transport it, please proceed as follows:
•
Pull out the power plug. Allow the autoclave to cool down.
•
Drain both chambers of the water supply tank (see Section 2.8). Or, if you have a direct connection to a watertreatment system, shut off the supply of demineralized / distilled water from this system.
•
Disconnect the hoses on the rear of the autoclave if you are using a water-treatment system (external water supply).
•
If you are transporting the autoclave with its tray racks and trays still inside, protect the surface of the door window by inserting a layer of foam rubber or other suitable material (e.g., bubble wrap) between the door and the sterilization chamber.
•
Important: To prevent transport damage, be sure to use the original packing of the autoclave. If there is a danger of frost damage during transport, be sure to follow the steps provided in the special service instructions.
•
To place the autoclave back into service after transport or repair, follow the instructions given in Sections 2 and 3 of this manual.
Page 21
6 Special functions
6.1 Display of water quality (conductivity) / pre-heat temperature of the sterilization chamber _______________________________________________________________
Be repeatedly pressing the «–» button, you can at any time display the pre-heat temperature of the sterilization chamber, and the conductivity of the demineralized / distilled water being used. These two displays will flash alternatively on the screen, as follows:
Operator action Shown on the display:
1. Press the «-» button and hold it down:
This will display the conductivity of the demineralized / distilled water in
µS/cm.
Release the button «-«:
This will return you to the normal display (the initial position, the selected program, or the program status). Shown here: the initial position.
Press the «-» button repeatedly and hold it down:
This will show the pre-heat temperature of the sterilization chamber in °C.
C o n d u c t i v i t y
1 5
µ S / c m
1 4 : 2 7 : 1 2
0 . 0 2 b a r 2 5 ° C
T e m p _ p r e h t _ c h a m b
1 2 0 ° C
6.2
Selection for additional drying _____________________________________________
The standard drying times for each specific program guarantee sufficient drying of the sterilized items if all instructions for loading are followed (see Section 4.3). If, however, residual moisture remains on the sterilized items after you have used special loading variations, you can select the function “Additional drying” to lengthen the drying time by 50%, as follows:
Operator action
When you start the program, press the button «+» at the same time. The display will confirm the selection for additional drying.
Then the program will run as described in
Section 4.7. The drying times will be extended by 50%.
Shown on the display:
S u p p l e n t d r y i n g s e l e c t e d
Program Start-Stop
6.3
Logging / documentation of sterilization cycles_______________________________
The non-volatile memory of the autoclave computer control system archives the records of the last 40 sterilization / disinfection cycles. The user can print out these logs immediately, or at any other time, by using the serial interface
(RS232). If the computer memory is full, with 40 records, the system will overwrite the oldest record automatically when the next program starts. If an external printer is connected for logging, if it has been initialised, and if the printout option setting is for “No” under “Immediate printout”, then the system will ask the user if he or she really wants to overwrite the oldest record (see Section 7.3). The following section describes the various possibilities for output media, and for the manner of outputting the logs.
6.3.1 Output of logs _______________________________________________________________________
6.3.1.1.1 Connection of the external printer Melaprint
®
42 __________________________________________
To connect the Melaprint
®
42 external printer to the autoclave, plug in the data-transfer cable at the 9-pole jack on the front of the autoclave, and plug in the other end to the 25-pole jack at the rear of the printer. Securely insert the cable plugs and tighten the screws to fasten them down. Hook up the printer to the mains power supply by plugging in the delivered power supply unit with its power cable to a power outlet. Then plug in the coaxial plug (the lowvoltage output of the power supply unit) to the power-supply jack at the rear side of the printer. The printer will confirm that it is ready for operation when the operating-voltage display shows “P”, and when the status display (the
ON / OFF line) shows “SEL”. For more instructions on placing the printer into operation (e.g., installation of the
Page 22
Technical Description for the Vacuklav
®
23-B
external paper-roll mount, insertion of the paper roll, etc.), and on how to operate the printer, please consult the manual for the printer.
6.3.1.1.2 Initialization of the printer _____________________________________________________________
After you have connected the printer to the autoclave, you must initialise the printer. This means logging it in to the autoclave computer control system. Please proceed as follows:
Operator action Shown on the display:
1. Switch on the autoclave. It must be in its initial position:
1st line: time of day
2nd line: chamber pressure and temp.
1 4 : 2 7 : 1 2
0 . 0 2 b a r 2 5 ° C
Program Start-Stop
2. Press the «+» button and hold it down; while holding it down, press the «–» button. The menu item “Function” with sub-menu “Print” will appear.
F u n c t i o n :
P r i n t
Program Start-Stop
3. Press the button “Program”.
The menu item “Print” with sub-menu “File transmission” will appear.
P r i n t
F i l e t r a n s m i s s i o n
Program Start-Stop
4. Press the button “Program”.
The menu “File transmission” will appear. The current setting will appear (e.g., “No printer,” as shown to the right).
5. Press the button «+»
(or «-«) until the message
“External printer” appears in the display.
F i l e t r a n s m i s s i o n
N o p r i n t e r
F i l e t r a n s m i s s i o n
E x t e r n a l p r i n t e r
Program Start-Stop
Program Start-Stop
6. Press the button “Program”.
The display will confirm the setting and will return to the menu “Print”.
P r i n t
F i l e t r a n s m i s s i o n
Program Start-Stop
7. Press the button «Start-Stop».
The system will return to the menu «Function».
F u n c t i o n :
P r i n t
Program Start-Stop
8. Press the «Start-Stop» button.
The system will leave the menu «Function» and will return to the initial position.
1 4 : 2 7 : 3 0
0 . 0 2 b a r 2 5 ° C
Program Start-Stop
Page 23
6.3.1.2.1 Installation _________________________________________________________________________
You can also use an external PC to output the autoclave log, and to archive data. To install this mode, use a null modem cable to connect the serial interface of the PC to the printer interface of the autoclave. You must install the program MELAwin
®
on your PC to allow data transfer and to enable processing of this data. The software manual for MELAwin provides detailed instructions on all the possibilities you can use.
6.3.1.2.2 Initializing the output on your PC_______________________________________________________
After you have connected the autoclave to your PC, you must set the log output function to «External PC». Follow
the same procedure here as for initialisation of an external printer (see Section 6.3.1.1.2 of this manual). There is
one difference, however: under step no. 5, use the «+» or the «–» button to set the option to «External PC».
In order to set the option «No printer», follow the same procedure as described under Section 6.3.1.1.2. There is
one difference, however: under step no. 5, use the «+» or the «–» button to set the option to «No printer».
If you have connected an external printer to the autoclave, and if you have initialised this printer, you can have the autoclave automatically log out a printout at the end of each program cycle. To make this setting, first switch on the main power to the autoclave, and then carry out the following steps:
Operator action Shown on the display:
1. Press the «+» button and hold it down; while holding it down, press the «–» button. The menu item “Function” with sub-menu “Print” will appear.
F u n c t i o n :
P r i n t
Program Start-Stop
2. Press the button «Program».
The menu item «Print» with sub-menu «File transmission» will appear.
P r i n t
F i l e t r a n s m i s s i o n
Program Start-Stop
3. Press the button «+». The selection in the sub-menu
«Immediate printout» will appear. The display will show the option set until now (in this example: «No»).
4. You can use the «Program» button to toggle back and forth between «Yes» and «No».
Press «Program» until the option «Yes» appears.
5. Press the «Start-Stop» button.
This will confirm the new setting and return you to the menu «Function» with submenu «Print».
6. Press the button «Start-Stop».
You will now leave the menu
«Function» and return to the initial position.
I m m e d . p r i n t o u t
N o
I m m e d . p r i n t o u t
Y e s
P r i n t
F u n c t i o n :
1 4 : 2 7 : 3 0
0 . 0 2 b a r 2 5 ° C
Program Start-Stop
Program Start-Stop
Program Start-Stop
Program Start-Stop
Page 24
Technical Description for the Vacuklav
®
23-B
6.3.3 Printing out stored cycles at a later time _________________________________________________
If you have connected an external printer to the autoclave, and if you have initialised this printer, you can print out earlier cycles which you have later selected. To do this, switch on the autoclave at its mains power switch, and make the following settings:
Operator action Shown on the display:
1. Press the «+» button and hold it down; while holding it down, press the «–» button. The menu item “Function” with sub-menu “Print” will appear.
F u n c t i o n :
P r i n t
Program Start-Stop
2. Press the button «Program».
The menu item «Print» with sub-menu «File transmission» will appear.
P r i n t
F i l e t r a n s m i s s i o n
Program Start-Stop
3. Press the button «+» (or «-» ) repeatedly until the following display appears: «Last cycle: print no. 40».
L a s t c y c l e : p r i n t n o . 4 0
Program Start-Stop
4. Press the button «Program».
The log number will flash in the display.
L a s t c y c l e
p r i n t : n o . 4 0
Program Start-Stop
5. To select the log which you wish to print out, press the button «+» (or «-» ) until the number of the log appears on the display which you wish to print out: e.g., 25.
6. Press the button «Program» to start printing out the selected log. To interrupt the printing, press «Start-Stop». This will return you to the menu «Function».
7. After the printout is finished, the first display will appear again. To print out other stored cycles, start at step no.
4 again, or …
8. … press «Start-Stop» to return to the menu “Function”.
L a s t c y c l e
p r i n t : n o . 2 5
P r i n t o u t
L a s t c y c l e p r i n t : n o . 4 0
F u n c t i o n :
P r i n t
Program Start-Stop
Program Start-Stop
Program Start-Stop
Program Start-Stop
9. Then press «Start-Stop» when you wish to return to the initial position.
1 4 : 2 7 : 3 0
0 . 0 2 b a r 2 5 ° C
Program Start-Stop
Page 25
If you have connected an external printer to the autoclave, and if you have initialised this printer, you can print out all stored logs at any point in time. To do this, switch on the autoclave at its mains power switch, and make the following settings:
Operator action Shown on the display:
1. Press the «+» button and hold it down; while holding it down, press the «–» button. The menu item “Function” with sub-menu “Print” will appear.
F u n c t i o n :
P r i n t
Program Start-Stop
2. Press the button «Program».
The menu item «Print» with sub-menu «File transmission» will appear.
P r i n t
F i l e t r a n s m i s s i o n
Program Start-Stop
3. Press the button «+» (or «-» ) repeatedly until the following sub-menu appears in the display: «Print storaged cycles».
4. Press the button «Program» to print out all stored cycles (up to 40). You can press «Start-
Stop» to cancel printing, but once the printout has started, you can interrupt it only by switching off the main power switch.
5. After the printout is finished, the initial message appears again:
P r i n t s t o r a g e d c y c l e s
P r i n t s t o r a g e d c y c l e s
P r i n t o u t
Program Start-Stop
Program Start-Stop
Program Start-Stop
6. Press «Start-Stop» to return to the menu «Function».
F u n c t i o n :
P r i n t
Program Start-Stop
7. Then press «Start-Stop» again to return to the initial menu position.
1 4 : 2 7 : 1 2
0 . 0 2 b a r 2 5 ° C
Program Start-Stop
Page 26
Technical Description for the Vacuklav
®
23-B
6.3.5 Displaying the contents of the printer memory ____________________________________________
If you have connected an external printer to the autoclave, and if you have initialised this printer, you can look at the content of the printer memory by carrying out the following steps:
Operator action Shown on the display:
1. Press the «+» button and hold it down; while holding it down, press the «–» button. The menu item “Function” with sub-menu “Print” will appear.
F u n c t i o n :
P r i n t
Program Start-Stop
2. Press the button «Program».
The menu item «Print» with sub-menu «File transmission» will appear.
P r i n t
F i l e t r a n s m i s s i o n
Program Start-Stop
3. Press the button «+» (or «-» ) repeatedly until the display shows the content of the print memory. This example shows
40 cycles stored and no free memory.
4. Press «Start-Stop» to return to the menu «Function» …
A l l o c a t e d : 4 0
O p e n : 0
F u n c t i o n :
P r i n t
Program Start-Stop
Program Start-Stop
5. Then press «Start-Stop» again to return to the initial menu position.
1 4 : 2 7 : 1 2
– 0 . 0 2 b a r 2 5 ° C
Program Start-Stop
Page 27
6.3.6 Deleting stored cycles from the memory _________________________________________________
You may wish to erase all stored cycles from the memory: for example, to avoid the warning “Printer memory full”.
This is possible only if you have set the immediate-printout option to “No” (see Section 7.3 of this manual). First, switch on the power to the autoclave, and proceed as follows:
Operator action Shown on the display:
1. Press the «+» button and hold it down; while holding it down, press the «–» button. The menu item “Function” with sub-menu “Print” will appear.
F u n c t i o n :
P r i n t
Program Start-Stop
2. Press the button «Program».
The menu item «Print» with sub-menu «File transmission» will appear.
P r i n t
F i l e t r a n s m i s s i o n
Program Start-Stop
3. Press the button «+» (or «-» ) repeatedly until you see the following in the display: «All cycles delete».
A l l c y c l e s
D e l e t e
Program Start-Stop
4. Erase all cycles from memory by pressing the button «Program». You can cancel this action by pressing «Start-
Stop».
5. Press «Start-Stop» to return to the menu «Function».
A l l o c a t e d : 0
O p e n : 4 0
F u n c t i o n :
P r i n t
Program Start-Stop
Program Start-Stop
6. Then press «Start-Stop» again to return to the initial menu position.
1 4 : 2 7 : 1 2
– 0 . 0 2 b a r 2 5 ° C
Program Start-Stop
Page 28
Technical Description for the Vacuklav
®
23-B
To check the printer functions and the communication between the printer and the autoclave, print out a test log as follows:
Operator action Shown on the display:
1. Press the «+» button and hold it down; while holding it down, press the «–» button. The menu item “Function” with sub-menu “Print” will appear.
F u n c t i o n :
P r i n t
Program Start-Stop
2. Press the button «Program».
The menu item «Print» with sub-menu «File transmission» will appear.
P r i n t
F i l e t r a n s m i s s i o n
Program Start-Stop
3. Press the button «+» (or «-» ) repeatedly until the following appears in the display: «Test printout”.
T e s t p r i n t o u t
Program Start-Stop
4. Press the button “Program” to start the test printout. Or, you can press «Start-Stop» to cancel this printout.
P r i n t o u t
Program Start-Stop
5. Press «Start-Stop» to return to the menu “Function”.
F u n c t i o n :
P r i n t
Program Start-Stop
6. Then press «Start-Stop» again to return to the initial menu position.
1 4 : 2 7 : 1 2
– 0 . 0 2 b a r 2 5 ° C
Program Start-Stop
Page 29
6.4
Setting the date and time of day ______________________________________
You can set the date and time of day as required (for example, for changes between winter and summer time).
Proceed as follows:
Operator action Shown on the display:
1. Press the «+» button and hold it down; while holding it down, press the «–» button. The menu item “Function” with sub-menu “Print” will appear.
F u n c t i o n :
P r i n t
Program Start-Stop
2. Press the button «+» (or «-» ) repeatedly until the following sub-menu appears in the display: «Date / Time of day»,
3. Press the button «Program».
The display will show the time as currently set (here, for example, 17.00 hours = 5:00 p.m.).
4. Press the button «+» (or «-» ) repeatedly to move among the options shown in the examples at the right:
F u n c t i o n :
D a t e / T i m e
D a t e / T i m e
H o u r : 1 7
D a t e / T i m e
M i n u t e : 2 3
Program Start-Stop
Program Start-Stop
Program Start-Stop
Program Start-Stop
D a t e / T i m e
S e c o n d : 1 3
Program Start-Stop
D a t e / T i m e
D a y : 1 4
Program Start-Stop
D a t e / T i m e
M o n t h : 0 5
Program Start-Stop
D a t e / T i m e
Y e a r : 0 0
5. When you reach the option which you want to set (for example, «Minute»), press the button «Program». The value as currently set will begin to flash.
6. Press the button «+» or «-» to increase or decrease the value which is flashing. In the example here, the «+» button was pushed to increase the value for minutes.
D a t e / T i m e
M i n u t e : 2 3
D a t e / T i m e
M i n u t e : 2 8
Program Start-Stop
Program Start-Stop
Page 30
Technical Description for the Vacuklav
®
23-B
Operator action
7. Press the button «Program» to confirm the newly set value.
The new value will now stop flashing. To set other values, return to step 4 above and follow the same procedure.
Shown on the display:
D a t e / T i m e
M i n u t e : 2 8
Program Start-Stop
8. To finish the settings, press the «Start-Stop» button to return to the «Function» menu, and …
F u n c t i o n :
D a t e / T i m e
Program Start-Stop
9. Then press «Start-Stop» again to return to the initial menu position.
1 4 : 2 7 : 1 2
– 0 . 0 2 b a r 2 5 ° C
Program Start-Stop
The Vacuklav
®
23-B has a function which, before the program starts, heats the sterilization chamber to the preheating temperature required by the specific program. This function can also keep the chamber at this temperature between consecutive cycles. This heating reduces the formation of condensate on the walls of the sterilization chamber: which shortens the cycle times and enables excellent drying results. If the automatic pre-heating function has been activated, it will go into operation when the autoclave is turned on at its power switch. The default setting for the autoclave (the setting when delivered from the factory) is for automatic pre-heating. You can change this default setting, however, and can switch this automatic pre-heating function off and on as required. To do so, proceed as follows:
Operator action Shown on the display:
Program Start-Stop
1. Press the «+» button and hold it down; while holding it down, press the «–» button. The menu item “Function” with sub-menu “Print” will appear.
F u n c t i o n :
P r i n t
2. Press the button «+» (or «-» ) repeatedly until the sub-menu
«autom. Preheating» appears in the display.
F u n c t i o n : a u t o m . P r e h e a t i n g
Program Start-Stop
3. Press the button «Program».
The display will show the current setting. In the example to the right, the current setting is «Yes».
4. You can press the button
«Program» to toggle back and forth between «Yes» and «No».
In the example to the right, the user has pressed the button once to change from
«Yes» to «No».
5. To end the setting procedure, press «Start-Stop», and you will return to the menu «Function».
P r e h e a t i n g
Y e s
P r e h e a t i n g
N o
F u n c t i o n : a u t o m . P r e h e a t i n g
Program Start-Stop
Program Start-Stop
Program Start-Stop
Page 31
Operator action
6. Then press «Start-Stop» again to return to the initial menu position.
Shown on the display:
1 4 : 2 7 : 1 2
– 0 . 0 2 b a r 2 5 ° C
Program Start-Stop
The Vacuklav
®
23-B has a total-cycle counter. You can read the current number of total cycles by proceeding as follows:
Operator action Shown on the display:
1. Press the «+» button and hold it down; while holding it down, press the «–» button. The menu item “Function” with sub-menu “Print” will appear.
F u n c t i o n :
P r i n t
Program Start-Stop
2. Press the button «+» (or «-» ) repeatedly until the sub-menu
«Sum batch number» appears in the display.
F u n c t i o n :
S u m b a t c h n u m b e r
Program Start-Stop
3. Press the button «Program».
The display will show the current meter reading. This is the total number of cycles executed until now.
4. To leave this display, press the button «+» (or «-» ). This will return you to the menu
«Function». Now …
5. Then press «Start-Stop» again to return to the initial menu position.
S u m b a t c h n u m b e r
3 6 7
F u n c t i o n :
S u m b a t c h n u m b e r
1 4 : 2 7 : 1 2
– 0 . 0 2 b a r 2 5 ° C
Program Start-Stop
Program Start-Stop
Program Start-Stop
Page 32
Technical Description for the Vacuklav
®
23-B
6.7
Changing the setting for supply of demineralized / distilled water _______________
The Vacuklav
®
23-B can be set to accept demineralized / distilled water from either outside sources (a separate water-treatment system) or from internal sources (purchased demineralized / distilled water which is poured into the water supply tank). Proceed as follows to make this setting:
Operator action Shown on the display:
1. Press the «+» button and hold it down; while holding it down, press the «–» button. The menu item “Function” with sub-menu “Print” will appear.
F u n c t i o n :
P r i n t
Program Start-Stop
2. Press the button «+»
(or «-» ) repeatedly until the sub-menu «ayua-dem supply» appears in the display.
F u n c t i o n : a q u a — d e m s u p p l y
Program Start-Stop
3. Press the «Program» button.
This will display the currently set option. In the example here, the internal option was set.
4. You can now press the «Program» button repeatedly to toggle back and forth between the «Internal» or «External» option.
5. To end the setting procedure, press «Start-Stop», and you will return to the menu «Function».
6. Then press «Start-Stop» again to return to the initial menu position.
a q u a — d e m s u p p l y
I n t e r n a l a q u a — d e m s u p p l y
E x t e r n a l
F u n c t i o n : a q u a — d e m s u p p l y
1 4 : 2 7 : 1 2
– 0 . 0 2 b a r 2 5 ° C
Program Start-Stop
Program Start-Stop
Program Start-Stop
Program Start-Stop
The program sequences (sub-atmospheric pulsing , heating up, sterilizing, pressure release, drying, and venting), as well as the program parameters (pressure, temperature, and time) satisfy the usual requirements encountered in everyday medical practice.
It is the responsibility of the user, however, that the items to be sterilized are correctly loaded. This includes the type of wrapping, the number of articles loaded, and the arrangement of items so as to ensure proper drying.
The two options «Automatic pre-heating» and «Additional drying» offer two of the standard possibilities to influence the program sequence which can be implemented by the user.
It is possible in individual cases to modify the program sequences on a customised basis (and within the context of the guarantee for sterilization effectiveness). These modifications, however, may be carried out only by personnel authorised by MELAG. If you require such modifications, get in touch with your specialist dealer or with the MELAG company.
Page 33
7 Faulty operation / malfunctions
7.1
What to do in case of malfunctions _________________________________________
In case of conditions which deviate from normal operating states (for example, poor drying results, notification reports, warnings, or error messages), please consult the following instructions to ensure that faulty operator actions are not the cause of such conditions.
Observe these instructions and correct and faulty operating action. Then continue your work with the autoclave.
Only if the malfunction occurs again, get in touch with your specialist dealer, an authorised MELAG customer-care representative, or directly with the MELAG company.
7.2
Malfunctions without an error message _____________________________________
7.2.1 An empty display window_______________________________________________________________
When you switch on the power to the autoclave, the display should show the initial position (see Section 4.1.2 of this manual).
If there is no text in the display window, please check the following:
1. Is the electrical plug of the autoclave inserted into a power socket?
2. Does this socket supply the proper mains voltage (one possibility: use another electrical device to test the power supply).
3. Check the fuses. First unplug the power cable of the autoclave from the power socket. Then exchange the two mains fuses located below the power switch (see page 4, Fig. 1, no. 9). Use a screwdriver or a coin to unscrew the threaded cap of the fuse mounts. Then use the 2 spare fuses on the inside of the door to replace the 2 fuses used until now. Now replace the threaded cap and plug in the power cable to the socket. If there is still no text in the display, or if the autoclave fails after a short period (for example, during the first program start), then please notify your specialist dealer. If you need to replace the original fuses, be sure to order two new fuses from your specialist dealer (MELAG article no. 57592).
7.2.2 The autoclave uses too much demineralized / distilled water__________________________________
The amount of demineralized / distilled water used by the autoclave will depend on the program and on the loading of the autoclave. If the autoclave uses considerably more water than the amounts given in Technical Data (see
Section Fehler! Verweisquelle konnte nicht gefunden werden.), then check the following:
1. Check to make sure that the condensate is not obstructed in its return flow. The autoclave must be set up correctly to ensure the correct return flow. If necessary, increase the slope of the autoclave toward the rear by farther unscrewing the front autoclave feet to raise the front (see Section 2.3 of this manual).
2. Check to make sure that fallen instruments, filter paper, or the like have not clogged the condensate return flow on the bottom of the chamber.
3. If the above measures do not reduce the excessive consumption of water, please notify your specialist dealer.
In addition to proper functioning of the autoclave itself, satisfactory drying will essentially depend on properly setting up and operating the autoclave. Please check the following if drying is not satisfactory:
1. Check to make sure that the condensate is not obstructed in its return flow. The autoclave must be set up correctly to ensure the correct return flow. If necessary, increase the slope of the autoclave toward the rear by farther unscrewing the front autoclave feet to raise the front (see Section 2.3 of this manual).
2. Check to make sure that fallen instruments, filter paper, or the like have not clogged the condensate return flow on the bottom of the chamber.
3. Check to make sure that you have not loaded too many items into the autoclave (especially textiles). Make sure that loading is correct (for example, avoid direct contact of items with the sterilization chamber wall,
which causes absorption of condensate). Use tray racks, and see instructions under Section 9.1 of this
manual.
4. Activate the automatic pre-heating function (see Section 6.5 of this manual).
5. Start the program with the «Additional drying» function: see Section 6.2 of this manual.
6. If unsatisfactory drying still results despite the above measures, please notify your specialist dealer.
Page 34
Technical Description for the Vacuklav
®
23-B
If you see the following warning messages in the display, check the instructions given below at the right. Take the corrective action. Then start the program again. If the warning appears again, please notify your specialist dealer.
Warning message
W A R N I N G !
Cause of trouble / Corrective action
• The door contact is not closed when the autoclave is started:
D o o r o p e n
N o s t a r t
− Corrective action: Slide the locking handle down to the bottom catch. The display will then be «Door closed» if this action is properly taken.
p o s s i b l e
A c k n o w l e d g e w i t h b u t t o n » – «
W A R N I N G !
W a t e r s u p p l y
C h e c k s u p p l y
N o s t a r t p o s s i b l e
W a t e r q u a l i t y b a d
N o s t a r t p o s s i b l e
A c k n o w l e d g e a q u a d e s t . / d e m w i t h b u t t o n » – «
A c k n o w l e d g e w i t h b u t t o n » – «
• This message will appear when the supply of demineralized / distilled water is set to «Internal», and if there is not sufficient water in the internal tank. The «Internal» setting is used when the water supply to the autoclave comes from demineralized / distilled water which is purchased and filled into the built-in water supply tank of the device.
• When the water level in the water supply tank (right chamber) has fallen below the prescribed minimum level, the built-in float switch initiates this warning.
− Corrective action: Check the level of water in the right chamber of the water supply tank. If it is low, fill the tank up to the maximum-level mark with demineralized / distilled water in sufficient quality.
• The conductivity of the demineralized / distilled water is above the second limit value. The internal test system of the autoclave prevents the device from starting.
− Corrective action: Empty and clean the water storage tank of the autoclave and refill it with demineralized / distilled water: Or: check the external water supply (i.e., the mixed bed resin of the MELAdem
®
).
W A R N I N G ! s t e r i l e f i l t e r
R e p l a c e
A c k n o w l e d g e w i t h b u t t o n » – «
• The minimum or maximum pressure value for ventilation drying has been exceeded. This warning will appear at the end of the program. It will also appear in the printed log in the last line:
− Corrective action: The sterile filter is defective.
Exchange the sterile filter (MELAG article no.: 20160)
Page 35
Warning message
P r i n t e r i s
N o t r e a d y
P r i n t e r m e m o r y f u l l
E x e c u t e s e r v i c e p l e a s e
T e s t u n s u c c e s s f u l
L e a k r a t e : 3 . 2
Cause of trouble / Corrective action
• Communication with the printer via the serial interface is interrupted. This warning will appear when the operator attempts to print. This warning will appear for 20 s and then will disappear. If the communication is restored during this
20 s, the data will be printed out. Corrective action:
• It is possible that the autoclave is being operated without a printer, but that the printer is installed. In this case, fol-
low Section 6.3.1.3 to set the option «No printer» in the
menu «File transmission».
• Check to make sure that the data cable is correctly connected to the autoclave and to the printer.
• Check to make sure that there is power supply to the printer. If not, restore power. If power is provided, the
MELAprint
®
42 LED display will show a red «P».
• If the printer is offline, set it to online. To set the MELA-
®
42 online, press the button «SEL». The green LED
«SEL» will then light up when it is online.
• The internal printer memory is full (i.e., 40 cycles have been stored there: the maximum). An external printer is installed, the option «Immediate printout» is set for «No» in the menu
«Print». This warning appears each time when a program is started. Corrective action:
• Press the button «Start-Stop» for a second time. The warning may disappear, and the program may start.
• Set the immediate-printout option for the printer to «Yes»
(see Section 6.3.1.3).
• Erase all stored cycles (see Section 6.3.6). Warning: If
you need this data, be sure to print it out before deleting
the memory (see Section 6.3.4). Deinstall the printer in
the menu «File transmission» by selecting «No printer»
(see Section 6.3.1.3).
• The service message is activated because the device has reached the maximum number of cycles or the maximum operating time before the next service is due. This message will appear each time you start a program. Corrective
action:
• Press the button «Start-Stop» again. The warning may disappear, and the program for this cycle may start. This solution may enable you to use the autoclave until the proper service has been performed.
• Have the required service performed by a MELAG service company, or by the authorized specialized dealer. The service personnel will reset the service counter after the service.
• The leak rate determined in the vacuum test is greater than the maximum permitted value. Corrective action:
• Check the door gasket and the sterilization chamber flange for cleanliness. Clean them if they are dirty.
• Repeat the vacuum test while the autoclave is completely cold
If no other error messages appear during the program sequence, you can continue to work with the autoclave. At the next regularly scheduled inspection by authorized service staff, however, the personnel must find the cause for the increased leak rate.
Page 36
Technical Description for the Vacuklav
®
23-B
Error messages generally occur with the display message «Error», followed by the error number and a description of the error.
Error messages can appear before a program is started: i.e., as soon as the power switch is placed on, or some time after the power is switched on. Or, they can occur after program start, while the program is running. If errors occur while the program is running, the system will always issue an error message, and it will abort the program.
Depending on the chamber pressure at the time that the error appears, the system may stop the program immediately and may automatically release the pressure in the chamber. Or, it may stop the program together with ventilation of the chamber. During abort of the program, the display will alternate between the error message and the program phase («Pressure release» or «Ventilation»). After the program has been stopped, the display will alternate between the error message and the message «Acknowledge with button ‘–'» and «Stop / End». When you press button «–» this will delete the error message (unless the cause of the error remains, in which case the error message will also remain). The door of the autoclave will remain locked until you have acknowledged the error message.
If a program is aborted, the items loaded in the autoclave must be considered non-sterile or not disinfected. The sterilization or the disinfection program must be repeated. In such cases, we recommend that the user remove all items from the chamber after such an abort, and to run one sterilization cycle without a load. This is because the drying phase may not proceed properly after the first start.
If an external printer is connected, and if you have set the immediate-printout option for the printer to «Yes», the system will automatically print out a log at the end of the program abort. This will take place not only for non-cyclic errors (i.e., a program has not started), but also for cyclic errors (i.e., during a program). The printed log will show the complete error designation. If the program is aborted before the end of the sterilization phase, the printout will also show the message «Load not sterile».
The following tables show the error messages, their causes, and the corrective action:
Error message
M a l f u n c t i o n 1 :
V a c u u m s y s t e m
M a l f u n c t i o n 2 :
S t e a m g e n e r a t o r
M a l f u n c t i o n 4 :
P r e s s u r e r e l e a s e
Cause of trouble / Corrective action
• The monitoring time was exceeded for achieving the subatmospheric pressures for the individual evacuation pulses, for the pressure release, and for the achieving of minimum pressure for drying. Corrective action:
− Check the door gasket and the sealing surface of the chamber for defects and for soiling. If dirty, clean.
− Check to make sure that the autoclave has been correctly
set up (see Section 2.3).
− Check to make sure that fallen instruments, filter paper, or the like have not clogged the condensate return flow on the bottom of the chamber.
− Determine the leak rate by running the program «Vacuum test».
If this error repeatedly occurs, please notify your specialist dealer.
• The monitoring time was exceeded for the heat-up phases for the sub-atmospheric pulsing, and for reaching the sterilization pressure. Corrective action:
− There may be too many items loaded into the autoclave for sterilization. Reduce the amount loaded.
− If the mains voltage is too low, the heating output of the autoclave may be insufficient. Check the electrical building installation in the building. Try the autoclave on another, more powerful circuit.
If this error repeatedly occurs, please notify your specialist dealer.
• The monitoring time was exceeded for the pressure release.
Corrective action:
− Check the pressure-release fittings at the bottom rear of the sterilization chamber. Clean them out if they are clogged.
If this error repeatedly occurs, please notify your specialist dealer.
Page 37
Error message
M a l f u n c t i o n 6 :
V e n t i l a t i o n
M a l f u n c t i o n 8 :
T i m e b a s e
M a l f u n c t i o n 9 :
D o o r o p e n
M a l f u n c t i o n 1 0 :
S t e a m g e n . t o o h o t
M a l f u n c t i o n 1 2
D o o r l o c k i n g
M a l f u n c t i o n 1 4 :
N o f e e d w a t e r
M a l f u n c t i o n 1 8 :
S e n s o r d e f e c t 1 , 2
M a l f u n c t i o n 2 1 :
P r e — h e a t i n g
M a l f u n c t i o n 2 2 :
P r e h e a t t o o h o t
M a l f u n c t i o n 2 6 :
A / D C o n v e r t i n g
M a l f u n c t i o n 2 7 :
T e m p . s e n s . d e f . 1 , 2
Cause of trouble / Corrective action
• The monitoring time was exceeded for venting the sterilization chamber. Corrective action:
− The sterile filter may be dirty. If it is, there will be a warning to this effect before this error message (see Section 7.3 of this manual).
− Change the filter.
• The maximum limit has been exceeded for the difference between the program run time and the internal computer clock.
Corrective action:
If this error repeatedly occurs, please notify your specialist dealer.
• The door contact has opened during a program. Corrective
action:
− Press down the sliding handle until it will go no farther. The following display will appear: «Door closed».
If this error repeatedly occurs, please notify your specialist dealer.
• The capillary-tube controller «Level control» is open when a program has started (this error message will appear immediately after the start of the program). Or, during a program run (until the end of the sterilization phase) the monitoring time is exceeded until the capillary-tube controller switches back (it will switch back upon additional feed of demineralized / distilled water). Corrective action:
− This error message can appear if a program has been aborted and if the user tries to restart immediately. If so, wait for 2 minutes and start again.
If this error repeatedly occurs, please notify your specialist dealer.
• The maximum permissible time for locking the door has been exceeded. Corrective action:
− Check to make sure that the locking pin moves easily.
If this error repeatedly occurs, please notify your specialist dealer.
• The float switch for the supply of demineralized / distilled water does not shut during program run. Corrective action:
− See the error message «Warning: Water supply»
• The internal autoclave testing function for the temperature, pressure, and conductivity sensors has discovered an excessive deviation. This error message can occur when the autoclave is switched on, or during program run. Corrective
action:
If this error repeatedly occurs, please notify your specialist dealer.
• The monitored time was exceeded from switching on the preheating, until reaching the particular required preheating temperature. Corrective action:
− If this error repeatedly occurs, set the option «Automatic preheating No» (see Section 6.5). Please notify your specialist dealer.
• The maximum preheating temperature has been exceeded.
Corrective action:
− If this error repeatedly occurs, start the autoclave from a cold state. Please notify your specialist dealer.
• The maximum permissible deviation has been exceeded for internal computer signal conditioning (A/D conversion).
Corrective action:
If this error repeatedly occurs, please notify your specialist dealer.
• The maximum permissible deviation between the two temperature sensors for the steam temperature has been exceeded. Corrective action:
If this error repeatedly occurs, please notify your specialist dealer.
Page 38
Error message
M a l f u n c t i o n 2 9 :
B a t t e r y R A M
M a l f u n c t i o n 3 2 :
P o w e r f a i l u r e
S t e r i l e f i l t e r s t e r i l i z e
M a l f u n c t i o n 3 1 :
S y s t e m l e a k
M a l f u n c t i o n 3 3 :
P r e s s u r e d r o p
M a l f u n c t i o n 3 4 :
S t e r i l i z a t i o n T U
M a l f u n c t i o n 3 5 :
S t e r i l i z a t i o n T O
M a l f u n c t i o n 3 6 :
S t e r i l i z a t i o n P U
M a l f u n c t i o n 3 7 :
S t e r i l i z a t i o n P O
M a l f u n c t i o n 3 8 :
S t e r i l i z a t i o n T D
Technical Description for the Vacuklav
®
23-B
Cause of trouble / Corrective action
• Data inconsistency or data loss has occurred in the data memory. This can be the result of electrical malfunctions (e.g., serious mains fluctuations), or of too low battery voltage. When you acknowledge this malfunction, this will automatically set the time of day to 00:00, and will set the cycle counter to the value from the EEPROM. All stored cycles in the memory will be deleted at the same time. Corrective action:
− After you acknowledge the error message, set the time of data and date again (see Section 6.4), and restart.
• During the program “Vacuum test”, the maximum permissible pressure was exceeded after the evacuation pressure was reached (very large leak).
Corrective action:
− Repeat «Vacuum test». If this error message appears again, please notify your specialist dealer.
• After a program has started, the operational voltage failed. This error message appears after the voltage has returned.
Corrective action:
− Please check the building electrical systems. If you cannot find the fault there, please notify service personnel.
• The power fails while a started program is in an overpressure
(hyperbaric) phase. The system additionally requests that you sterilize the sterile filter, since it has become moist and may have picked up micro-organisms. Corrective action:
− Remove the sterile filter on the rear of the autoclave.
− Then sterilize the filter in the «Fast program» (there will be no filter in the autoclave during this cycle).
− After the program is finished, insert the sterilized filter in the autoclave again.
• The maximum on-time of the steam generator has been exceeded for achieving the controlled pressure. Corrective
action:
If this error repeatedly occurs, please notify your specialist dealer.
• The temperature has fallen below the minimum permissible sterilization temperature. Corrective action:
− The amount loaded in the sterilization chamber is too great.
Operate the autoclave with a smaller load.
− If this error repeatedly occurs, please notify your specialist dealer.
• The sterilization temperature is greater than the maximum permissible limit. Corrective action:
If this error repeatedly occurs, please notify your specialist dealer.
• The sterilization pressure has fallen below the minimum permissible limit. Corrective action:
− The amount loaded in the sterilization chamber is too great.
Operate the autoclave with a smaller load.
If this error repeatedly occurs, please notify your specialist dealer.
• The sterilization pressure has exceeded the maximum permissible limit. Corrective action:
If this error repeatedly occurs, please notify your specialist dealer.
• The difference between the measured and theoretical temperature has exceeded the maximum limit. Corrective
action:
If this error repeatedly occurs, please notify your specialist dealer.
Page 39
8 Preserving the value of this device
8.1
Preparation of instruments ________________________________________________
MELAG — use of non-rusting materials for parts which come into contact with steam
All parts of the Vacuklav
®
23-B which come into contact with steam are made of non-rusting materials. The sterilization chamber and the chamber door are made of stainless steel, steam lines are Teflon
®
, and threaded connections and solenoid valves are brass.
Drag-in rust
The non-rusting parts used in the Vacuklav
®
23-B ensure that the autoclave itself cannot cause rust to form. In any cases in which rust has developed on the autoclave or on the sterilized items inside, investigations have consistently shown that this rust has been dragged into the autoclave from the outside by rusty instruments. We
must point out that rust can form on stainless-steel instruments made by even the best manufacturers.
One main cause of instrument rusting is improper treatment with chemical cleaning and disinfecting agents during preparation for sterilization.
Preparation of instruments for sterilization
The problem of drag-in rust shows how important it is to properly prepare items for sterilization. It is urgently
necessary to observe the following procedures:
1. Clean and prepare (for example, by oiling) handpieces and contra angles as described in the instructions provided by the manufacturers of these items.
2. Immediately after their medical use, all other instruments must be placed in a disinfection and / or cleaning solution in accordance with UVV/VBG 103 and properly cleaned and disinfected there.
3. Always be sure to use the correct dosage of disinfection and / or cleaning agents in these solutions.
4. Important: Be sure to carefully follow the instructions for the length of time that the instruments must soak in the solutions.
5. We also recommend the use of ultrasonic equipment, recommended cleaning and care equipment for handpieces and contra angles, as well as thermal disinfecting techniques.
6. The proper cleaning of instruments is also essentially important in preventing particles of soiled matter from separating from the instruments during sterilization and from clogging the filters, nozzles, and valves of the autoclave. It is extremely important to use a brush to very carefully clean the locks, joints, and hinges of the instruments before sterilization.
7. Important: Use a brush under running water to completely rinse all cleaning and disinfecting agents from instruments before placing them in the autoclave. Residue of chemical cleaning and disinfecting agents
must by no means be allowed to enter the autoclave, since they will cause corrosion there.
8. As a final step before placing the instruments into the autoclave, rinse them with demineralized water, and dry them well.
9. Be sure to use oil (as indicated in the manufacturers’ instructions) to prepare turbines and handpieces for sterilization, in order to ensure their long service life.
Instruments new from the factory:
Be sure also to follow the above-described pre-cleaning procedure even for instruments new from the factory.
Often there are small amounts of oil, grease, and impurities still on new instruments, from their production.
Important: It is absolutely necessary to carefully follow the instructions for preparation and re-sterilization
procedures which are provided by manufacturers of instruments.
8.2
Drag-in rust (rust brought into the autoclave) ____________________________
Important: As explained above, the non-rusting materials used in the autoclave make it impossible for the autoclave itself to cause rust on the items being sterilized.
Any rust occurring on these items is drag-in rust which comes in on instruments or other metal objects placed into the autoclave. Rust can occur on normal steel objects whose electroplated finish has become defective, and even on stainless-steel objects. Often, only one single instrument with a rust spot is enough to drag in rust and cause it to spread to and develop on other instruments or on the autoclave itself. Drag-in rust spreads to other instruments in the form of film rust, which leads to rust corrosion on other instruments and on the autoclave. It is absolutely necessary to remove drag-in rust from instruments, from the sterilization chamber, and from tray racks, by using cleaning agents which are especially designed for use on stainless steel, which are not alkaline, and which do not
contain chlorine. We recommend the German product Sidol
®
. IMPORTANT: Do not use steel wool or wire
brushes. Clean off normal dirty spots with a non-ravelling cloth (i.e., which does not shed lint) which has been dampened in water, methylated alcohol, or other types of alcohol.
Page 40
Technical Description for the Vacuklav
®
23-B
8.3 Regular care of the Vacuklav
®
23-B _________________________________________
8.3.1 Cleaning _____________________________________________________________________________
At least once a week perform a cleanliness inspection of the tray rack, the sterilization chamber, the sealing surface for the door gasket, and the round plate around the door of the sterilization chamber. Check for dirt and for deposits. Clean dirty spots from the sterilization chamber with a non-ravelling cloth (i.e., which does not shed lint) which is moistened with methylated alcohol. Before cleaning the sterilization chamber, remove the trays and the tray rack by lifting them out through the front of the chamber. If there are stubborn spots or stains on the sterilization chamber, use a non-ravelling cloth moistened in small amounts of a gentle cleaning agent which is especially designed for stainless steel and which has a pH of 5 … 8. We recommend the German product Sidol
®
.
Warning: Be careful that none of this cleaning agent enters the piping which leads off from the sterilization chamber. Important: The cleaning agent used may not contain chlorine and may not be alkaline. Do not use
metal pot cleaners (such as steel wool), and do not use wire brushes. Once a week inspect the door gasket for damage and soiling. Remove any dirty spots with normally commercially available, gentle cleaning agents which have a pH of 5 … 8 and which do not contain vinegar. Or, use methylated alcohol. If required for cleaning, remove the door gasket from the plate around the door of the sterilization chamber.
The locking bolts of the door lock (right side of door), as well as the hinges of the door (left side) must be kept constantly lubricated. This is required to allow ease of shutting and locking the door, and to prevent premature wear. As required, use silicone grease as a lubricant. You can use normally commercially available, gentle liquid cleaning agents to clean the outer part of the autoclave enclosure. If water for your autoclave is supplied and disposed of directly through the built-in water storage tanks, check these tanks for cleanliness each time you fill the right tank with demineralized / distilled water. Before filling, clean the tanks out if necessary by flushing out with fresh demineralized / distilled water. Empty the water drain tank on the left side at least every two weeks and clean it out with clear tap water. In case the drain tank is soiled with stubborn or oily matter, use a suitable synthetic brush, washing-up liquid (kitchen detergent), and warm tap water to clean it. Then rinse out with demineralized / distilled water. If the right chamber of the water storage tank is soiled from long service in the circulatory-flow mode of water supply, then also use warm water and washing-up liquid and a suitable synthetic brush to clean it. After cleaning, likewise rinse out with demineralized / distilled water.
8.3.2
Use of demineralized / distilled water __________________________________________________
Quality criteria for the demineralized / distilled water used
The following is required for steam sterilization: use of steam-distilled water, or fully demineralized water.
The autoclave operator must observe the values given in the following two tables as criteria for the water quality.
These characteristics are in accordance with European standard EN 13060.
Battery water is also suitable for operation of the Vacuklav
®
23-B, but only if it strictly conforms with the relevant
VDE criteria. These criteria are:
Specifications for water quality in accordance with EN 13060:
Evaporation residue
Silicon oxide, SiO
Iron
Cadmium
Lead
Other heavy metals
Chlorides (Cl)
Phosphates (P
2
O
5
2
)
Conductivity at 20°C
≤ 10 mg/l
≤ 1 mg/l
≤ 0.2 mg/l
≤ 0.005 mg/l
≤ 0.05 mg/l
≤ 0.1 mg/l
≤ 2 mg/l
≤ 0.5 mg/l
≤ 15 µS/cm * pH (degree of acidity) 5 … 7.5
Appearance Colourless; clean; without sediment
Hardness (
Σ of ions of alkaline earth) ≤ 0.02 mmol/l
*
µS/cm = micro-Siemens per cm
Page 41
Where to get water for the Vacuklav
®
23-B
Battery water in accordance with VDE 510 is available in all major European drug stores, supermarkets, DIY centres and wholesale markets. The mark «VDE 510» must, however, be specifically contained on the labels of the water containers. If the VDE 510 standards are not met by the purchased water, calcium carbonate (lime) deposits in the steam piping and in the valves can seriously impair the functioning of the autoclave. Aggressive water (i.e., pH < 5 or > 7.5) can also damage the autoclave.
Spotting
The extent of formation of spots on the instruments will depend on the quality of the water used for steam generation.
8.4
Monitoring the functions of the autoclave ___________________________________
The electronic parameter control system of the Vacuklav
®
23-B continuously and automatically monitors the sterilization-relevant parameters and compares them with standard process data. In the event that the measured parameters do not satisfy these standard data, the control system will initiate an error message. When the program runs without error, an “End” message will additionally be shown. In addition, the log printout will output a verification message.
The user of the autoclave is able to continuously monitor the progress of the program by consulting the values shown on the display, or by reading the log printout (if a printer is connected to the autoclave).
The standard DIN 58 946, Part 8, Section 3.2 recommends the following:
“Periodic testing takes place at the installation site at intervals of, for example, every six (6) months. The purpose of this testing is to confirm that the small sterilizer actually properly sterilizes when the operating instructions are followed.”
If the user so requests, German hygiene institutes and State Medical Testing Laboratories will mail test spores.
After these spores have been treated in the autoclave, the spores are returned to such institutes for testing and evaluation, with results on a test form.
8.4.3 Periodic maintenance recommendation ________________________________________________
In order to maintain the value of this device and to minimise the rise of its unexpected failure, the MELAG company recommends periodic maintenance of the Vacuklav
®
23-B. The maintenance may be conducted only by especially trained customer-care technicians, or by technicians from the specialised dealer, in accordance with the maintenance instructions for this particular autoclave. This periodic maintenance consists of visual and functional testing in which all functions and safety-relevant components and electrical systems are tested. The display of the
Vacuklav
®
23-B will call attention to the need for this maintenance after two (2) years of autoclave operation, or after
1000 sterilization cycles, whichever comes earlier.
Please get in touch with your specialist dealer, or with MELAG Customer Care staff.
Page 42
Technical Description for the Vacuklav
®
23-B
9 Annex
9.1 Instructions on drying ___________________________________________________
The sterilization programs of the Vacuklav
®
23-B alone provide very good drying of the sterilized items. The supplementary functions «Additional drying» and «Automatic pre-heating» effectively manage more difficult drying
tasks: for example, with double wrapping (see Sections 6.2 and 6.5 of this manual). Please read the following
sections for a better understanding of the drying processes and how they can be successfully managed. You will also see how to guarantee optimum drying results by proper loading.
9.1.1 The drying process in sterilization containers ______________________________________________
In autoclaves steam is produced by heating water. The steam heats the sterilization containers and the instruments inside by transferring its heat to the sterilized items and to their container. This heat-transfer process produces a change of state in the steam from vapour to liquid. The steam condenses into water, which collects to some extent as condensate drops on the instruments and their container.
Steam Steam
Heat
Condensate
Formation of condensate on the sterilization container
The steam likewise heats the items being sterilized in the sterilization container. Condensate precipitates out onto the sterilized items, and part of it drips onto the bottom of the sterilization container.
Steam
Heat
Condensate
Heat
Formation of condensate on the items being sterilized
At the end of the sterilization process, during drying, the entire condensate must evaporate: both from the sterilization container, as well as from the sterile items themselves. This takes place by transfer of heat to the condensate from the heat stored in the walls of the sterilization container and in the sterilized items themselves. We recommend the use of sterilization containers made of aluminium, since the good heat-storage and heatconductivity properties of this material accelerate the drying process in the autoclave.
Page 43
Condensate + heat = steam
Heat
Heat Heat Heat Heat
The drying process
For good drying, it is necessary to transfer the available excess heat to the sterilized items. This process requires removal of the condensate from the walls of the sterilization container. This is achieved by the special design of the sterilization containers: the recesses and beading in the bottom the bottom, and in the cover by the raised filter area so that the condensed water can run off.
9.1.2 Textiles ______________________________________________________________________________
When preparing textiles for the autoclave, it is essential that the folds of the textiles lined up be in parallel, and that the textiles are lined up vertically: see illustration «B» below. This vertical orientation guarantees that channels form between the textile layers for the air to stream out and for the steam to stream in. Do not by any means stack the textiles horizontally («A»), since this will prevent the steam from penetrating the textile package.
A
B
How to load textiles
When loading textiles into sterilization containers, make sure that the textiles will stay in their vertical position and not fall. Do not, however, squeeze the textiles into the container, since this would prevent air and steam flow channels from forming. If the textile packet will not remain in its vertical position, we recommend wrapping the textiles in sterilization paper. Make sure that the textiles have as little contact as possible to the walls and bottom of the sterilization container. If the textiles are in close contact with the walls and bottom, they will excessively absorb the condensate which has collected there.
For good drying, it is furthermore important that the textiles be dry before they are placed in the autoclave. The heat energy stored in the sterilization chamber and in the sterilization container is not sufficient to evaporate the condensate occurring during sterilization AND any moisture brought into the autoclave by damp textiles.
Page 44
Technical Description for the Vacuklav
®
23-B
9.1.3 Instruments __________________________________________________________________________
If instruments are to be sterilized which can be taken apart, then they should be taken apart before being placed in the autoclave. This will improve drying results. Do not use lubricants (instrument oil or instrument milk) on instruments before placing them into the autoclave, unless this is absolutely necessary for the particular instruments. Before sterilizing instruments with these lubricating or instrument-care preparations, however, make sure to consult the manufacturer of these preparations and confirm that these substances are suitable for being subjected to sterilization. Unsuitable instrument-care preparations include types of oil which repel water or which do not allow the penetration of steam. With such preparations, not only the drying will be poor: even steam sterilization itself can fail, since these preparations protect not only the instruments but also the micro-organisms on the instruments.
9.1.4 Loading the autoclave__________________________________________________________________
Do not sterilize textiles and instruments together in one sterilization container. If at all possible, you should not sterilize textiles and instruments in different sterilization containers in the same cycle batch. If this cannot be avoided for economic reasons, then please observe the following rules:
• Instruments and sterilization containers on the bottom
• Textiles always toward the top
• See-through sterilization packages and paper packages toward the top (exception: when together with textiles, then toward the bottom).
Textiles
Textiles
A
Instruments Instruments
Instruments Instruments
B
Textiles
Textiles
Loading of an autoclave
9.1.5 Loading of containers with soft sterilization packages _______________________________________
Soft sterilization packages such as paper pouches or see-through sterilization packages can be sterilized in sterilization containers or in sterilization baskets. To ensure better drying, such soft packages should be lined up vertically at close intervals. This allows the advantage that the condensate can flow off of the packages easily, and that the packages will not swell up excessively (which can burst the seams).
correct wrong
Correct loading of soft packages into a sterilization container
Page 45
9.1.6 Stacking of sterilization containers _______________________________________________________
When stacking sterilization containers, make sure that the condensate dripping from these containers cannot wet the sterile items loaded below. The optimum solution is to stack several sterilization containers of the same size on top of each other: then the condensate will run down the walls of all the containers.
Stacking of sterilization containers
9.1.7 Removing sterilized items ____________________________________________________________
Immediately after sterilization, it can occur that small amounts of condensate are still remaining on the sterilized items. The ongoing transfer of heat from the sterilized instruments to the condensate can evaporate this moisture after sterilization is complete.
Information contained in DIN 58953, Part 7, Section 7 includes the following statement on condensate moisture which remains on paper pouches or see-through sterilization paper after sterilization:
“Small amounts of water which remain on the outside of the packages are harmless if they have dried away within 30 minutes after removal from the steam sterilizer.”
9.1.8 Further improvement of the drying process _____________________________________________
Drying can be further improved by the following measures:
• Pre-heating OR running of an empty sterilization cycle (i.e., with no instruments in the autoclave)
• Lining up the see-through sterilization packages and paper pouches vertically, like 3 × 5 cards in a catalogue file
• Activation of the “Additional drying” function
• Lengthening of the programmed drying times (but only after first co-ordinating with MELAG customer care service).
Page 46
Technical Description for the Vacuklav
®
23-B
10 Index
Changing the setting for supply of demineralized / distilled water 33
Cleaning 41
Control panel 7
Date and time of day 30
Door 12, 15, 37, 38
Drag-in rust 40
Drying 43
Emptying the water storage tank 9
Error messages 21, 37
External printer 22
Faulty operation 34
Installation 8
Installation examples 6
Installation log 11
Internal water supply with demineralized / distilled water 9
Levelling 8
Loading the autoclave 14
Mains power supply 8
Manual abort of the program 19
Operating times 5
Outlet connection for one-way water 9
Output of records 22
PC 24
Performance features 7
Placing the autoclave into operation 9
Pre-heat temperature 22
Pre-heating 31
Preparation of instruments 13
Preparation of of instruments 40
Printer 8, 9, 21, 36
Printout of cycle log 18
Regular care 41
Safety instructions 12
Selection of the program 15
Space requirements 8
Start of program 16
Technical data 5
Trial run 11
Vacuum test 10
Views of the unit 4
Warning messages 35
Warnings 21
Water and power 13
Water consumption 5
Water quality 22
Water treatment system 9
Water treatment system 7
BA_2_GB_23B.doc Rev.: 0 – 99/………
Seite 47