
Контакты NOCO.
Телефон:
Почтовый адрес:
О GB150.
NOCO Genius® Boost PRO™ GB150 — это
ультра-компактное и портативное литий-ионное
пусковое устройство для высокоскоростных газовых и
дизельных двигателей в автомобилях, грузовиках, лодках,
на оборудовании и т. д. Безопасно в использовании
для двигателей любых размеров. Продукт отличается
безопасностью при использовании. Предусматривают
технологию искрозащищённости и защиту от неправильной
полярности. GB150 может мгновенно запустить большинство
одно-аккумуляторных средств, до 80+ раз за один заряд.
GB150 также оснащён аккумуляторной батареей с USB,
12-вольтным выходным портом и светодиодным фонарём,
что делает его потрясающим набором для аварийной
ситуации.
Начало работы.
заряженным и должен быть полностью заряжён перед
использованием. Внимательно прочитайте и уясните
руководство по эксплуатации, конкретные меры
предосторожности и рекомендуемые методы запуска
автомобиля. Обязательно определите напряжение
и химический состав аккумулятора, изучив перед
использованием этого продукта инструкцию по
эксплуатации. GB150 предназначен только для 12-вольтовых
свинцово-кислотных аккумуляторов.
Присоединение к аккумулятору.
Перед подключением к аккумулятору убедитесь, что это
12-вольтовый свинцово-кислотный аккумулятор. GB150
не подходит к другим видам аккумуляторов. Правильно
определите полярность полюсных штырей. Положительный
полюсный штырь обычно обозначен этими буквами или
символами (POS,P,+). Отрицательный полюсный штырь
обычно обозначен этими буквами или символами (NEG,N,-).
Не соединяйте с карбюратором, топливопроводами
или тонкими частями из листового металла. Ниже даны
инструкции для системы с заземлением отрицательного
полюса (наиболее часто встречающаяся). Если ваш
1.800.456.6626
support@no.co
Email:
30339 Diamond Parkway, #102
Glenwillow, OH 44139
United States of America
GB150 предлагается частично

EN
User Guide & Warranty
DANGER
READ AND UNDERSTAND ALL SAFETY INFORMATION BEFORE USING THIS PRODUCT. Failure to
follow these safety instructions may result in ELECTRICAL SHOCK, EXPLOSION, FIRE, which
may result in a SERIOUS INJURY, DEATH, or PROPERTY DAMAGE.
Electrical Shock. Product is an electrical device that can shock and cause serious injury. Do not cut power
cords. Do not submerge in water or get wet.
Explosion. Unmonitored, incompatible, or damaged batteries can explode if used with product. Do not leave
product unattended while in use. Do not attempt to jump start a damaged or frozen battery. Use product only
with batteries of recommended voltage. Operate product in well ventilated areas.
Fire. Product is an electrical device that emits heat and is capable of causing burns. Do not cover product.
Do not smoke or use any source of electrical spark or fire when operating product. Keep product away from
combustible materials.
Eye Injury. Wear eye protection when operating product. Batteries can explode and cause flying debris.
Battery acid can cause eye and skin irritation. In the case of contamination of eyes or skin, flush aected area
with running clean water and contact poison control immediately.
Explosive Gases. Working in the vicinity of a lead-acid is dangerous. Batteries generate explosive gases
during normal battery operation. To reduce risk of battery explosion, follow all safety information instructions
and those published by the battery manufacturer and manufacturer of any equipment intended to be used in
the vicinity of battery. Review wcautionary markings on these products and on engine.
For more information and
support visit:
Similar to NOCO Genius BOOST PRO GB150 Manuals, User Guides and Instructions:
-
AKX AKX-CH4-2WSS
COnformityFCC COMPLIANCEThis device complies with FCC rules, and is subject to the following conditions:(1) This device may not cause harmful interference.(2) This device may accept interference received, including interference that may cause undesired operation.INDUSTRY CANADA COMPLIANCEThis device complies with …
AKX-CH4-2WSS Remote Starter, 8
-
Fortin EVO-ALL
ADDENDUM — SUGGESTED WIRING CONFIGURATION ADDENDA — SCHÉMA DE BRANCHEMENT SUGGÉRÉALLREV.: 20180216HARDWARE VERSIONVERSION MATÉRIELLEFIRMWARE VERSIONVERSION LOGICIELLEThis manual may change without notice. www.fortinbypass.com for latest version.Ce Guide peut faire l’objet de changement sans préavis. www.fortinby …
EVO-ALL Automobile Electronics, 5
-
MPC SP-502
1 | P a g e TIP SHEET Installation Tips for your SP-502/SP-402 + KEY-OVERRIDE-ALL (4) + SPDT T1649 v1.3 3/5/14 (for Toyota/Lexus Vehicles) Thank you for purchasing your remote start from MyPushcart.com — an industry leader in providing remote starts to do-it-yourself installers sinc …
SP-502 Remote Starter, 5
-
Commando FM-870
JAN/07/2003 RST872 1 COMMANDO MODEL FM-870 REMOTE ENGINE STARTER WITH ALARM SYSTEM OWNER’S MANUAL …
FM-870 Remote Starter, 17
-
AstroStart 4204
08/03 193-127-308-00 PATENT NOS CAN 1.130.426 USA 4.345.554 — 5.614.883 — 5.617.819 — 5.673.017 AND OTHER PATENTS PENDING Manufactured in Canada by: Litho’d in Canada All rights reserved © Astroflex 2003 2 WAY REMOTE CONTROL ENGINE STARTER WITH INTEGRATED ALARM* USER MANUAL Model 4204 / 5204 For all automatic …
4204 Remote Starter, 18
-
Ultra Start PRO Series
The manufacturer warrants to the original purchaser of their remote starters and alarms, that the product shall be free from defects in material and workmanship. However, should this product be proven to be defective, within a one year period from the original date of purchase, the manufacturer will, without charge t …
PRO Series Remote Starter, 2
Смотреть руководство для NOCO Genius Boost Pro GB150 ниже. Все руководства на ManualsCat.com могут просматриваться абсолютно бесплатно. Нажав кнопку «Выбор языка» вы можете изменить язык руководства, которое хотите просмотреть.
- Бренд:
- NOCO
- Продукт:
- зарядные устройства
- Модель/название:
- Genius Boost Pro GB150
- Тип файла:
- Доступные языки:
- голландский, английский, немецкий, французский, испанский, итальянский, шведский, португальский, русский, китайский, Японский Язык, Арабский, Корейский Язык
Сопутствующие товары NOCO Genius Boost Pro GB150
Noco GB150 Boost PRO 3000A UltraSafe Lithium Jump Starter — Use Manual — Use Guide PDF.
Documents: Go to donwload!
User Manual
- User Manual — (English, French, Portuguese, Spanish, German, Arabic, Dutch — Holland, Italian, Japanese, Korean, Russian, Swedish)
Specification
- Specification Sheet — (English)
Warranty
- Warranty — (English)
- User Interface.
- Getting Started.
- Connecting to the Battery
- Jump Starting.
- Low Voltage Batteries & Manual Override
- Understanding Charge LEDs.
- Understanding Error Conditions.
- Charging the GB150
- Charging Times.
- Charging Your USB Devices.
- Powering Your 12V Devices.
- LED Flashlight.
Table of contents
User Guide for Jump Starter

User Interface.
1. Internal Battery Level
Indicates the charge level of the internal battery.
2. Error LED
Illuminates Red if reverse polarity is detected, or blinks “On” and “Off” when the internal battery temperature is too high.
3. Power Button
Push to turn unit “On” & “Off”.
4. Power LED
Illunimates White when unit is “On”.
5. Boost LED
Illuminates White when Boost is active. If the unit is connected properly to a battery, the GB150 will automatically detect a battery and go into Boost mode (LED flashes White when Manual Overide feature is active).
6. Manual Override Button
To enable, push and hold for three (3) seconds.
WARNING: Disables safety protection and manually forces Boost “On”. Only for use when a battery is too low to be detected.
7. Light Mode Button
Toggles the ultra-bright LED light through 7 light modes: 100% > 50% > 10% > SOS > Blink > Strobe > Off
8. Voltmeter Display
Displays the voltage of the vehicle’s battery for enhanced diagnostics and troubleshooting when the battery clamps are connected.
Getting Started.
The GB150 comes partially charged out of the box and needs to be fully charged prior to use. Carefully read and understand the vehicle owner’s manual on specific precautions and recommended methods for jump starting the vehicle. Make sure to determine the voltage and chemistry of the battery by referring to your battery owner’s manual prior to using this product. The GB150 is for jump starting 12-volt lead-acid batteries only.
Connecting to the Battery
Before connecting to the battery, verify that you have a 12-volt lead-acid battery. The GB150 is not suitable for any other type of battery. Identify the correct polarity of the battery terminals on the battery. The positive battery terminal is typically marked by these letters or symbol (POS,P,+). The negative battery terminal is typically marked by these letters or symbol (NEG,N,-). Do not make any connections to the carburetor, fuel lines, or thin, sheet metal parts. The below instructions are for a negative ground system (most common). If your vehicle is a positive ground system (very uncommon), follow the below instructions in reverse order.
1.) Connect the positive (red) HD battery clamp to the positive (POS,P,+) battery terminal. 1.800.456.6626 support 30339 Diamond Parkway, #102 Glenwillow, OH 44139 United States of America Phone: Email: Mailing Address:
2.) Connect the negative (black) HD battery clamp to the negative (NEG,N,-) battery terminal or vehicle chassis.
3.) When disconnecting, disconnect in the reverse sequence, removing the negative first (or positive first for positive ground systems).
Jump Starting.
1.) Verify the voltage and chemistry of the battery.
2.) Confirm the HD battery clamps are connected to the correct polarity battery terminals.
3.) Make sure all of the vehicle’s power loads (headlights, radio, air conditioning, etc.) are turned off before attempting to jump start the vehicle.
4.) Press the Power Button to begin jump starting. All LEDs will flash, indicating that all LEDs are properly functioning. If you are properly connected to the battery, the White Boost LED will illuminate and the charge level LEDs will chase. If the battery clamps are connected in reverse, the Red Error LED will illuminate. Reverse the connections to clear this error and then the White Boost LED will illuminate. The White Boost LED is illuminated, when the GB150 is ready to jump start your vehicle.
5.) Try starting the vehicle. Most vehicles will immediately start. Some vehicles may require the GB150 to be connected for up to 30 seconds before starting. If the vehicle does not start right away, wait 20-30 seconds and try again. Do not attempt more than five (5) consecutive jump starts within a fifteen (15) minute period. Allow the GB150 to rest for fifteen (15) minutes before attempting to jump start the vehicle again.
6.) Once you have started your vehicle, disconnect the battery clamps, and remove the GB150.
Low Voltage Batteries & Manual Override
The GB150 is designed to jump start 12-volt lead-acid batteries down to 2-volts. If your battery is below 2-volts, the Boost LED will be “Off”. This is an indication that the GB150 can not detect a battery.
If you need to jump start a battery below 2-volts there is a Manual Override feature, which allows you to force “On” the jump start function.
CAUTION. USE THIS MODE WITH EXTREME CARE. THIS MODE IS FOR 12-VOLT LEAD-ACID BATTERIES ONLY. BOTH THE SPARK PROOF AND REVERSE POLARITY PROTECTION FEATURES ARE DISABLED. PAY VERY CLOSE ATTENTION TO THE POLARITY OF THE BATTERY BEFORE USING THIS MODE. DO NOT ALLOW THE POSITIVE AND NEGATIVE BATTERY CLAMPS TO TOUCH OR CONNECT TO EACH OTHER AS THE PRODUCT WILL GENERATE SPARKS. THIS MODE USES VERY HIGH CURRENT (UP TO 4000 AMPS) THAT CAN CAUSE SPARKS AND HIGH HEAT IF NOT USED PROPERLY. IF YOU ARE UNSURE ABOUT USING THIS MODE, DO NOT ATTEMPT AND SEEK PROFESSIONAL HELP.
Before using the Manual Override feature, make sure the HD battery clamps are connected to the correct polarity battery terminals. To use the Manual Override feature, press and hold the Manual Override Button (a red exclamation point icon inside a red circle) for three (3) seconds. The White Boost LED will flash “On” and “Off” indicating you have successfully entered into Manual Override and it is ready to jump start your vehicle. If connected in reverse polarity, the Red Error LED will illuminate and the unit will not operate.
CAUTION: POWER THE GB150 “OFF” BEFORE DISCONNECTING THE BATTERY CLAMPS. THIS WILL ENSURE YOUR SAFETY. REMEMBER BOTH THE SPARK PROOF AND REVERSE POLARITY PROTECTION FEATURES ARE DISABLED.
Most vehicles will immediately start. Some vehicles may require the GB150 to be connected for up to 30 seconds before starting. If the vehicle does not start right away, wait 20-30 seconds and try again. Do not attempt more than five (5) consecutive jump starts within a fifteen (15) minute period. Allow the GB150 to rest for fifteen (15) minutes before attempting to jump start the vehicle again.
Understanding Charge LEDs.
The GB150 has four (4) Charge LEDs — 25%, 50%, 75% and 100%. These Charge LEDs indicate the internal battery’s state-of-charge (SOC). See below:
| LED | Explanation |
|
25% Red LED
|
The 25% Charge LED will be solid when the internal battery is 25% or less charged. |
|
50% Red LED 25% 50% 75% 100%
|
The 50% and 25% Charge LEDs will be solid when the internal battery is more than 25% but less than 50% charged. |
|
75%. Yellow LED 25% 50% 75% 100%.
|
The 75%, 50%, and 25% Charge LEDs will be solid when the internal battery is more than 50% but less than 75% charged. |
|
100% Green LED 25% 50% 75% 100%
|
All four (100%, 75%, 50%, and 25%) Charge LEDs will be solid when the internal battery is more than 75% up to 100% charged. |




The above charge states apply when the GB150 is NOT connected to a power supply and recharging.
When Recharging the GB150.
| LED | Explanation |
|
25% Red LED 25% 50% 75% 100%
|
The 25% Charge LED will slowly pulse “On” and “Off”, when the battery is less than 25% charged. When the battery is 25% charged, the Red Charge LED will be solid |
|
50% Red LED 25% 50% 75% 100%
|
The 50% Charge LED will slowly pulse “On” and “Off”, when the battery is less than 50% charged. When the battery is 50% charged, the Red Charge LED will be solid. |
|
75% Yellow LED 25% 50% 75% 100%
|
The 75% Charge LED will slowly pulse “On” and “Off”, when the battery is less than 75% charged. When the battery is 75% charged, the Yellow Charge LED will be solid. |
|
100% Green LED 25% 50% 75% 100%
|
The 100% Charge LED will slowly pulse “On” and “Off”, when the battery is less than 100% charged. When the battery is fully charged, the Green LED will be solid, and the 25%, 50% and 75% Charge LEDs will turn “Off”. |




Understanding Error Conditions.
The GB150 shall display an Error Condition when a reverse polarity condition is present, a battery below two (2) volts, or the internal battery overheating. When one of these Error Conditions are present, the following will happen:
| Error | Reason/Solution |
| Error LED Solid Red | Reverse polarity/ Reverse the battery connections. |
| Error LED Blinking Red w/Cables Connected Properly | The internal battery is too hot/ Allow the unit to cool. Bring the unit into cooler environment. |
| Boost Light Does Not Come On w/Cables Connected Properly | Connected battery is below 2-volts/ Remove all loads, and try again, or use Manual Override Mode. |
Charging the GB150
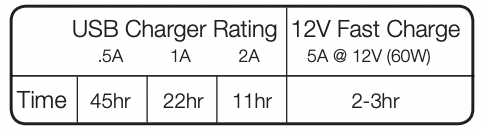
12V Fast Charge (60W):
Connect the 12V Cable to the “12V IN” port on the GB150, and the other end to the Male 12 Plug. Plug into a powered 12V AUX Plug (Cigarette Lighter Port.)
USB Charging (Up to 10W):
Connect the GB150 using the included USB Charge Cable to the USB IN port and a powered USB port, like an AC adapter, car charger, laptop and more. The USB IN port is rated at 2.1 Amps to ensure safe and efficient charging of the internal lithium battery.
Due to FCC regulations, we do not recommend charging and discharging the unit at the same time.
Charging Times.
The time to recharge a GB150 will differ based on the discharge level and the power source used. Actual results may vary due to battery conditions.
Charging Your USB Devices.
You can recharge virtually any USB device, like a smartphone. Connect the included USB Charge Cable to the USB OUT port and connect to your USB device.
The number of times you can recharge a USB device will vary between devices. For recharge times, contact your device manufacturer.
Powering Your 12V Devices.
Connect the 12V Cable to the “12V OUT” port on the GB150, and the other end to the Female 12V Plug (12V AUX/Cigarette Lighter Port.) Plug-in any standard 12V device (Up to 15A) with a 12V plug and turn the GB150 «On” to start powering your device.
LED Flashlight.
The GB150 has an integrated ultra-bright LED flashlight. It has seven (7) light modes that effect its performance and longevity: 100%, 50%, 10%, SOS, Blink, Strobe, and Off.
To turn the flashlight “On” and “Off”, use the Power button with the light bulb icon. Press once to turn the flashlight “On” at 100% luminosity, again for 50% luminosity (within 3 seconds), again for 10% luminosity (within 3 seconds), again for SOS (within 3 seconds), again for Blink (within 3 seconds), again for Strobe (within 3 seconds) and again for “Off”. If a light mode is not selected within 3 seconds, it will remain “On” in the current light mode, and the next selection will turn the flashlight “Off”.
Depending on the mode selection, the GB150 will have various levels of output and runtime. Selecting a lower power level when using the GB150 for extended periods of time will prolong battery life.
Modes:
100% > 50% > 10% > SOS > Blink > Strobe > Off