
-
Contents
-
Table of Contents
-
Bookmarks
Quick Links
TOPFIELD
TF 7700 HSCI
User Guide
High Definition
Digital Satellite Receiver
Extensible to Personal Video Recorder
Related Manuals for Topfield TF 7700 HSCI
Summary of Contents for Topfield TF 7700 HSCI
-
Page 1: User Guide
TOPFIELD TF 7700 HSCI User Guide High Definition Digital Satellite Receiver Extensible to Personal Video Recorder…
-
Page 3
The lighting flash with arrowhead symbol, within an equilateral triangle, is intended to alert the user to the presence of uninsulated “dangerous voltage” within the product’s enclosure that may be of sufficient magnitude to consititute a risk of electric shock to a person. The exclamation point, within an equilateral triangle, is intended to alert the user to the presence of important operating and maintenance (servicing) instructions in… -
Page 4: Table Of Contents
iv Contents Contents Contents 1 Introduction Features ……. Controlling the digital receiver .
-
Page 5
Contents v 3.2.2 Video cassette recorder ….19 3.2.3 Television aspect ratio ….20 3.2.4 High definition television . -
Page 6
vi Contents 7 Recording and Playing Recording a programme ….. . 52 7.1.1 Instant recording ….. . 53 7.1.2 Timer recording . -
Page 7: Introduction
Chapter 1 Introduction The TF 7700 HSCI digital receiver is fully compliant with the international Digital Video Broadcasting (DVB) standard, and thus is able to receive digital broadcasts of that standard. For its operation you need an antenna, which must be installed appropriately.
-
Page 8: Controlling The Digital Receiver
2 Introduction • Can store up to 5000 television and radio services. • You can edit the services list. • You can create favourite lists of your favourite services. • You can view information about the current television or radio programme. •…
-
Page 9: The Front Panel
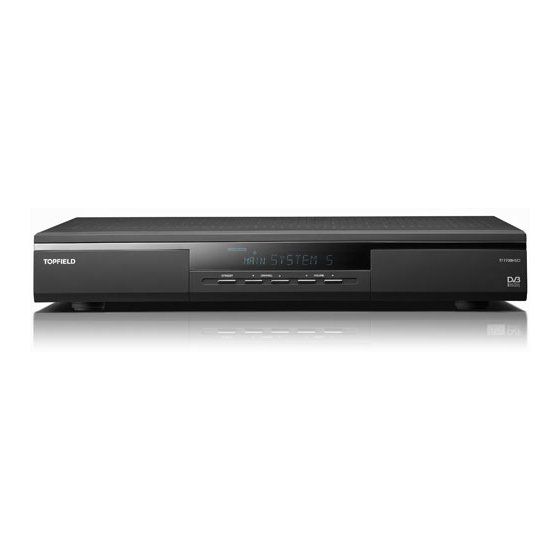
1.2 Controlling the digital receiver 3 1.2.1 The front panel The front panel of the digital receiver has buttons to control the digital receiver, and specific lamps and a display to indicate its status. The following indicates what they mean. STANDBY button switches the digital receiver between standby mode and operation mode.
-
Page 10: The Remote Control
4 Introduction 1.2.2 The remote control button switches the digital re- ceiver between standby mode and operation mode. is used to set a sleep timer in 10 minute increments. buttons decrease or in- crease the volume. They are also used to change values for menu op- tions.
-
Page 11
1.2 Controlling the digital receiver 5 a video track of multifeed programme. is used to select a subtitle track. displays teletext. changes video resolution. See § 3.2.4 for more V.Format details. changes aspect ratio. See § 3.2.3 for more details. switches between television services and radio ser- vices. -
Page 12: What Is Common Interface
6 Introduction is used to start reverse playback. Subsequent presses increase the rewind speed. is used to start fast motion playback. Subsequent presses increase the playback speed. is used to start slow motion playback. Subsequent presses change the playback speed. is used to jump back to beginnng of recording during a playback.
-
Page 13
1.3 What is common interface? 7 To watch a pay service, you should take the following steps: 1. Purchase a conditional access module and a subscription card for the pay service you want to watch. 2. Insert the subscription card into the conditional access module. -
Page 14: Setup
8 Setup Chapter 2 Setup 2.1 Unpacking Before going any further, check that you have received the following items with your digital receiver. • Remote control unit • Two batteries for the remote control (AAA 1.5 V) • A copy of this user guide NOTE Accessories may vary according to your local area.
-
Page 15
2.2 Safety precautions 9 • The wall outlet should be near the equipment. Do not run an extension lead to the unit. • Do not expose the digital receiver to any moisture. The digital receiver is designed for use indoors only. Use dry cloth when cleaning the digital receiver. -
Page 16: Rear Panel Connections
10 Setup 2.3 Rear panel connections The TF 7700 HSCI has some connections on the back. VIDEO LNB IN YPbPr SCART LNB OUT HDMI AUDIO S/PDIF RS-232 Check what connections your television set has in comparison with the digital receiver.
-
Page 17: Connecting Up Your Digital Receiver
2.4 Connecting up your digital receiver 11 S/PDIF Dolby digital output socket for the audio sys- tem. RS-232 Serial port for firmware update and data transfer. USB port for firmware update and data trans- fer. Table 2.3: Connectors specifications HDMI High definition video output Left &…
-
Page 18: Connecting The Antenna
12 Setup 2.4.1 Connecting the antenna Whatever sort of connection you have be- tween the digital receiver and the television, you need to connect the digital receiver to your television antenna so that it can receive digital television services. Connect the antenna cable to the LNB IN con- nector.
-
Page 19
2.4 Connecting up your digital receiver 13 To use the HDMI connector If you have a high definition television set, you should use a HDMI cable for best re- sults. Plug one end of the cable into the HDMI socket on the digital receiver, and plug the other end into the matching socket on your television. -
Page 20
14 Setup To use the component video connector You will need to obtain a component video ca- ble (RCA cable) to use the component video connector. Plug one ends of the cable into the Y (green), Pb (blue) and Pr (red) sockets on the digital receiver, and plug the other ends into the matching sockets on your television. -
Page 21: Connecting To Your Video Cassette Recorder
2.5 Switching on for the first time 15 To enjoy Dolby digital audio, your televi- sion or audio system must be able to decode Dolby digital audio, and you will need to obtain a S/PDIF cable. Plug one end of the cable into the S/PDIF socket on the digi- tal receiver, and plug the other end into the matching socket on your audio system.
-
Page 22: Powering On And Checking Picture
16 Setup used batteries. The manufacturer accepts no liability for the damage resulting from leaking batteries. NOTE Batteries, including those which contain no heavy metals, may not be disposed of with household waste. Please dispose of used batteries in an environmentally sound manner. Find out about the legal regulations which apply in your area.
-
Page 23: Preference Settings
Chapter 3 Preference Settings 3.1 Language settings You can select the language in which the menu would be dis- played. In addition to that, you can select which language of au- dio track and of subtitle track should be output. Select the System Setting Lan- guage Setting menu.
-
Page 24
18 Preference Settings Subtitle language Set the 1st Subtitle Language option and the 2nd Subtitle Lan- guage option to your desired languages. When you watch a programme, if the programme has a subtitle track of the lan- guage that is designated for the 1st Subtitle Language, it will be displayed. -
Page 25: Video And Audio Settings
3.2 Video and audio settings 19 3.2 Video and audio settings You have to configure the video and audio settings appropriately to your television set and other appliances. Select the System Setting A/V Output Setting menu. You should see a screen like the left figure.
-
Page 26: Television Aspect Ratio
20 Preference Settings playback. But if the option is set to External A/V, the digital receiver will not pass the video automatically. To pass it, you have to press the button. NOTE It is impossible for the digital receiver to record the video that the video recorder plays back because the digital receiver is just a bypass for the video recorder.
-
Page 27: High Definition Television
3.2 Video and audio settings 21 You cannot fully enjoy wide-screen programmes with your normal-screen television as the above figures show. The left figure shows a normal picture displayed in the normal screen. To watch wide-screen programmes in the shape like the centre figure, set the 16:9 Display Format option to Letter Box.
-
Page 28: Audio Mode
22 Preference Settings If you have the digital receiver linked to your television via the component video connectors (Y, Pb and Pr) or the HDMI connector, you have to toggle the video output selection switch on the back panel to the YPbPr position. Otherwise if you have connected it to your television via the TV SCART connector, you have to toggle the switch to the SCART position.
-
Page 29
3.3 Local time setting 23 the programme guide may be distrustful. For the programme guide, refer to § 5.3. Select the System Setting Time Setting menu. You should see a screen like the left figure. You can set the clock manually or use the time signal, Green- wich Mean Time (GMT), carried as part of the digital television… -
Page 30
24 Preference Settings Table 3.1: Time offset table Time offset City 12:00 Eniwetok, Kwajalein 11:00 Midway Island, Samoa 10:00 Hawaii 09:00 Alaska 08:00 Pacific Time US, Canada 07:00 Mountain Time US, Canada 06:00 Central Time US, Canada, Mexico City 05:00 Eastern Time US, Canada, Bogota, Lima 04:00 Atlantic Time Canada, La Paz… -
Page 31: Parental Control
3.4 Parental control 25 3.4 Parental control In general, television programmes are classified according to the level of violence, nudity and language of their content. When you are watching a programme, you can check its pro- gramme classification on the information box. For the informa- tion box, see §…
-
Page 32: Adjusting The On-Screen Display
26 Preference Settings You can also restrict uses of some menus. Selecting the Access Control menu displays a list of menus that you can lock. If the Time Setting item is set to Locked, you have to enter the per- sonal identification number when accessing the Time Setting menu.
-
Page 33: Service Search
Chapter 4 Service Search After connecting up the digital receiver, you will need to per- form a service search. 4.1 Searching broadcasting services This digital receiver can be operated with both fixed antenna and motorized antenna. You have to configure antenna settings according to your antenna system in the following order: 1.
-
Page 34
28 Service Search The other is K band which ranges approximately from 12 to 18 GHz. The LNB (Low Noise Block converter) is used to take a wide band of relatively high frequencies, amplify and convert them to similar signals that is carried at a much lower frequency, which is called Intermediate Frequency (IF). -
Page 35
4.1 Searching broadcasting services 29 ever, if you have selected the Other entry at the Satellite Name option to specify a satellite that is not in the satellite list, you might have to fill in the correct LNB frequency. The absolute difference between a broadcasting frequency and its LNB fre- quency must be within 950 to 2150 MHz. -
Page 36: Configuring Diseqc 1.2 Settings
30 Service Search 4.1.2 Configuring DiSEqC 1.2 settings Your motorized antenna will turn toward your desired satellites horizontally by DiSEqC 1.2. When you switch to an service, if the service is provided by a satellite other than current one, it will take longer time than usual because the antenna has to turn to its position.
-
Page 37: Configuring Usals Settings
4.1 Searching broadcasting services 31 you had better check the receiving quality of every trans- ponder and choose the best one at the Transponder (or Frequency) option. It will be helpful to your fine tuning. 5. Finally set the Motor Control option to Store to save the tuned position when the receiving quality is best.
-
Page 38: Searching Services
32 Service Search 2. Enter your location to the My Longitude option and the My Latitude option with the and numeric but- tons. 3. Enter the position of your selected satellite to the Satellite Angle option if it is not correct. 4.
-
Page 39
4.1 Searching broadcasting services 33 • Searching every service of a SMATV (Satellite Master Antenna Television) system. Searching every service of a satellite To search every service of a satellite, perform the following steps: 1. Choose your desired satellite at the Satellite Name op- tion. -
Page 40
34 Service Search and the Pilot option will become enabled. You also should set these options correctly. NOTE You may get transponder information from a satellite magazine or web site such as http://www.satcodx.com http://www. lyngsat.com. Searching one service of a transponder To search one service of a transponder, perform the following steps: 1. -
Page 41: Editing The Transponder List
4.2 Editing the transponder list 35 4. Enter the symbol rate of your desired transponder to the Symbol Rate option with the numeric buttons. You can search pay services as well as free services as follows: • To search only free services, set the FTA/Scrambled option to FTA only.
-
Page 42: Resetting To Factory Settings
36 Service Search Then the on-screen keyboard appears. Change the name as you desire and save it. To delete a satellite entry, select your desired entry at the Satel- lite Name option and select the Delete Satellite option; then you get asked for confirmation. If you select Yes, it will be deleted.
-
Page 43: Daily Usage
Chapter 5 Daily Usage 5.1 Volume control Use the buttons to alter the volume to a com- fortable level. You may need to adjust the volume on your television set too. To temporarily switch off the sound, press button. Press it again to restore the sound to previous level.
-
Page 44
38 Daily Usage On the services list, you can see the service information: • Service number and name • Transmitting satellite • Transponder information A dollar sign ($) may be marked on some entries, indicating pay service. To watch pay services, you need the subscription card. -
Page 45
5.2 Watching television 39 • By setting the Show Provider option to On, you can view service entries by groups of broadcasters. • To change the name of the highlighted service, select the Rename option; then the on-screen keyboard appears, with which you can enter a new name. -
Page 46: The Favourite Services List
40 Daily Usage 5.2.2 The favourite services list You can select a service to watch on a favourite list as well as on the services list. To display the favourite lists, press the button. should see a screen like the left figure.
-
Page 47: Viewing Programme Information
5.2 Watching television 41 delete a group or a service, press the button; then you get asked for confirmation. If you select Yes, it will be deleted. 5.2.3 Viewing programme information Pressing the button displays the information box, on which you can see all of the following: •…
-
Page 48: Selecting Audio Tracks
42 Daily Usage volume in this case, hold down the button until the sound bar appears and reaches your desired level. Pressing the button once more displays detailed informa- tion about the current programme. To hide the information box, press the button.
-
Page 49: Viewing Electronic Programme Guide
5.3 Viewing electronic programme guide 43 5.3 Viewing electronic programme guide The Electronic Programme Guide shows the current and sched- uled programmes that are or will be available on each service with a short summary for each programme. Pressing the button dis- GUIDE plays the electronic programme…
-
Page 50: Using Time Shift
44 Daily Usage box. Press the button, then available video tracks will be listed. Once you select one, it will be presented. At this time, you have to press the button once more to select audio tracks. 5.5 Using time shift You can pause and resume a live television programme, and even rewind and replay it.
-
Page 51
5.5 Using time shift 45 • You can jump forward 30 seconds at a time by pressing button. • You can jump backward 20 seconds at a time by pressing button. • You can change playback speed. For slow motion see §… -
Page 52: Listing Services
46 Listing Services Chapter 6 Listing Services 6.1 Editing the services list You would have got the services list after service search. You can rename, move, lock or delete service entries on the services list. Select the Organizing Svc/Fav Organizing Services menu. You should see a screen like the left figure.
-
Page 53
6.1 Editing the services list 47 To edit the radio services list, press the button; then radio service entries will be listed on the right column. To switch back to the television services list, press it again. To change the name of a service, select the Rename and select a desired service;… -
Page 54: Editing The Favourite List
48 Listing Services CAS–FTA from pay services to free services Provider by broadcaster Fav–NoFav from favourite services to unfavourite services. Transponder by transponder 6.2 Editing the favourite list You can make your own favourite services list. In fact, you can define multiple favourite services lists, each being a ‘group’…
-
Page 55
6.2 Editing the favourite list 49 To delete a group, put the highlight bar on the group entry you want and press the button; then a message box appears asking you for confirmation. If you select Yes, it will be deleted. You can add a favourite service to a group by taking the follow- ing steps: 1. -
Page 56: How To Use On-Screen Keyboard
50 Listing Services 6.3 How to use on-screen keyboard You can move the highlight key horizontally with the buttons and vertically with buttons. Press- ing the button on a key en- ters its letter in the input line. To type a space, select the Space key.
-
Page 57
6.4 Transferring receiver data 51 1. Plug one end of a RS-232 cable (9 pin D- sub cable) into the RS-232 port on the dig- ital receiver, and the other end into the matching port on the other digital receiver. 2. -
Page 58: Recording And Playing
52 Recording and Playing Chapter 7 Recording and Playing The digital receiver allows you to record television programmes into an external hard disk drive via the USB port. NOTE You must connect a hard disk drive to the USB port on the back of the digital receiver before everything.
-
Page 59: Instant Recording
7.1 Recording a programme 53 NOTE When a recording is complete, it might not be saved if its recording duration is less than one minute. 7.1.1 Instant recording To instantly record the programme you are watching at present, press the button.
-
Page 60: Timer Recording
54 Recording and Playing To stop recording, press the button; then a box like the left figure appears, which shows programmes currently be- ing recorded. If you select one, its recording will stop. Once a recording is started, it is put on the recorded programme list even though it is not finished yet.
-
Page 61
7.1 Recording a programme 55 To input a timer recording, select the Timer Setting menu; then the timer list will be displayed. To add a new timer event, press button, and a box like the left figure appears. Take the fol- lowing steps: 1. -
Page 62
56 Recording and Playing If your favourite programme is broadcast at weekends and you wish to record every episode of the programme, set the Mode option to Every Weekend. 6. Set the Date option to a desired date, on which the digital receiver will turn on. -
Page 63: Scheduling Recordings Using The Programme Guide
7.1 Recording a programme 57 7.1.3 Scheduling recordings using the programme guide If the electronic programme guide is properly provided, you can make timer events on it. The instructions on how to make timer recordings using the elec- tronic programme guide are as follows: 1.
-
Page 64: File Archive
58 Recording and Playing To record a programme of a pay service in descrambled form, perform the following steps: 1. Select a programme of a pay service you want to record. 2. Make sure that the subscription card is inserted in the slot on the front of the digital receiver.
-
Page 65: To Delete A Recording
7.2 File archive 59 You can play, move, delete, rename and lock a recording file. You can also sort the recording files by file name, playing dura- tion or file size. In addition, you can make a new folder. 7.2.1 To delete a recording To delete a recording, put the highlight bar on it and press the button;…
-
Page 66: To Rename A Recording
60 Recording and Playing 7.2.4 To rename a recording To change the name of a recording, perform the following steps: 1. Put the highlight bar on a desired recording. 2. Press the button to display the additional options. 3. Select the Rename option, and the on-screen keyboard appears.
-
Page 67: To Navigate Using The Progress Bar
7.3 Playing back a recording 61 During a playback, you can enjoy the following tricks: • To see the detailed information about the currently played recording, press the button; then the information box appears and shows its file name, playing duration, pro- gramme information, and so on.
-
Page 68: To Play In Fast Motion
62 Recording and Playing 7.3.3 To play in fast motion To watch in fast motion during a playback, press the button. If you press it repeatedly, the playback speed changes in 3 steps: 2, 4 and 6 times. To resume normal speed, press the button.
-
Page 69: To Play Back A Scrambled Recording
7.4 Formatting the hard disk 63 To play back in whole, press the button when the progress bar is hidden; then the repetition symbol ( ) is displayed on the information box. To cancel it, press the button again. To play back in part, perform the following steps: 1.
-
Page 70
64 Recording and Playing Format Hard Disk menu, then you are asked for confirmation. If you select Yes, formatting will start. CAUTION Formatting the hard disk will delete all files permanently. NOTE If a new hard disk drive is installed, it must be formatted because the file system of the digital receiver is different from any of the personal computer. -
Page 71: Firmware Update
You can get the latest firmware and a firmware update tool, which runs on most versions of Windows, from the Topfield web site, http: //www.i-topfield.com. 8.1 Checking the firmware information You have to check up the firmware information of your digital receiver before download- ing a new firmware.
-
Page 72: From A Usb Memory
66 Firmware Update NOTE It is only allowed to update with the firmware of which system identification is identical to that of yours. Otherwise you will fail in firmware update. 8.2 From a USB memory If you have a USB memory stick, you can update the firmware from it by performing the following steps: 1.
-
Page 73: From Your Computer Via Rs-232 Port
It is possible to transfer a new firmware to the digital receiver from your computer by connecting them with a RS-232 cable. You need TFD-Down, a firmware transfer utility for this, which is available from the web site, http://www.i-topfield.com. To update the firmware by this method, perform the following steps: 1.
-
Page 74: From Another Digital Receiver Via Rs-232 Port
68 Firmware Update 8.4 From another digital receiver via RS-232 port It is possible to transfer the firmware from the digital receiver to another same digital receiver by connecting them with a RS- 232 cable. To update the firmware with this method, perform the following steps: 1.
-
Page 75: Over The Air
Astra (19.2° E) the transponder information Frequency 12603 MHz appointed by the manufac- Symbol Rate 22000 KS/s turer, Topfield for firmware Polarisation Horizontal update. This transponder information can be changed. You can get the information from the web site, http://www.i-topfield.com.
-
Page 76: Index
70 INDEX Index 16:9, CAS–FTA, 39, 16:9 Display Format, Censorship, 1st Audio Language, Center, 1st Subtitle Language, Center extract, 22 kHz, Change PIN Code, 2nd Audio Language, 2nd Subtitle Language, Common Interface, 4:3, Common Interface, 4:3 Display Format, Date, A/V Output Setting, Daylight Saving Time, Access Control, Default, 39,…
-
Page 77
Factory Setting, Menu Language, Fav–NoFav, 39, Mini A, FEC, Mode, 23, File List, 54, 58, Modulation, File Name, mono, Find, Motor Control, 30, Format Hard Disk, Motorized DiSEqC 1.2, Frequency, 31–34, Motorized DiSEqC 1.3, FTA + CAS, Move, 32, FTA only, Movement, FTA–CAS, 39, multifeed,… -
Page 78
72 INDEX S/PDIF, Transfer Data to Other IRD, S/PDIF, Transfer Firmware to Other IRD, SAT Name Edit, Transponder, SAT/TP Edit, Transponder, 23, 31, Satellite, 39, transponder, Satellite, 23, 38, Satellite Angle, TV, 13, 22, satellite list, 28, TV Aspect Ratio, Satellite Name, 28–31, 33–36 Type,… -
Page 80
Manufactured under license from Dolby Laboratories. Dolby and the double-D symbol are trademarks of Dolby Laboratories. Correct disposal of this product This marking shown on the product or its literature indicates that it should not be disposed with other household wastes at the end of its working life. To prevent possible harm to the environment or human health from uncontrolled waste disposal, please separate this from other types of wastes and recycle it responsibly to promote the sustainable reuse of material resources.
Устройство:
Topfield TF 7700 HSCI
Размер: 1,4 MB
Добавлено: 2013-11-04 13:56:52
Количество страниц: 70
Печатать инструкцию
Скачать
Как пользоваться?
Наша цель — обеспечить Вам самый быстрый доступ к руководству по эксплуатации устройства Topfield TF 7700 HSCI. Пользуясь просмотром онлайн Вы можете быстро просмотреть содержание и перейти на страницу, на которой найдете решение своей проблемы с Topfield TF 7700 HSCI.
Для Вашего удобства
Если просмотр руководства Topfield TF 7700 HSCI непосредственно на этой странице для Вас неудобен, Вы можете воспользоваться двумя возможными решениями:
- Полноэкранный просмотр -, Чтобы удобно просматривать инструкцию (без скачивания на компьютер) Вы можете использовать режим полноэкранного просмотра. Чтобы запустить просмотр инструкции Topfield TF 7700 HSCI на полном экране, используйте кнопку Полный экран.
- Скачивание на компьютер — Вы можете также скачать инструкцию Topfield TF 7700 HSCI на свой компьютер и сохранить ее в своем архиве. Если ты все же не хотите занимать место на своем устройстве, Вы всегда можете скачать ее из ManualsBase.
Topfield TF 7700 HSCI Руководство по эксплуатации
Печатная версия
Многие предпочитают читать документы не на экране, а в печатной версии. Опция распечатки инструкции также предусмотрена и Вы можете воспользоваться ею нажав на ссылку, находящуюся выше — Печатать инструкцию. Вам не обязательно печатать всю инструкцию Topfield TF 7700 HSCI а только некоторые страницы. Берегите бумагу.
Резюме
Ниже Вы найдете заявки которые находятся на очередных страницах инструкции для Topfield TF 7700 HSCI. Если Вы хотите быстро просмотреть содержимое страниц, которые находятся на очередных страницах инструкции, Вы воспользоваться ими.
 Осенью 2006 года на рынке появилась серия ресиверов premium-класса Topfield TF7700H, предназначенная для приема программ телевидения высокой четкости (High Definition Television или HDTV). Серия состоит из традиционного набора: спутникового, эфирного и кабельного ресиверов. Эфирный ресивер представлен в двух вариантах, с CI слотом и без. На тестирование попал спутниковый вариант TF7700HSCI.
Конструкция
 Ресивер Topfield TF7700HSCI выполнен в черном, стильном корпусе, ширина которого составляет 43 см, что является стандартом для техники Hi-End класса. За открывающейся крышкой расположено два слота для подключения модулей условного доступа. Тюнер ресивера может работать в режиме DVB-S и DVB-S2. На матричном дисплее отображается текстовая и символьная информация: номер и название канала, индикация режимов, наличие дополнительных сервисов и др. Символы кириллицы на дисплее не отображаются. Спецификация ресивера представлена в таблице 2.
На передней панели расположен минимальный набор кнопок управления:
- STANDBY – кнопка перевода ресивера в рабочий режим из режима ожидания;
- CHANNEL – кнопки переключения каналов;
- VOLUME – кнопки изменения уровня громкости.
При тестировании была проверена работа ресивера с различными CI модулями. Критерием работы модуля является его инициализация. Также была проверена работа модулей с официальными картами доступа «НТВ-Плюс» и «Триколор ТВ». Результаты тестирования модулей сведены в таблицу 1. Как видно из таблицы, ресивер готов к приему HD пакета, который в скором времени планирует запустить компания «НТВ-Плюс».  Таблица 1.
| Результаты проверки работы модулей условного доступа | |
| Название модуля, версия | Статус |
| Red VIACCESS, V1.08.003 + официальная карта доступа «НТВ-Плюс» |
Инициализируется, декодирует каналы пакета «НТВ-Плюс» |
| DRECrypt, SW v1.2.2, HW v1.1 + официальная карта доступа «Триколор ТВ» |
Инициализируется, декодирует каналы пакета «Триколор ТВ» |
| Irdetto Access, v1.06 | Инициализируется |
| Matrix, V1.05 | Инициализируется |
| Matrix, V1.180 | Инициализируется |
| Zeta CAM, V2.26 | Инициализируется |
| CryptoWorks, V3.00.015 | Инициализируется |
На задней панели расположен следующий набор интерфейсных разъемов:
- антенный вход LNB IN и петлевой выход LNB OUT (гнезда F типа);
- RS232 порт;
- два разъема SCART (TV, VCR);
- разъемы RCA, композитный видеосигнал CVBS и аудио RL;
- разъемы RCA, компонентный видеосигнал YPbPr;
- разъем HDMI;
- оптический выход цифрового звука, S/PDIF;
- USB порт;
- переключатель YPbPr<->SCART.
Таблица 2.
| Технические характеристики ресивера Topfield TF7700HSCI | |
| Тюнер | |
| ВЧ вход | F-тип, IEC169-24, Female |
| Входная частота, МГц | 950 – 2150 |
| Напряжение питания LNB, В | V – 13.5 H – 18 |
| Максимальный ток LNB, A | 0.5 |
| Сигналы управления | 22 кГц, DiSEqC 1.0, 1.1, 1.2, USALS |
| Режим | DVB-S, DVB-S2 |
| MPEG декодер | |
| Видео | MPEG-2, H.264AVC |
| Профили | MPEG-2MP@ML, MP@HL, MPEG-4 H.264/AVC |
| Аудио | MPEG-12, Layer 12, Dolby Downmix |
| Видеоразрешение | 576i, 576p, 720p, 1080i |
| Выходы аудио/видео и данных | |
| TV-SCART | Видеовыход: CVBS / RGB / S-Video; Аудиовыход: L/R |
| VCR-SCART | Видеовыход: CVBS; Видеовход: CVBS / RGB / S-Video; Аудиовыход: L/R; Аудиовход: L/R |
| CVBS | RCA выход (CVBS) |
| Audio L/R | RCA выход (Audio L/R) |
| S/PDIF | Optical (AC3) |
| Component | RCA выходы (Y, Pb, Pr) |
| HDMI | Мультимедийный интерфейс высокого разрешения |
| USB | USB 2.0 host |
| RS-232C | Скорость данных 115200 bps, 9 pin D-Sub Female |
| Условный доступ | |
| PCMCI | Два слота DVB-CI |
| Система | |
| Процессор | ST 7100 |
| Блок питания | |
| Входное напряжение,В | 90-250, 5060 Гц |
| Потребление, Вт | Рабочий режим (макс) 37, режим ожидания 8 |
| Конструкция | |
| Габариты, мм | 430x60x265 |
| Вес, кг | 2,88 |
При установке переключателя в положение YPbPr в меню ресивера Системные установки Настройки выхода А В опцию тип сигнала с разъема SCART можно установить в значение CVBS или S-Video, а формат сигнала с разъема HDMI можно установить в одно из следующих значений: 576i, 576p, 720p, 1080i, авто. При установке переключателя в положение SCART опцию «тип сигнала» с разъема SCART можно установить в значения: RGB CVBS S-Video, а формат сигнала с разъема HDMI можно установить только в значение 576i или авто.
Пульт ДУ выполнен из черного, не царапающегося пластика, все кнопки хорошо различимы на ощупь. В ходе работы никаких претензий к работе пульта ДУ выявлено не было. Питание пульта осуществляется от двух батареек ААА.
Установка и настройка
Мастера настройки (Wizard) в меню ресивера Topfield TF7700HSCI обнаружить не удалось. Вся настройка ресивера производится через систему экранных вложенных меню, что может представлять некоторую трудность для людей впервые встречающихся с устройствами данного класса (спутниковый ресивер). При самостоятельной настройке может оказать полезной подробная инструкция на русском языке. Принимая во внимание тот факт, что для обновления ПО (загрузки базы каналов) теперь необходимо иметь только USB флэш-диск с записанным на него файлом обновления базой каналов, процесс настройки может быть проведен прямо в магазине.В ресивере TF7700HSCI реализована поддержка 19 языков экранных меню, включая русский. Качество русского перевода меню ресивера находится на высоком уровне, однако встречаются и неудачные варианты перевода некоторых строк.
Поиск каналов
Функция поиска каналов не претерпела каких-либо изменений по сравнению с поиском в других современных приемниках фирмы Topfield. Поиск может проводиться в автоматическом режиме по базе транспондеров спутников, прописанных в памяти ресивера (список из 74 позиций); с ручным вводом параметров транспондера; также доступен расширенный поиск по PID или поиск SMATV. Доступны дополнительные опции: сетевой поиск, пропуск кодированных (FTA) каналов при поиске. Скорость работы поиска – высокая, полный поиск по спутнику Hot Bird занял всего пять минут, было найдено 1265 теле- и 477 радиоканалов.
Обновление ПО и сохранение настроек

Обновить ПО в ресивере Topfield TF7700HSCI можно следующими способами:
• Через спутниковый канал – ОТА (Over The Air). Необходимо установить параметры транспондера и PID, на котором осуществляется передача обновления.
• Через USB, достаточно подключить к USB порту ресивера флэш-диск с записанным на него файлом обновления и зайти в соответствующий пункт меню. Стоит отметить, что флэш-диски не всех производителей могут корректно работать с данным ресивером. Некоторые диски ресивер просто «не видит».
• Через последовательный RS232 порт. Обновление возможно как с компьютера, так и с другого ресивера. При обновлении с другого ресивера необходимо обновлять базу каналов или ПО.
На момент написания статьи обновить ПО не удалось ни одним из перечисленных способов ввиду отсутствия доступных обновлений.
В ресивере заявлена полезная функция, позволяющая сохранять его конфигурацию с возможностью ее дальнейшего восстановления. С ее помощью можно не бояться потерять все настройки в результате неумелых действий, ведь всегда есть возможность восстановить рабочую конфигурацию. Проверить работу этой функции не представилось возможным, при попытке сохранения конфигурации запрашивается PIN код, хотя какие бы то ни было блокировки в меню родительского кода отключены, ни один из стандартных PIN кодов не подходит. Будем надеяться, что этот дефект будет исправлен в следующих версиях ПО.
Функция перевода ресивера на заводские установки тоже претерпела небольшое изменение. Теперь имеется возможность сохранить данные о позициях антенн при сбросе на заводские установки.
Сервисные функции
Просмотр программ

Тестирование декодирования программ проводилось на 17-дюймовый ЖК телевизоре RoverScan Vision 171 (подключение через компонентный видеовыход) и 37-дюймовый LCD панели Acer AT3705 (подключение через компонентный видеовыход и HDMI). В качестве тестовых HDTV программ были использованы:
- Astra HD 01 (MPEG-2/HD), Astra 19.0°E 12610V22000 56;
- Luxe TV (MPEG-4/HD), Hot bird 13.0° E 12322H12322 34.
На 37-дюймовый панели картинка отличная, мелкие детали отображаются четко, без замыливания. Панель корректно обрабатывает изменение разрешения (576i, 576p, 720p, 1080i) на выходе HDMI, разницы в качестве картинки при трех вариантах обнаружить не удалось. Замечен неприятный дефект, который заключается в том, что после нескольких изменений разрешения на HDMI выходе картинка может начать дергаться. Дефект лечится перезагрузкой ресивера по питанию. Данный дефект не страшен для пользователя, так как в обычной жизни вряд ли кому-то придет в голову часто изменять параметры HDMI через меню ресивера.
Панель 17 -дюймовый была подключена к компонентному выходу ресивера. Изображение на экране отображается только при ручной установке в параметрах АВ выхода режима 576i. Картинка четкая, лишь немного уступает по качеству HDMI. На изображении раз в 2-3 минуты заметно легкое подергивание, что очень похоже на выпадение кадра. По всей видимости, это результат некорректной работы функции уменьшение разрешения с 1080i до 576i.
Поддержка звука DolbyDigital 5.1 реализована в полном объеме.
Из других приятных мелочей стоит особо выделить функцию установки таймера на просмотр программы прямо из EPG.
Заключение
Программное обеспечение ресивера имеет ряд недочетов, но, будем надеяться, в ближайшее время они будут исправлены. На момент написания статьи на официальном web-сайте производителя ещё не выложено ни одного обновления для данной модели (модификация 23222).
Тот факт, что карты доступа к многим HD каналам официально не продаются на территории России, не может способствовать повсеместному распространению HDTV ресиверов. Ресивер Topfield TF7700HSCI также может использоваться для приема трансляций в формате MPEG-4 SD (Standard Definition), поддерживает прием высокоскоростных пакетов, например, Stargate.Редакция благодарит компанию Sat.com.ru (г. Москва) за предоставленный для тестирования ресивер Topfield TF7700HSCI.

Ресивер имеет современный, из нецарапающегося черного напыления корпус, дружественный интуитивный интерфес меню, полностью руссицированные меню, поддержка кириллицы в телегиде и телетексте, и полный набор выходов на задней панели:
HDMI цифровые выходы изображения
отдельно выведен компонентный выход Y/Pb/Pr, что соотвествет прогрессивной развертке
механический переключатель RGB <-> Y/Pb/Pr
2 SCART разъема, один из который для подключения внешнего пишущего устройства, со скарта Вы можете получить SVHS, RGB и композит!
Одновременно Вы можете развести HDMI, Y/Pb/Pr и SVHS в разные точки!
НЧ выход и стерео-звук
S/P Dif — вывод цифрового оптического звука на внешний AV-декодер.
USB/COM для смены и обновления ПО ресивера.
ШНУР HDMI в комплектность аппарата не входит
Характеристики ресивера Topfield TF7700HSCI
Тюнер
ВЧ вход F-тип, IEC169-24, Female
Входная частота, МГц 950 – 2150
Напряжение питания LNB, В V – 13.5 H – 18
Максимальный ток LNB, A 0.5
Сигналы управления 22 кГц, DiSEqC 1.0, 1.1, 1.2, USALS
Режим DVB-S, DVB-S2
MPEG декодер
Видео MPEG-2, H.264AVC
Профили MPEG-2MP@ML, MP@HL, MPEG-4 H.264/AVC
Аудио MPEG-12, Layer 12, Dolby Downmix
Видеоразрешение 576i, 576p, 720p, 1080i
Выходы аудио/видео и данных
TV-SCART Видеовыход: CVBS / RGB / S-Video;
Аудиовыход: L/R
VCR-SCART Видеовыход: CVBS;
Видеовход: CVBS / RGB / S-Video;
Аудиовыход: L/R; Аудиовход: L/R
CVBS RCA выход (CVBS)
Audio L/R RCA выход (Audio L/R)
S/PDIF Optical (AC3)
Component RCA выходы (Y, Pb, Pr)
HDMI Мультимедийный интерфейс высокого разрешения
USB USB 2.0 host
RS-232C Скорость данных 115200 bps, 9 pin D-Sub Female
Условный доступ
PCMCI Два слота DVB-CI
Система
Процессор ST 7100
Блок питания
Входное напряжение,В 90-250, 5060 Гц
Потребление, Вт Рабочий режим (макс) 37, режим ожидания 8
Конструкция
Габариты, мм 430x60x265
Вес, кг 2,88

Инструкция
Обзор журнала Теле-сателлайт на русском языке.
-
Страница 1
T OPFIELD TF 7700 HSCI User Guide High Definition Digital Satellite Receiv er Common Interf ace[…]
-
Страница 2
[…]
-
Страница 3
Contents iii Contents 1 Introduction 1 1.1 Features …………………………. 1 1.2 Controlling the digital r eceiver ……………… 2 1.2.1 The front panel ………………….. 3 1.2.2 The remote contr ol ………………… 4 1.3 What is common interface? ……………….. 5 2 Setup 7 2.1 Unpacking …………………………[…]
-
Страница 4
iv Contents 3 Preference Settings 16 3.1 Language settings …………………….. 1 6 3.2 V ideo and audio settings …………………. 1 8 3.2.1 Colour model …………………… 1 8 3.2.2 V ideo cassette recor der ……………… 1 8 3.2.3 T elevision aspect ratio ………………. 1 9 3.2.4 High definition television ………..[…]
-
Страница 5
Contents v 5.2.6 V iewing teletext …………………. 4 2 5.3 V iewing electronic pr ogramme guide ………….. 4 3 5.4 W atching multifeed programme …………….. 4 4 5.5 Making timer events …………………… 4 4 6 Listing Services 47 6.1 Editing the services list ………………….. 4 7 6.2 Editing the favourite list ……..[…]
-
Страница 6
[…]
-
Страница 7
1 Chapter 1 Introduction The TF 7700 HSCI digital receiver is fully compliant with the international Digital V ideo Broadcasting (DVB) standar d, and can receive digital br oadcasts. For its operation you need an antenna, which must be installed appropriately . NOTE In general we equate a channel with a frequency . Unlike ana- logue broadcasts, how[…]
-
Страница 8
2 Introduction • Can store up to 5000 television and radio services. • Y ou can edit the services list. • Y ou can create favourite lists of your favourite services. • Y ou can view information about the current television or radio programme. • Has an electronic pr ogramme guide that provides an overview of scheduled programmes. • Y ou […]
-
Страница 9
1.2 Controlling the digital receiver 3 1.2.1 The front panel The front panel of the digital r eceiver has buttons to control the digital receiver , and specific lamps and a display to indicate its status. The following indicates what they mean. ST ANDBY button switches the digital receiver between standby mode and operation mode. CHANNEL , buttons[…]
-
Страница 10
4 Introduction 1.2.2 The remote control 1 2 3 4 5 6 7 8 9 10 11 12 13 22 23 21 10 20 20 19 18 17 16 15 14 1 button switches the digital re- ceiver between standby mode and operation mode. 2 pauses live television. 3 V .F or mat changes video resolution. See § 3.2.4 for more details. 4 Numeric buttons are used to en-[…]
-
Страница 11
1.3 What is common interface? 5 13 SA T displays the satellite list. 14 mutes the sound. Press again to switch it back on. 15 A/R changes aspect ratio. See § 3.2.3 for more details. 16 switches between television services and radio ser- vices. 17 F A V displays the favourite lists[…]
-
Страница 12
6 Introduction 1. Purchase a conditional access module and a subscription card for the pay service you want to watch. 2. Insert the subscription card into the conditional access module. 3. Insert the conditional access module into a common in- terface on the front of the digital r eceiver . T o view the information about the module and subscription[…]
-
Страница 13
7 Chapter 2 Setup 2.1 Unpacking Before going any further , check that you have r eceived the following items with your digital receiver . • Remote control unit • T wo batteries for the remote control (AAA 1.5 V) • One component cable • One HDMI cable (optional) • A copy of this user guide NOTE Accessories may vary according to your local […]
-
Страница 14
8 Setup the power consumption of the digital receiver , refer to T able 2.1 . • The wall outlet should be near the equipment. Do not run an extension lead to the unit. • Do not expose the digital receiver to any moistur e. The digital receiver is designed for use indoors only . Use dry cloth when cleaning the digital receiver . • Place the di[…]
-
Страница 15
2.3 Rear panel connections 9 2.3 Rear panel connections The TF 7700 HSCI has some connections on the back panel. YPbPr SCART AUDIO HDMI VCR TV RS-2 32 S/P DIF USB VIDEO Y Pb Pr L R LNB IN LNB OUT 1 2 3 4 5 6 7 8 9 10 11 12 Check what connections your television set has in comparison with the digital receiver . 1 LNB IN Satellite broadcasting si[…]
-
Страница 16
10 Setup 10 S/PDIF Dolby digital output socket for the audio sys- tem. 11 RS-232 Serial port for firmware update and data transfer . 12 USB USB port for firmware update and data trans- fer . T able 2.3: Connectors specifications HDMI High definition video output Left & right audio output Dolby digital audio output VIDEO composit[…]
-
Страница 17
2.4 Connecting up your digital receiver 11 2.4.1 Connecting the antenna Whatever sort of connection you have be- tween the digital receiver and the television, you need to connect the digital receiver to your television antenna so that it can receive digital television services. Connect the antenna cable to the LNB IN con- nector . If you have anot[…]
-
Страница 18
12 Setup T o use the HDMI connector If you have a high definition television set, you should use a HDMI cable for best re- sults. Plug one end of the cable into the HDMI socket on the digital receiver , and the other end into the matching socket on your televi- sion. In this case, you do not have to make audio connections because the HDMI connec- […]
-
Страница 19
2.4 Connecting up your digital receiver 13 T o use the component video connector Y Pb Pr Y ou will need to obtain a component video ca- ble (RCA cable) to use the component video connector . Plug one end of the cables into the Y (green), Pb (blue) and Pr (r ed) sockets on the digital receiver , and the other end into the matching sockets on your te[…]
-
Страница 20
14 Setup T o enjoy Dolby digital audio, your televi- sion or audio system must be able to decode Dolby digital audio, and you will need to ob- tain a S/PDIF cable. Plug one end of the cable into the S/PIDF socket on the digital receiver , and the other end into the matching socket on your audio system. 2.4.3 Connecting to your video cassette record[…]
-
Страница 21
2.5 Switching on for the first time 15 used batteries. The manufactur er accepts no liability for the damage resulting fr om leaking batteries. NOTE Batteries, including those which contain no heavy metals, may not be disposed of with household waste. Please dispose of used batteries in an environmentally sound manner . Find out about the legal re[…]
-
Страница 22
16 Preference Settings Chapter 3 Preference Settings 3.1 Language settings Y ou can select the language in which the menu would be dis- played. In addition to that, you can select which language of au- dio track and of subtitle track should be output. Select the System Setting > Lan- guage Setting menu. Y ou should see a screen like the left fi[…]
-
Страница 23
3.1 Language settings 17 Subtitle language Set the 1st Subtitle Language option and the 2nd Subtitle Lan- guage option to your desired languages. When you watch a programme, if the pr ogramme has a subtitle track of the lan- guage that is designated for the 1st Subtitle Language , it will be displayed. If the first language is not available but th[…]
-
Страница 24
18 Preference Settings 3.2 V ideo and audio settings Y ou have to configure the video and audio settings appropriately to your television set and other appliances. Select the System Setting > A/V Output Setting menu. Y ou should see a screen like the left figure. 3.2.1 Colour model Through the TV SCAR T connector , the digital receiver is able[…]
-
Страница 25
3.2 V ideo and audio settings 19 playback. But if the option is set to External A/V , the digital receiver will not pass the video automatically . T o pass it, you have to press the A UX button. 3.2.3 T elevision aspect ratio If you have a wide-screen television, set the TV Aspect Ratio option to 16:9 . Otherwise, if you have a norm[…]
-
Страница 26
20 Preference Settings Set the Video Format option as you desire. If you set this option to 576P , the digital receiver will pr esent even high definition programmes in r esolution of 576. On the contrary , if you set it to 1080I , the digital receiver will pr esent even standard definition pr ogrammes in resolution of 1080. It is recommended to […]
-
Страница 27
3.3 Local time setting 21 The digital receiver can output two types of digital audio sig- nals via the S/PDIF connector . One is an encoded signal, and the other is a decoded signal. If your digital audio system does not have a Dolby Digital decoder , you have to set the Dolb y Digital option to PCM . Otherwise, set it to Bitstream . 3.3 Local time[…]
-
Страница 28
22 Preference Settings T able 3.1: T ime offset table Time offset City GMT − 12:00 Eniwetok, Kwajalein GMT − 11:00 Midway Island, Samoa GMT − 10:00 Haw aii GMT − 09:00 Alaska GMT − 08:00 Pacific Time US , Canada GMT − 07:00 Mountain Time US, Canada GMT − 06:00 Central Time US, Canada, Me xico City GMT − 05:00 Easter n Time US, Cana[…]
-
Страница 29
3.4 Parental control 23 T o set the local time yourself, set the Mode option to Manual and enter your local time to the Local Time option with the numeric buttons. The time format is day/month/year 24-hour:minute . If daylight saving time is observed in your state at the moment, set the Da ylight Saving Time option to On . NOTE Daylight saving time[…]
-
Страница 30
24 Preference Settings programme; on the other hand, setting it to T otal block blocks every programme. NOTE If a programme does not have any pr ogramme classification information, your censorship setting will not take effect. If anyone is trying to watch a programme that is of or above the censorship setting, the person has to enter the personal […]
-
Страница 31
3.5 Adjusting the on-screen display 25 P osition option as you desire. Its available range is from − 10 to + 3 lines. The more high you set the option, the mor e low the information box will be positioned.[…]
-
Страница 32
26 Service Search Chapter 4 Service Search After connecting up the digital receiver , you will need to per- form a service search. 4.1 Searching broadcasting services This digital receiver can be operated with both fixed antenna and motorized antenna. Y ou have to configure antenna settings according to your antenna system in the following or der[…]
-
Страница 33
4.1 Searching broadcasting services 27 The other is K u band which ranges approximately fr om 12 to 18 GHz. The LNB (Low Noise Block converter) is used to take a wide band of relatively high frequencies, amplify and convert them to similar signals that is carried at a much lower frequency , which is called Intermediate Frequency (IF). High frequenc[…]
-
Страница 34
28 Service Search ever , if you have selected the Other entry at the Satellite Name option to specify a satellite that is not in the satellite list, you might have to fill in the correct LNB fr equency . The absolute differ ence between a broadcasting frequency and its LNB fr e- quency must be within 950 to 2150 MHz. For example, if the frequency […]
-
Страница 35
4.1 Searching broadcasting services 29 4.1.2 Configuring DiSEqC 1.2 settings Y our motorized antenna will turn toward your desir ed satellites horizontally by DiSEqC 1.2. When you switch to an service, if the service is provided by a satellite other than curr ent one, it will take longer time than usual because the antenna has to turn to its posit[…]
-
Страница 36
30 Service Search you had better check the receiving quality of every trans- ponder and choose the best one at the T ransponder (or F requency ) option. It will be helpful to your fine tuning. 5. Finally set the Motor Control option to Store to save the tuned position when the receiving quality is best. There ar e more motor control options for in[…]
-
Страница 37
4.1 Searching broadcasting services 31 2. Enter your location to the My Longitude option and the My Latitude option with the V − , V + and numeric but- tons. 3. Enter the position of your selected satellite to the Satellite Angle option if it is not correct. 4. Select the Goto the position option; then the antenna […]
-
Страница 38
32 Service Search • Searching every service of a SMA TV (Satellite Master Antenna T elevision) system. Searching every service of a satellite T o search every service of a satellite, perform the following steps: 1. Choose your desired satellite at the Satellite Name op- tion. 2. Set the Search Mode option to Auto . 3. If you set the Network Searc[…]
-
Страница 39
4.1 Searching broadcasting services 33 and the Pilot option will become enabled. Y ou also should set these options correctly . NOTE Y ou may get transponder information from a satellite magazine or website such as http://www.satcodx.com or http://www. lyngsat.com . Searching one service of a transponder T o search one service of a transponder , pe[…]
-
Страница 40
34 Service Search 4. Enter the symbol rate of your desired transponder to the Symbol Rate option with the numeric buttons. 5. Set the P olarization option to the polarization of your desired transponder . Y ou can search pay services as well as fr ee services as follows: • T o search only fr ee services, set the FT A/Scrambled option to FT A only[…]
-
Страница 41
4.3 Resetting to factory settings 35 T o change a satellite entry’s name, select your desired entry at the Satellite Name option and select the SA T Name Edit option. Then the on-screen keyboar d appears. Change the name as you desire and save it. T o delete a satellite entry , select your desired entry at the Satel- lite Name option and select t[…]
-
Страница 42
36 Service Search • Satellite list • Services list • Favourite list • Preference settings Also you can restor e them at any time. T o store your data, select the Installation > System Recov er y menu and select the Store option; then you get asked for the presonal identification number . The number may be differ ent from yours because t[…]
-
Страница 43
37 Chapter 5 Daily Usage 5.1 V olume control Use the V − and V + buttons to alter the volume to a com- fortable level. Y ou may need to adjust the volume on your television set too. T o temporarily switch off the sound, press the button. Press it again to restor e the sound to previous level. 5.2 W atching televisi[…]
-
Страница 44
38 Daily Usage On the services list, you can see the service information: • Service number and name • T ransmitting satellite • T ransponder information A dollar sign ( $ ) may be marked on some entries, indicating pay service. T o watch pay services, you need the subscription card. T o select a desired service, put the highlight bar on its e[…]
-
Страница 45
5.2 W atching television 39 • By setting the Show Provider option to On , you can view service entries by groups of br oadcasters. • T o change the name of the highlighted service, select the Rename option; then the on-scr een keyboard appears, with which you can enter a new name. See § 6.3 for how to use the on-screen keyboar d. • Y ou can […]
-
Страница 46
40 Daily Usage 5.2.2 The favourite services list Y ou can select a service to watch on a favourite list as well as on the services list. T o display the favourite lists, press the F A V button. Y ou should see a screen like the left figure. As you move the high- light bar up or down on the favourite group list at the left box, favo[…]
-
Страница 47
5.2 W atching television 41 delete a group or a service, pr ess the F4 button; then you get asked for confirmation. If you select Y es , it will be deleted. 5.2.3 V iewing programme information Pressing the button displays the information box, on which you can see all of the following: • Service number and name • T ransmitting […]
-
Страница 48
42 Daily Usage Pressing the button once more displays detailed information about the current pr ogramme. T o hide the information box, press the EXIT button. 5.2.4 Selecting audio tracks Some programmes ar e provided with audio tacks in one or more languages. Pressing the button displays available au- dio tracks. Once you select an […]
-
Страница 49
5.3 V iewing electronic programme guide 43 5.3 V iewing electronic programme guide The Electronic Pr ogramme Guide shows the current and sched- uled programmes that ar e or will be available on each service with a short summary for each programme. Pressing the GUIDE button dis- plays the electronic pr ogramme guide, on which you can[…]
-
Страница 50
44 Daily Usage 4. T o remove the marking, pr ess the OK button once again. 5.4 W atching multifeed programme Some broadcasts such as sports channels can pr ovide a variety of perspectives on a programme at a same time. W e call it a multifeed programme. Y ou can select and watch a perspective you prefer . If a multifeed programme is[…]
-
Страница 51
5.5 Making timer events 45 1. If you want a radio programme, set the T ype option to Radio ; otherwise, set it to TV . 2. Set the Satellite option to the satellite which transmits the service you want. Pressing the OK button on this option displays a satellite list, from which you can select your desired satellite. 3. Set the Ser vi[…]
-
Страница 52
46 Daily Usage T o delete a timer event, put the highlight bar on the entry you want to remove and pr ess the F2 button; then you are asked for confirmation. If you select Y es , it will be deleted.[…]
-
Страница 53
47 Chapter 6 Listing Services 6.1 Editing the services list Y ou would have got the services list after service search. Y ou can rename, move, lock or delete service entries on the services list. Select the Organizing Svc/F av > Organizing Ser vices menu. Y ou should see a screen like the left figure. There ar e editing options on the left colu[…]
-
Страница 54
48 Listing Services T o edit the radio services list, press the button; then radio service entries will be listed on the right column. T o switch back to the television services list, press it again. T o change the name of a service, select the Rename and select a desired service; then the on-scr een keyboard appears. See § 6.3 for how to use the […]
-
Страница 55
6.2 Editing the favourite list 49 CAS–FT A from pay services to free services Provider by br oadcaster F av–NoF av from favourite services to unfavourite services. T ransponder by transponder 6.2 Editing the favourite list Y ou can make your own favourite services list. In fact, you can define multiple favourite services lists, each being a ?[…]
-
Страница 56
50 Listing Services T o delete a group, put the highlight bar on the gr oup entry you want and press the F3 button; then a message box appears asking you for confirmation. If you select Y es , it will be deleted. Y ou can add a favourite service to a group by taking the follow- ing steps: 1. Put the highlight bar on a desired gr ou[…]
-
Страница 57
6.3 How to use on-screen keyboard 51 6.3 How to use on-screen keyboard Y ou can move the highlight key horizontally with the V − and V + buttons and vertically with the P + and P − buttons. Press- ing the OK button on a key en- ters its letter in the input line. T o[…]
-
Страница 58
52 Listing Services 1. Plug one end of a RS-232 cable (9 pin D- sub cable) into the RS-232 port on the dig- ital receiver , and the other end into the matching port on the other digital receiver . 2. T urn on the source digital receiver . 3. Select the Installation > T ransf er Fir mware > T ransf er Data to Other IRD menu, then you get asked[…]
-
Страница 59
53 Chapter 7 Firmware Update The digital receiver has a stable and convenient firmwar e to use. However , a new firmware may be released to impr ove the digital receiver . Y ou can get the latest firmware and an update utility which runs on most versions of W indows from the T opfield website, http://www.i- topfield.com . 7.1 Checking the firm[…]
-
Страница 60
54 Firmware Update NOTE Y ou can only update with firmwares of which system identifi- cation is identical to that of yours. Otherwise you will fail in firmware update.[…]
-
Страница 61
7.2 From a USB memory device 55 7.2 From a USB memory device If you have a USB memory stick, you can update the firmware from it by performing the following steps: 1. Download a new firmware from the T opfield website. 2. Copy the firmware file to your USB memory stick. 3. Insert the USB memory stick into the USB port on the back panel of the […]
-
Страница 62
56 Firmware Update 7.3 From your computer via RS-232 port It is possible to transfer a new firmware to the digital r eceiver from your computer by connecting them with a RS-232 cable. Y ou need TFD-Down , a firmware transfer utility for this, which is available from the website, http://www.i- topfield.com . T o update the firmware with this meth[…]
-
Страница 63
7.4 From another digital receiver via RS-232 port 57 7.4 From another digital receiver via RS-232 port It is possible to transfer the firmware fr om the digital receiver to another same digital receiver by connecting them with a RS- 232 cable. T o update the firmware with this method, perform the following steps: 1. T urn off the target digital r[…]
-
Страница 64
58 Firmware Update 7.5 Over the air Y ou can get a new firmware over the air . Select the Installation > O T A Firmware Upgrade menu. Y ou should see a screen like the left figure. Selecting the Star t option starts firmware update. Satellite Astra (19.2° E) F requency 12603 MHz Symbol Rate 22000 KS/s P olarisation Hor izontal PID 347 On the[…]
-
Страница 65
59 Index 16:9 , 19 16:9 Display F ormat , 19 1st Audio Language , 17 1st Subtitle Language , 17 22 kHz , 28 2nd Audio Language , 17 2nd Subtitle Language , 17 4:3 , 19 A/V Output Setting , 18 Access Control , 24 Add new TP , 35 Add Satellite , 34 Add to F av , 39 Advanced , 33 Alphabetic, 39 , 48 Astra , 58 A UDIO L, 13 A UDIO L/R, 9 A UDIO R, 13 A[…]
-
Страница 66
60 INDEX FT A only, 34 FT A–CAS, 39 , 48 FT A/Scrambled, 34 GMT Collection, 21 Goto, 29 Goto the position, 31 HDMI, 9 HDMI, 12 , 20 high definition, 19 Info Bo x Display Time, 24 Info Bo x P osition, 25 information box, 41 IRD Status, 53 K u band, 27 ke yboard, 51 Language Setting, 16 Letter Box, 19 LNB, 27 LNB F requency, 27 , 28 LNB IN, 9 LNB […]
-
Страница 67
61 services list, 37 Show Provider, 39 SMA TV , 32 SMA TV, 33 Sor t, 48 Sor ting, 39 Sound Mode, 20 Space, 51 specifications, 8 , 10 Star t, 58 Star t Search, 34 stereo , 20 Store, 30 , 36 subtitle, 42 Symbol Rate, 32 – 34 System ID, 53 System Recov er y, 36 System Setting, 24 teletext, 42 television services list, 48 TFD-Down , 56 time format, […]
-
Страница 68
[…]
-
Страница 69
[…]
-
Страница 70
Manufactured under license fr om Dolby Laboratories. Dolby and the double-D symbol are trademarks of Dolby Laboratories. Correct disposal of this product This marking shown on the product or its literatur e indicates that it should not be disposed with other household wastes at the end of its working life. T o prevent possible harm to the envir onm[…]