
Мультиварки Vitesse VS-529 — инструкция пользователя по применению, эксплуатации и установке на русском языке. Мы надеемся, она поможет вам решить возникшие у вас вопросы при эксплуатации техники.
Вы можете скачать инструкцию к Vitesse VS-529 по ссылке ниже, если не хотите ждать загрузки. Если остались вопросы, задайте их в комментариях после инструкции.
«Загружаем инструкцию», означает, что нужно подождать пока файл загрузится и можно будет его читать онлайн. Некоторые инструкции очень большие и время их появления зависит от вашей скорости интернета.
Полезные видео
Характеристики
Остались вопросы?
Не нашли свой ответ в руководстве или возникли другие проблемы? Задайте свой вопрос в форме ниже с подробным описанием вашей ситуации, чтобы другие люди и специалисты смогли дать на него ответ. Если вы знаете как решить проблему другого человека, пожалуйста, подскажите ему


Часто задаваемые вопросы

Как посмотреть инструкцию к Vitesse VS-529?
Необходимо подождать полной загрузки инструкции в сером окне на данной странице или скачать кликнув по специальной кнопке.
Руководство на русском языке?
Все наши руководства представлены на русском языке или схематично, поэтому вы без труда сможете разобраться с вашей моделью
Как можно распечатать инструкцию?
Скачайте ее по специальной кнопке над формой чтения на ваше устройства и отправьте на печать.
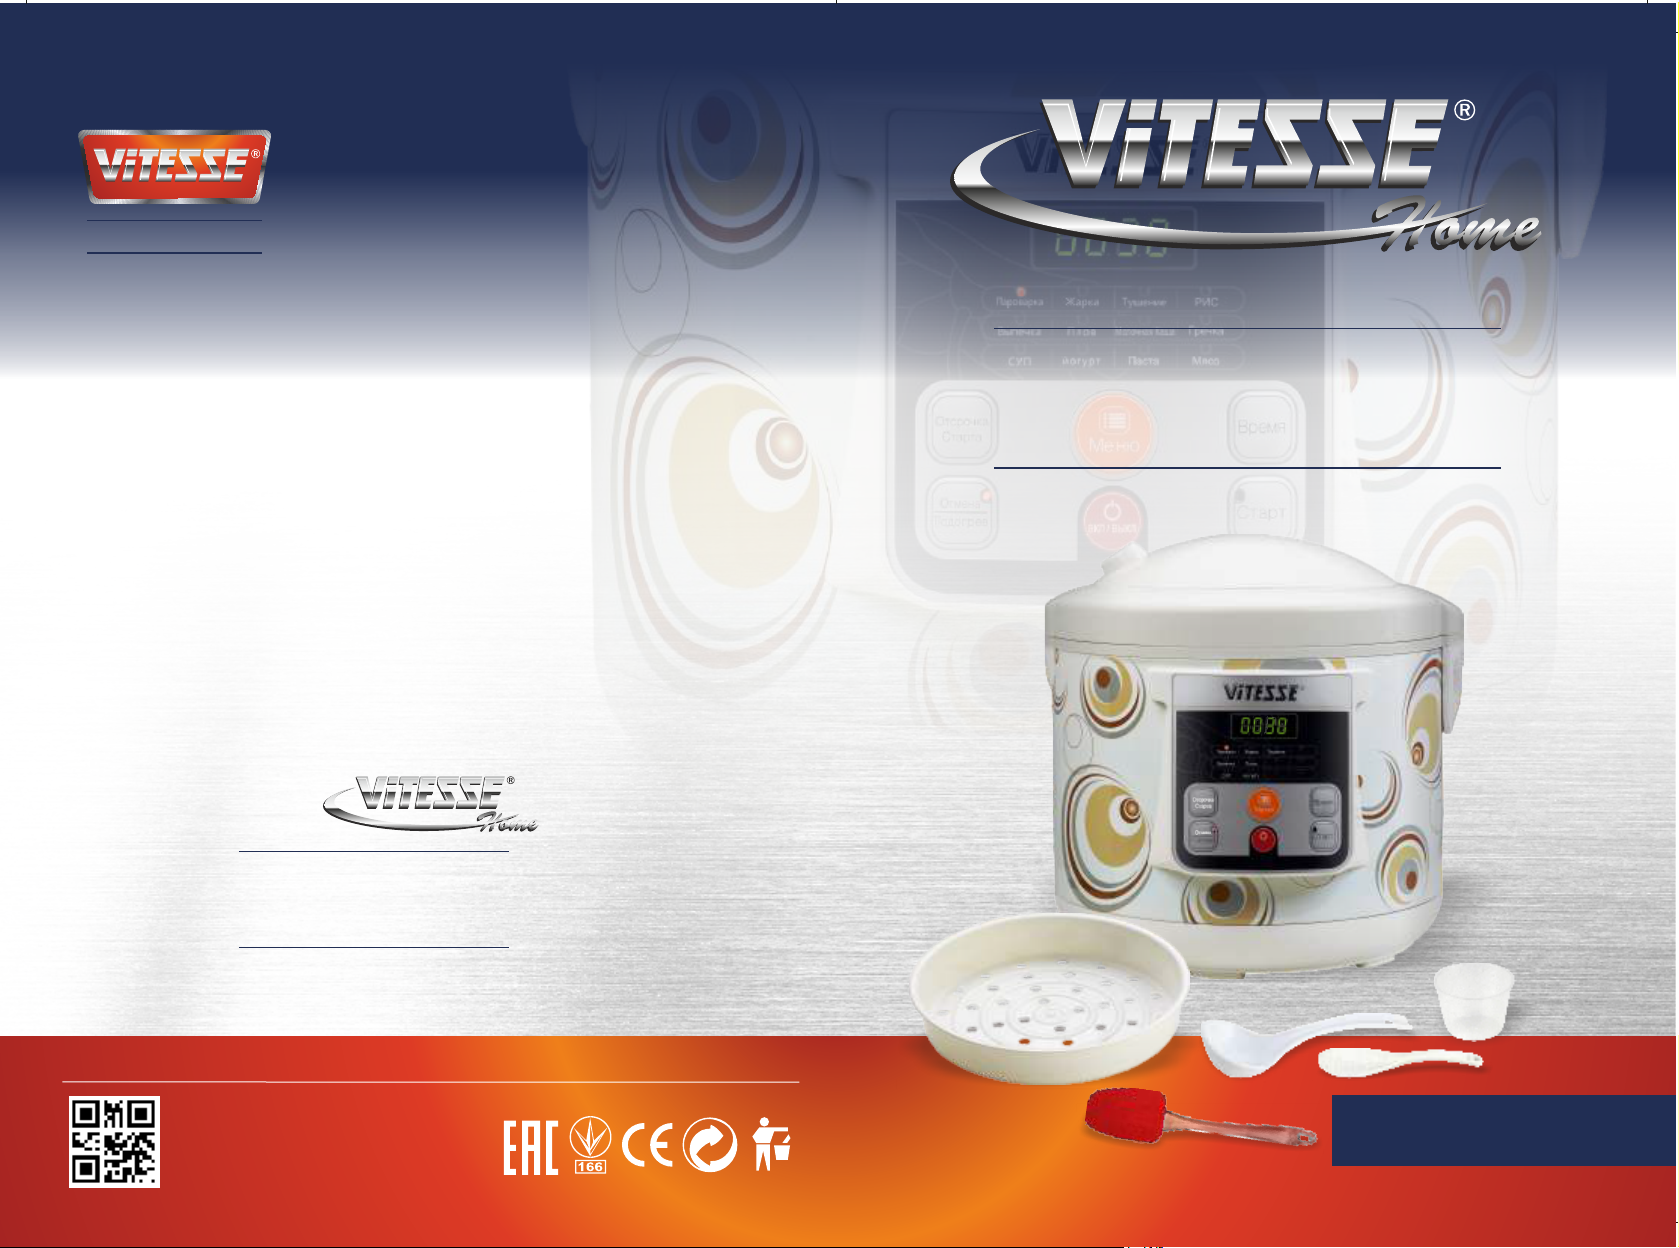
NOUS VIVONS SAIN We live healthy MULTI COOKER МУЛЬТИВАРКА РИС Молочная Каша Гречка Паста Мясо Отсрочка Старта Отмена ВКЛ / ВЫКЛ “Vitesse France S.A.R.L” (Витессе, Франция) 91 Руе Де Фоборг Сант Хонор, Париж 75008, Франция Сделано в Китае www.vitesse.ru VS-529
www.vitesse.ru DEAR CUSTOMER! YOU HAVE MADE AN EXCELLENT DECISION! ViTESSE Home trade mark offers you an exclusive, high quality range of appliances for your ultimate home luxury and healthy living. SAFETY INSTRUCTIONS Read the operating instructions carefully before putting the appliance into
www.vitesse.ru SCHEME OF THE UNIT Never connect to a power outlet other than specified power limits PARTS NAME Place the appliance on a flat, dry, stable surface away from sources of heat. 2 3 1 4 6 7 5 8 12 10 11 9 18 17 15 13 Never place the inner tank on the direct fire. Keep the device away
www.vitesse.ru HOW TO OPERATE THE APPLIANCE Micro-Computer Multi Cooker has many features! You can cook meals and soups, fried, steamed (vegetables, fish, meat), stew, bake and prepare yogurt. Regardless of the choice of the function, after cooking you can keep the food warm. Before switching on 1.
www.vitesse.ru 4. Close the Cover until it clicks. Connect the device to the mains. 5. Press “Select Program” button and choose the Pilaf Function 6. Press the START button to begin the cooking process, the display will flash: 0055. It is the preset time for this program. The Time can be adjustable
www.vitesse.ru — 180 ml of water — 1 cup You can also use your recipe, following the proposed sequence of actions and recommendations for the quantity. Make sure that all the ingredients (including liquid) were below the MAX, is located inside the bowl. 3. Insert the Bowl into the housing. Gently
www.vitesse.ru Keep in mind that these are general recommendations. Actual time may differ from the recommended values, depending on the freshness and the specific type of product, as well as your preferences. 8. Press the START button to begin the cooking process, the display will show the
www.vitesse.ru PROGRAM «STEW» 1. Press “Select Program” button and choose the Stew Function. Automatic cooking time: 1 Hour. You can change it by adjusting the cooking time (1 Hour to 24 Hours). 2. Press the START button to begin the process of heating, the display will flash the characters:
www.vitesse.ru To Clean the Condenser The condenser is designed to collect condensate drops when opening the lid, remove and wash it after each use. To Clean the Steam Exit Valves Cleaning of the exhaust valve should be carried out each time after use. 1. Carefully remove the exhaust valve, as
www.vitesse.ru • Следите за тем, чтобы шнур не перекручивался и не перегибался через край стола. Устанавливайте прибор только на сухую ровную поверхность. Соблюдайте также общепринятые правила безопасности при работе с прибором. Производитель не несет ответственности за повреждения, вызванные
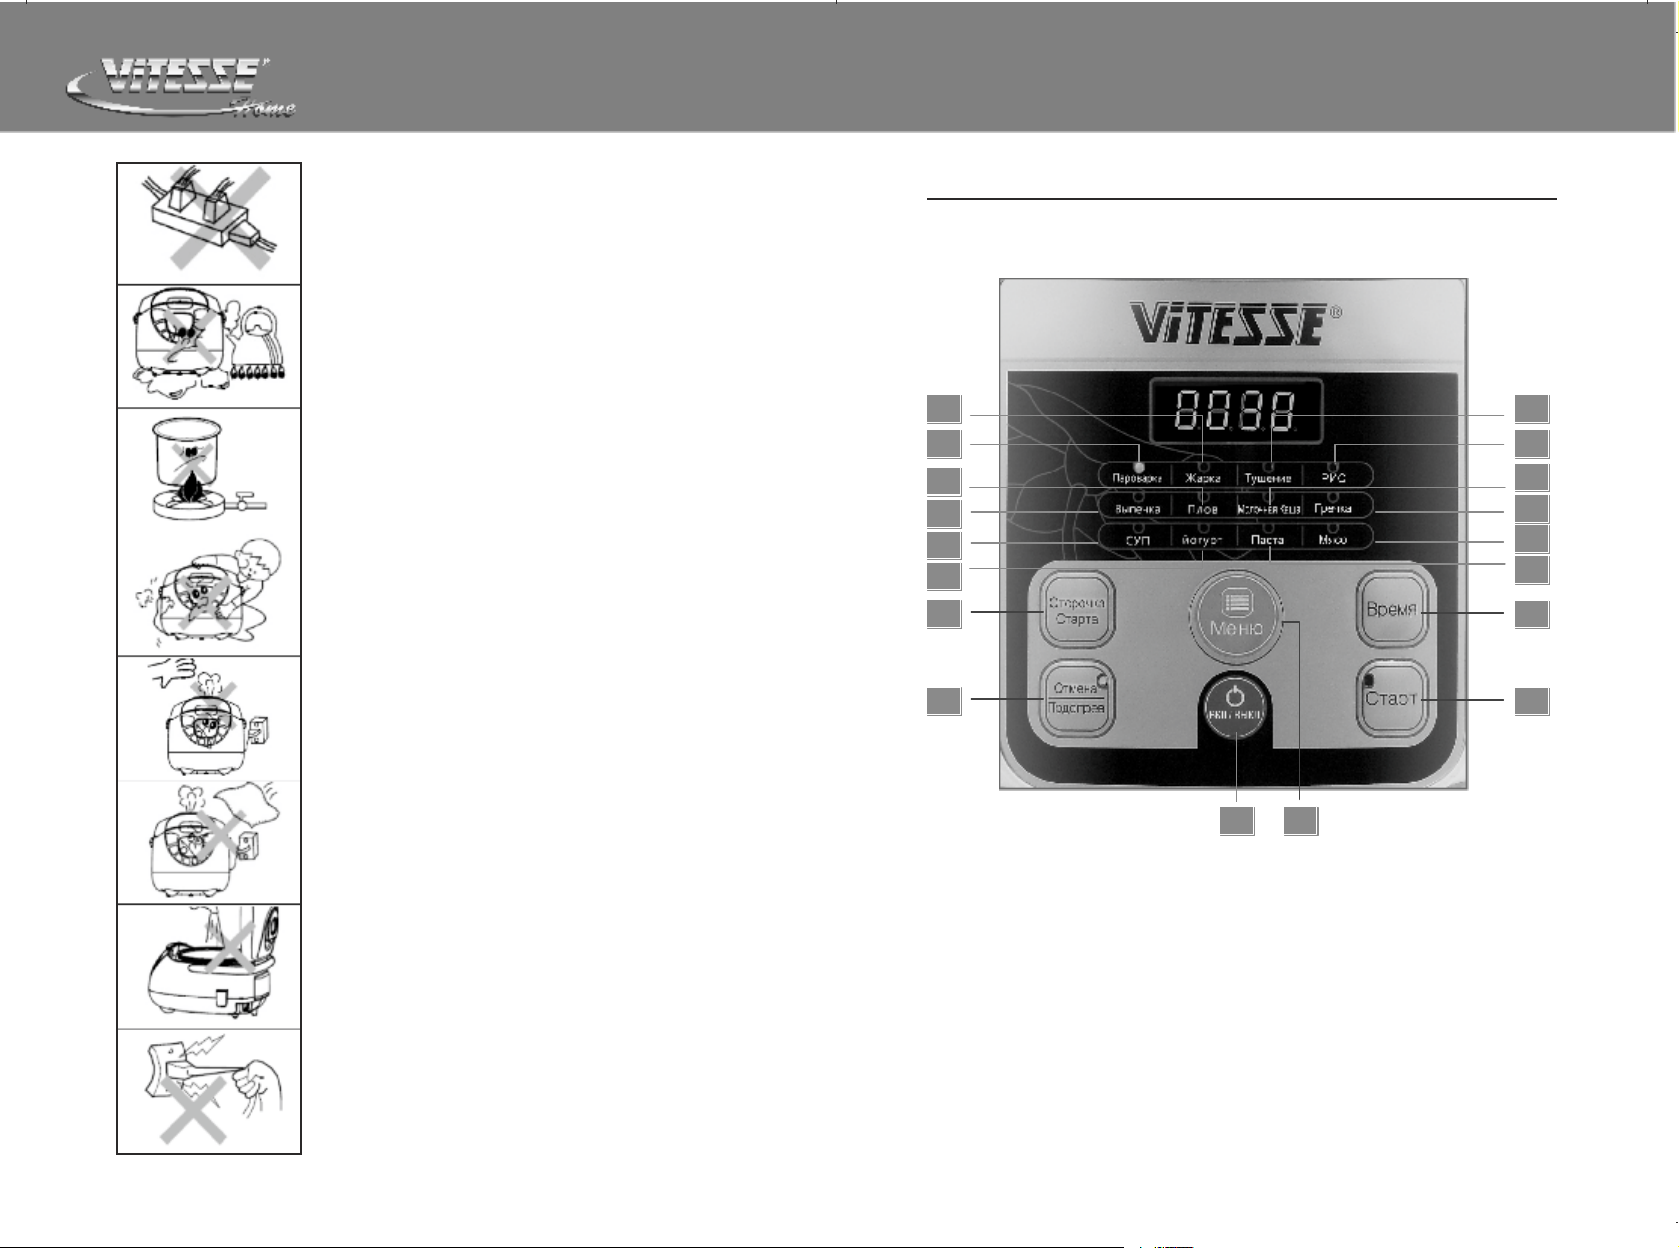
www.vitesse.ru УСТРОЙСТВО ПРИБОРА СХЕМА ПРИБОРА 2 3 1 4 6 7 5 8 12 10 11 9 18 17 15 13 14 P/19 16 1. Индикация программы «Пароварка» 2. Индикация программы «Жарка» 3. Индикация программы «Тушение» 4. Индикация программы «Рис» 5. Индикация программы «Выпечка» 6. Индикация программы «Плов» 7.
www.vitesse.ru ЭКСПЛУАТАЦИЯ МУЛЬТИВАРКИ Мультиварка имеет множество функций! Вы можете варить каши и супы, жарить, готовить на пару (овощи, рыбу, мясо), тушить, выпекать, готовить йогурт и многое другое. Независимо от выбора функции, после приготовления блюда вы можете воспользоваться режимом
www.vitesse.ru Вы также можете использовать свой рецепт приготовления плова, придерживаясь предложенной последовательности действий и рекомендаций по количеству. Следите за тем, чтобы все ингредиенты (включая жидкость) находились ниже уровня MAX, расположенного на внутренней поверхности чаши. 3.
www.vitesse.ru 4. Закройте крышку до щелчка. Если крышка будет закрыта неплотно, то программа по приготовлению будет выполнена некорректно. 5. Подключите прибор к питающей сети. 6. Нажимая на кнопку МЕНЮ, установите программу МОЛОЧНАЯ КАША. 7. Нажмите на кнопку СТАРТ. Мультиварка начнет работу, на
www.vitesse.ru 3. 4. 5. 6. 7. 8. 9. Следите за тем, чтобы все ингредиенты (включая жидкость) находились ниже уровня MAX, расположенного на внутренней поверхности чаши. Вставьте чашу в корпус. Слегка поверните ее против часовой стрелки, убедитесь, что чаша плотно соприкасается с нагревательным
www.vitesse.ru www.vitessehome.com 8. По окончании процесса приготовления раздастся звуковой сигнал, и мультиварка автоматически переключится в режим поддержания температуры готовых блюд: индикатор ПАРОВАРКА погаснет, начнет мигать индикатор ПОДОГРЕВ, дисплей покажет отсчет времени. Нажмите на
www.vitesse.ru Несмотря на то, что режим поддержания температуры готовых блюд рассчитан на 8 часов и более, не рекомендуется оставлять еду в этом режиме надолго, это может привести к пересушиванию продукта. 9. Отключите прибор от питающей сети. 10. Спустя 2-3 минуты выньте чашу из корпуса. Затем
www.vitesse.ru ПРОГРАММА «ПАСТА» 1. Налейте в чашу 500 мл воды и добавьте 1 столовую ложку оливкового масла. Масло необходимо при приготовлении пасты, если его не добавлять макароны получатся слипшимися. 2. Добавьте необходимое количество макарон (пропорция 2 части воды 1 часть макарон). Если вы
www.vitesse.ru МЕРЫ ПРЕДОСТОРОЖНОСТИ ПРИ ИСПОЛЬЗОВАНИИ СЪЕМНОЙ ЧАШИ • Для помешивания используйте только деревянную лопатку или специальную пластмассовую ложку. • Не разрезайте блюдо внутри кастрюли. • Внутренняя чаша мультиварки имеет антипригарное покрытие, поэтому после нескольких дней
www.vitesse.ru ДЛЯ ЗАМЕТОК ДЛЯ ЗАМЕТОК P/37 P/38
NOU S VI VON S SA IN
We l ive hea lth y
MULTI COOKER
МУЛЬТИВАРКА
РИС
Гречка
Молочная Каша
Мясо
Паста
Отсрочка
Старта
Отмена
ВКЛ / ВЫКЛ
“Vitesse France S.A.R.L” (Витессе, Франция)
91 Руе Де Фоборг Сант Хонор, Париж 75008, Франция
Сделано в Китае
www.vitesse.ru
VS-529

www.vitesse.ru
DEAR CUSTOMER! YOU HAVE MADE AN EXCELLENT DECISION!
ViTESSE Home trade mark offers you an exclusive, high quality range of
appliances for your ultimate home luxury and healthy living.
SAFETY INSTRUCTIONS
Read the operating instructions carefully before putting the appliance into
operation and keep the instructions including the warranty, the receipt and, if
possible, the box with the internal packing. If you give this device to other people,
please also pass on the operating instructions.
SAFETY AND PRECAUTIONS
When using this appliance, follow the instructions below.
When used correctly, it will serve you for years.
Before connecting the outlet please cross check the supply voltage with the
supply voltage of the device. This can be found in technical data or on the name
plate.
If you use an extension cord, make sure it is designed for the power
consumption of the device. Different voltage can cause electric shock or fire
cable.
For safety, the appliance is to be kept and used at a sturdy and ground
surface. Otherwise, it would not meet the requirements of protection against
electric shock.
If you want to disconnect the unit from the wall outlet, then remove the power
cord with hands on the plug, not the cord. Otherwise, it can lead to rupture of
the cable or electric shock. Unplug this apparatus after use and during
cleaning or moving.
Do not lay the power cord around sharp corners and edges, close to the heat
source (gas or electric stove).
This can cause problems that do not meet the terms of the warranty.
Make sure that the cord will not twist or bend over the edge of the table. Place
the unit on a dry level surface. Please comply with generally accepted safety
rules when working with the device.
Do not use the appliance and packaging materials for children to play.
Do not allow children near the appliance. Keep the product out of reach of their
place.
It is forbidden to use the appliance for any failures. The manufacturer is not
liable for damage caused by non-compliance with safety and technician rules
of use.
Do not allow children to use the device until they are explained and
understood the instructions for safe operation.
D o not leave the appliance plugged unattended.
Do not submerge the device in water and do not use it in high humidity areas. It
is forbidden to use the unit in the open air; there is risk of damage due to
moisture inside.
Do not use the device at any failures. If it is faulty, disconnect it from the
network, removing the plug from the outlet and contact an authorized service
center.
Never try to repair the unit, or unauthorized modifications to the instrument. All
maintenance and repair should be performed by an authorized service center.
Unprofessional work could damage, personal injury and property damage.
Use of the device for purposes other than the above, is a violation of the
proper operation of the device.
Operation should be carried out only in the domestic environment; the device
is not intended for industrial use.
When the appliance is operating — do not touch the body and the cover and
take care of the face and hands from the steam coming out of the valve.
Do not operate the appliance without the empty bowl or cup. Never touch the
interior surfaces of the heated device.
P/1 P/2
SCHEME OF THE UNIT
www.vitesse.ru
Never connect to a power outlet other than specified
power limits
Place the appliance on a flat, dry, stable surface away
from sources of heat.
Never place the inner tank on the direct fire.
Keep the device away from children.
Children can use the device under the supervision
of Adults. Do not let them play with the device.
Do not bring your hands or face close to the holes
for the steam on the top cover.
PARTS NAME
2
1
6
5
12
11
18
15
3
4
7
8
10
9
17
13
Do not block the Steam openings with towel or other items,
to avoid deformation and discoloration device.
Do not immerse in water or other liquids.
If you are not using the device, disconnect it from the mains.
Do not pull the power cord, hold the plug. Never bend or twist
the power cord. If the power cord is damaged — do not use the
device; contact an authorized service center for repairs. This
device is not intended for use by persons with reduced
physical, sensory or mental capabilities, a lack of knowledge or
experience.
P/3 P/4
14
1. Indication Program STEAM
2. Indication Program DEEP FRY
3. Indication Program STEW
4. Indication Program RICE
5. Indication Program CAKE
6. Indication Program PILAF
7. Indication Program MILK PORRIDGE
8. Indication Program BUCKWHEAT
9. Indication Program PASTA
16
10. Indication Program ROASTED MEAT
11. Indication Program YOGURT
12. Indication Program SOUP
13. START Button
14. ON / OFF Button*
15. KEEP WARM / CANCEL Button
16. MENU Button
17. COOKING TIME Button
18. PRESET TIME Button
* As a Safety Feature Press the On / Off Button once to on the unit and press the
On / Off Button Continuously for 3 Seconds to Off the unit.

www.vitesse.ru
HOW TO OPERATE THE APPLIANCE
Micro-Computer Multi Cooker has many features! You can cook meals and
soups, fried, steamed (vegetables, fish, meat), stew, bake and prepare
yogurt. Regardless of the choice of the function, after cooking you can keep
the food warm.
Before switching on
1. Read the instructions carefully and follow these instructions mentioned.
2. Open the package. Remove all accessories and manual.
3. Open the cover of the Multi-Cooker by pressing the open button.
4. Inner bowl (pan) has non-stick coating that helps to avoid burning your food.
Clean the inside of the bowl with a soft sponge for dishes. After washing, wipe
the device.
5. Install all of the components.
6. Before preparing the internal and external parts of the Multi-Cooker must be
clean. Also make sure that between the inner pot and the heating surface
there are no objects.
7. Make sure the lid is tightly closed.
8. Turn On the outlet.
CAUTION: Do not connect the appliance to the outlet, if it does not meet the
above guidelines.
USING INSTRUCTION
PROGRAM “RICE”
Measure the rice recipe. Before Cooking — Wash it with clean water. Prepare the
remaining ingredients, wash them clean, cut & Keep Ready.
1. Put the rice (or grain) and seasoning in a bowl, cover with water. Can use your
recipe rice based on proposed sequence. Make sure that all the ingredients
(including liquid) are the marking MAX. (is located inside the bowl).
2. Insert the Bowl into the housing. Gently turn it counter-clockwise, make sure
that the bowl is in contact with the heating element. Close the cover until it
clicks.
NOTE: If the cover is not completely closed, the program will not work
correctly.
3. Connect the device to the mains output.
4. Press the SELECT PROGRAM button and choose the Program “Rice”
5. Press the START button to begin the cooking process, the display will flash:
0045. It is the preset time for this program. The Time can be adjustable by
pressing the Cooking Time button and it can be adjusted at an interval of 3060 Mins
6. The cooking time is set by microprocessor and cooking process will end
automatically, but you can stop it by pressing keep warm / CANCEL.
7. At the end of the cooking process the Multi-Cooker will automatically switch to
Keep Warm mode: RICE Function LED goes out and Keep Warm LED will
keep flashing.
8. Click on the keep warm / CANCEL to turn off the appliance and open the lid.
9. Despite the fact that the appliance is willing to maintain the temperature of
food for 8 hours or more, do not leave food in this mode for a long time, it can
lead to drying of the product.
10. Disconnect the unit from the mains.
PROGRAM «PILAF»
1. Measure the rice with the measuring cup based on the prescription. Wash it
with clean water before use. Prepare the remaining ingredients, wash them
clean and cut.
2. Put all ingredients in a bowl in accordance with our recommendations:
Vegetable oil 60 g
Lamb / Pork 400-500 g
Carrots 150g
Onion 150g
Rice 260 g
Water or broth 650 ml
Salt and spices to taste
You can also use your own recipe pilaf, following the proposed sequence of
actions and recommendations for the quantity. Make sure that all the
ingredients (including liquid) are the marking MAX. (is located inside the
bowl).
3. Insert the Bowl into the housing. Gently turn it counter-clockwise, make sure
that the bowl is in contact with the heating element. Close the cover until it
clicks.
NOTE: If the cover is not completely closed, the program will not work
correctly.
P/5 P/6
www.vitesse.ru
4. Close the Cover until it clicks. Connect the device to the mains.
5. Press “Select Program” button and choose the Pilaf Function
6. Press the START button to begin the cooking process, the display will flash:
0055. It is the preset time for this program. The Time can be adjustable by
pressing the Cooking Time button and it can be adjusted at an interval of 3065 Mins
7. The cooking time is set by microprocessor and cooking process will end
automatically, but you can stop it by pressing keep warm / CANCEL.
8. At the end of the cooking process the Multi-Cooker will automatically switch to
Keep Warm mode: PILAF Function LED goes out and Keep Warm LED will
keep flashing.
9. Click on the keep warm / CANCEL to turn off the appliance and open the lid.
10. Despite the fact that the appliance is willing to maintain the temperature of
food for 8 hours or more, do not leave food in this mode for a long time, it can
lead to drying of the product.
11. Disconnect the unit from the mains.
PROGRAM «DEEP FRY»
1. Prepare the necessary ingredients and keep ready.
2. Make sure that all the ingredients (including liquid) were below the MAX, is
located inside the bowl.
3. Insert the cup into the housing. Gently turn it counter-clockwise, make sure
that the cup is in contact with the heating element.
4. Close the cover until it clicks. If the lid is not closed properly, the program will
be on the preparation work correctly.
5. Connect the device to the mains.
6. Press “Select Program” button and choose the Deep Fry Function
7. Press the START button to begin the cooking process, the display will flash:
0030. It is the preset time for this program. The Time can be adjustable by
pressing the Cooking Time button and it can be adjusted at an interval of 1099 Mins
8. The cooking time is set by microprocessor and cooking process will end
automatically, but you can stop it by pressing keep warm / CANCEL.
9. Disconnect the unit from the mains.
cooking.
2. Put all the ingredients in a bowl according to our recommendations. You can
also use your recipe milk porridge, following the proposed sequence of
actions and recommendations for the quantity. Make sure that all the
ingredients (including liquid) were below 2/5th of the bowl.
3. Insert the Bowl into the housing. Gently turn it counter-clockwise, make sure
that the bowl is in contact with the heating element. Close the cover until it
clicks.
NOTE: If the cover is not completely closed, the program will not work
correctly.
4. Close the Cover until it clicks. Connect the device to the mains.
5. Press “Select Program” button and choose the Milk/Porridge Function
6. Press the START button to begin the cooking process, the display will flash:
0030. It is the preset time for this program. The Time can be adjustable by
pressing the Cooking Time button and it can be adjusted at an interval of 1060 Mins
The cooking time is set by microprocessor and the cooking process will end
automatically, but you can stop it by pressing keep warm / CANCEL.
7. At the end of the cooking process the Multi-Cooker will automatically switch to
Keep Warm mode: Milk / Porridge Function LED goes out and Keep Warm
LED will keep flashing.
8. Click on the keep warm / CANCEL to turn off the appliance and open the lid.
9. Despite the fact that the appliance is willing to maintain the temperature of
food for 8 hours or more, do not leave food in this mode for a long time, it can
lead to drying of the product.
10. Disconnect the unit from the mains
PROGRAM «BUCKWHEAT»
1. Measure the cereal as per the desired prescription. Rinse with clean with
water before cooking.
2. Put all the ingredients in a bowl according to our recommendations.
PROGRAM «MILK PORRIDGE»
1. Measure the cereal up to 2/5th of the bowl. Rinse with clean with water before
P/7 P/8
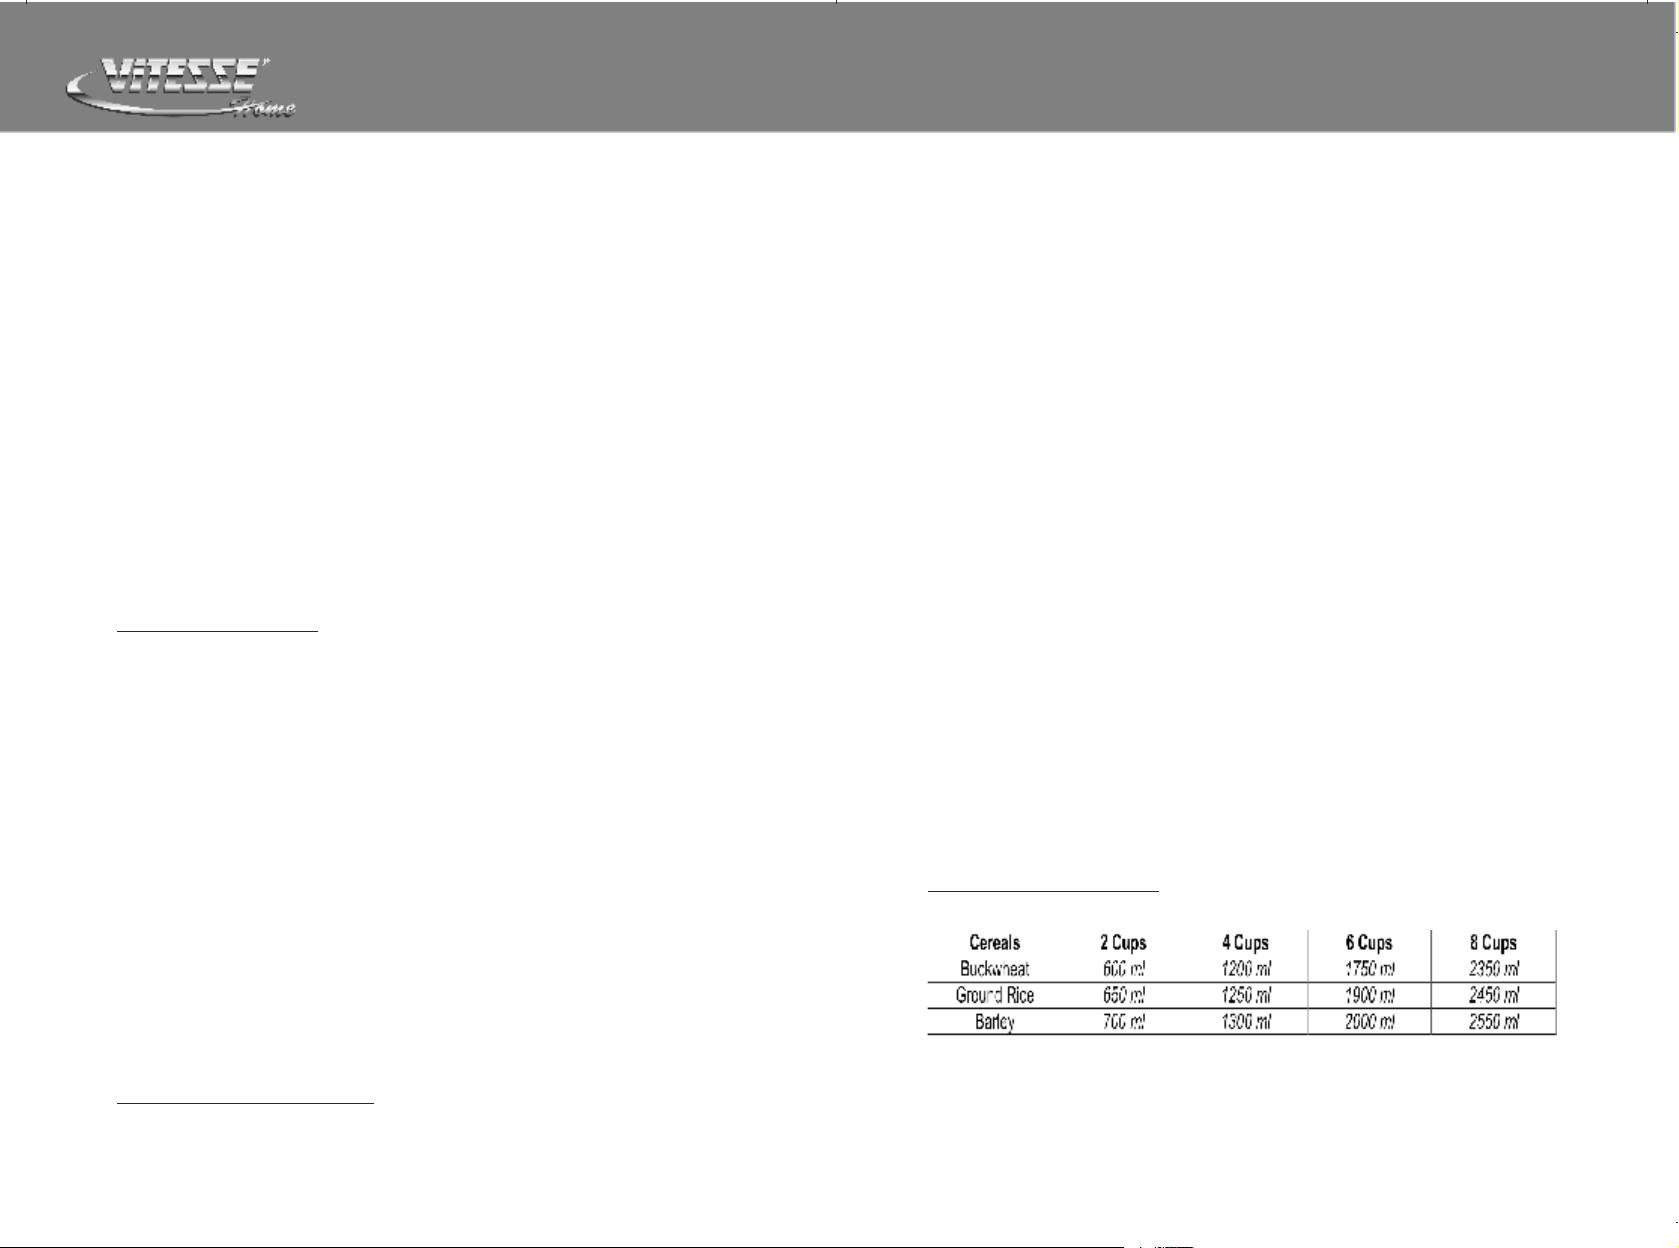
Measuring cup estimates are:
— 130g cereal — 1 cup
www.vitesse.ru
— 180 ml of water — 1 cup
You can also use your recipe, following the proposed sequence of actions and
recommendations for the quantity. Make sure that all the ingredients
(including liquid) were below the MAX, is located inside the bowl.
3. Insert the Bowl into the housing. Gently turn it counter-clockwise, make sure
that the bowl is in contact with the heating element. Close the cover until it
clicks.
NOTE: If the cover is not completely closed, the program will not work
correctly.
4. Close the Cover until it clicks. Connect the device to the mains.
5. Press “Select Program” button and choose the Buckwheat Function
6. Press the START button to begin the cooking process, the display will flash:
0050. It is the preset time for this program. The Time can be adjustable by
pressing the Cooking Time button and it can be adjusted at an interval of 1099 Mins
The cooking time is set by microprocessor and the cooking process will end
automatically, but you can stop it by pressing keep warm / CANCEL.
7. At the end of the cooking process the Multi-Cooker will automatically switch to
Keep Warm mode: Buckwheat Function LED goes out and Keep Warm LED
will keep flashing.
8. Click on the keep warm / CANCEL to turn off the appliance and open the lid.
9. Despite the fact that the appliance is willing to maintain the temperature of
food for 8 hours or more, do not leave food in this mode for a long time, it can
lead to drying of the product.
10. Disconnect the unit from the mains
pressing the Cooking Time button and it can be adjusted at an interval of 1099 Mins
8. The cooking time is set by microprocessor and the cooking process will end
automatically, but you can stop it by pressing keep warm / CANCEL.
9. Disconnect the unit from the mains.
PROGRAM «STEAM»
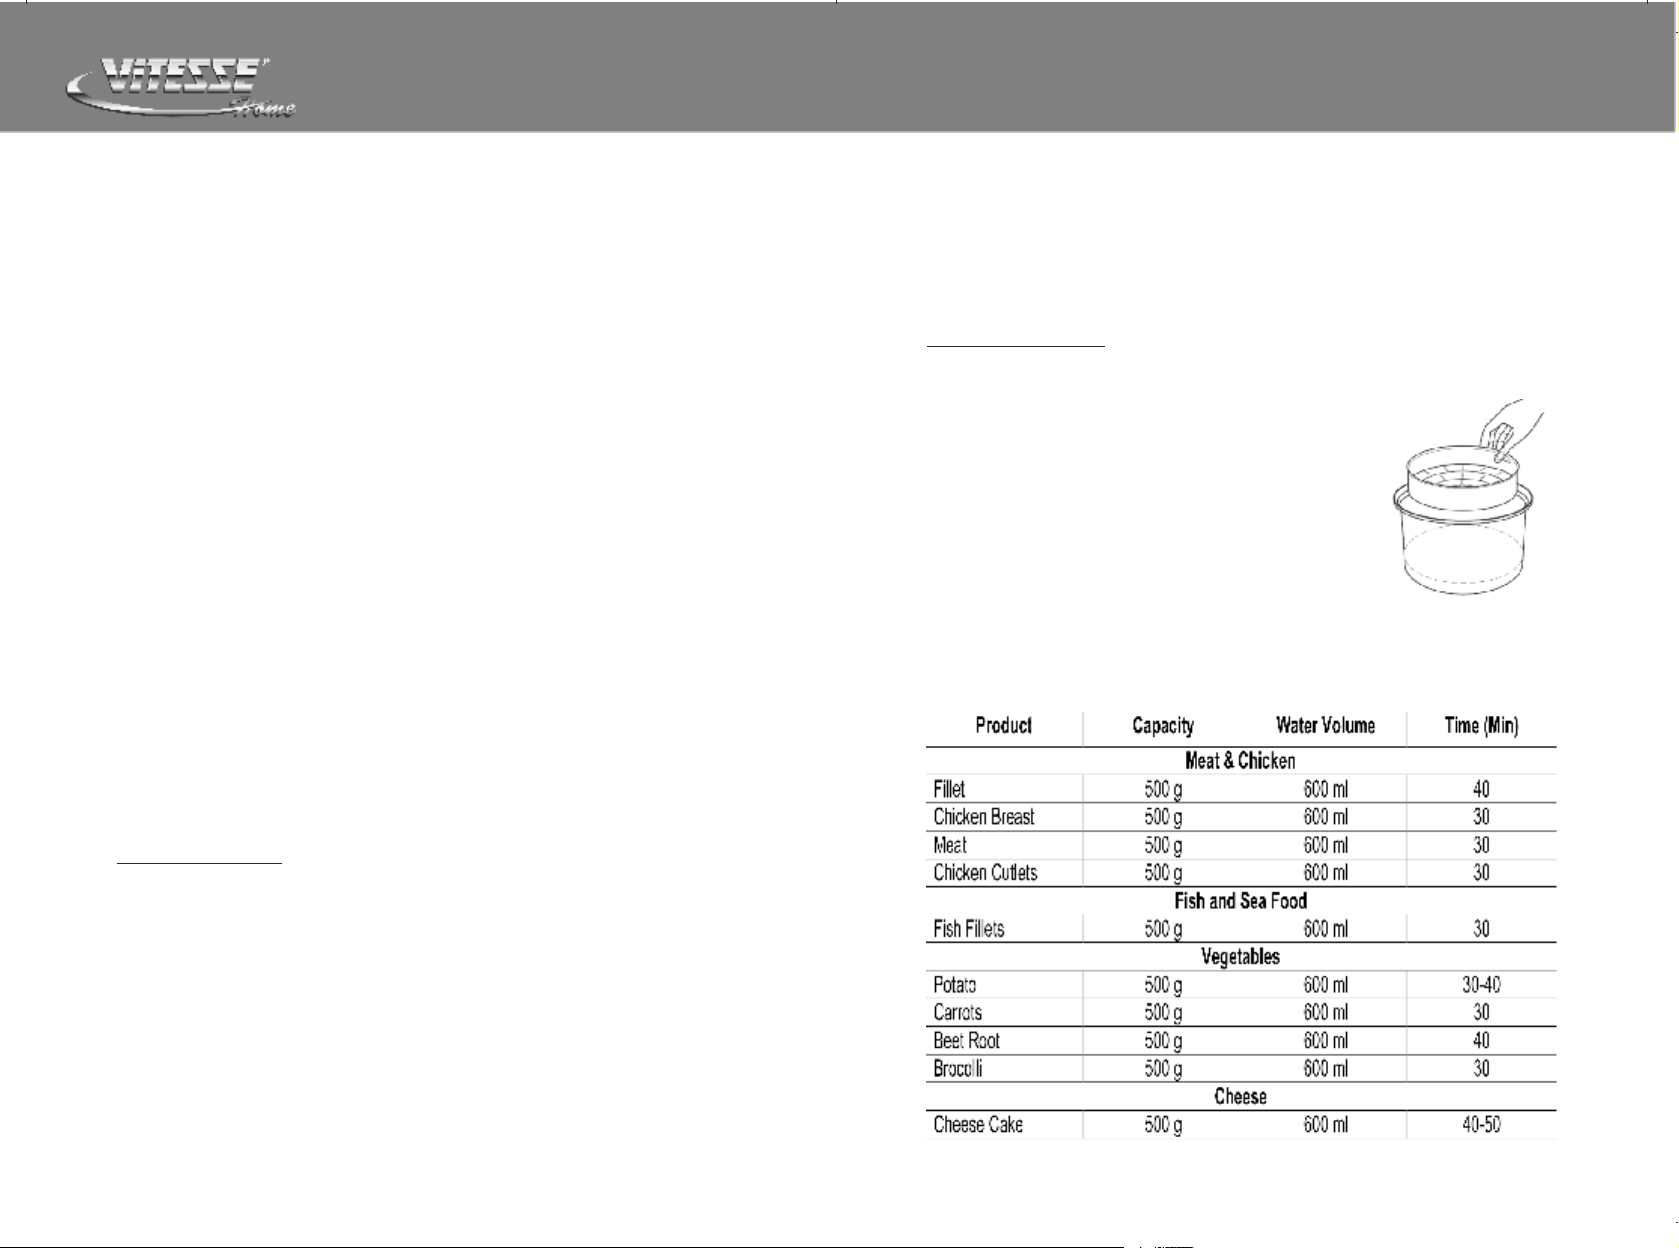
1. Pour 500-550 ml water into a bowl.
2. Place the provided Steamer Basket into the bowl, as
shown in the figure.
3. Prepare all the food, wash them and cut. Evenly
spread out in Steamer Basket and insert the cup into
the housing. Gently turn it counter-clockwise, make
sure that the cup is in contact with the heating element.
4. Close the cover until it clicks. If the lid is not closed
properly, the program will be on the preparation work
correctly.
5. Connect the device to the mains.
6. Press “Select Program” button and choose the Steam Function. Automatic
cooking time: 30 Mins.
7. You can change it (in the range from 10 minutes to 99 Minutes) by pressing the
cooking time.
PROGRAM «SOUP»
1. Prepare the necessary ingredients and keep ready.
2. Make sure that all the ingredients (including liquid) were below the MAX, is
located inside the bowl.
3. Insert the cup into the housing. Gently turn it counter-clockwise, make sure
that the cup is in contact with the heating element.
4. Close the cover until it clicks. If the lid is not closed properly, the program will
be on the preparation work correctly.
5. Connect the device to the mains.
6. Press “Select Program” button and choose the Soup Function
7. Press the START button to begin the cooking process, the display will flash:
0045. It is the preset time for this program. The Time can be adjustable by
P/9 P/10
 Loading…
| Языки: |
Русский |
|---|---|
| Страницы: | 20 |
| Описание: | Мультиварка |
Стр.
из
результат(ов) по запросу ««
×
|
|
NoDevice
Loading…
-
« Назад
Ctrl + ←
-
Вперёд »
Ctrl + →
Мануал подходит для устройств
-
ViTESSE VS-529